 by
by 
TABLE OF CONTENTS
The Wiggle Expression in After Effects (or AE Wiggle) is a great way to make objects move randomly, have some sort of idle Movement in character joints, animate a random camera shake, create wobbly text or animate a flickering light.
Although Wiggle is a popular Expression that I pretty much use in every other Project, I often find myself sitting at my desk, realizing, that I have once again forgotten how the correct wiggle Expression syntax is or how to achieve some of the more advanced Wiggle techniques.
My excessively optimized After Effects PC is just waiting for my command, but I need a quick copy & paste of a Wiggle Expression so I can get started.
Or maybe you're a beginner that's heard about bringing your Motion Designs and 2D Animations to the next level by applying Wiggle to some of the objects.
In any case, here's everything I've learned and come across concerning AE Wiggle through the course of my many years of being a Motion Designer.
For copy/pasting some wiggle snippets, scroll down to the second half of this article.
What is an Expression in After Effects?
Adding Keyframes for layer animations or exporting your compositions to an MP4 Video are examples of some very basic things that everyone does in After Effects.
But expressions?
What's an Expression, anyway?
Here's what Adobe has to say about this:
An expression is small piece of JavaScript code that you can plug into animated properties in your After Effects projects, that evaluate to a single value for a single layer property at a specific point in time.
So, in other words, you set a layer property value through code.
A layer property value is "Scale" or "Position" or "Rotation", and others.
Well, we're no Coders, we're creatives, I know I am, so why should I learn "JavaScript?!" for Motion Design?
Because, boy, does it make your life easier.
Here's a freakishly simple Expression that, when applied to your layer's rotation property, rotates your Object continuously:
Yes, that's it. "time" will set your layer's rotation value to the current time of your timeline in seconds.

Want to rotate that object faster? Nothing easier than that:
You see, time automatically counts up depending on the running time of your composition, and multiplying it by 10 will just make it count up 10 times as fast.
The end result of that simple math will automatically be applied to the layer's rotation value.

So that's a really simple Expression.
The After Effects Wiggle Expression is just slightly more complicated, but it can also do a lot more:
What is the After Effects Wiggle Expression?
In its essence, the After Effects Wiggle Expression (like many other Expressions) is a premade, so-called, Function, that takes your parameters (inputs), does some magic with them, and returns an altered value. Over time it wiggles a value.
Think of it this way: Ever seen those Pizza Vending Machines?
Well, your Inputs & parameters is your Money, as well as the toppings you select, and the finished Pizza that you are given is the returned value. The Expression Function is the Pizza Vending Machine.
If you select other toppings, you'll have a different Pizza as an end-result.
Let's look at the code. Here's what a typical After Effects Wiggle Expression looks like in its most basic form:
Here's what this code would look like applied to our layer's position property:

The "wiggle"-part in that code looks somewhat straightforward, but what are all the numbers?
Let's see:
What do the individual Wiggle Expression Values do?
The wiggle expression above is sort of a shorthand version where some parameters are left at default because we don't define them.
The full Wiggle Expression looks like this:
In the script above, I am using placeholders to make the individual parameters easier to understand. To make the above expression functional, we would have to replace the placeholders with actual values (numbers).
Before we do that, let's take a look at the individual parameters that the function accepts and how that line of code is to be understood:
This is the function name. The parenthesis "()" defines this as a function. When the compiler later runs through your code, it will know what to do with that word/name as it is followed by parenthesis that designates it as a function.
Now, what's inside the parenthesis?
Any values inside the parenthesis will be passed to the function. The function then uses the values, does its magic (well, some predefined math), and returns the result.
The value "frequency", in this case, will tell the Wiggle Expression how fast the value, how often per second, it should wiggle. Large values make the wiggle faster, small values make it slower. A slow value would be something like 0.1, fast would be something like 100.
After the colon "," the next value is passed, which in this case is:
Analog to the frequency above, the amplitude value that we pass along to the wiggle function (expression) will define how far the value will be wiggled.
Of course, it'll depend on what you do with the return value, but if we wiggle a layer's position property, a small value would be something like 5 (pixels in this case), and a large value could be something like 50.
Next up:
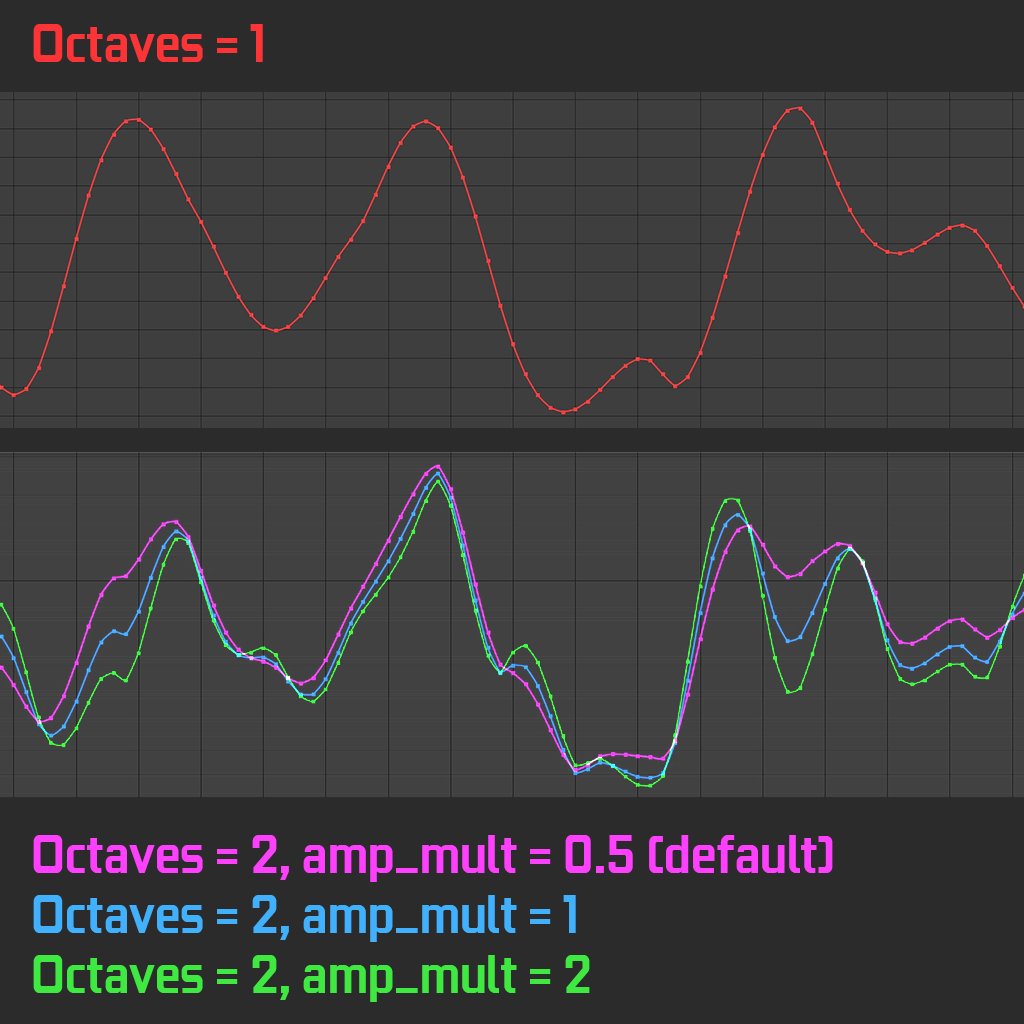
Octaves defines how detailed the wiggle is. Low octaves will get you a smoother result, higher octave values will make the wiggle more detailed and jittery.
Here's an image that shows how the wiggle expression modifies a curve with different octave values:

The higher the octaves the more turbulent the wiggle becomes.
Now here's something new. The equal sign "=" followed by a 1 means, that this parameter has a default value. If you do not set this parameter, it will default to 1.
Remember the simple example we made above? Here it is again:
Although the wiggle function can pass along 5 values, the last 3 of those have default values and can therefore be skipped. When we skip them, the default value will be passed along for them.
Next up is the amplitude_multiplier:
The amplitude multiplier defines by which value each additional octave's amplitude should be multiplied by.
The default is set to 0.5. If you had 5 Octaves, each of those octaves' amplitude will get smaller when it is layered onto the wiggle curve.
You can also set the multiplier to values larger than 1. In this case, each additional octave will be much more pronounced and add a strong influence onto the wiggle curve.
This brings us to the last parameter that the Wiggle Expression accepts:
We already took a quick look at "time" at the beginning of this article. "time" returns the current composition's time in seconds as a value.
So if our play-head is on Frame 25 (if our comp is set to 25fps), "time" would return 1. If our play-head is at Frame 50, or 2 seconds, time returns 2.
Easy as that.
Because the Wiggle Expression is a Function that wiggles values over time, meaning the values change over time, we need this time component in the Wiggle Function. Now, this could be an inherent functionality that is hidden away behind the curtain, but After Effects actually lets us modify it.
What can we do with this?
We can speed up or slow down our wiggle function or use other input values that will influence the time value. The possibilities are endless.
Take the following example, which is an easy start to use the time component in the Wiggle expression:
You have set up your wiggle just the way you like, but your client wants this wiggle to basically stay the same, BUT it should be slightly slower than before.
Without the time component, it would be difficult to restructure the wiggle through frequency and amplitude and octaves and we would probably not be able to replicate this exact movement, just a bit slower. At least not without some pre-comp magic.
By multiplying the time component by a value lower than 1, we can easily slow down the wiggle without changing any of the other values - and vice-versa.
So, those are the building blocks of the Wiggle Expression.
Next up: How to actually use it in a project:
How to use the After Effects Wiggle Expression
How to add an Expression in After Effects
You can add an Expression to layer properties. Twirl down the small arrows on your layer or use hotkeys such as "a" (Anchor), "s" (Scale), "p" (Position), and others to access the layer property you want to add an expression to.
There are four ways to enable expressions on a layer property.
- Right-click on the layer-property and select "Edit Expression"
- Select your layer-property and in the Main Menu go to "Animation" and then "Add Expression"
- Use Hotkeys: Option + Shift + = (macOS) or Alt + Shift + = (Windows). Depending on your Keyboard Layout, this might differ. Try Alt + Shift + (*+~) as well.
- ALT-click the layer-property's stopwatch
The Expression Script Window will be visible in your timeline. This is where you add your code.
Beware that some layer properties will expect multiple return values. For example, if I set a fixed value "10" into my expression field on X-Position, it'll be just fine. If I set my Scale to "10", though, After Effects will return an Error because the Scale consists of two values. X-Scale and Y-Scale.
(Before separating Position into two dimensions, it too consists of two values.)
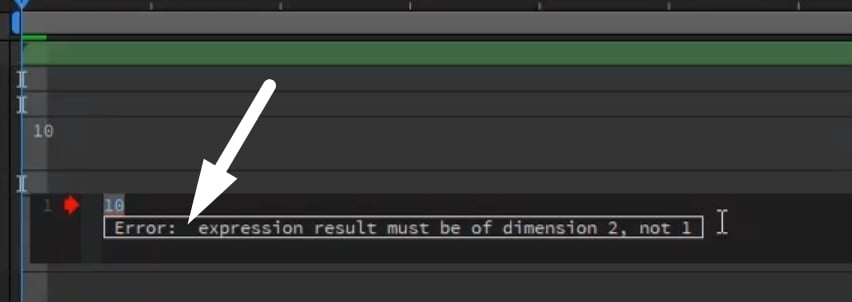
So you'll always have to make sure to return the number of values that are expected.
Scale, for example, expects an Array with a length of two. An Array in Javascript is written like this
The Wiggle Expression, though, thankfully is intelligent enough to wiggle all values - it already returns an array.
BUT, it will wiggle each value independently. Which is cool in some cases, but will need to be addressed in others.
How to Add a Wiggle Expression in After Effects
Adding a Wiggle Expression is as easy as adding any other Expression. We use one of the methods described above, and write our code into the little Expression Code Editor.
We've already dissected the individual components of a wiggle expression and should now be able to replace the placeholders with values.
Here's how to wiggle far but slowly:
Here's how this one looks when applied to the y-position of my logo-layer:

Wiggle a bit faster but not so far:

Wiggle fast but not far:

Wiggle Expression Examples
Let's take a look at some more advanced Wiggle Expression examples:
Wiggling just One Dimension
As discussed above, the Wiggle expression wiggles all dimensions. If you had a 2-Dimensional Position layer property (x-pos, y-pos), each of those would be wiggled.
If we want to wiggle just horizontally, so in x-position, we would have to make use of variables and arrays.
This is more complicated than it sounds. A variable is basically just a temporary storage of a value, that can be used later on.
An Array is a variable with multiple values. Remember when we said the wiggle expression wiggles all three values? It does so because it returns an array with many values.
Anyway, here's how to wiggle in just one dimension, the x-position in this case:
originalLayerValue=value;
temporaryWiggleCache=wiggle (5,50);
[temporaryWiggleCache[0],originalLayerValue[1]];
I am using long variable names to make this easier to understand.
The "originalLayerValue=value" saves the current layer value into the variable "originalLayerValue". So if our original layer position is 100,100, this value is saved into the variable. This is important so we can make use of it later.
The "temporaryWiggleCache=wiggle (5,50);" saves the returned array from the wiggle expression into the variable "temporaryWiggleCache", again so we can make use of it later.
The last line "[temporaryWiggleCache[0],originalLayerValue[1]];" tells the layer property which values should be used. Since the position layer property consists of two dimensions (x-pos and y-pos), it expects an array with two values.
An Array is written like this [ ]. With each colon adding an additional value to the array. [value 1, value 2].
Above, our first value is the x-position that we want to wiggle. So we add in the "temporaryWiggleCache" here. Remember how the wiggle expression returns an array of its own? The "[0]" reads the first value that is returned from the wiggle expression.
This way we add in a single value, namely the first array-value that is returned from the wiggle expression, into the x-pos layer property value.
The second layer-property value, y-pos. should stay the same, we don't want to wiggle it.
So we just take the original value that we temporarily saved in the variable "originalLayerValue=value;".
Since "value" (the original layer's position in x and y) is an array with two values [x-pos, y-pos] as well, the variable "originalLayerValue" will need to read out the second value in this array and assign it back to the y-pos layer-property in the last line of code "originalLayerValue[1]".
Beware that Arrays always start at 0. So if we want to read out the second value in an array, we have to access it by counting up from 0. Zero is the first value, One is the second value. So [1].
The above is the long form to be able to understand what's going on under the hood more easily. (Hopefully)
There is a shorthand version as well, that does exactly the same, but reduces the code needed:
Or here's one that uses reserved names for layer properties that you can access from anywhere:
Looping the Wiggle Expression
Wiggle is great, but if you’re creating loops, the end and start values often don’t match up and you'll see a jump. Here’s how to make the After effects Wiggle Expression loop perfectly:
amp = 110; //creates variable "amp" representing the amplitude
loopTime = 3; //creates variable "loopTime" representing the length of our wiggle loop
t = time % loopTime; //t represents how far we are into our loop
wiggle1 = wiggle(freq, amp, 1, 0.5, t); //our normal wiggle expression
wiggle2 = wiggle(freq, amp, 1, 0.5, t - loopTime); //our wiggle expression that is offset in time by loopTime
linear(t, 0, loopTime, wiggle1, wiggle2) //blends both wiggle expressions
Basically what we do is create two wiggle expressions.
One normal Wiggle expression and one that is offset back in time. Then we blend between them, that way we match the start with the end time perfectly.
All you have to adjust is the "loopTime" to suit your comp length or the time you'd like a wiggle animation to loop (in seconds).
Randomize or don’t randomize Seed on the Wiggle Expression
Wiggle will randomize its values for every Expression you add to any layer-property. If you want two layers to wiggle in the same way, you'll have to freeze the "seed" value.
Here's how to do so:
wiggle(5,50)
The seedRandom's first value sets the seed, and the second boolean value sets it to true or false.
Control the Wiggle using Sliders (e.g. Fade Wiggle in and out)
By using sliders you gain a lot of control over all aspects of your Wiggle Expression. You can easily fade in and out your wiggle speed, frequency, amplitude or even octaves.
Here's how to control a Wiggle Expression through sliders.
First, add a Slider Control Effect to your layer. This can be any layer and doesn't necessarily have to be the layer that you want to control. I usually add a Null-Object with all my Sliders that is easily accessible at the top.
Next you enable the layer property that you want to wiggle for Expressions.
Now click and drag the "whip-pick" onto the slider that you just created as seen in the image below.
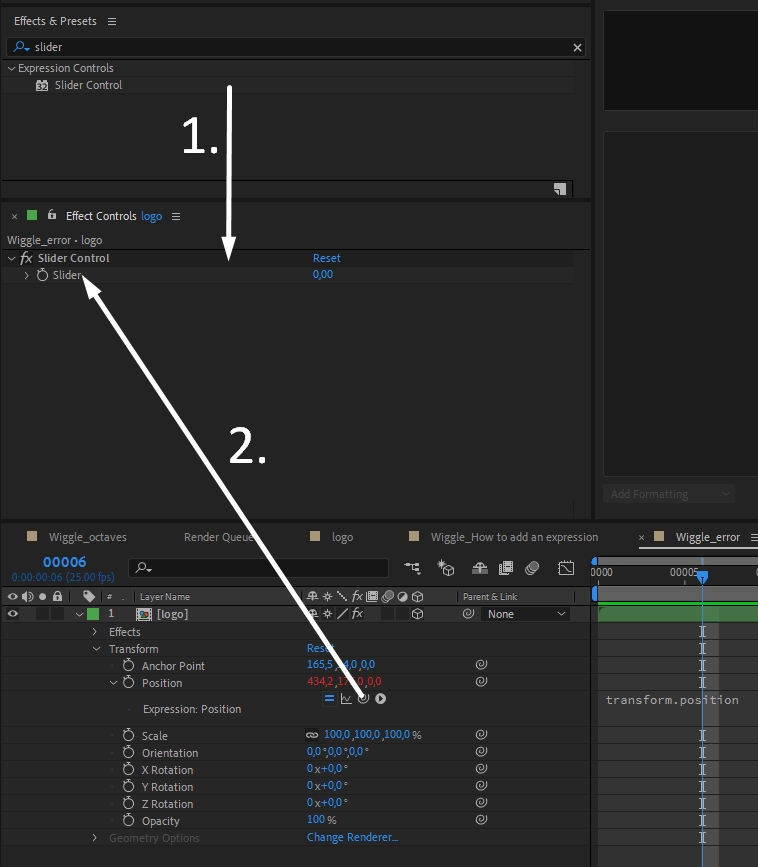
Depending on the layer property you want to control, After Effects will have created something like this in the Expression Editor:
[temp, temp, temp]
Well, the "temp" variable now has the value of your slider. If you set the slider to 100, the temp-value will be 100 as well.
Just plug your temp-value into one or more parameters of the wiggle expression you want to control and you are good to go:
wiggleTemp=wiggle(sliderTemp,50);
[wiggleTemp[0], wiggleTemp[1], wiggleTemp[2]]
Or use shorthand:
Well, that one isn't that much shorter, but it doesn't use any temporary variables.
Make wiggle more natural
You can make your Wiggle more natural, by basically wiggling the wiggle. Set up your Wiggle Expression and add a Control Slider to Amplitude and Frequency, and wiggle those Sliders as well.
You can do this by Alt-clicking the Stopwatch on the Sliders and adding Wiggle to them. You'll want to limit them somewhat so the original wiggle isn't influenced too strongly.
Sharp Flickering Wiggle
A more mathematical approach to randomize your wiggle and make it look less smooth and sharper, is to use the random math generator that is available in JavaScript.
The random generator picks a random number between the two set values (e.g. 0.1 and 1 or 1 and 15) on every frame. This means the entire wiggle curve will change on every frame which can produce some crazy sharp and flickery motions.
Making wiggle start and stop at specific times
Controlling values and code execution based on conditions is standard practice in any programming language. JavaScript, which powers After Effects' Expressions System, works the same way.
If we want to control our Wiggle Expressions and tell them to start and/or stop at specific times, there's nothing easier than using if-conditions to do so:
timeToStart = 3;
if (time > timeToStart){
wiggle(3,25);
}else{
value;
}
//If your wiggle expression should stop at 10 seconds
timeToStop = 10;
if (time > timeToStop){
value;
}else{
wiggle(3,25);
}//If your wiggle expression should start at 5 seconds and stop at 15 seconds
timeToStart = 5;
timeToStop = 15;if ((time > timeToStart) && (time < timeToStop)){
wiggle(3,25);
}else{
value;
}
Other ways to wiggle in After Effects without manual coding
Let's face it. We're creatives and anything that makes us write code just doesn't sync with our colorful brains.
Here are some ways to still make use of After Effects' Wiggle functionality without writing a single line of code:
Use Behaviour Presets
After Effects comes with many presets for animations, effects, and also for Wiggle. Just twirl down the "Animation Presets" Category in your Effects & Presets Panel and navigate to "Behaviours".
You'll find some Wiggle Presets listed there that you can just drag and drop onto your layers.
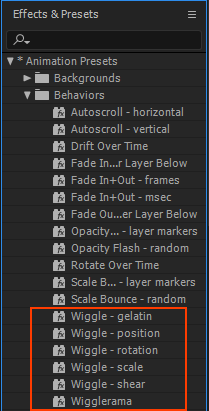
Here's what these presets look like.
You'll have to make do with what is available, though, so if you want more control, you might want to look into one of the following methods.
Use the After Effects “Wiggler”
The Wiggler Tool in After Effects lets you add wiggled keyframes in-between two selected keyframes.
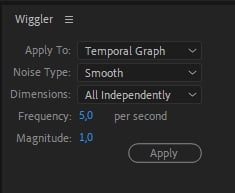
Select two Keyframes within the layer property that you want to wiggle, adjust the Frequency, Magnitude, Noise type, and Dimensions to your liking, and hit "apply" in the Wiggler.
Use Wiggle Plugins
Good After Effects Plugins come and go. Here are a few that will let you apply pre-made wiggle expressions to your layers or make it easier to tweak them without having to write code:
Over to you
That's about it from me! Let me know of any Wiggle Questions that you might have in the comments.
For further discussions, you can also swing by our experts Forum or hop on over to the Adobe Community which is usually very helpful in answering your Expression questions.
")

![Why Does My Computer Beep and What Does It Mean? [Beep Code Guide]](https://www.cgdirector.com/wp-content/uploads/media/2023/08/Why-Does-My-Computer-Beep-and-What-Does-It-Mean-Twitter-594x335.jpg "Why Does My Computer Beep and What Does It Mean? [Beep Code Guide]")
![How to Use a Laptop as a Monitor [2024 Update]](https://www.cgdirector.com/wp-content/uploads/media/2023/06/How-to-Use-a-Laptop-as-a-Monitor-CGD-APR-594x335.jpg "How to Use a Laptop as a Monitor [2024 Update]")

14 Comments
24 February, 2024
you are my hero for the day
24 June, 2022
This is the best explanation on wiggle on the internet, period. You guys explained the syntax as well as the concept like it should be. Thank you so very much!
28 June, 2022
Thanks Zach, Glad you liked it. Let me know of any questions!
Cheers,
Alex
5 May, 2022
Thanks a lot, your information was so practical and precisely what I needed.