 by
by 
TABLE OF CONTENTS
Your CPU fan spins at different speeds, which helps keep your processor cool enough to run all your tasks efficiently.
How exactly does your CPU fan work, though? Can you monitor and control it?
And what is a good CPU Fan RPM, anyway?
Let’s see:
Does CPU Fan Speed Matter?
If you care about the performance and health of your CPU, you’ll pay close attention to your fan speeds.
If you’re a heavy PC user, PC gamer, or professional creative using it for high-end rendering workloads, you want optimum CPU fan speeds that get you just the right amount of performance.
If they’re too high, you might have to deal with jet engine-like noise which is no fun. At all.
If you’re running stock CPU fans, higher RPMs will have you replacing them frequently. You’ll also have to clean them often as they’ll accumulate dust faster.
The upside of higher Fan RPMs? Your CPU will run much cooler and last longer, and you can overclock it for better performance.
You can always replace your stock PC fan with something custom that runs quieter at high RPMs, so no annoying noise.
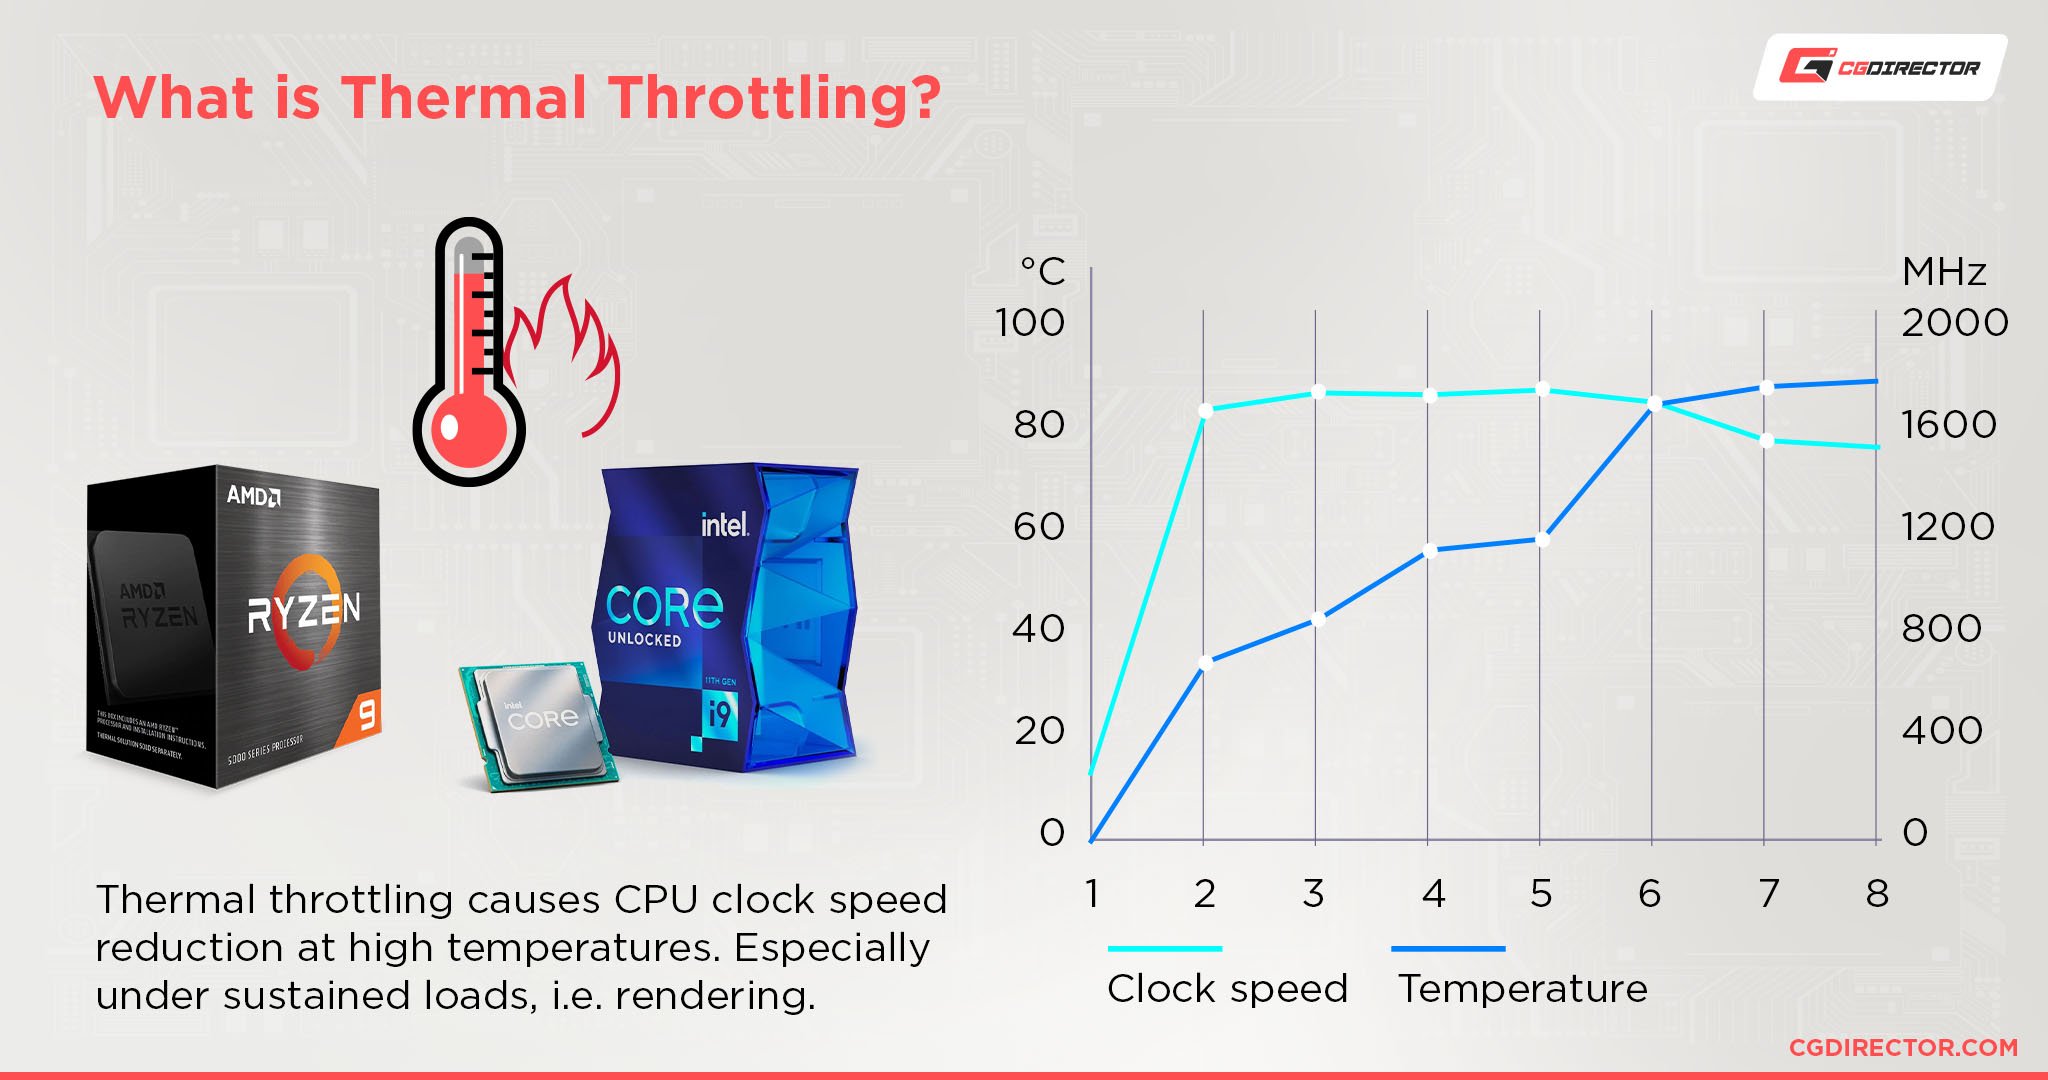
In comparison, lower fan RPMs may result in thermal throttling, which will make your CPU underperform and risk overheating. Your tasks will run slower. If that doesn’t drive you nuts, freezing windows, lag, and frequent shutdowns and restarts probably will.
While the highest CPU fan speeds offer a higher performance and health but a lot of noise, optimum speeds give you the best of both worlds: low CPU temperatures, longer-lasting components, unrestricted CPU performance and a mostly inaudible fan.
Of course, you can always opt for liquid cooling or an All-In-One fan, but that’s another discussion altogether.
But if CPU fan speeds are vital, that begs the question:
What’s the Ideal CPU Fan Speed?
Typical CPU FAN Speeds depend on the dimensions of the Fan. Larger Fans rotate slower than small fans, while pushing the same amount of air. Larger Fans are also quieter, thanks to lower RPMs.
Here are typical CPU FAN RPM Ranges depending on the Fan Size of your CPU Cooler:
- 140mm Fans: ~400 – 1200 RPM
- 120mm Fans: ~500 – 1500 RPM
- 92mm Fans: ~600 – 2000 RPM
- 80mm Fans: ~800 – 2500 RPM
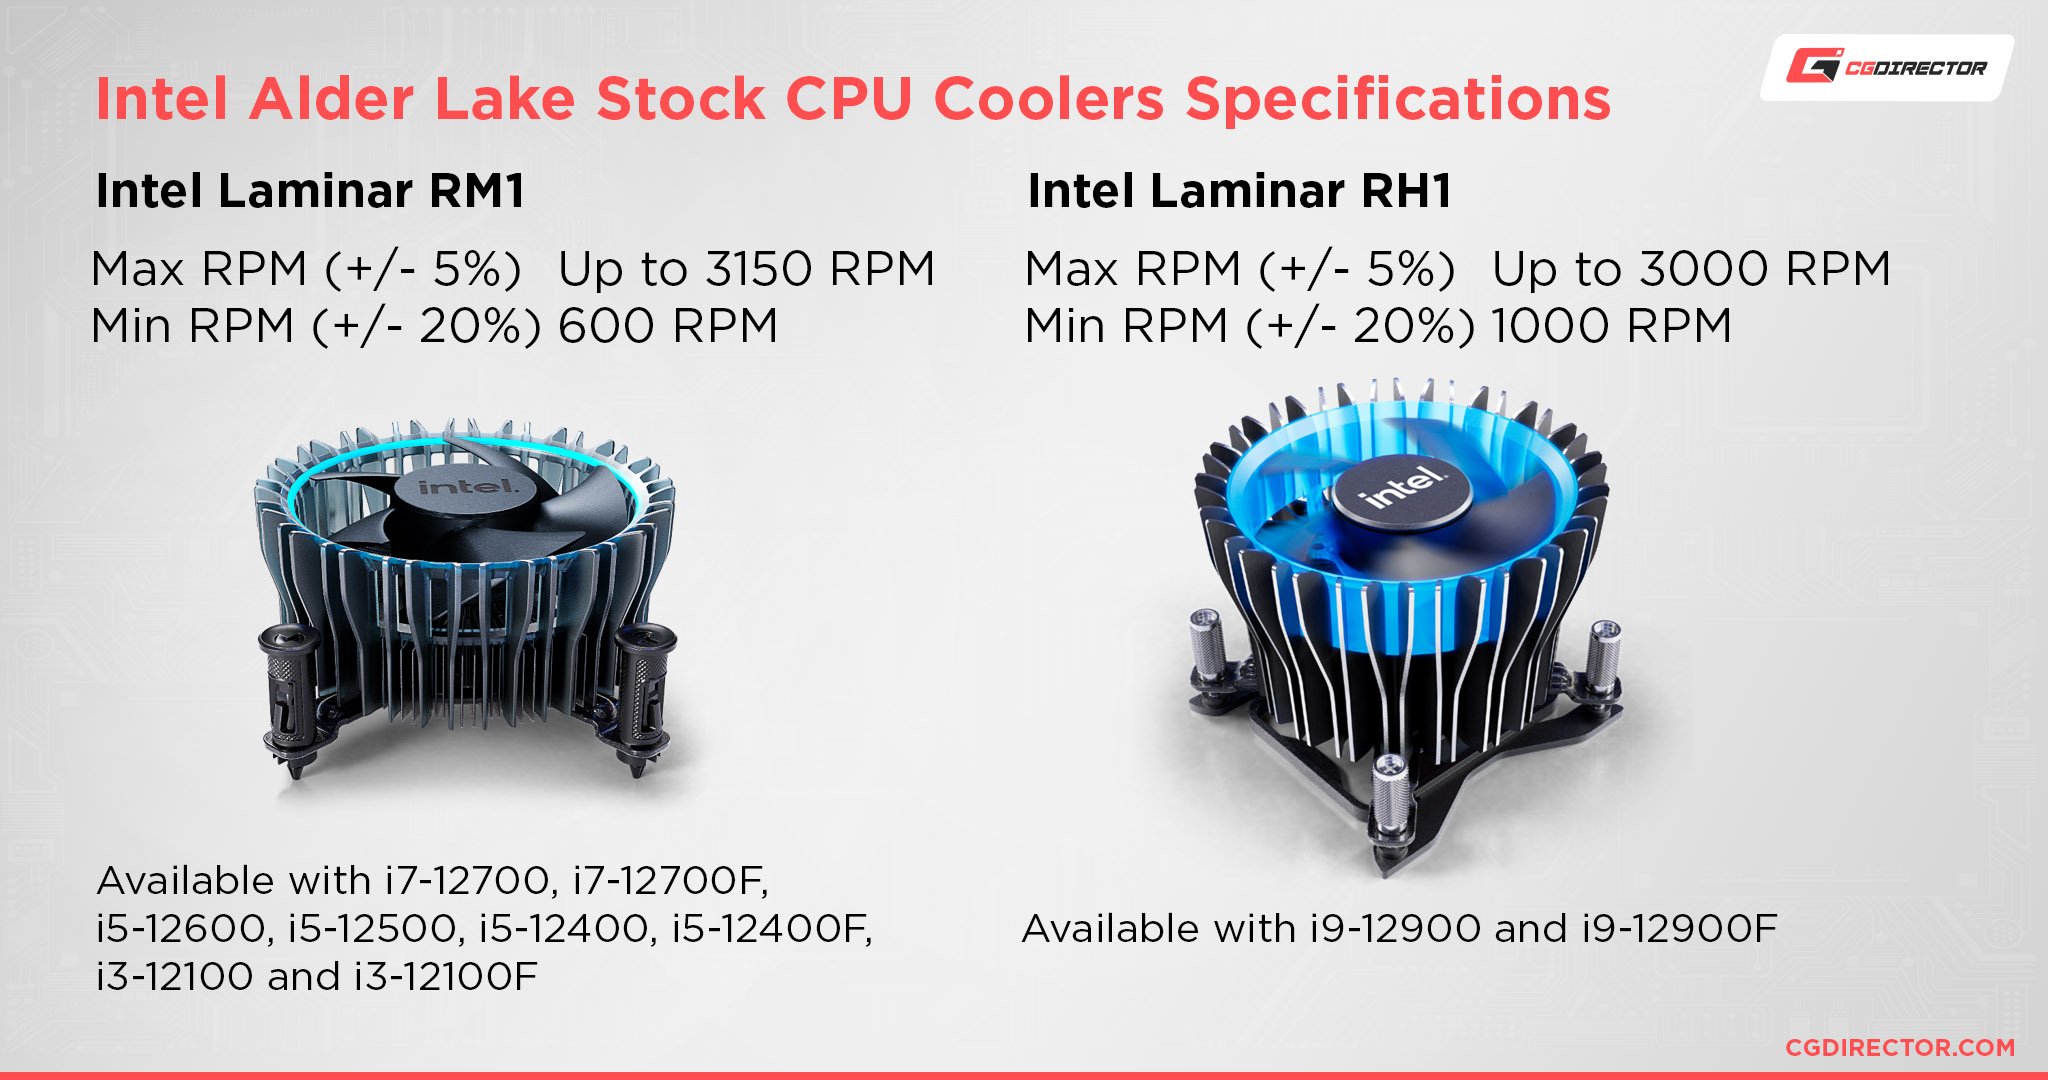
- 92mm Intel Laminar RM1 (Stock Cooler): ~600 – 3150 RPM
- 92mm AMD Wraith Prism (Stock Cooler): ~600 – 2800 RPM
Your typical CPU fan speed ranges from about 600 RPM to 3000 RPM. However, for a clearer picture, check your CPU Cooler’s Product Page.
The ideal CPU FAN Speed is a middle ground between:
- Higher Speed / RPM = cooler CPU = higher CPU performance, and
- Fan Noise / wear
There are diminishing returns the higher your Fan RPM. A CPU won’t be cooled twice as well if you double your CPU Fan RPM.
This is because there are more factors at play than just the CPU Fan Speed. The Radiator, the thermal paste, the ambient air temperature, the heatspreader, heat-pipes, and more, are all responsible for cooling the CPU.
The Fan itself is just one part of it.
In my experience from many years of testing and benchmarking, the ideal CPU Fan Speed is halfway two 2/3 of the maximum CPU FAN RPM. This keeps your CPU cool, while being relatively quiet.
Ideal CPU FAN Speeds for different Fan Sizes:
- 140mm Fans: 600 – 800 RPM
- 120mm Fans: 750 – 1000 RPM
- 92mm Fans: 1000 – 1300 RPM
- 80mm Fans: 1250 – 1600 RPM
- 92mm Intel Laminar RM1 (Stock Cooler): 1575 – 2100 RPM
- 92mm AMD Wraith Prism (Stock Cooler): 140 – 1850 RPM
How to Check Your Computer Fan Speed
There are several ways you can check your PC fan speeds:
- Check your fan speeds in your BIOS
- Use third party software to read your fan speeds / sensors
Here’s how:
Check Your Fan Speeds in Your BIOS
Your Motherboard’s BIOS monitors and controls all fans that are attached to it, including the CPU Fan(s).
To access your BIOS:
- First, shut down and restart your computer.
- Depending on your computer model, you’ll use Del, Esc, F2, F10, F11, or F12 to access your BIOS menu.
- On the BIOS menu, find the fan control settings, which are often found in the Hardware Monitor section.
- Here, you can view and adjust your fan RPM.
Use Software to Check Your Fan Speeds
Alternatively, you can use freeware like SpeedFan to check your fan speed.
But it does more than just that. It can also read other sensors on your motherboard and provide helpful information on voltages, speeds, and temperatures – all from your within your Operating System!
SpeedFan does this using Self-Monitoring Analysis and Reporting Technology (SMART) that runs through your motherboard.
To use SpeedFan:
- Download and install the app on your computer
- Open the app. When the main window opens, click on the ‘Configure’ button.
- Select the Fans tab and select the CPU fan.
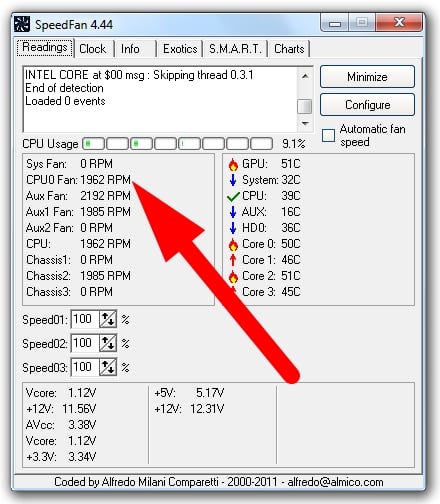
Monitor CPU FAN RPM with third-party Software Speedfan
Controlling CPU Fan RPM Speeds
Many PC configurations will allow you dynamic control over your CPU fan, but some won’t.
Before attempting to regulate your CPU fan speeds, confirm that its FAN connectors will enable you to do that.
This step is practical, and you’ll have to get hands-on with your desktop PC. To find out the type of connector your system uses:
- Turn your PC off and disconnect it from the power supply.
- Depending on your configuration, you may slide off, pop off or unscrew the side panel of your PC build to open it up.
- Your fan should be on the upper third of your motherboard with a cable that runs from it.
- At the end of that cable is a connector. Take a closer look at it to see if it’s 3- or 4-Pin.
Connectors
A closer look at these connectors should help you determine how to handle your fan.
Different PC setups will accept different connectors, but most modern motherboards will take a 4-pin Pulse Width Modulation (PWM) connector.
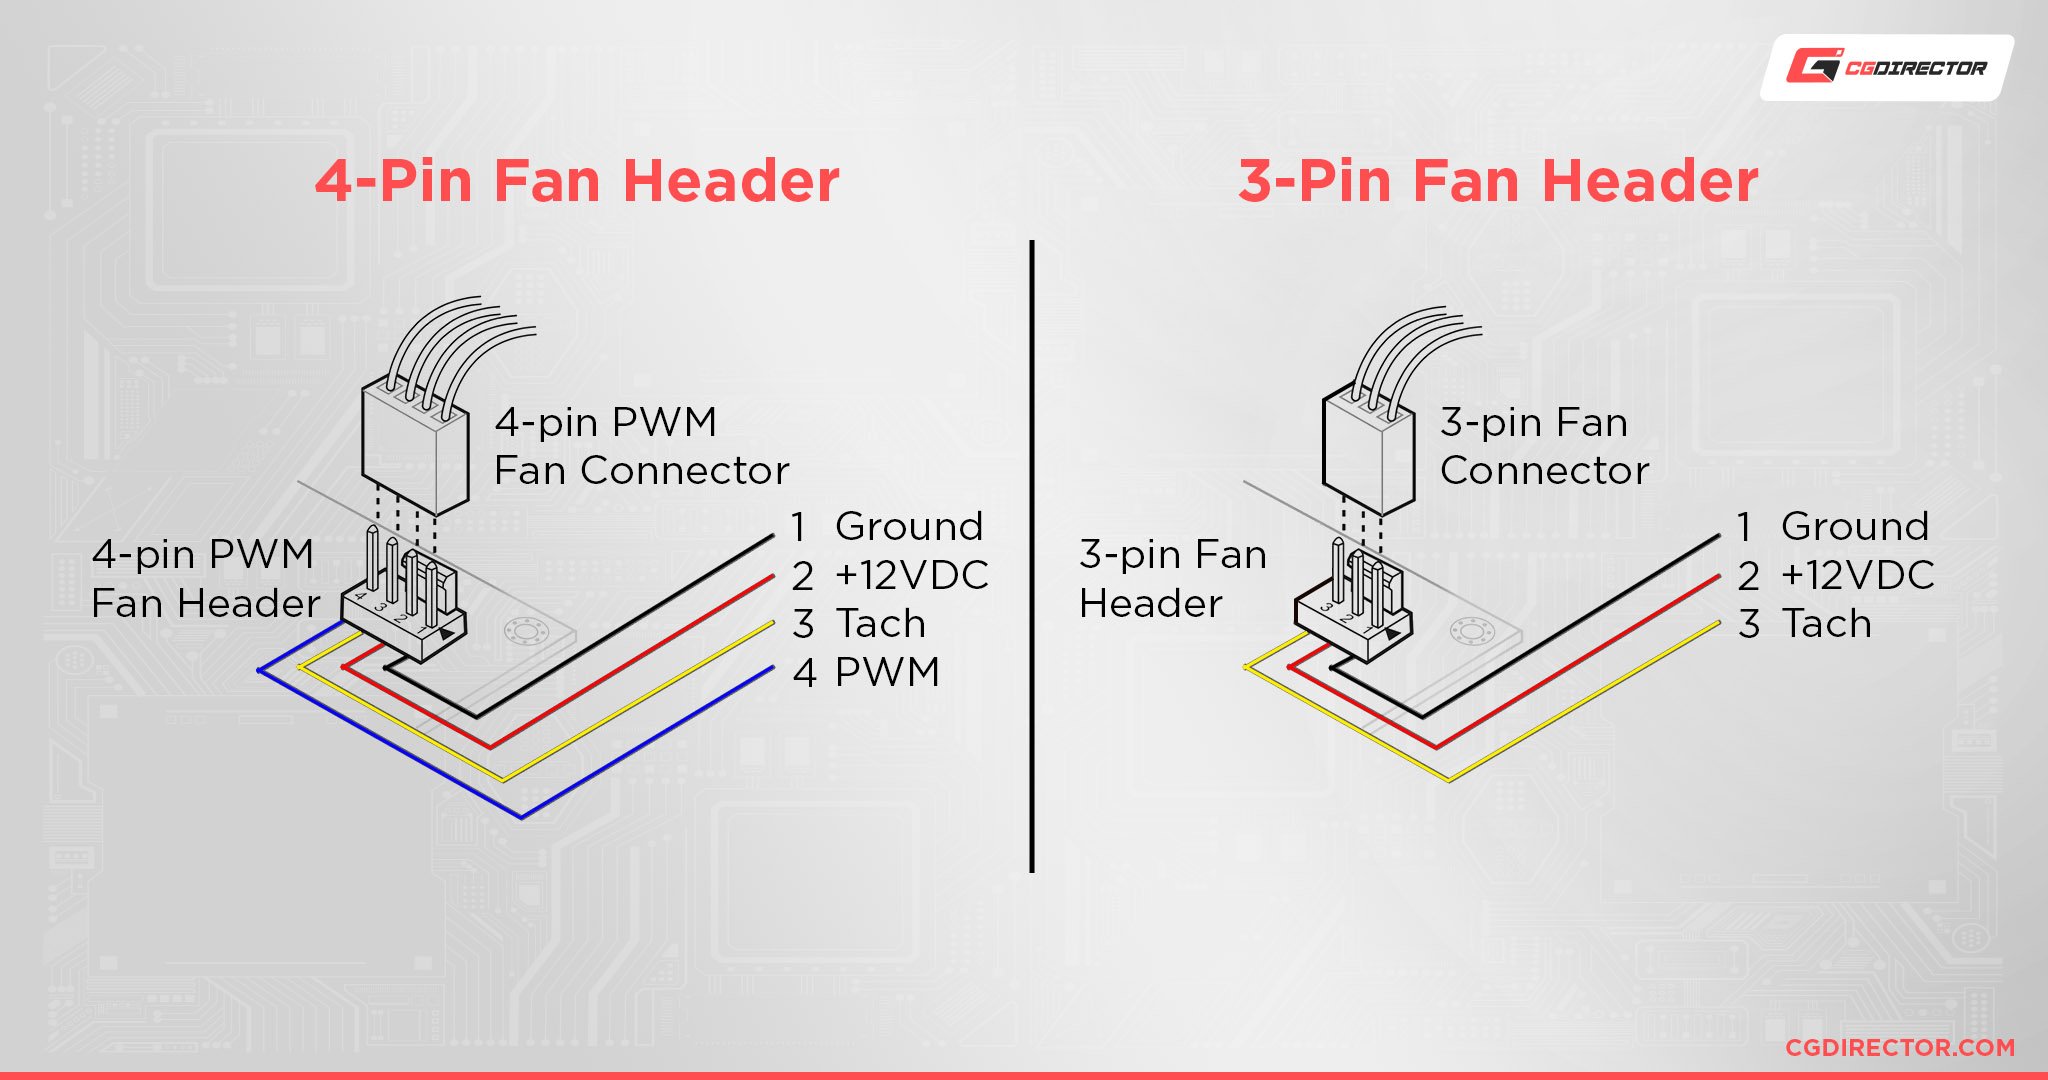
A PWM is a 4-pin female connector, and its advantage is easy to control by both hardware and software.
4-pin fans autoregulate the voltage of the fan. That way, when you’re performing CPU-intensive tasks, the PWM connector increases the voltage to the fan, making it run faster to keep the CPU cooler. Once you reduce the CPU workload, the fan slows down automatically.
A 3-pin DC connector runs on full power, which isn’t easy to control using software. Instead, you control its speed by regulating how much power flows to it – which can be unreliable.
If your PC has a Molex connector that takes all its power from the power supply unit, you can only control it using a resistor cable, which isn’t as dynamic as a PWM.
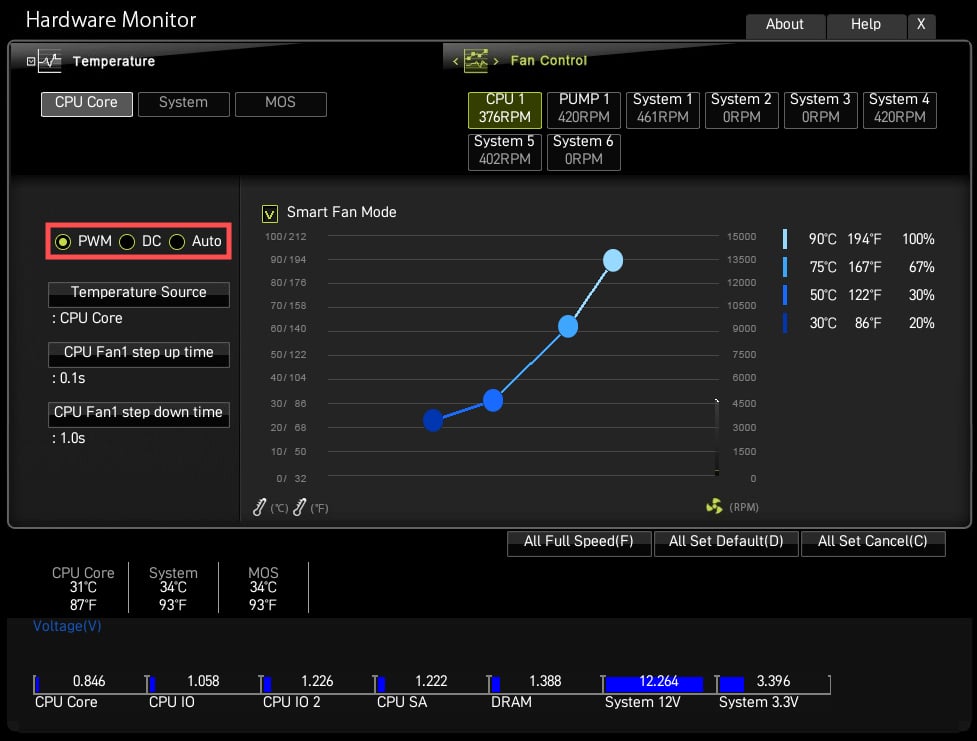
BIOS
Back to the BIOS.
If your PC BIOS allows it, you can control your CPU fan speeds from here.
Each manufacturer deploys different BIOS software for all their devices, so there is no clear-cut way that applies to all brands. However, the Menus are very similar and you’ll be looking for settings or tabs that manage hardware (monitoring).
Once you get to this tab:
- Select the type of fan your PC uses. It may be DC or PWM.
- Choose between modes. Often, you’ll choose between full speed, automatic (or performance), and silent modes.
- Some BIOS software will allow you to change the temperature threshold. Ideally, you want your CPU to run below 70 degrees. Therefore, set it to run at higher RPMs once temperatures approach 65 degrees.
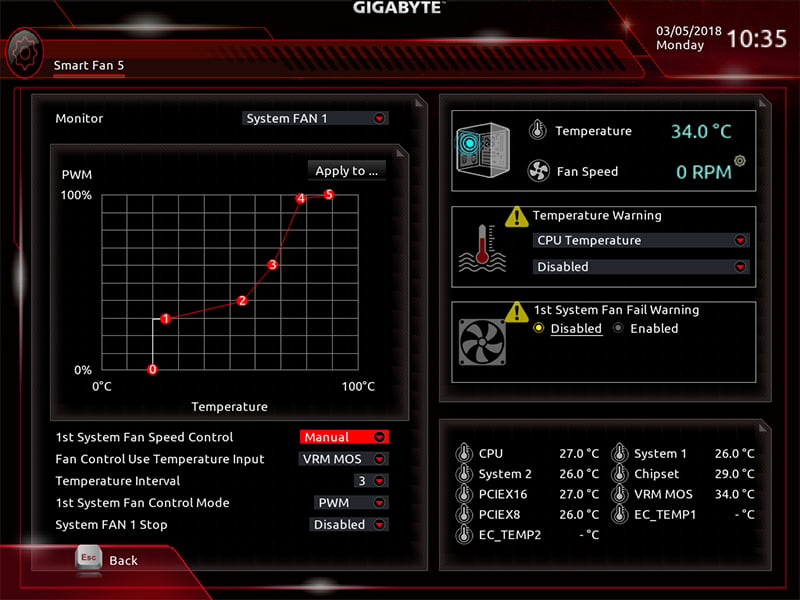
Setting the Fan Curve in the BIOS
If your system uses UEFI BIOS, you can configure your CPU fan curve, primarily if it uses a PWM or DC connector.
The fan curve is a graph with fan speeds on the vertical axis and CPU temperature on the horizontal axis. You can manually plot a line graph that controls the behavior of your CPU fan once your processor hits a specific core temperature.
You can set your fan to statically run at specific speeds or dynamically adjust to the CPU’s temperature – which is the recommended option for most cases.
Once you’ve made your changes, you save your configuration and restart your device.
Speedfan
Speedfan is another powerful speed control tool.
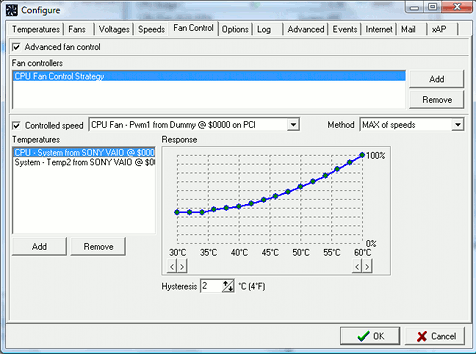
You use Speedfan to control CPU fan speeds:
- Install and open the Speedfan app on your PC.
- Take some time to get familiar with Speedfan and understand how it works. You may have a slight learning curve, but that’s normal.
- If you’d rather not go through the learning process, select ‘Automatic Fan Speed’ and let Speedfan manage your CPU fan RPMs.
- If you’d like to manage your speeds yourself, Select ‘Configure’ then ‘Advanced’
- From the drop-down menu, select your CPU.
- Once you select your CPU, Speedfan will list all your fans based on their connector. Select the fan and set it to Manual. Select OK to proceed.
- Head back to the main window.
Use the arrow keys next to your chosen fan from the main window to adjust CPU fan speeds.
You’ll notice the RPMs increase and reduce on your command, which should signify Speedfan works correctly.
CPU Fan Speed Errors
Sometimes, your PC will throw a fan speed error when you turn it on. This means you’ll have to check your fan for issues.
Often, your Windows installation will sense the problem after it boots, or it may display on your BIOS startup page.
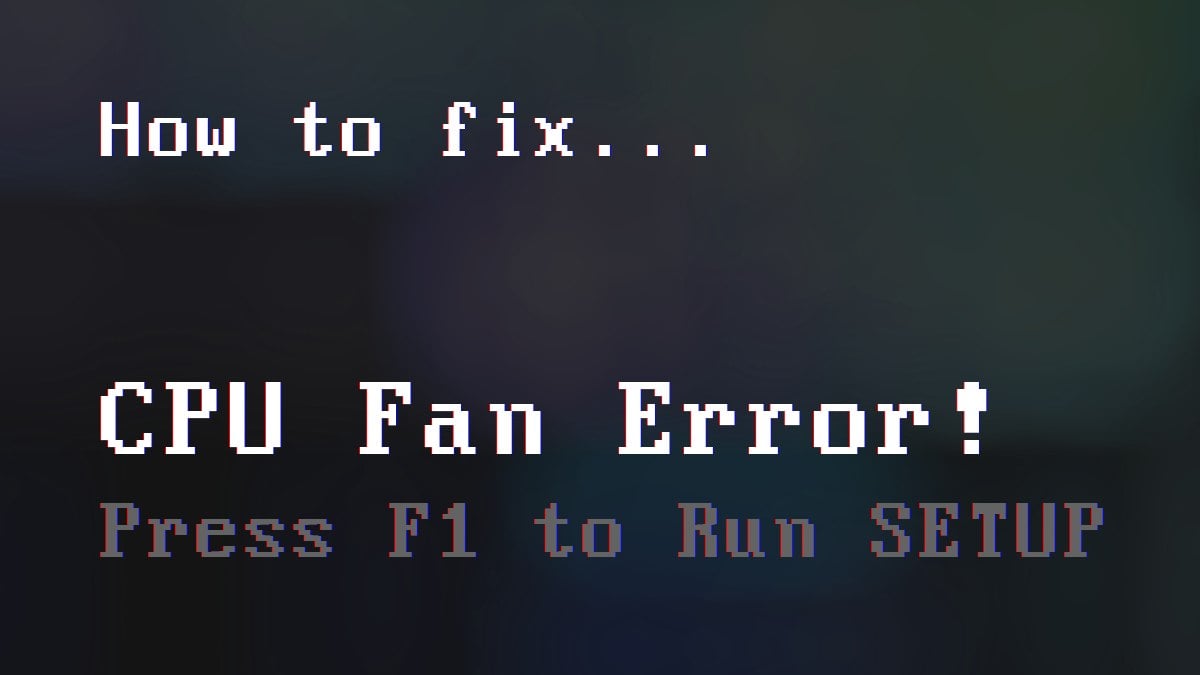
To fix Fan Speed Errors try these steps first:
- Restore Default CPU fan setting in your BIOS
- Make sure you have your Fan plugged into the correct FAN Header
- Go through our Fan Error Guide
Over to You
That’s it for now! Feel free to ask me any questions you may have about CPU FAN RPMs in the comments or our forum!

![How to Get a CPU Cooler off of a CPU [Un-stick Glued-On Cooler]](https://www.cgdirector.com/wp-content/uploads/media/2024/03/How-to-get-CPU-Cooler-off-CPU-Twitter-copy-594x335.jpg "How to Get a CPU Cooler off of a CPU [Un-stick Glued-On Cooler]")
![Where Do You Connect PC Fan PWM Cables To? [Beginner’s Guide]](https://www.cgdirector.com/wp-content/uploads/media/2023/12/Where-Do-PWM-Cables-Go-Beginners-Guide-Twitter-1-594x335.jpg "Where Do You Connect PC Fan PWM Cables To? [Beginner’s Guide]")


4 Comments
8 December, 2023
Great guide, thank you.
27 May, 2023
Thanks Alex! Just wanted to say thank you for all the helpful articles you have written. I have learned a lot and hope to continue learning more from you!
21 November, 2022
Thank you, yesterday I replaced stock Ryzen cooler to Arctic A35 ARGB, sadly I discovered that my motherboard doesn’t have an ARGB connector(three pins) 🙁 I do have an aftermarket controller controlling the rest of the lights but pins won’t match for my new cooler is there a way to connect it somehow? Is there adapter I could buy?
23 November, 2022
Hey PJ, did you give our RGB header guide a read? Should answer your question 🙂
https://www.cgdirector.com/no-rgb-header-on-motherboard/
Cheers,
Alex