 by
by 
TABLE OF CONTENTS
When your computer randomly turns on by itself, it can be a major cause for alarm.
All kinds of worrying thoughts might run through your head — is my hardware faulty? Have I been hit by malware? Will the repair be costly or even possible?
Not only that, but it can also be incredibly infuriating, especially if your computer turns on at night when you’re trying to get some much-needed sleep.
But don’t worry, a blaring, bright screen won’t have to plague your nights any longer: I’ve gathered the 8 most common (and effective) solutions for this problem in this article.
You’ll also be relieved to know that, in most cases, your computer turning on by itself isn’t caused by something serious but rather due to a small misconfiguration of your settings, peripherals, or software.
Virtually all of the fixes are easy too!
What Causes My Computer to Turn On By Itself?
Unsurprisingly, your computer turns on by itself when it’s awoken by something, whether by software, settings, hardware, or an external peripheral.
Common causes include:
- Accidental input from peripherals (aka your cat playing at your desk)
- Automatic maintenance and restarts
- Scheduled tasks and having wake timers enabled
- Fast startup
- Malware
- A hardware fault
- Wake on LAN
- Automatic switching between power-saving modes
- Power outages
Not familiar with the likes of “scheduled tasks,” “wake timers,” and “fast startup?”
Don’t worry, I’ll explain everything in detail and guide you through the process.
If you get stuck or confused at any point, you can also chat with our experts in the forum or drop a comment down below.
How to Fix a Computer That Randomly Turns On By Itself
1. Prevent Your Devices from Waking Your Computer
External peripherals are the most common reason a computer randomly turns on by itself. You can often determine if a device is the cause by using the command prompt:
- Search for “CMD” or “Command” in the Windows Search (Taskbar), right-click the resulting “Command Prompt”-Item, and launch it as administrator
- In the command prompt, type “powercfg -lastwake” and hit “Enter.” This will give you information about what caused your device to wake up from its last sleep transition. Usually it’s caused by your mouse, keyboard, or network adapter (Wake on LAN).
- You can also type “powercfg –devicequery wake_armed” and press “Enter.” It’ll show you a list of all the devices that are able to wake up your device.

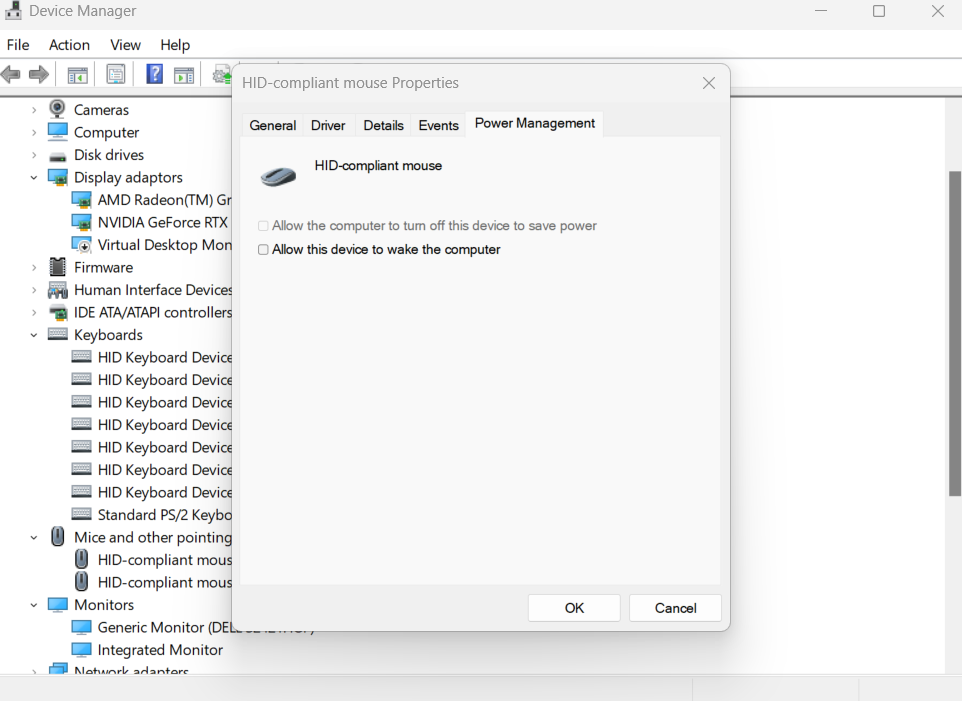
If a device is the cause, you can prevent it from waking up your computer in the Device Manager:
- Press the X and Windows keys simultaneously and choose “Device Manager.”
- Double click or right-click on the necessary device, then go to “Properties,” “Power Management.”
- Uncheck the “Allow this device to wake up computer” box.
- Apply the changes.
- Repeat for other devices if the issue still persists. Don’t forget to disable the option for your network adapter as well.
If this didn’t solve your issue? Don’t worry, there’s plenty more troubleshooting methods you can try!
Keep on reading.
2. Disable Scheduled Tasks
Scheduled tasks in Windows OS can cause your PC to automatically turn on, so it’s worth disabling these to see if it fixes the problem. Make sure to disable scheduled tasks for both Windows and third-party programs.
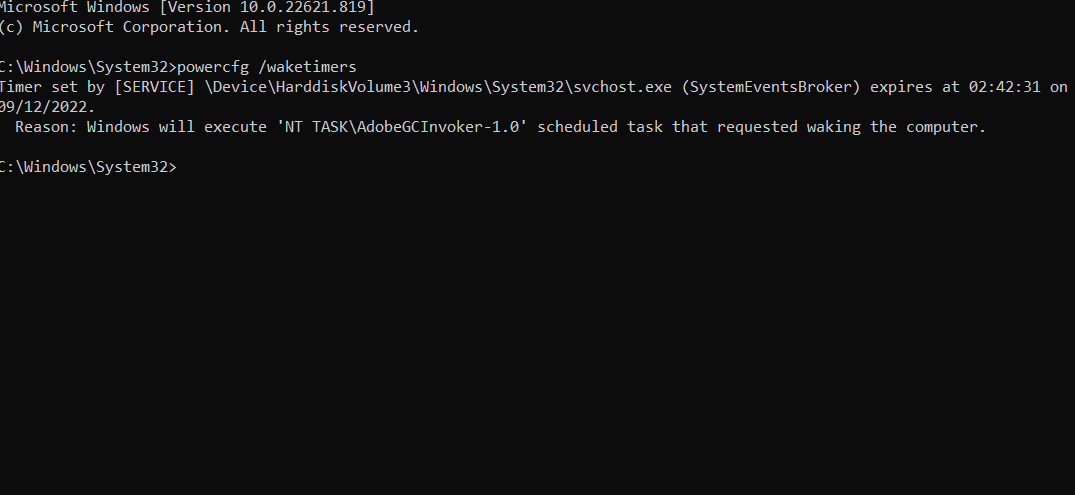
You can actually pinpoint which scheduled tasks are causing the issue in the command prompt:
- Open the command prompt (as an administrator).
- Type “powercfg /waketimers” and press enter. This will give you a list of all tasks that are able to wake up your device.
You’ll next want to disable these active tasks:
- Hold the Windows and R keys simultaneously. Type “taskschd.msc” and hit “Enter.”
- Open the “Task Scheduler Library” file to access the list of scheduled tasks.
- Select the scheduled task of your choice.
- Click “Properties” and open the “Conditions” tab.
- Under “Power,” untick “Wake the computer to run this task.”
- Press “Ok” to apply the changes.
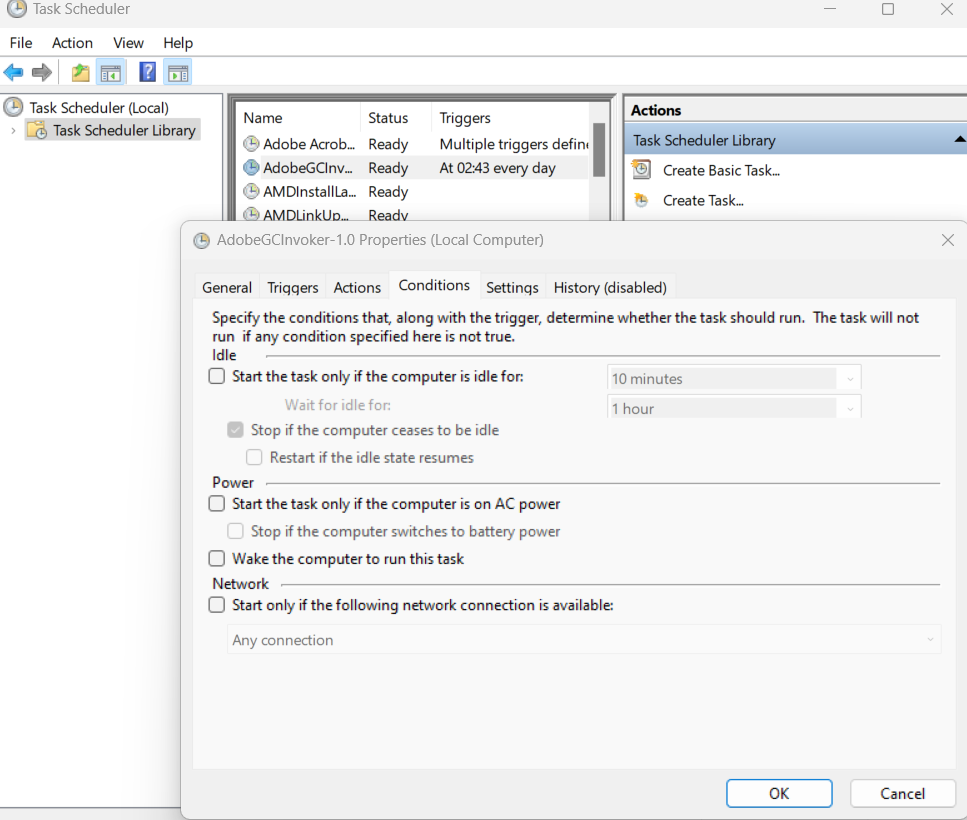
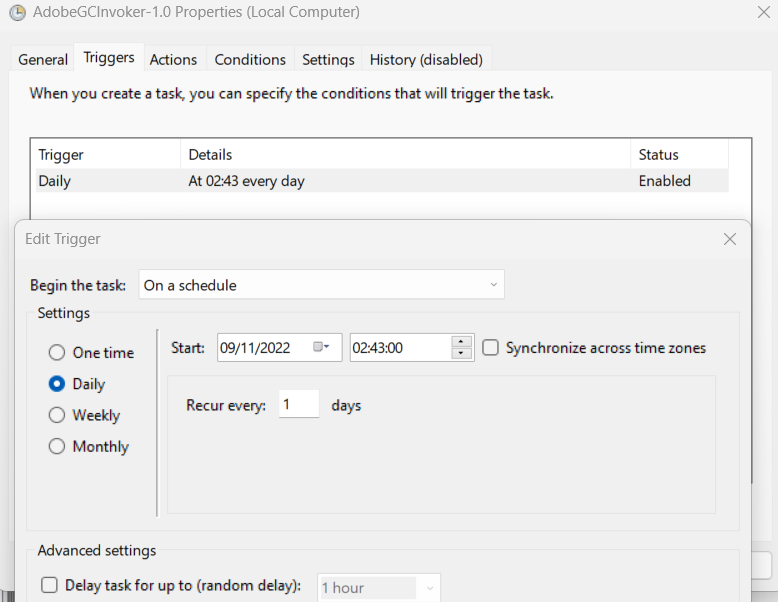
You can also adjust the timings of scheduled tasks in the “triggers” tab.
This will ensure that any active tasks only occur during the day — or whenever is most convenient for you — and not at 4 in the morning.
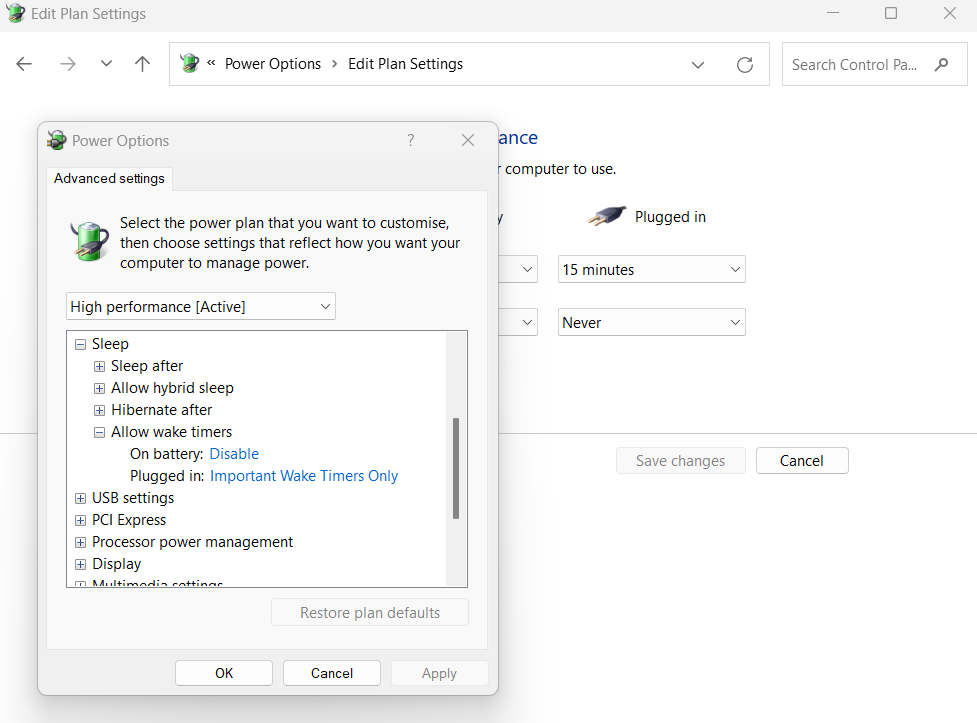
If you want to disable wake timers for everything, you can do so in the Control Panel:
- Type “Control Panel” in the Windows Start search bar. Hit “Enter.”
- Go to “Power Options,” “Hardware and Sounds,” and then “Change Plan Settings.”
- Select “Change Advanced Power Settings.”
- Open the “Sleep” tab and click “Allow Wake Timers.”
- Disable the “On Battery” and “Plugged In” options.
- Apply the changes.
Always make sure you run the command prompt as administrator. Otherwise, you won’t be able to make the necessary changes.
If you don’t have any scheduled tasks enabled, or you’re still experiencing the problem despite disabling them, another typical fix is to turn off fast startup.
3. Turn Off Fast Startup
As its name suggests, fast startup is a Windows feature designed to help your computer boot quickly. It’s enabled by default on most devices.
While convenient, fast startup has been known to cause computers to turn on by themselves, so you should try disabling this feature to see if it fixes the issue.
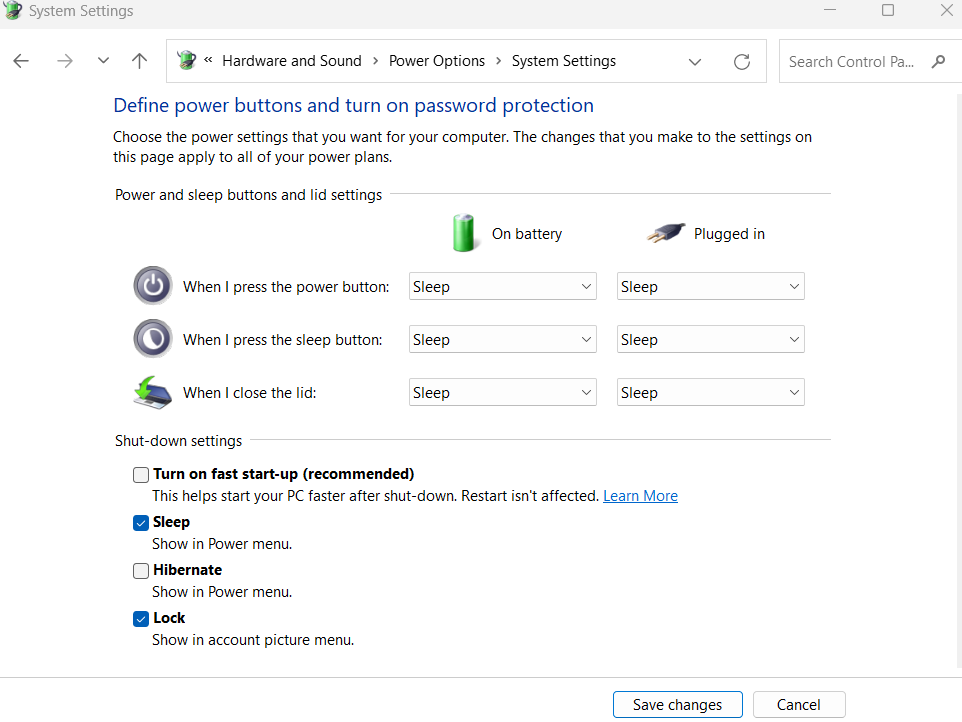
- Click on the Windows start button.
- In the search bar, type “Control Panel” and then press “Enter.”
- Select “Hardware and Sound,” “Power Options.”
- Click on the “Choose what the power buttons do” tab.
- Select “Change settings that are currently unavailable.”
- Under “Shutdown Settings,” untick the “Turn On Fast Startup” option.
- Save the changes.
Without fast startup enabled, your computer will boot slightly slower the next time you use it.
However, in my opinion, this is a worthy tradeoff if you never want to deal with your screen waking you up at 2 am again.
But if this method has made no difference? You’ll next want to try disabling your PC’s automatic maintenance.
4. Disable Automatic Maintenance
Both Windows 10 and 11 have a feature called “automatic maintenance,” which allows your PC to turn itself on when it needs to perform maintenance tasks.
Here’s how to disable it:
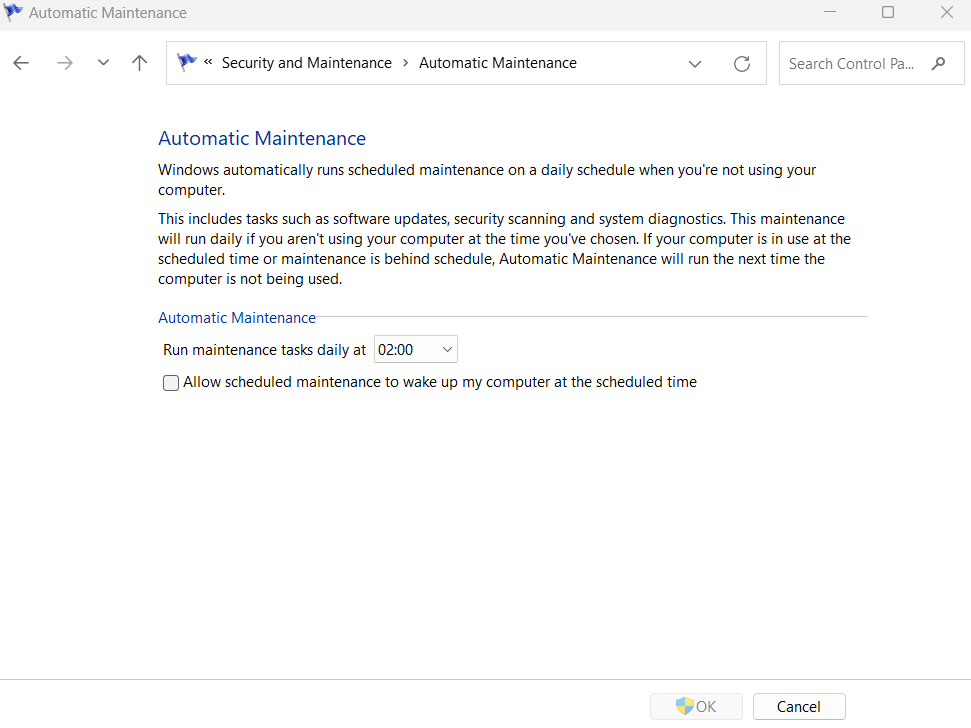
- Go to the “Control Panel,” select “System and Security,” then “Security and Maintenance.”
- Under the “Maintenance” tab, click “Change Maintenance Settings.”
- Untick “Allow scheduled maintenance to wake up my computer.”
- Click “Ok” to apply the changes.
The above should solve the problem in most cases, but if you want to completely disable automatic maintenance you’ll need to access the Registry Editor.
Be warned that editing the Registry can be dangerous if not done properly, so you should only do this if you’re experienced with computers. You should also make a full backup of your device.
- Hold the “Windows” and “R” keys simultaneously
- Type “regedit” and hit Enter.
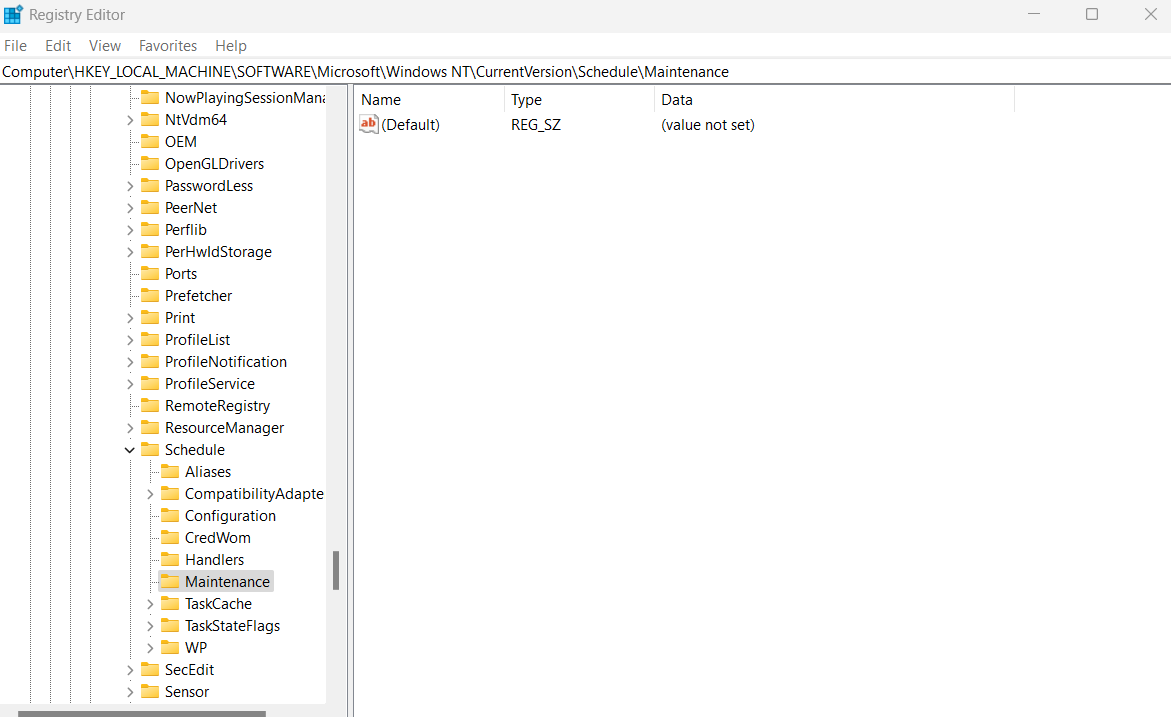
- Double-click on the “HKEY_LOCAL_MACHINE” file, then open “Software.”
- Double-click the “Microsoft” file, then “Windows NT”
- Double-click “CurrentVersion” and select “Schedule.”
- Open the “Maintenance” folder.
- Check if there’s a “Maintenancedisabled” file. If there isn’t, right-click in the folder, select “New,” then “DWORD (32-bit) Value.”
- Name the file “MaintenanceDisabled.”
- Double-click on the file, and then set its value data to 1. Press “OK” to apply the changes.
Automatic maintenance should now be completely disabled. Whenever you want to re-enable this feature, simply go back and change the value data to 0.
While you’re at it, you might also want to consider disabling another default Windows feature, known as automatic restarting.
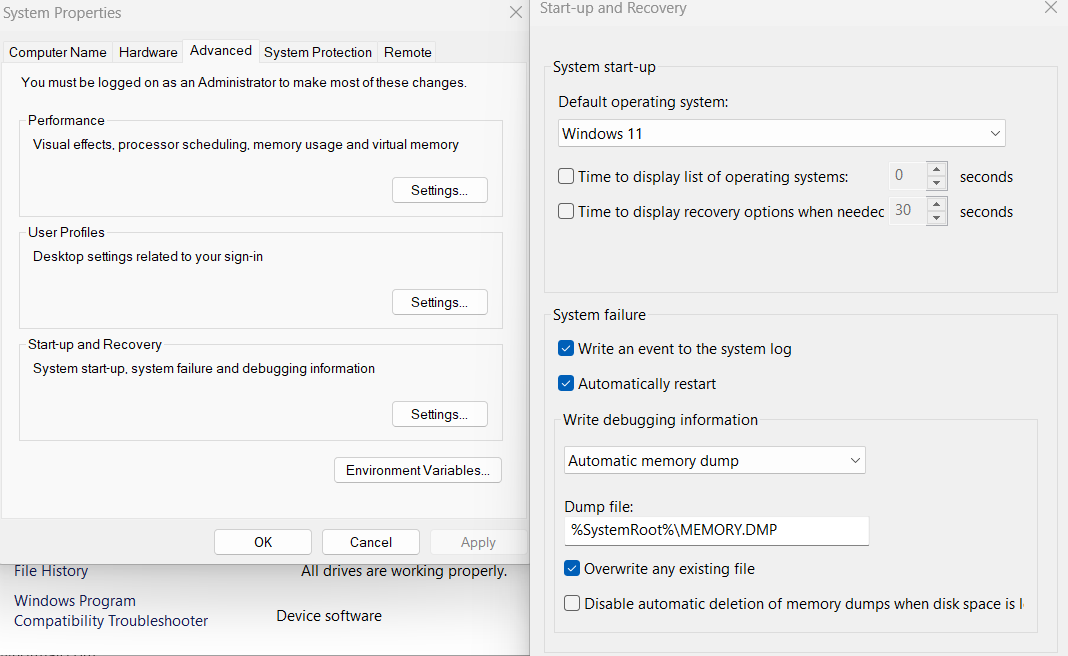
5. Disable Automatic Restarting
This built-in feature essentially makes your PC auto-restart if a system failure occurs. While helpful, this feature can sometimes happen abruptly and cause any unsaved data to be lost.
It can also cause your PC to get stuck in a boot loop, making it look like your device is randomly turning on by itself.
If the methods above haven’t worked so far, it’s definitely worth disabling this feature:
- Click Windows Start, type “Control Panel” in the search bar, and then hit Enter.
- Select “System and Security,” then “System.”
- Select “Advanced System Settings.”
- Under the “Startup and Recovery” tab, choose “Settings.”
- Untick the “Automatically Restart” option.
- Click “OK” to apply the changes.
6. Disable Wake on Lan
Wake on Lan (WOL) is another Windows feature that has been known to cause your computer to randomly turn on by itself. Disabling it is a pretty easy process:
- In the Windows Start search bar, type “Device Manager” and hit Enter.
- Double-click on the ‘Network Adapters” tab
- Double-click on the relevant network adapter to open its properties.
- Select the “Advanced” tab, and then locate the “Wake on Magic Packet” option.
- Set the value to “Disabled.”
- Apply the changes.

Shut down your computer and check if the issue has now been solved. If your computer continues to turn on by itself randomly, you’ll want to next scan for malware.
7. Scan for Malware
Malware is a plague in the computer realm. It attacks your device and can steal vital information, ruin its performance, and shorten its lifespan.
Unsurprisingly, malware can also cause your computer to randomly turn on by itself, especially if it has changed your system settings or corrupted data files.
But don’t sweat it. There are plenty of antivirus scanners out there that can keep malware at bay (or deal with a current malware attack). I personally recommend Malwarebytes.
Windows also has a built-in virus scanner, which you can easily access in Windows Security:
- In the Windows Start search bar, type “Windows Security.” Hit Enter.
- Select “Virus & Threat Protection.”
- Click “Quick Scan.”
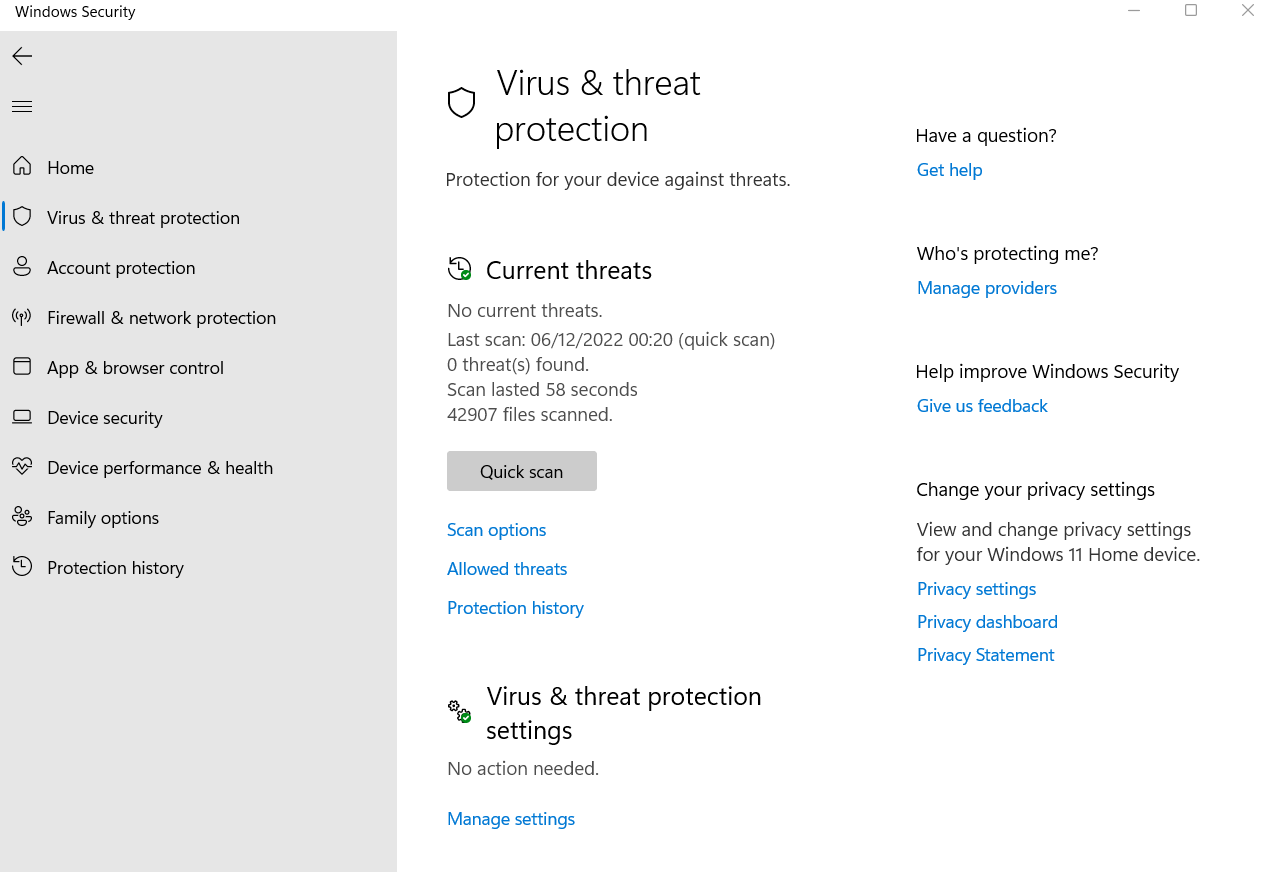
If the scan and/or your premium antivirus scanner has given you the all-clear, you’ll next want to inspect your hardware.
8. Inspect Hardware Components
If none of the fixes above have worked, it’s possible you have a hardware issue. Several components can cause this issue, but the most typical cause is a stuck power button.
Inspect the power button and check whether it appears stuck. It can be difficult to determine this with the naked eye, so make sure to press and feel around the button.
If there’s some tension (or stickiness) when you press it, it’s possible that there’s dust, dirt, or debris trapped inside. Wipe it with a microfiber cloth and gently use a toothpick to clean out the crevices around the button.
If the button looks clean and physically feels fine, it’s possible you have a faulty Power Supply Unit (PSU). You’ll need to speak to your manufacturer and/or take it in for repairs.
You should also make sure it’s properly connected to your motherboard. If you need help with this, you can check out our dedicated how-to guide on the topic right here.
If you’re comfortable with hardware, you can perform the paperclip test to determine whether your PSU is actually faulty.
You should also make sure your fans are working properly and there’s sufficient airflow.
Overheating can definitely cause your computer to crash and randomly turn on and off. We actually cover ways to beat the heat in this guide. You should also undo any overclocking.
Aside from hardware, you’ll also want to make sure all your cables are properly connected, and that the power socket isn’t faulty. Swap to a new power socket and see if the issue still persists.
Also, if you experience power outages frequently, this can cause your PC to turn on by itself. To prevent this from happening because of a power interruption, go into your BIOS, and in the Power Options set “Restore on AC Power Loss” to “OFF”.
This will keep the computer off if it encounters a power interruption.
FAQ
Why does my computer turn on by itself?
Several things can cause a computer to randomly turn on by itself, including peripherals, scheduled tasks, automatic maintenance, fast startup, and a stuck power button.
Why does my computer randomly turn itself on at the same time?
It’s likely that you have an active scheduled task set to that time of day.
You can disable scheduled tasks — or change the time they run — by following method 2.
Can overheating cause my computer to randomly turn on?
Overheating can cause PCs to randomly restart and sometimes switch off entirely.
If the culprit is overheating, you’ll likely experience performance issues as well, like stuttering and crashes.
Why does my monitor turn itself on and off?
The most common cause is faulty or improperly connected cables.
Other potential causes include an insufficient power supply, faulty GPU, and out-of-date drivers.
Why is my computer slow to shut down?
If your computer is slow to shut down, it’s likely because you have lots of tasks and applications running in the background.
Other possible reasons include malware, a power problem, and corrupted registry files.
Over to You
That’s a wrap! We hope the fixes above have helped you gain back control over your computer (and sleep). But if they haven’t, always remember that you can seek advice from a professional at a repair shop, or even reach out to experts in our forum.
Leave a comment below and let us know which fix worked for you. Feel free to share any other fixes we haven’t listed above too — you may help a fellow PC user!
![How to Measure/Figure Out Your Monitor Size [In 1 Minute]](https://www.cgdirector.com/wp-content/uploads/media/2023/04/How-to-Measure-Figure-Out-Your-Monitor-Size-In-1-Minute-Twitter-594x335.jpg "How to Measure/Figure Out Your Monitor Size [In 1 Minute]")

![Monitor Goes Black For A Second [Causes & How to Fix]](https://www.cgdirector.com/wp-content/uploads/media/2022/11/Monitor-Goes-Black-For-A-Second-Causes-Fixes-Twitter-594x335.jpg "Monitor Goes Black For A Second [Causes & How to Fix]")


2 Comments
16 November, 2023
None of these solutions worked for me, either because they just did not work or because part of the solution was not to be found and therefore could not be completed. But I did find a solid solution that will work for everyone. Philips sps1101wa/37, costs less than $10. Any other brand doing the same thing will also work.
16 November, 2023
Thanks Craig, are you saying you’re having power outages / bad wiring and this device helped?