 by
by 
TABLE OF CONTENTS
Have you ever switched off your PC — or left it running for a long time without turning off your monitor — and noticed it entering power-saving mode?
This, essentially, is your monitor entering hibernation.
What Is Power-Saving Mode On A Monitor?
A monitor enters power-saving mode when it stops receiving any kind of video signal from your GPU.
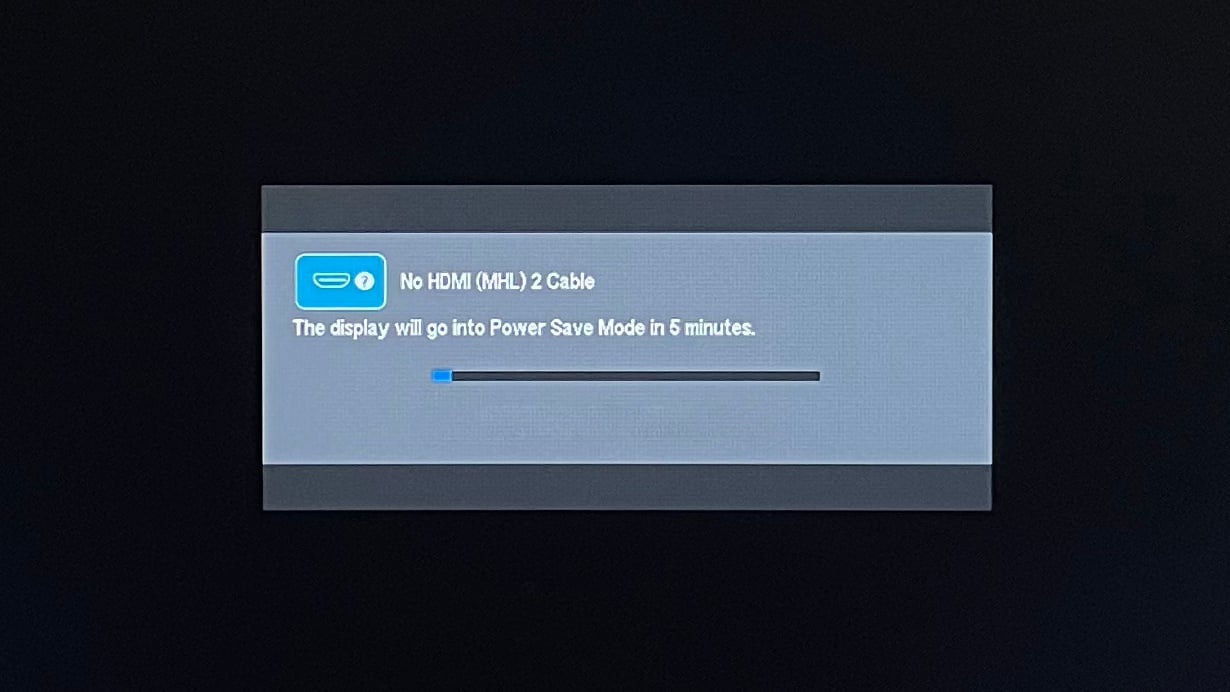
As the name suggests, this feature was implemented to conserve energy and prevent excessive degradation caused by screen burns.
However, it can cause plenty of discomfort if your monitor randomly enters power-saving mode while the PC is still being used.
This article will help you troubleshoot this pesky issue.
Basic Troubleshooting
Before you go tweaking any power settings or reinstalling your GPU driver, do the following:
- Connect your system to another monitor. If the problem persists, your PC is at fault
- Alternatively, connect another desktop PC or laptop to your monitor. The problem lies within the monitor if it still enters power-saving mode
This already narrows down our culprit considerably.
Now let’s move on to more comprehensive troubleshooting methods!
Primary Causes
Faulty Video Connections
Improper/loose connections and wrong input settings can cause your monitor to enter power-saving mode.
To make sure we’ve covered all bases, do the following:
- First, check that all connections between the GPU and monitor are secure
- Next, (if you have some available) try other display cables (HDMI, DisplayPort, USB-C, VGA, or DVI) to ensure there are no problems with the video ports and/or display cables
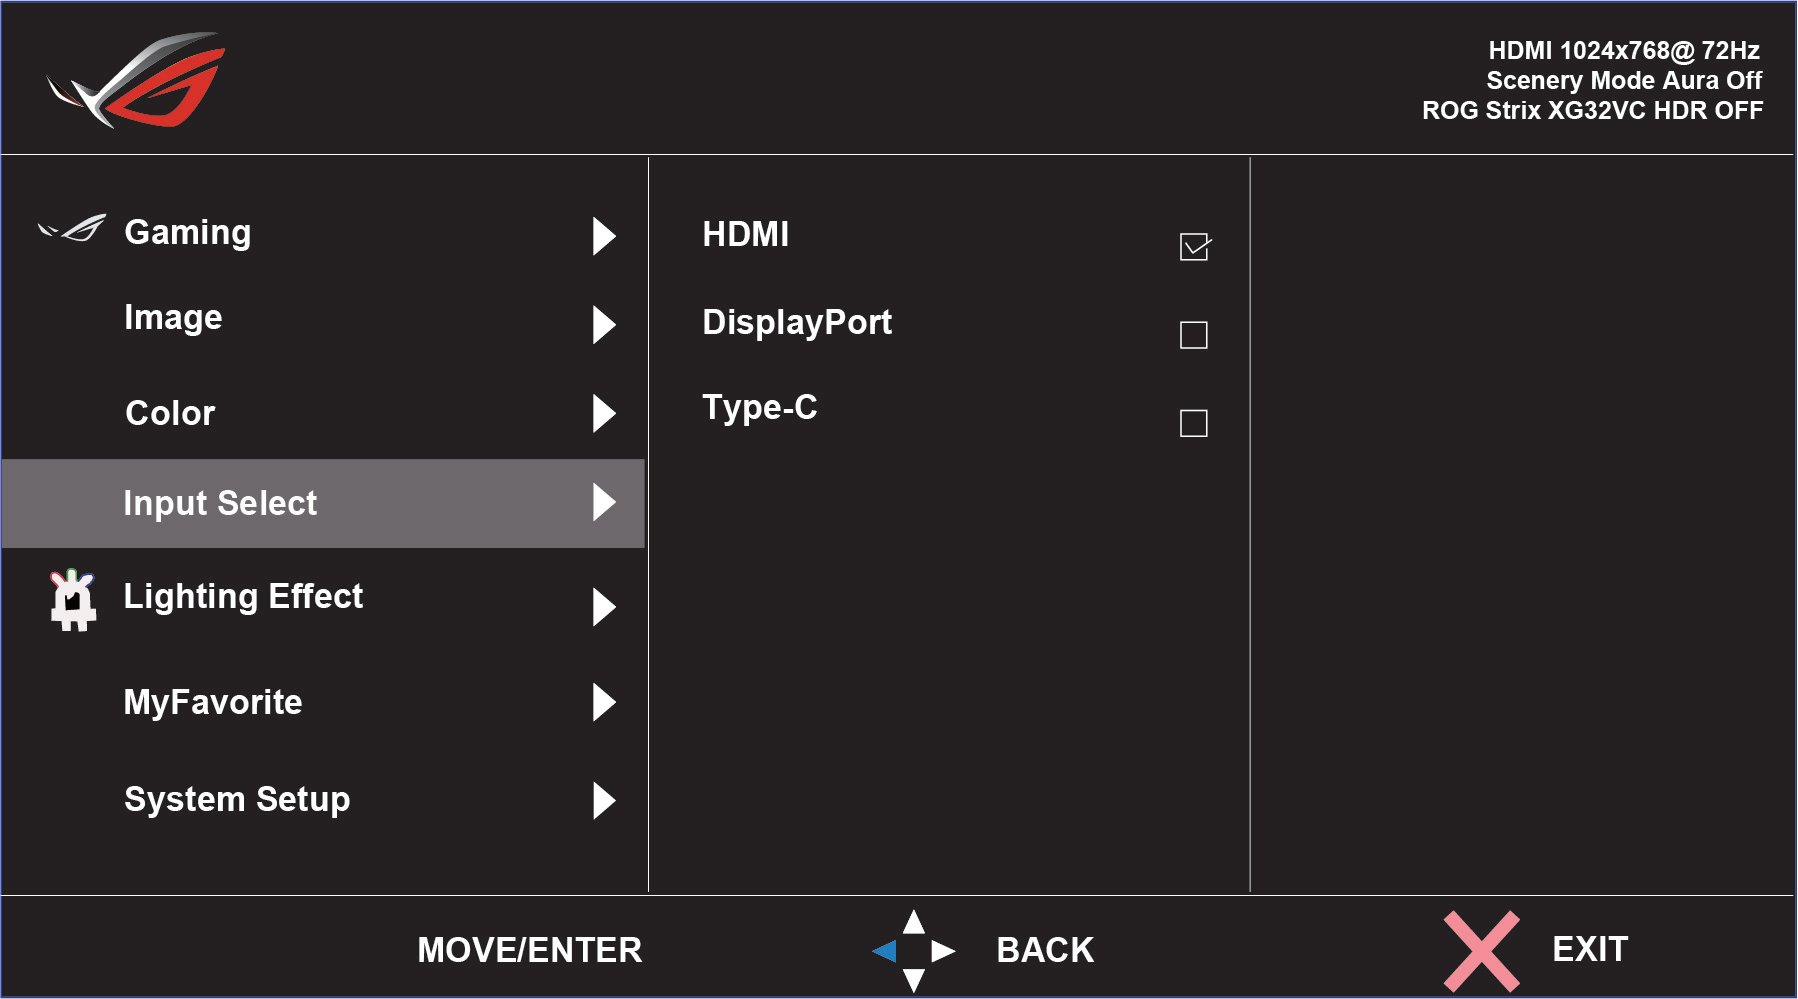

- Lastly, disable Auto Source and, depending on your choice of display cable, select the correct Input Source using your monitor’s On Screen Display (OSD) settings
Long Periods Of Inactivity
More often than not, your monitor will enter power-saving mode when your PC goes to sleep or, alternatively, when it remains inactive long enough to stop sending any video signal.
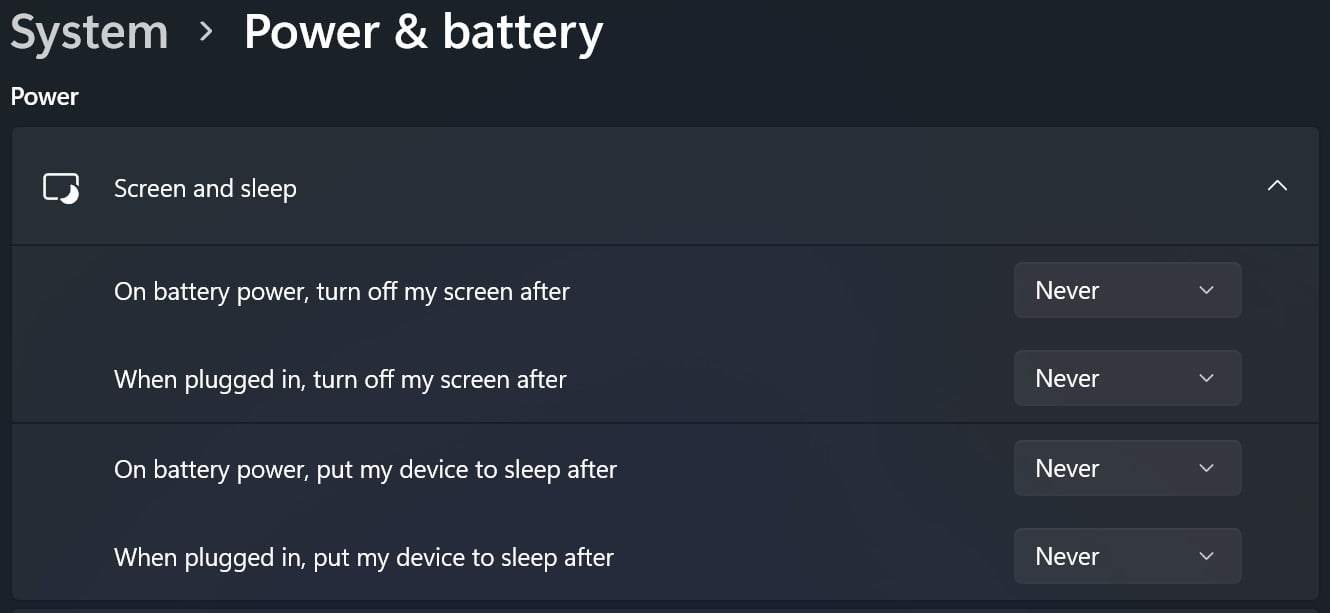
To counteract this, change your Screen Timeout options in the Settings panel.
Do the following:
- Type “Settings” in Windows Search Bar and press Enter
- Click on Display and then select the Power & Sleep tab
- Set the Screen Timeout and PC Sleep Time to Never

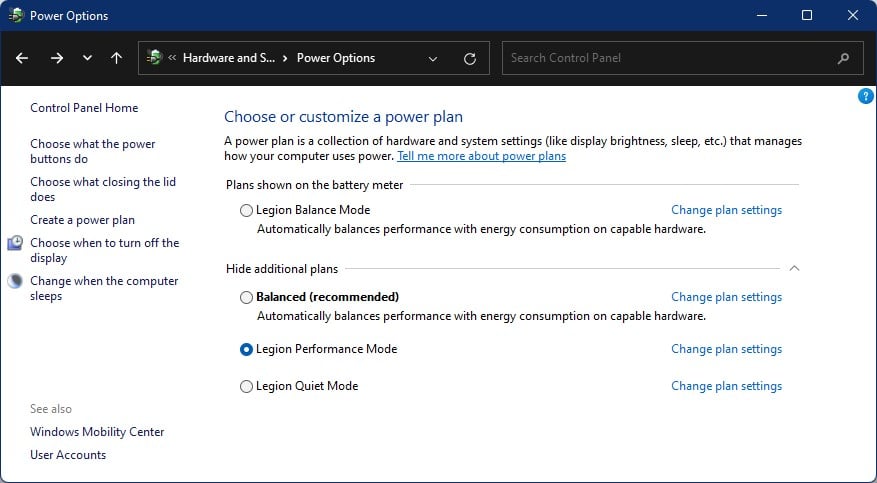
Next, you should also change the Power Plan Settings in the Control Panel.
- Click on Additional Power Settings on the right-hand side of the Power & Sleep tab
- Toggle High-Performance Mode and click on Change Plan Settings
- Set both “Turn off the display” and “Put the computer to sleep” to Never
- Next, click on Change Advanced Power Settings and set the “Sleep After” setting under the Sleep header as Never. Hit Apply, and then click OK
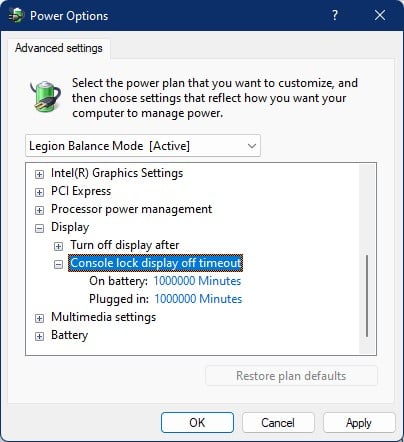
Console Lock Display Timeout
If the problem persists, disable the Console Lock Display Timeout setting. The Console Lock Display Timeout instructs the OS to wait a certain amount of time on the Lock Screen until it’ll time out and turn off the monitor. But this option isn’t easily accessible. Here’s how to fix that:
First, you need to edit the Registry to make this option appear and disable it once it does.
To do so, follow these steps:
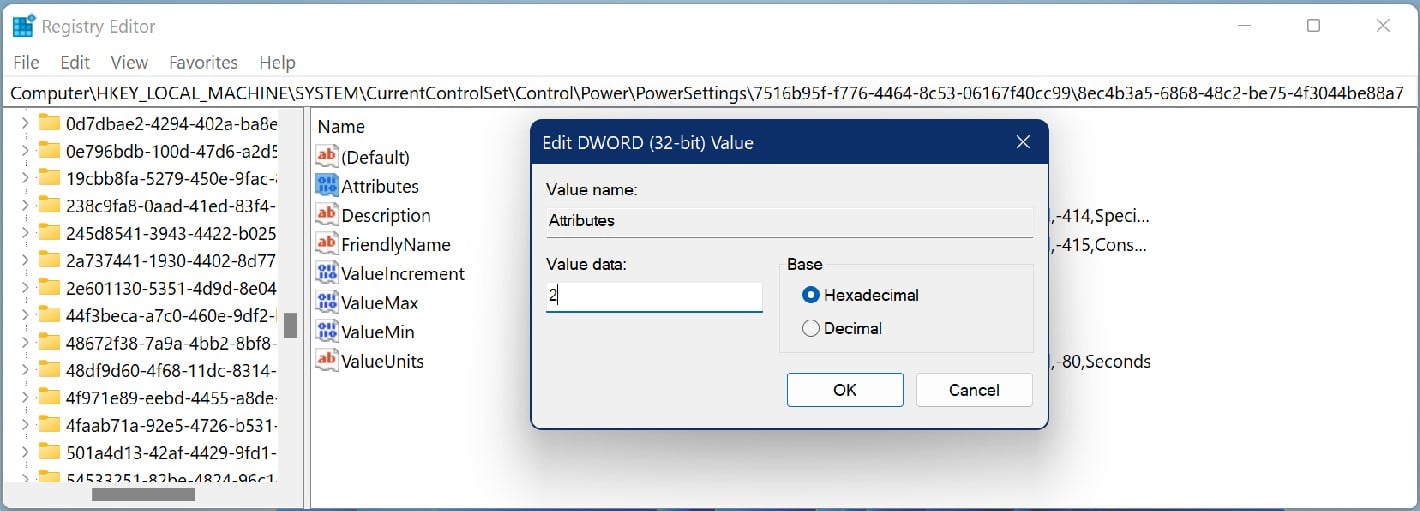
- Type “Regedit” in the Windows Search Bar to open up the Registry Editor
- Navigate to HKEY_LOCAL_MACHINE\SYSTEM\CurrentControlSet\Control\Power\PowerSettings\7516b95f-f776-4464-8c53-06167f40cc99\8EC4B3A5-6868-48c2-BE75-4F3044BE88A7
- Double-click on Attributes and change the value data from 1 to 2. This will allow the Console Lock Display Off Timeout option to show up on the Control Panel

- Open Additional Power Settings from the Control Panel again
- Head to the Display tab. The Console Lock Display Off Timeout will now be visible
- Change the value from 1 (minute) to a large number, like 1000000, hit Apply, and then click OK

Device Idle Policy
If all these solutions fail, you can resort to setting the Device Idle Policy to Performance.
Like the previous step, you need to change some Registry values to get this option to appear on the Control Panel.
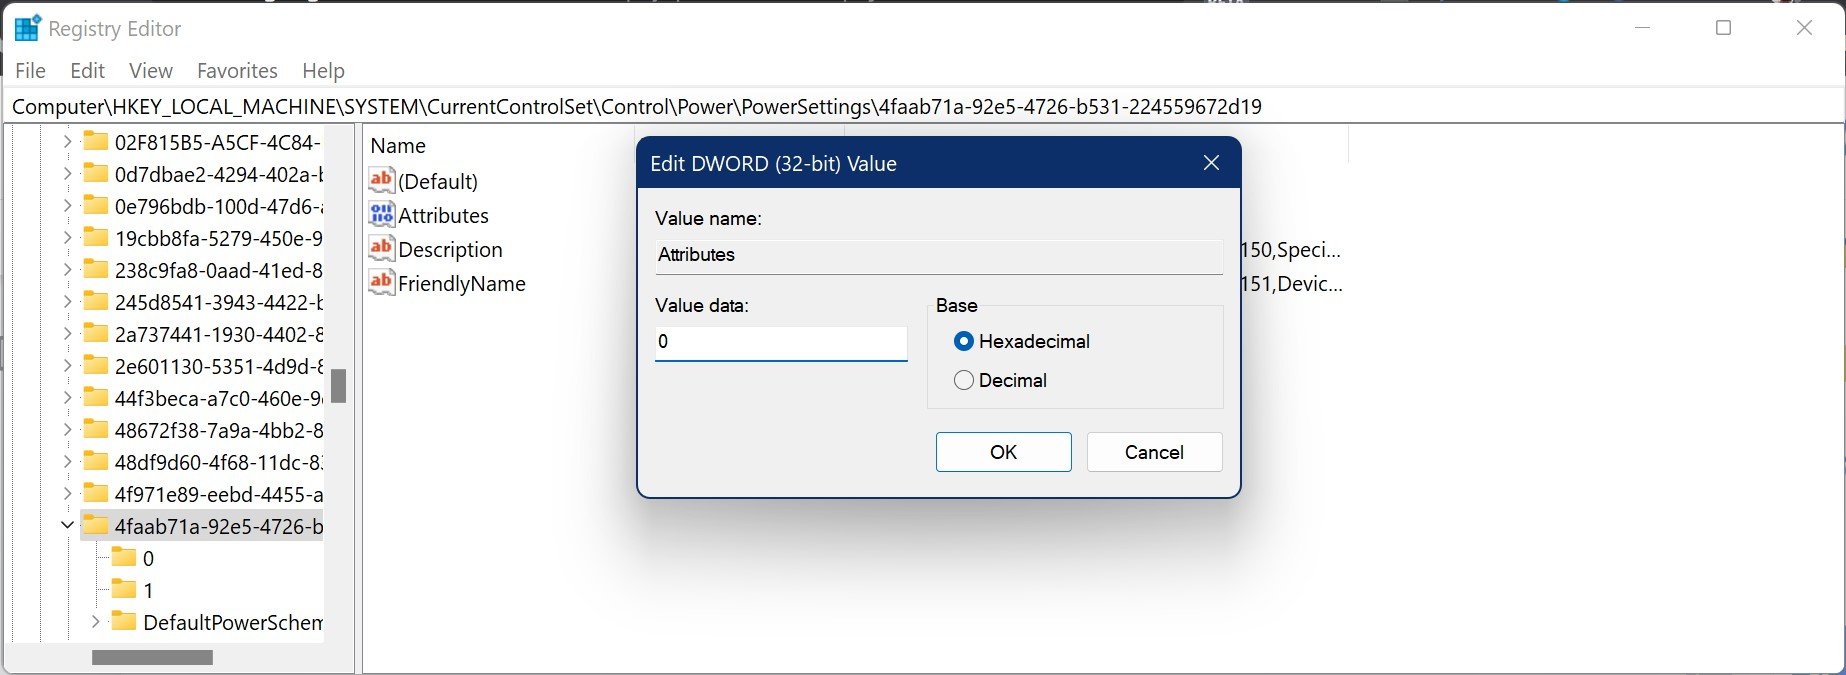
- Open Regedit and navigate to HKEY_LOCAL_MACHINE\SYSTEM\CurrentControlSet\Control\Power\PowerSettings\4faab71a-92e5-4726-b531-224559672d19
- Double-click on Attributes and change its value data from 1 to 0. The Device Idle Policy can now be changed from the Control Panel

- Again, open the Additional power settings
- You will see a new option titled High Performance (or Balanced if that’s your power plan)
- Click on the + icon to reveal Device Idle Policy, switch it from Power Savings to Performance, hit Apply, and then click OK

GPU Driver Incompatibility
Your monitor can also enter power-saving mode — at the most random of moments — if you’re facing any kind of GPU driver-related issue.
You can uninstall your current GPU driver from the Device Manager, but we recommend using a specialized tool like Display Driver Uninstaller (often referred to as DDU).
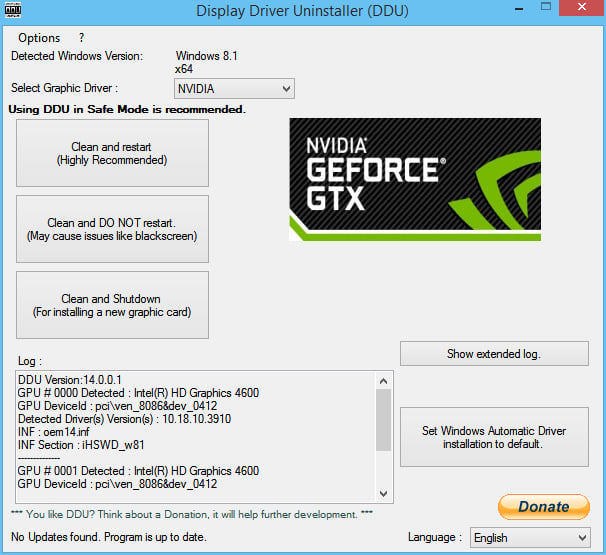
- After downloading and installing DDU, select the Clean And Restart option to remove the incompatible GPU driver
- Alternatively, if you are installing a new GPU, click on the Clean and Shutdown option to remove the old GPU’s driver
- After that, reinstall the newest Driver for your GPU
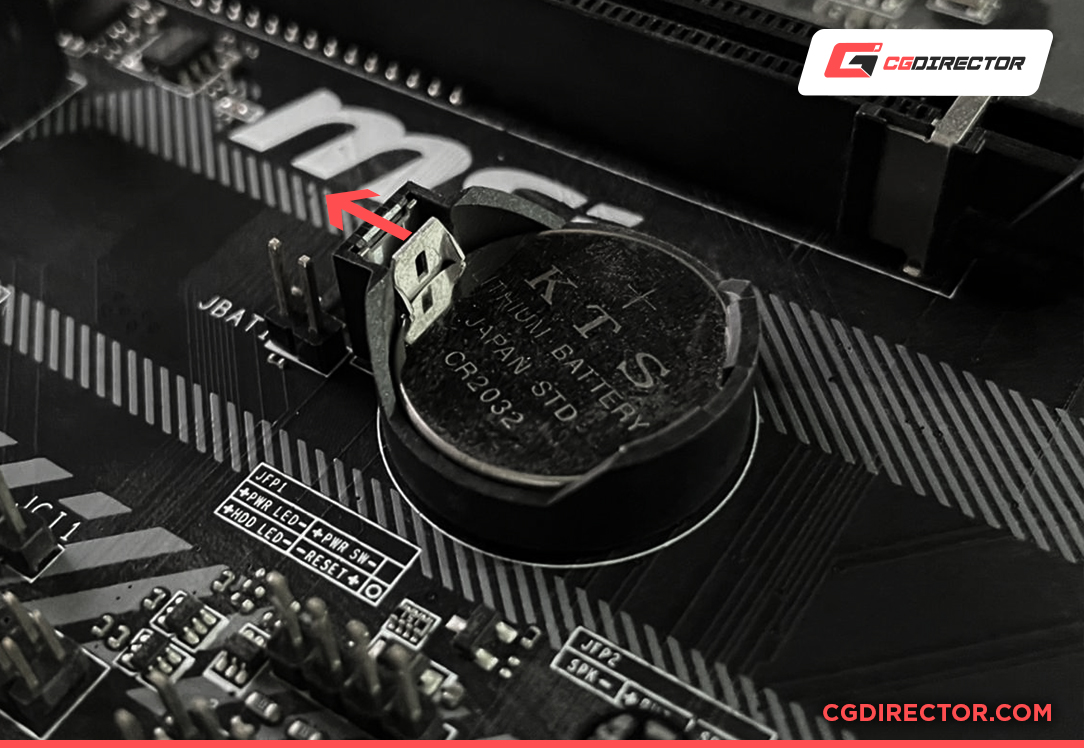
Dead Motherboard Battery
A dead CMOS battery can also cause your monitor to go into a power-saving state when you boot up your PC.
That’s because a drained CMOS battery will not retain any BIOS settings and will display the following message every time you turn on your computer: “Devices changed (CPU or Memory) or CMOS has been cleared.” Because the boot process won’t continue, the monitor will display “No Signal” and enter power-saving mode after a few moments.
You can either ignore it by pressing F2 to reset your BIOS and reboot the system or slot in a new CR2032 battery into your motherboard to eliminate this problem.
The entire process is extremely straightforward; all you have to do is release a lock to remove the old CMOS battery and slot in the new one.
Should You Disable Power-Saving Mode?
Well, it depends. Power-saving mode helps the monitor conserve energy, and there are ways to delay it from entering power-saving mode instead of outright disabling it.
If it starts affecting your day-to-day usage, then you should, by all means, disable it altogether.
Increased power consumption might not be that big of an issue — it varies from one individual to the next. Unless, of course, you have an OLED display.
Monitor Enters Power-Saving Mode While Gaming
If your monitor keeps entering power-saving mode or shows “No Signal” when you play games or perform any other hardware-intensive tasks, the culprit might be the instability of your GPU.
This can be caused if your overclock is unstable, if your PC has inadequate cooling, or if your GPU receives insufficient power from your PSU.
Removing all GPU overclock settings should help prevent the monitor from entering power-saving mode if the overclock is unstable. Then, you can run stress tests while slowly increasing the GPU’s clock speeds to get a stable overclock.
To prevent thermal throttling from causing monitor-related problems, keep your PC adequately cooled, replace its thermal paste, and increase the GPU fan speed to dissipate heat faster.
Lastly, keep a weather eye on the temperature of your GPU using monitoring software like MSI Afterburner, and make sure it doesn’t exceed 85 degrees Celsius.
To check whether you have a beefy enough PSU, you can use websites such as PCPartPicker or BuildMyPC. If your PSU is too weak to handle your GPU at full load, you can try undervolting the GPU.
Furthermore, try removing and reseating the GPU on the top PCIe x16 slot on your motherboard. If you have enabled G-Sync/FreeSync, disable them from your GPU’s control panel.
Lastly, reset your monitor’s refresh rate and resolution to its default values.
- Head to Settings, and click on the System tab
- Change the Display Resolution of the monitor under the Display sub-menu to the value recommended by Windows
- Next, click on the Advanced Display Settings option
- Here, you’ll see the option to change the refresh rate of your monitor
If all these solutions fail, your GPU might be defective.
Secondary Monitor Enters Power-Saving Mode
If your secondary monitor enters power-saving mode (while the primary one still works), double-check whether it’s adequately connected to your GPU.
Then, ensure that both monitors appear in your GPU’s control panel.
Do the following:
- Open Settings and navigate to System
- You should be able to see the monitors under the Display sub-menu
- Ensure that your second monitor shows up along with the primary one
- If your second monitor is missing, click on the Detect option
If this doesn’t solve the problem, go over all the aforementioned fixes one by one to prevent your second monitor from entering power-saving mode.
FAQ
How to Stop My Monitor From Blinking/Flickering?
A flickering monitor is most commonly caused by improperly inserted cables, very high (unsupported) refresh rates, or your GPU acting up.
The simple fix is to check your connections, disable G-Sync/FreeSync, lower your display’s refresh rate, and install new drivers for your GPU.
How Can I Access My Monitor’s On-Screen Display (OSD) Settings?
Most monitors have several buttons located near the power button. Simply press any of them, and a Shortcut Menu will pop up.
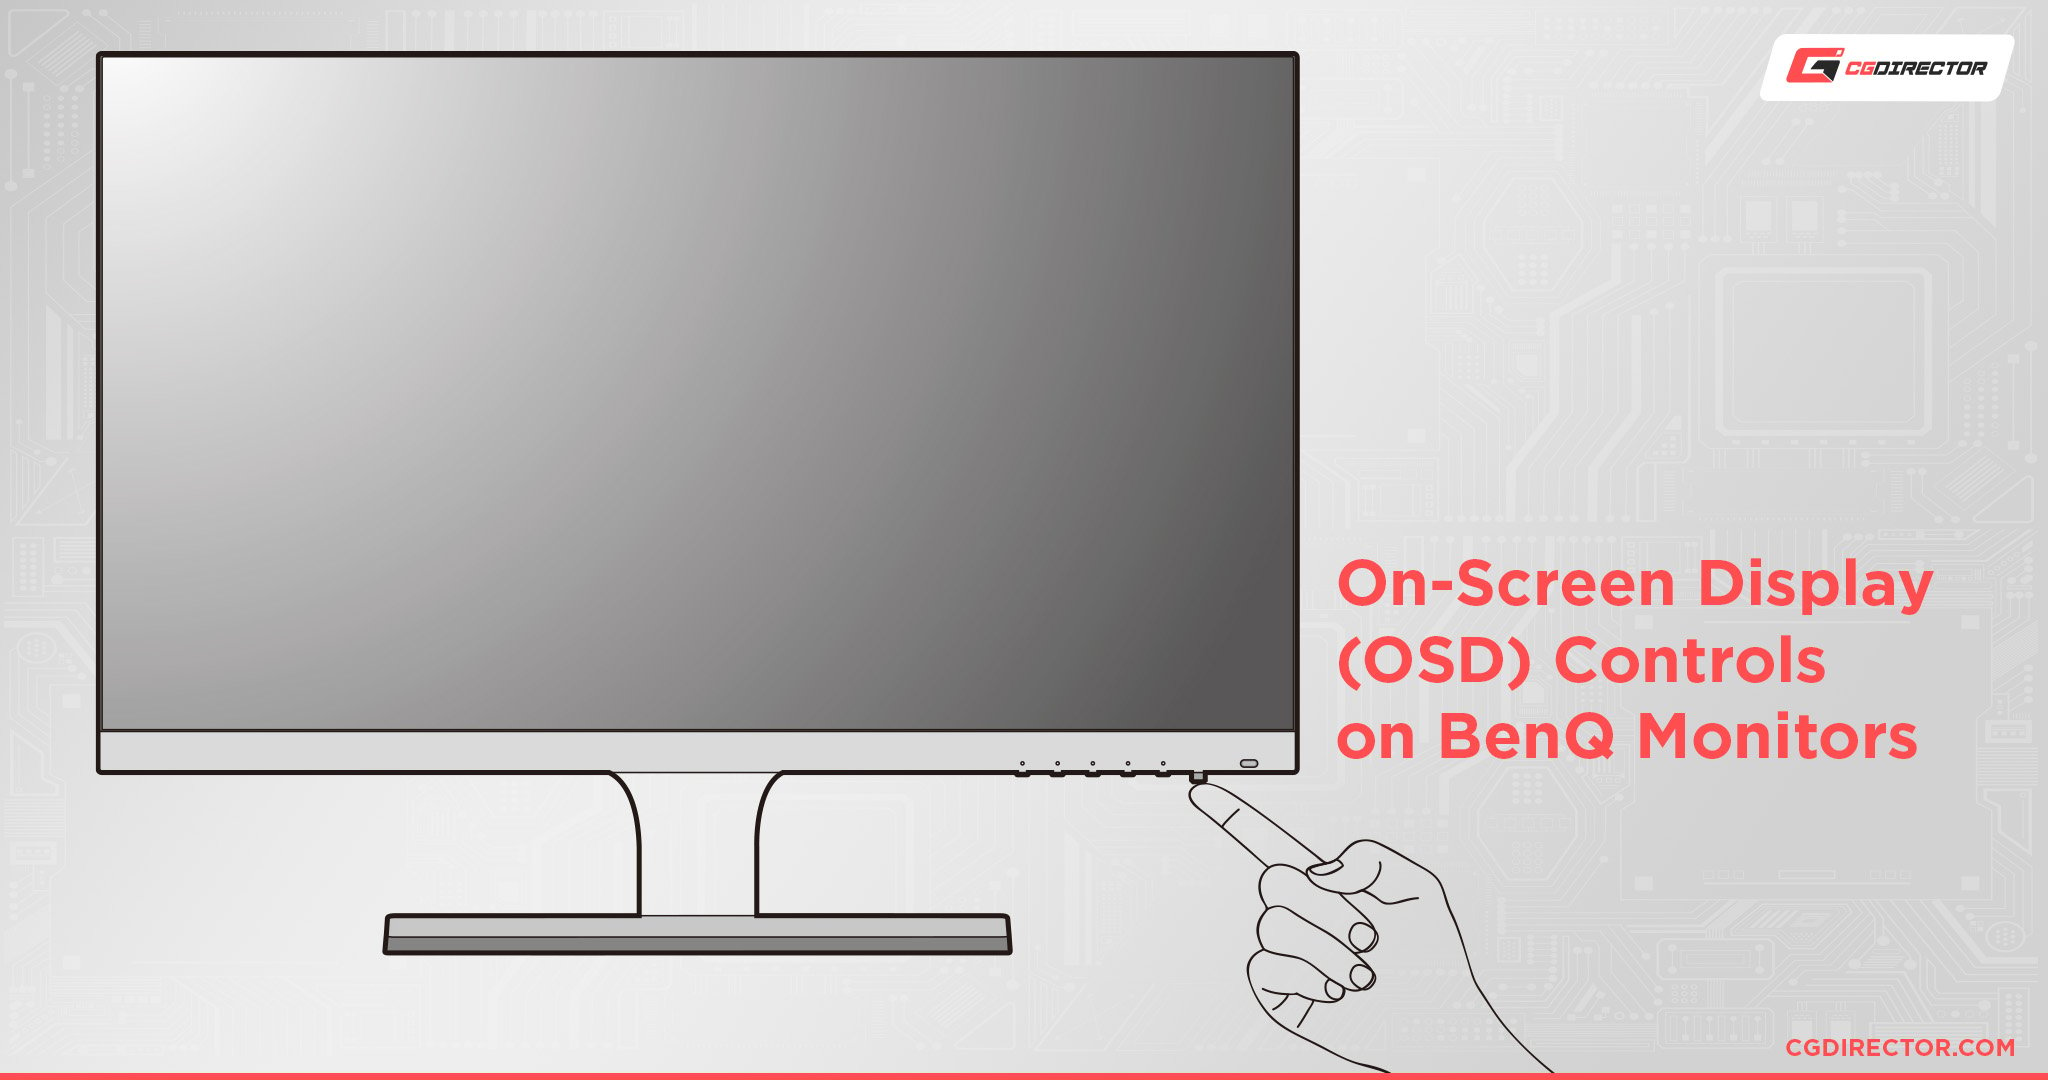
There you’ll be able to change a myriad of different (admittedly quite important) settings.
As a general rule of thumb, the button closest to the monitor’s power button allows you to access the OSD settings like Super Sharpness, Overdrive, Blue Light, and so on.
Over To You
A monitor randomly entering power-saving mode can sound like a daunting issue to fix, but rest assured, it’s not all that complicated. So long as you follow all the steps listed above, you can get rid of the issue without too much trouble.
If you have any questions, feel free to post them down below in the comments or on our forum!
")
![How To Enable/Set Your Monitor To 144 Hz [Updated]](https://www.cgdirector.com/wp-content/uploads/media/2023/12/How-To-EnableSet-Monitor-To-144-Hz-Twitter-copy-594x335.jpg "How To Enable/Set Your Monitor To 144 Hz [Updated]")

![The Monitor Guide to Refresh Rates and Response Times [Updated]](https://www.cgdirector.com/wp-content/uploads/media/2020/05/TheGuideToRefreshRates-Facebook_1200x675-594x335.jpg "The Monitor Guide to Refresh Rates and Response Times [Updated]")

0 Comments