 by
by ![How to Fix Red CPU Light on Motherboard [2024 Update]](https://www.cgdirector.com/wp-content/uploads/media/2023/08/How-to-Fix-Red-CPU-Light-on-Motherboard-Twitter-copy-1200x675.jpg "How to Fix Red CPU Light on Motherboard [2024 Update]")
TABLE OF CONTENTS
It’s the weekend. You’ve decided that today will be the day you finally finish watching your favorite Netflix show. You get your snacks and grab a pair of headphones in anticipation.
Or you’ve just finished a new PC Build or an upgrade to the CPU and you hit your PC’s power button.
But instead of a bright, glowing screen, you’re met with absolute darkness. You hit the power button again and… still nothing.
You decide to investigate the cause and troubleshoot your PC — check power cables and PSU switch, then take off the side panel and it’s here you’re greeted by a glaring red CPU light on your motherboard. But don’t panic just yet.
While a red CPU light can indicate some serious hardware problems, in many cases the underlying issue is something easily fixable, like a loose cable.
Today, we’ll guide you through the troubleshooting process and help you diagnose (and solve!) the cause behind your motherboard’s red CPU light.
Let’s get right into it!
What Does a Red CPU Light Mean?
Most modern motherboards come equipped with a set of four diagnostic LEDs — BOOT, VGA, DRAM, and CPU — that switch on when they detect a hardware malfunction during the startup process (POST phase).
Each LED is labeled and associated with different components:
- BOOT: Indicates the status of boot devices and procedures (i.e. the hard drive)
- VGA: Indicates the status of the graphics card or iGPU
- DRAM: Indicates the status of the RAM modules
- CPU: Indicates the status of the CPU
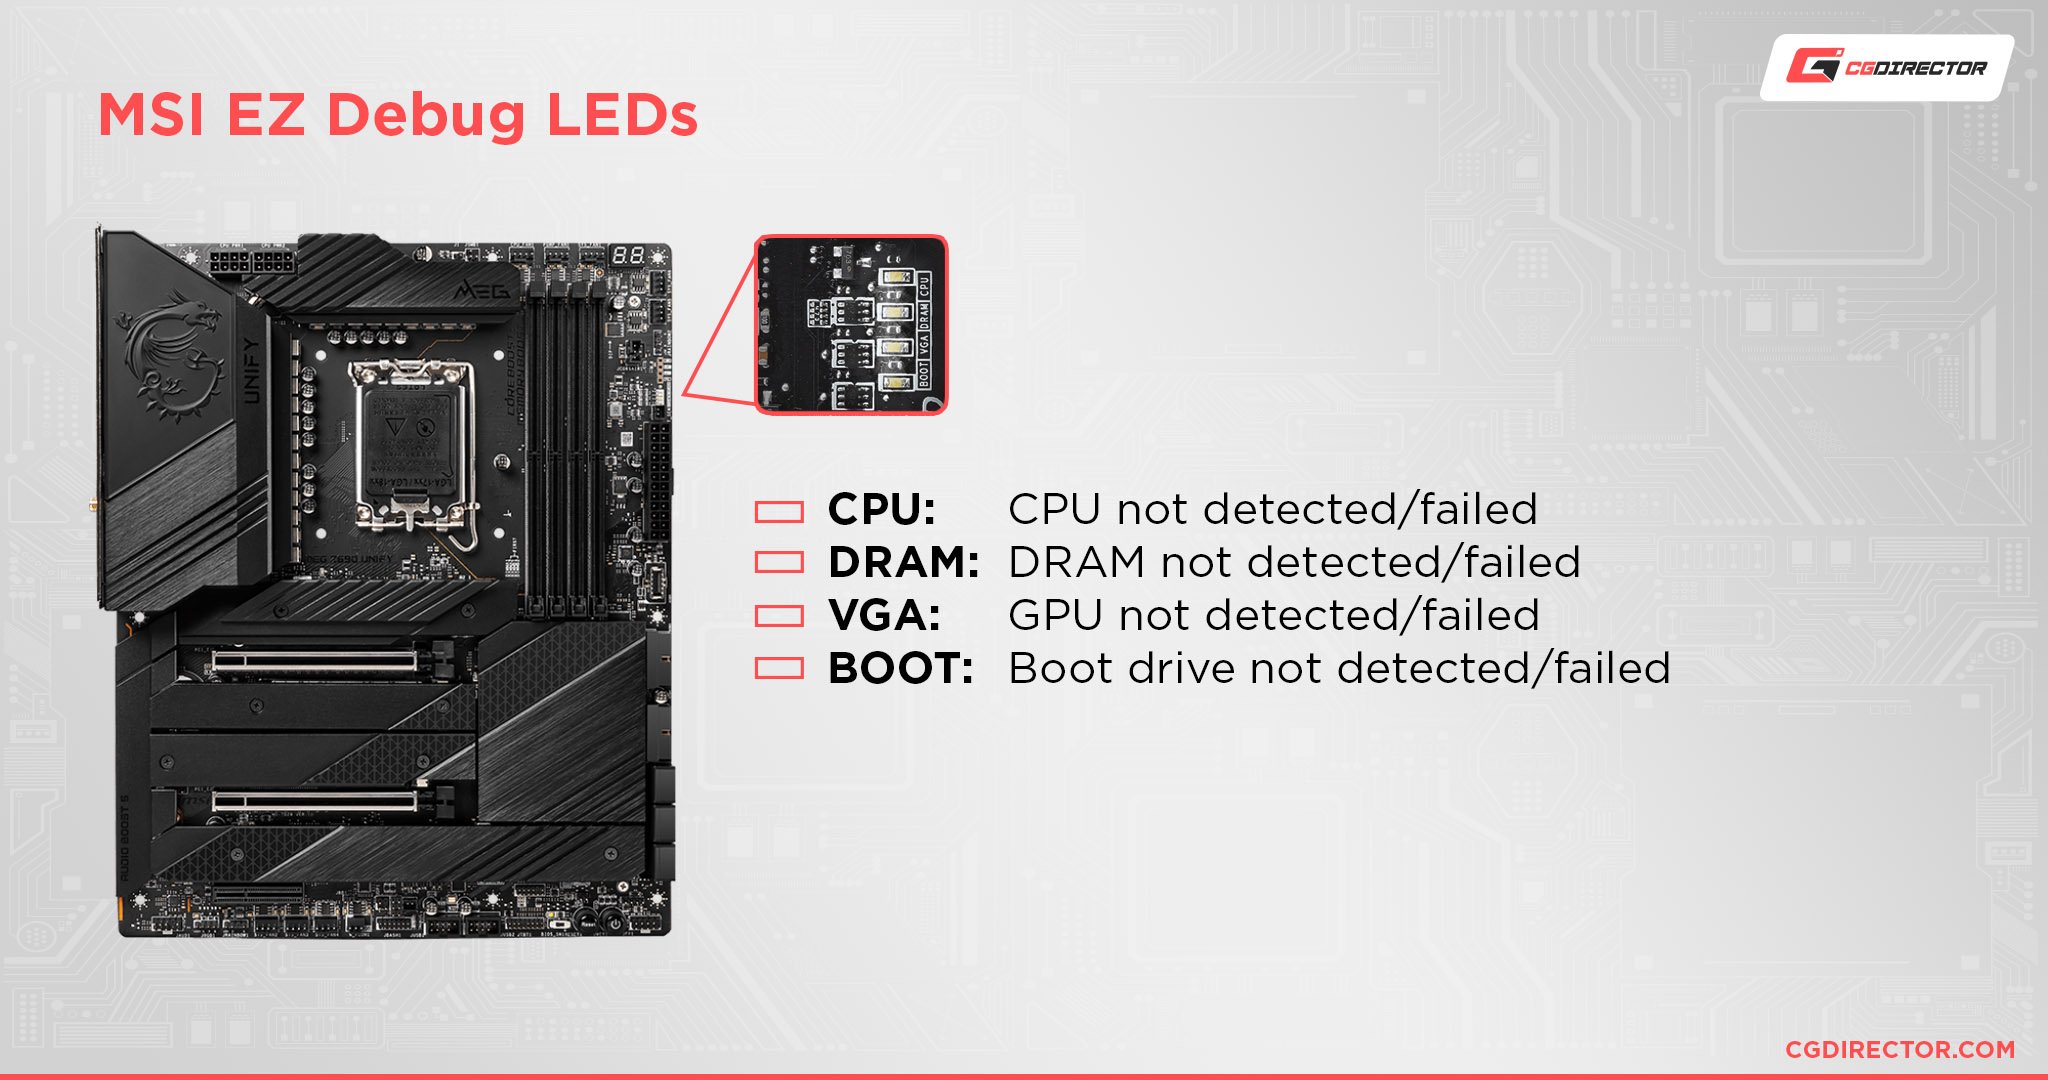
So, if the CPU diagnostic LED light has switched on (and stays on!), it’s essentially your motherboard’s way of communicating that there’s an issue with your CPU, whether due to compatibility problems, improper installation, or outdated BIOS firmware.
Keep in mind that for some motherboards, it’s normal for LED debug lights to flash during the initialization process — they indicate a problem if they stay lit and don’t automatically switch off after a minute or so.
Top tip: All motherboards are unique and yours may display error codes in a different way. Always check your motherboard’s manual for specific guidance on what the various lights (and their flashing patterns and/or colors) indicate.
Older motherboards usually only have one LED debug light, so you’ll need to troubleshoot several components to figure out the underlying cause — we have a handy in-depth guide for this process.
We also have dedicated articles on LED Error Codes here in case your motherboard comes with an LED Error Code display: MSI, Gigabyte, ASRock, ASUS.
Moving on:
How to Troubleshoot a Red CPU Light: A Step-by-Step Guide
Troubleshooting a red CPU light can be a challenge — if you don’t know where to start. We’ve gathered the most common causes (and fixes) of a red CPU light below, starting with the easiest fixes to some more advanced troubleshooting methods.
Experience has shown that there’s a high chance that one of these measures will help restore your PC to its former glory, though don’t panic if you’re still experiencing issues. Remember that you can always contact our experts on the forum for further advice or reach out to your manufacturer.
Do double-check if your PC is still under warranty. In most cases, your manufacturer will happily fix this problem for you (and replace any faulty components) free of charge. This is especially the case if you’ve just bought the PC.
To prepare your PC for troubleshooting, make sure to switch it off, unplug everything, and remove all non-essential USB devices and peripherals. You should also work on a clean, static-free surface (avoid carpet or plastic).
1. Start With the Basics
Before delving into further troubleshooting, you’ll want to check that your cables are all connected properly and aren’t showing any signs of damage or wear — you’ll be surprised how often a loose cable can cause a red CPU light on the motherboard to pop up!
Check all of the following cables inside your PC, even if they don’t directly have anything to do with the CPU (best to be thorough):
- CPU Power Cables (Guide to CPU Power Cables)
- ATX Power Cable(s)
- CPU and Case Fan Cables (Where to plug your Fans in)
- GPU Power Cables (GPU power cable guide)
- Any SATA cables you might have (SATA cable guide)
- All Front Panel connector cables
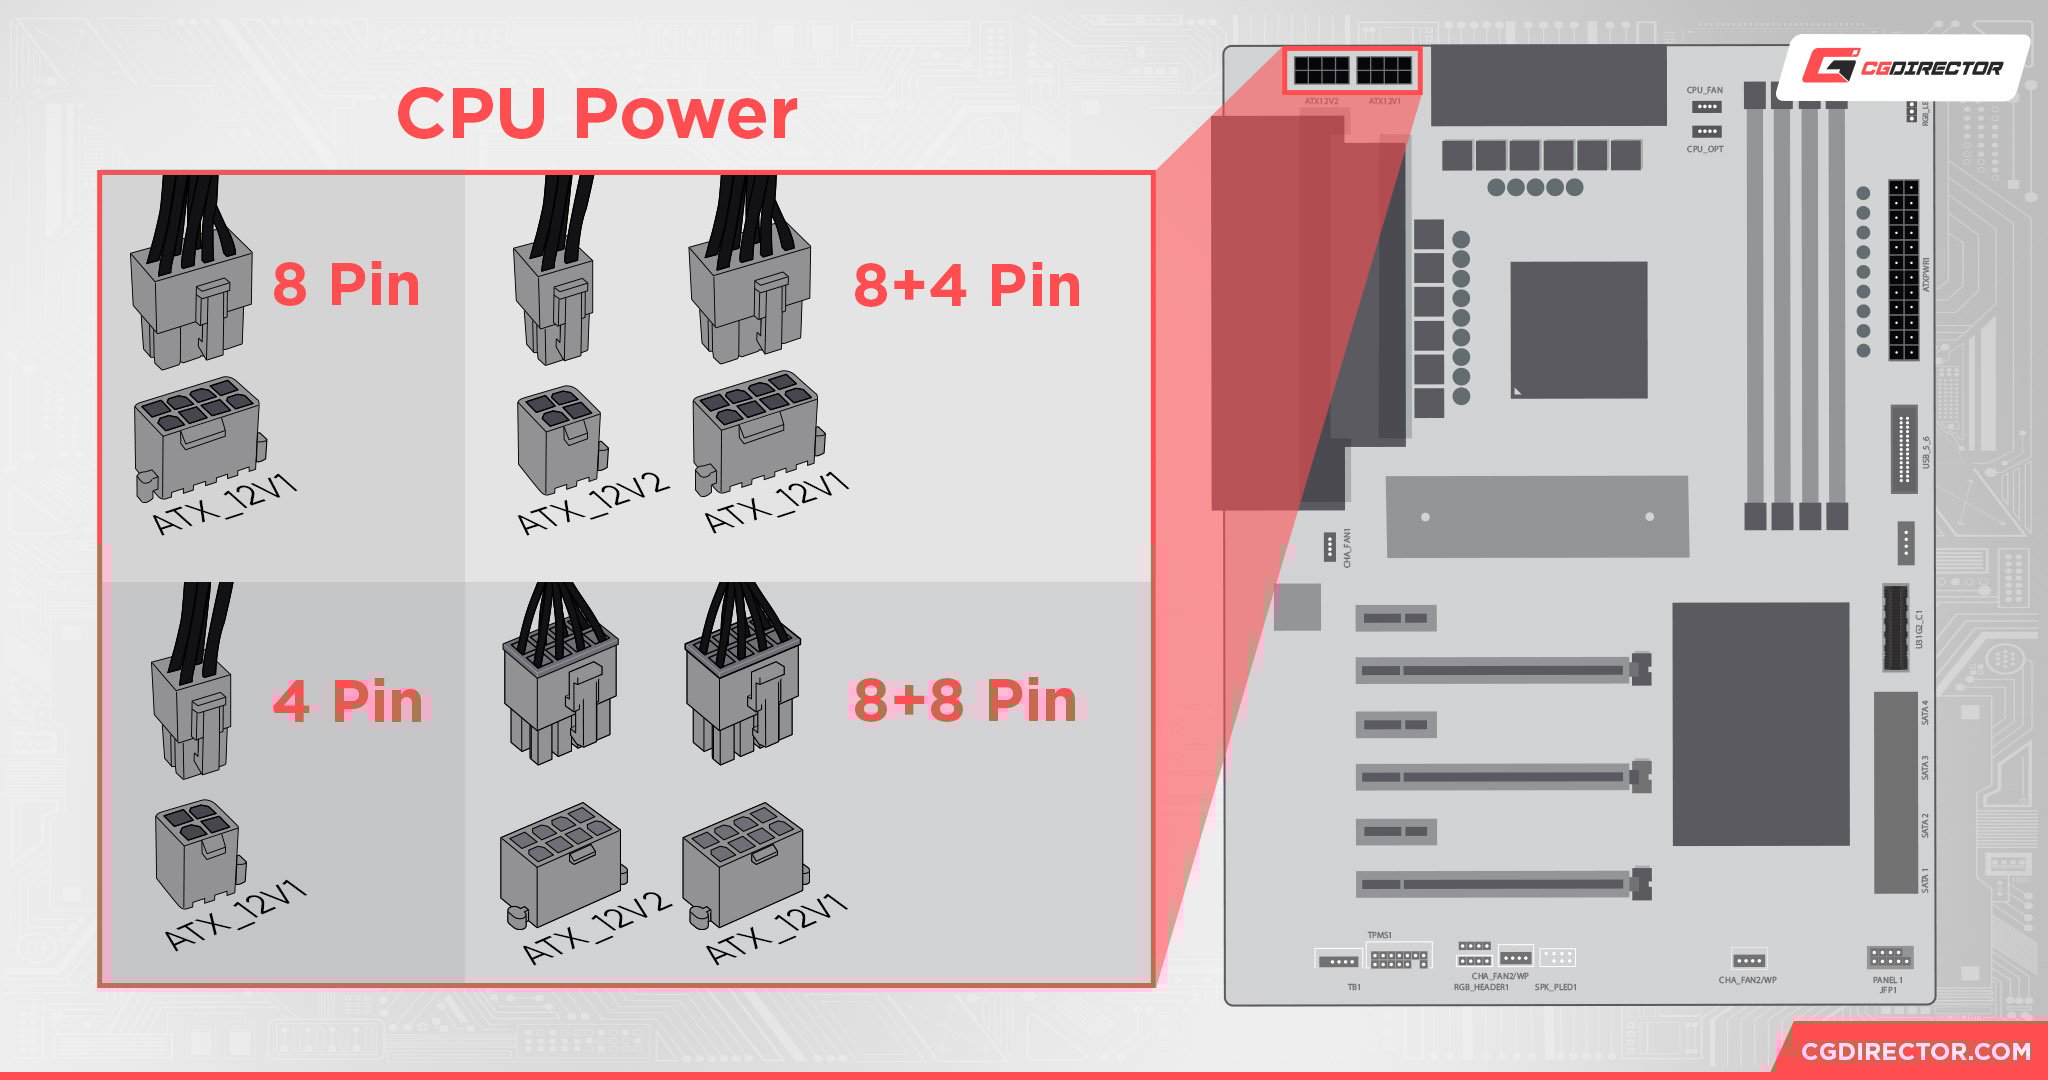
If all your cables are in working order, and you’ve double-checked your CPU power cables (on both sides of the cable, the motherboard, and PSU, if the PSU is modular), then you’ll next want to clear out any dust, debris, and grime clogging up your PC. Use a microfiber cloth and compressed air to clear out dirt from the crevices, paying special attention to the CPU fan blades.
If the red CPU light still persists after all this? You’ll next want to check your CPU’s compatibility.
2. Check CPU Compatibility
It would be awesome if you could just plug any CPU into your motherboard, but this sadly isn’t the case — the CPU socket, motherboard chipset, and BIOS compatibility can all affect whether a CPU will work.
So, if you’ve just set up your PC and are experiencing the red CPU light issue, it’s possible that the CPU you’re using isn’t actually compatible with your motherboard.
Here’s how to check if your CPU is compatible:
- Identify the model of your motherboard. In most cases, the manufacturer prints the model details on the motherboard itself, but if you can’t find this information then your best bet is to check the original packaging box or manual. You can also check the receipt if you still have it on hand.
- Identify your CPU model. You can usually find this information on the CPU’s original packaging, manual, or receipt. If you don’t have any of these documents, don’t panic — most CPUs have their identification details printed on them at the top. However, do note that to access the actual CPU you will need to remove the cooler. We’ll cover how to go about this (and reseat the CPU) a little further down, so stay tuned!
- Go to the manufacturer’s official support website. Enter your motherboard model and then navigate to the CPU support section.
- Search for your CPU model. If you can’t find it listed, then it’s a clear indicator that it isn’t compatible with your motherboard. You’ll need to invest in a new, compatible CPU.
Here’s our in-depth guide to checking your CPU compatibility with your Motherboard.
If your CPU is compatible, then I’ve got some good news and bad news. The good news? You probably won’t have to fork out for a new CPU.
The bad news? You’ve still got some troubleshooting to do! Let’s proceed to the next step: resetting your BIOS.
3. Reset Your BIOS
Have a habit of tinkering around with the BIOS settings? Then it’s possible that something has gone awry and triggered the red CPU light on your motherboard.
Fortunately, resetting your BIOS back to its default settings is a relatively simple process and there are several different methods you can try.
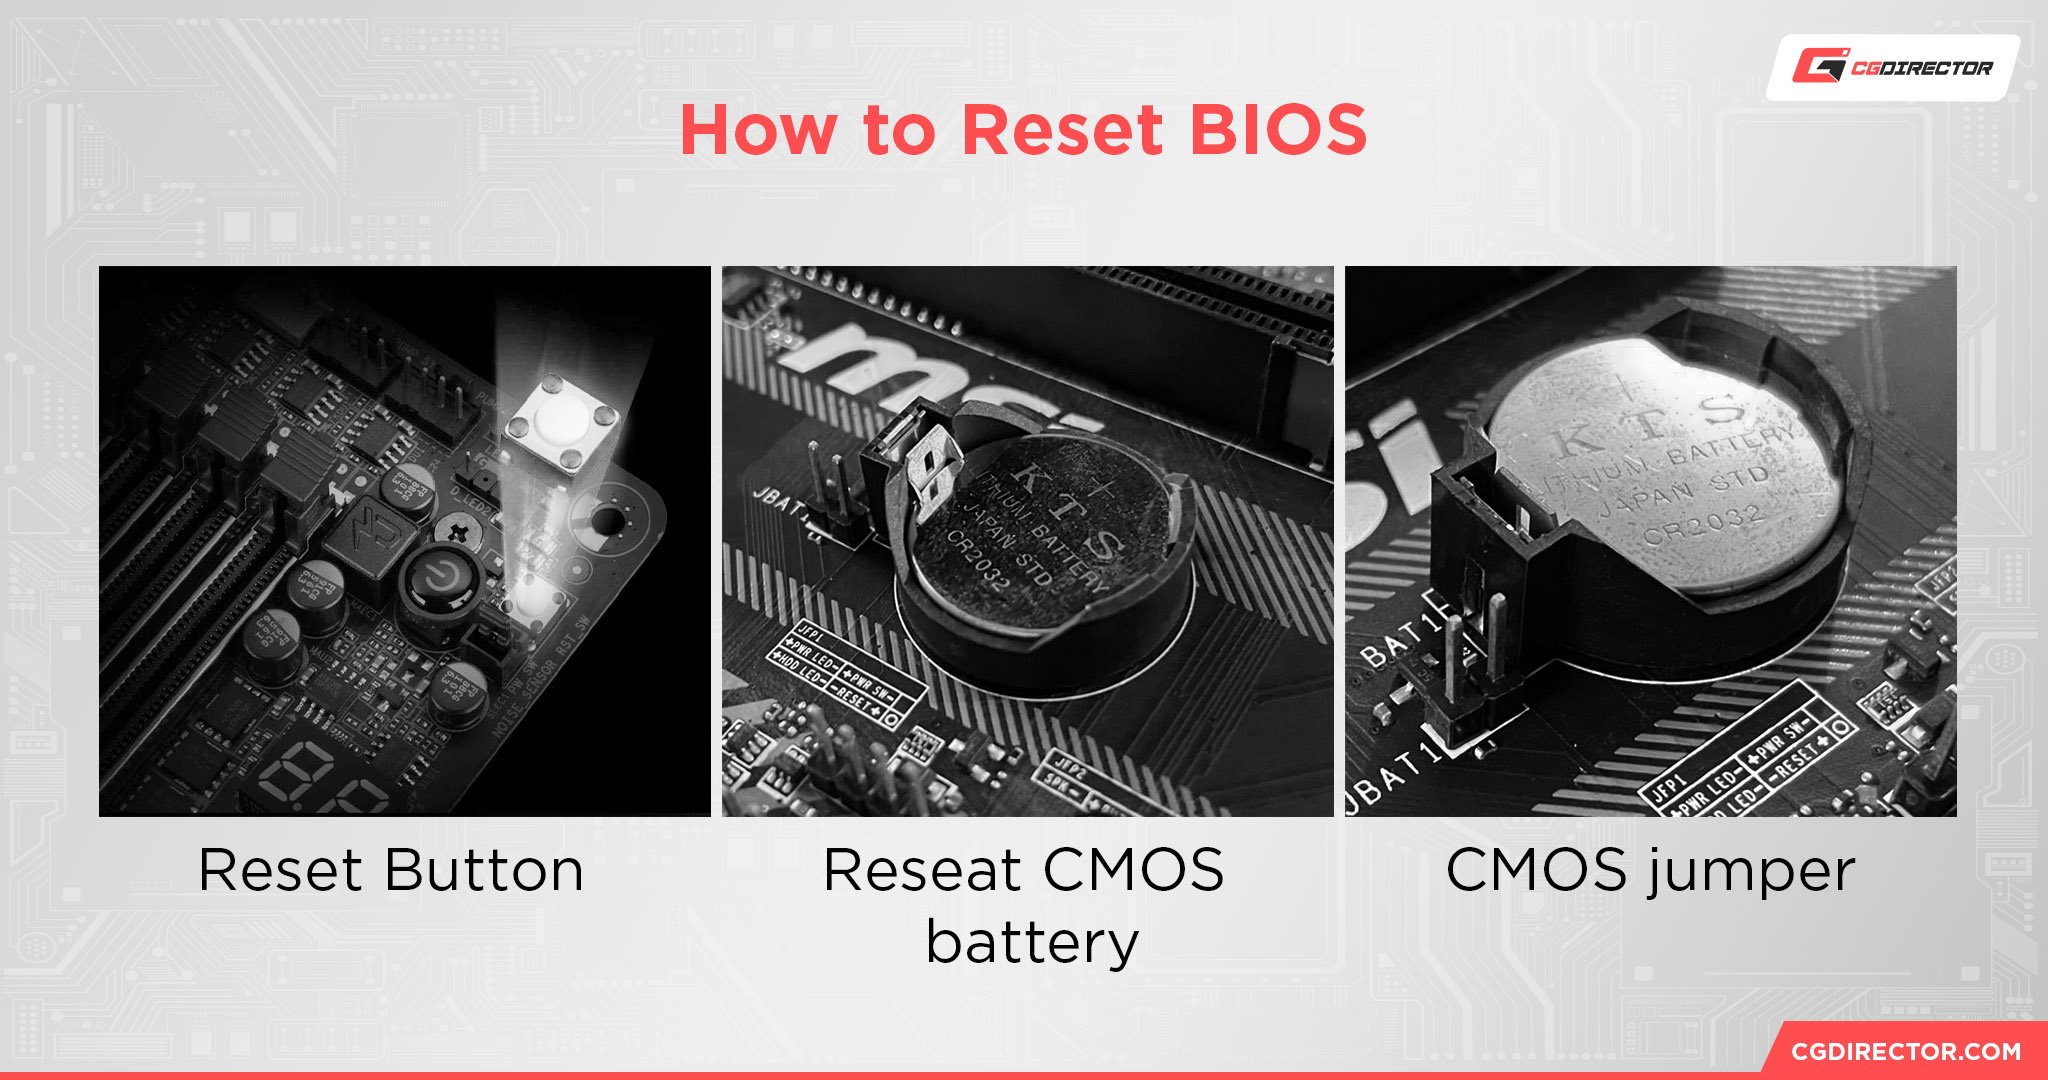
- Reset button: Some high-end devices have a dedicated reset button you can press, which is typically located on the rear I/O or on the motherboard itself. The reset button will usually be labeled “CMOS reset,” “Clear CMOS,” or “CLR CMOS.” Check for this button first, as it’s the fastest method and will save you a lot of hassle. If your motherboard doesn’t have a reset button, try the next two methods.
- Reseat the CMOS battery: Remove the CMOS battery — a silver coin-sized component — for a few minutes. Most batteries are held in place by a safety lock and pop out easily if you apply pressure to the lock, though you may need to check your motherboard’s manual if the mechanism differs. Once removed, wait for a few minutes and then reseat the CMOS battery. The BIOS should now be back to its default settings.
- CMOS jumper: You can also use the CMOS jumper — the two to three pins next to the CMOS battery — to reset the BIOS settings. Usually, you’ll need to move the CMOS jumper from position 1-2 to position 2-3 and wait a few minutes before moving it back to its default position. However, the exact method can vary depending on your motherboard (check your manual for guidance).
Here’s our in-depth guide to resetting your BIOS if you want more info.
Hopefully, this has now solved your issue and your PC is booting up normally again. If the red CPU light still persists though, you’ll next want to try updating the BIOS.
4. Update Your BIOS
Your CPU might be physically compatible with your motherboard, but if your motherboard is still running an incompatible BIOS version? Then your PC isn’t going to recognize the CPU in its socket and throw an error (cue red CPU light).
You’ll want to update the BIOS to the latest version, especially if your CPU is newer than the motherboard itself.
The exact installation process can vary depending on your motherboard’s manufacturer. You’ll typically need to go to the manufacturer’s official website, download the relevant BIOS update file for your motherboard, and transfer the file to a formatted USB flash drive.
We highly recommend you check out our in-depth article on how to update your BIOS without a CPU for step-by-step guidance.
Once any incompatibility issues are solved, the CPU red light on your motherboard should switch off.
However, if you’re still experiencing issues, you’ll want to reseat the CPU and examine its pins. This requires you to be a little more hands-on than other methods, so always ask an expert for help if you’re not comfortable with the hardware.
5. Reseat the CPU (and Examine the Pins)
Assuming all your cables are properly connected — it’s worth double-checking all this again, especially the CPU power cable! — then it’s possible that your CPU isn’t seated correctly or it or the socket has a bent pin.
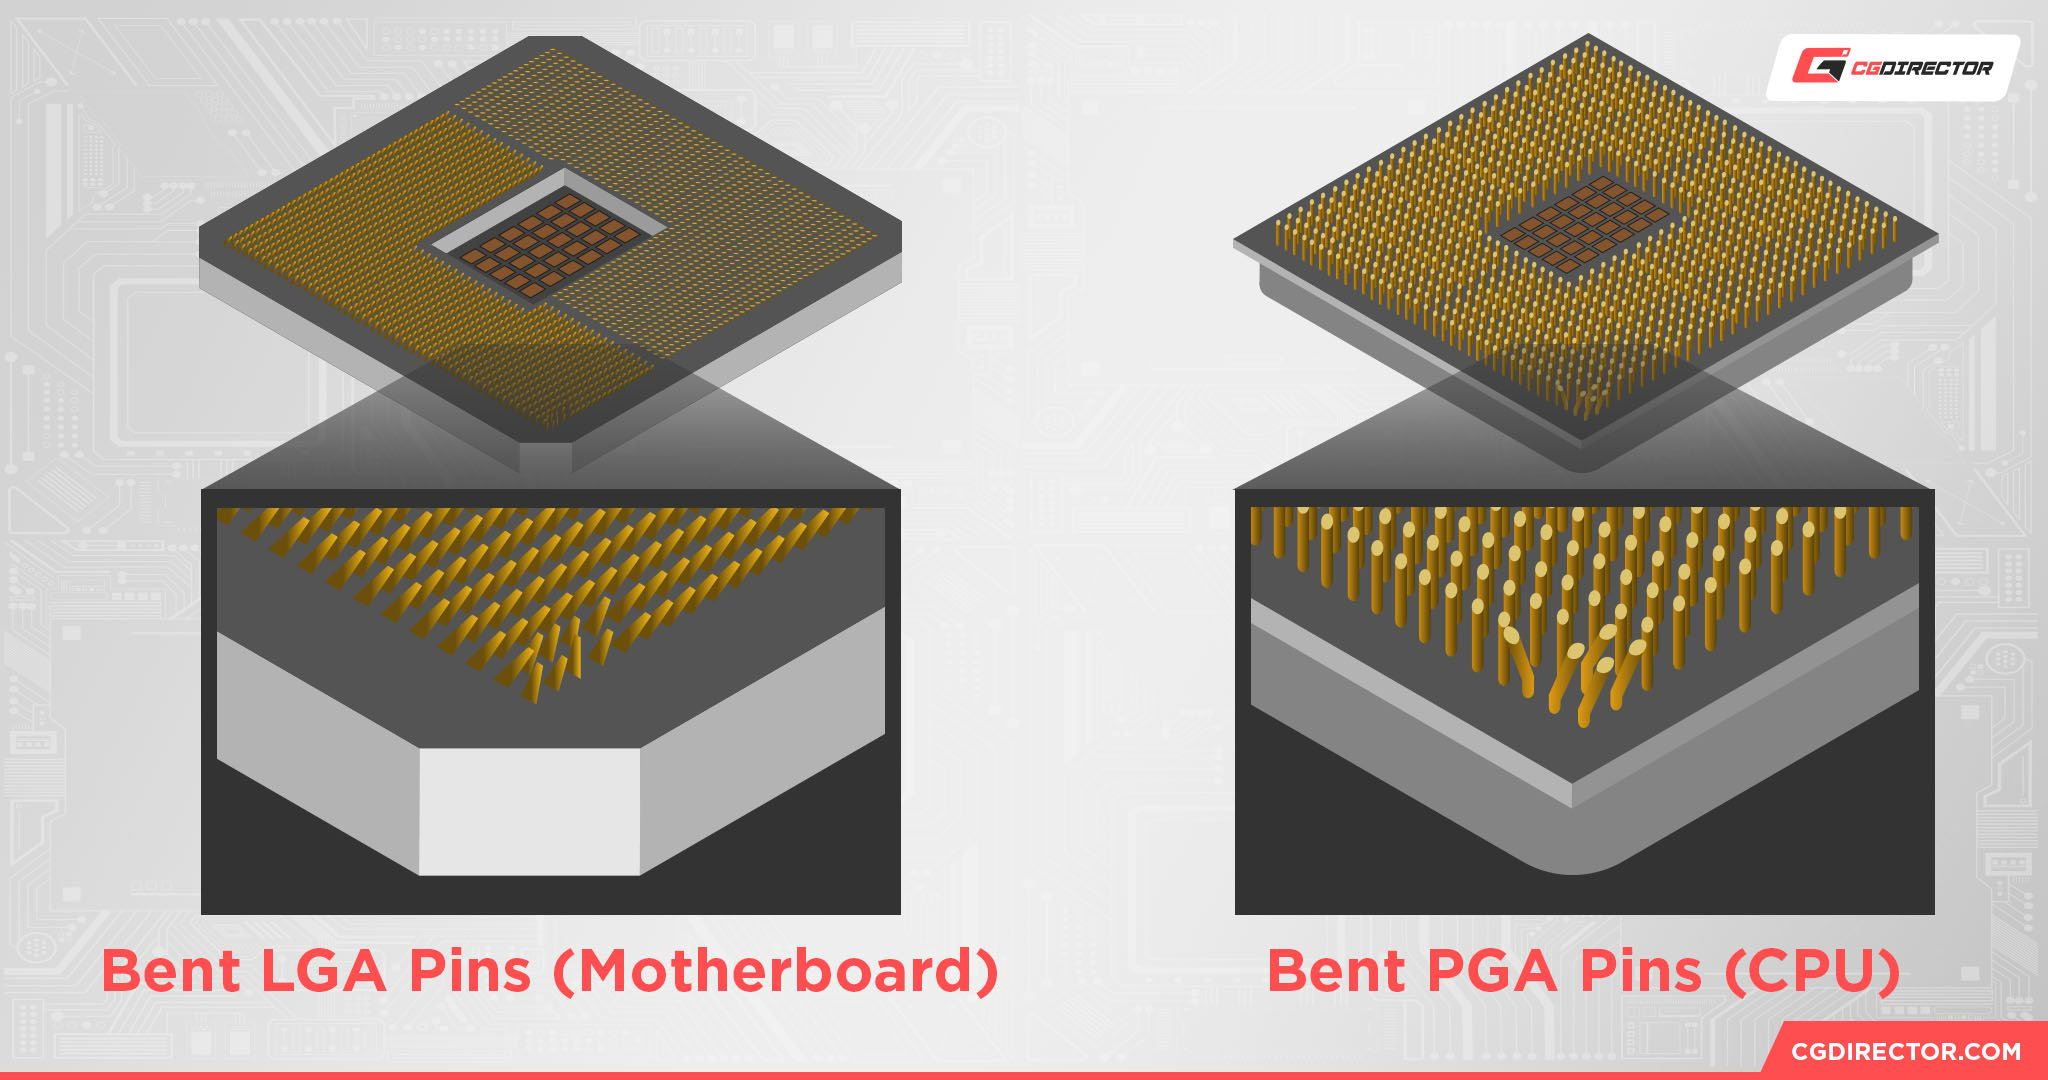
You’ll need to reseat the CPU and check for signs of damage:
- Turn off your PC, disconnect all cables, and then open up your chassis.
- Carefully unmount the CPU cooler — usually, you just need to unscrew its bolts or clips, though always check the manual for specific removal instructions.
- Slowly twist the CPU cooler to break the thermal paste’s adhesive bond, then gently pull up the cooler to remove it.
- Once removed, use a 99% isopropyl alcohol cleaning solution to clear away any old thermal paste.
- Lift the retention arm or “latch” of the CPU socket to release the CPU.
- Gently pick up the CPU from its sides, making sure not to touch any pins in the process.
- Inspect the CPU carefully for signs of bent pins.
If your CPU does have a bent pin, don’t give up hope just yet! In a lot of cases, it’s possible to fix bent pins with a gentle hand and some good ol’ tweezers. We have a detailed guide on how to salvage bent pins right here.
If all the pins are in working order, carefully insert the CPU back into the socket. You’ll need to make sure that the CPU is in the correct position; usually, this involves lining up the orientation indicator on the CPU, such as an arrow printed on one of the corners, with the indicator on the socket.
Once the CPU is back in the socket, lower the cover and move the lever back to its original position.
You’ll next need to apply the new thermal paste and remount the CPU cooler:
- Reapply a pea-sized drop of thermal paste onto the center of the CPU’s integrated heat spreader (IHS). Some CPU models, such as the AMD Threadripper, may require you to apply slightly more thermal paste.
- Line up your CPU cooler’s screws/connectors with the holes on the motherboard. If the cooler’s fan is in the way of the screws, you’ll need to carefully remove it.
- Using light pressure, place the CPU cooler back onto the IHS. Hold it in place so that the thermal paste distributes evenly.
- Gradually secure the CPU cooler’s connectors in a diagonal “X” pattern to ensure you’re applying equal pressure.
- Mount the fans back on if you removed them. The exact installation process can vary significantly here, so always refer to your manufacturer’s manual for specific guidance.
- Once the CPU cooler is firmly attached, plug all the cables back in and check to see if the red CPU light issue is now solved.
This troubleshooting method usually solves a red CPU light, though there’s one other method you can try as a last resort if the light still hasn’t gone away.
6. Change CMOS Battery
If none of the methods above have worked, then it may be that your CMOS battery has died and needs to be replaced. Luckily, most CMOS batteries are inexpensive and can be bought online or from your local hardware store.
As we mentioned earlier, removing a CMOS battery usually involves pushing on the safety lock to release it, while reseating it involves pushing it back into the slot (make sure it’s the exact same orientation as the original position).
The process of changing a CMOS battery may differ depending on your motherboard. For example, in a lot of ITX motherboard models the CMOS battery is connected to the motherboard via a plug, so you’ll need to detach this plug to remove the CMOS battery.
Further Troubleshooting Steps
Unfortunately, if you’re still experiencing a red CPU light after changing the CMOS battery, then it’s likely you have some hardware damage.
The best way to figure out if, indeed, it’s your CPU that is damaged and not some other parts like the motherboard or PSU Cables, is by replacing all parts one by one with one that you’re positive is working (e.g. from a friend).
If all fails, you’ll need to send your Motherboard, CPU, or entire PC in for repairs or contact your manufacturer for further troubleshooting advice.
FAQ
Can overclocking cause a red CPU light?
Yes, poorly-configured overclocking can trigger a red CPU light. You’ll need to reset the BIOS to revert the settings back to default.
You’ll then need to reapply any overclocking, but this time run several stress tests — and ask for help from our experts on the forum — to ensure it’s stable.
Can a faulty power supply trigger a red CPU light?
While uncommon, a faulty (or wrongly connected) PSU can trigger a red CPU light.
You’ll want to check that the PSU connector is properly plugged into the motherboard and that the switch at the back of the PSU is set to “On.” You can also test your PSU by connecting it to another, working motherboard.
What to do if I get thermal paste on CPU pins?
Most thermal pastes on the market are non-conductive, so unless you specifically went out of your way to find a liquid-metal paste, your CPU should still be salvageable.
You’ll need to clean the CPU pins very carefully with lint-free cotton swabs and an isopropyl alcohol solution. Use a gentle hand and take your time — do not apply pressure to any of the pins, since bending or breaking them can leave you with a dead CPU.
Over to You
While a red CPU light is certainly ominous, it isn’t a death sentence — usually the fix is something as simple as reconnecting a cable or resetting your BIOS settings.
We hope one of our troubleshooting methods above has helped solve the red CPU light, but if you’re still experiencing this issue feel free to leave a comment down below and we’ll get back to you as soon as we can. You can also contact one of our experts on the forum.
![Where Do You Connect PC Fan PWM Cables To? [Beginner’s Guide]](https://www.cgdirector.com/wp-content/uploads/media/2023/12/Where-Do-PWM-Cables-Go-Beginners-Guide-Twitter-1-594x335.jpg "Where Do You Connect PC Fan PWM Cables To? [Beginner’s Guide]")
![How To Connect Front Panel Cables To Your Motherboard [Guide]](https://www.cgdirector.com/wp-content/uploads/media/2024/01/How-To-Connect-Front-Panel-Cables-To-Your-Motherboard-Twitter-copy-1-594x335.jpg "How To Connect Front Panel Cables To Your Motherboard [Guide]")


2 Comments
20 October, 2024
Dear Alex, cables first. Thank you, your guide solved my issue.
6 December, 2023
I get the red light every once in a while, and I restart the computer and it turns on normally. What would be the problem that causes this?