 by
by ![Guide to Undervolting your GPU [Step by Step]](https://www.cgdirector.com/wp-content/uploads/media/2024/04/Guide-to-Undervolting-your-GPU-Twitter-1200x675.jpg "Guide to Undervolting your GPU [Step by Step]")
TABLE OF CONTENTS
Undervolting and overclocking have always been considered a playground for the enthusiast community. And rightly so, with voltages, core clocks, etc., it’s a complicated little world for the average user.
But the process has become much more straightforward in the past few years – with manufacturers outright disabling settings that can cause damage to your GPU.
Do You Really Need to Undervolt Your Stock GPU?
Well, need is too strong a word. I’d say it’s a good idea in the current market.
NVIDIA’s launch of the RTX 4090 seems to cement the era of power-hungry GPUs. However, even parts like the RTX 4090 CAN run efficiently (when not pushed past a certain point).
Undervolting allows you to, in the worst-case scenario, lose a few percentage points of performance in exchange for a relatively large drop in power consumption.
Is it worth it? Well, it certainly can be.
Here’s a power scaling chart from Tom’s Hardware that shows the performance of the RTX 4090 at various power limits.
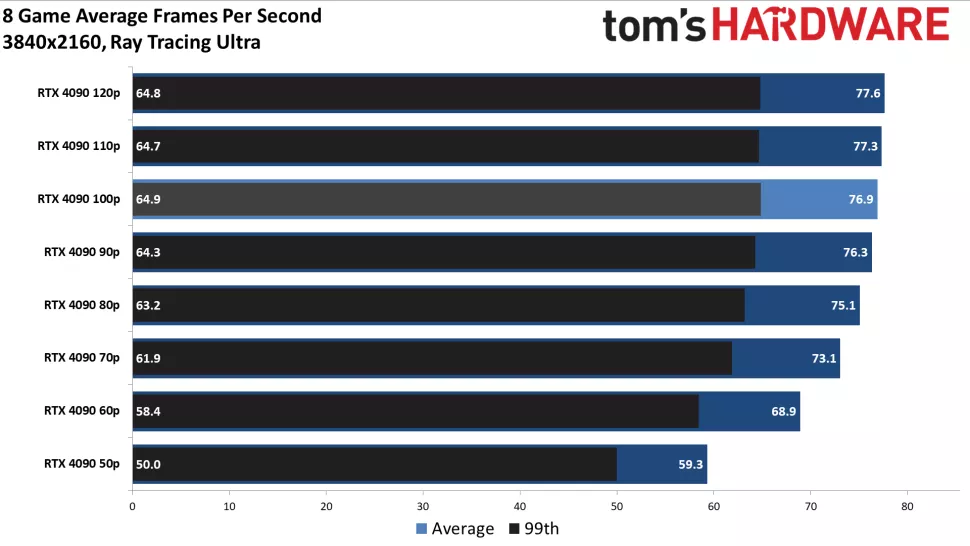
As you can see, even with a 70-80% power limit, an RTX 4090 still retains most of its performance. Kinda begs the question…why was this card even pushed so far over its efficiency sweet spot? But that’s a rant for another day. For now, let’s get back to making do with what we have.
Although the process of undervolting is relatively safe, do keep in mind that any tweaks to stock configs can introduce instability (in the form of crashes, freezes, etc.).
What’s more, every GPU (every single chip) is different in terms of what it can handle from a performance and voltage standpoint. So, what works for our GPUs might not work for you, or vice versa.
It’s with very good reason that we often recommend not to fiddle with overclocking when it comes to workstation tasks. So, go down this road only if you’re ready to sit down and devote some time to finding the sweet spot for your GPU.
In this guide, we’ll try to reduce the power consumption and operating temperatures of an ASUS ROG Strix RTX 3070 Ti without giving up too much performance. But you can apply the information here to any GPU, by just changing the clock speed targets.
Undervolting: What Exactly is it Anyway?
While undervolting refers to limiting the voltage that your GPU can demand, to bring down temperatures and lower power consumption.
If you’re only losing 5% performance with a 20% drop in power consumption, is it worth it?
Well, that’s up to you to decide.
Although a simple undervolt gives you excellent stability without too much tinkering, it also leaves some performance on the table.
On the other hand, a combination of undervolting and overclocking (yes, it sounds counter-intuitive) offers the best way to enjoy stock or better-than-stock performance without excessive power consumption.
However, this method does compromise on stability unless you put some serious time into the process.
What You Need
- A supported GPU
- MSI Afterburner (for both Nvidia and AMD) or Radeon software (for AMD only)
- Monitoring Software (HWinfo)
- Stability Testing App (OCCT):
Although you can undervolt Nvidia (up to Pascal), AMD Radeon GPUs (any), and Intel Arc GPUs with MSI Afterburner, AMD and Intel give you access to these settings in their respective driver software.
Note – Check out which graphics cards from team green and team red are worth buying in our handy buyer’s guide with benchmarks.
First, download MSI Afterburner (only use the MSI website or Guru3d, as there are many spam/malware-infested versions out there).
It will give you control over your graphics card, regardless of brand, allowing you to monitor and tweak settings like fan speed, memory and core clocks, and of course, voltages.
If you want to learn more about MSI Afterburner, check out our article on it.
You’ll also need a monitoring tool like HWinfo, to get real-time readings for power, voltage, temps, etc.
Explaining Some Jargon
Although the process of undervolting itself is pretty straightforward, understanding what’s happening is a bit more complex.
I’ll be using a few terms throughout the guide, so here’s a list with their explanation:
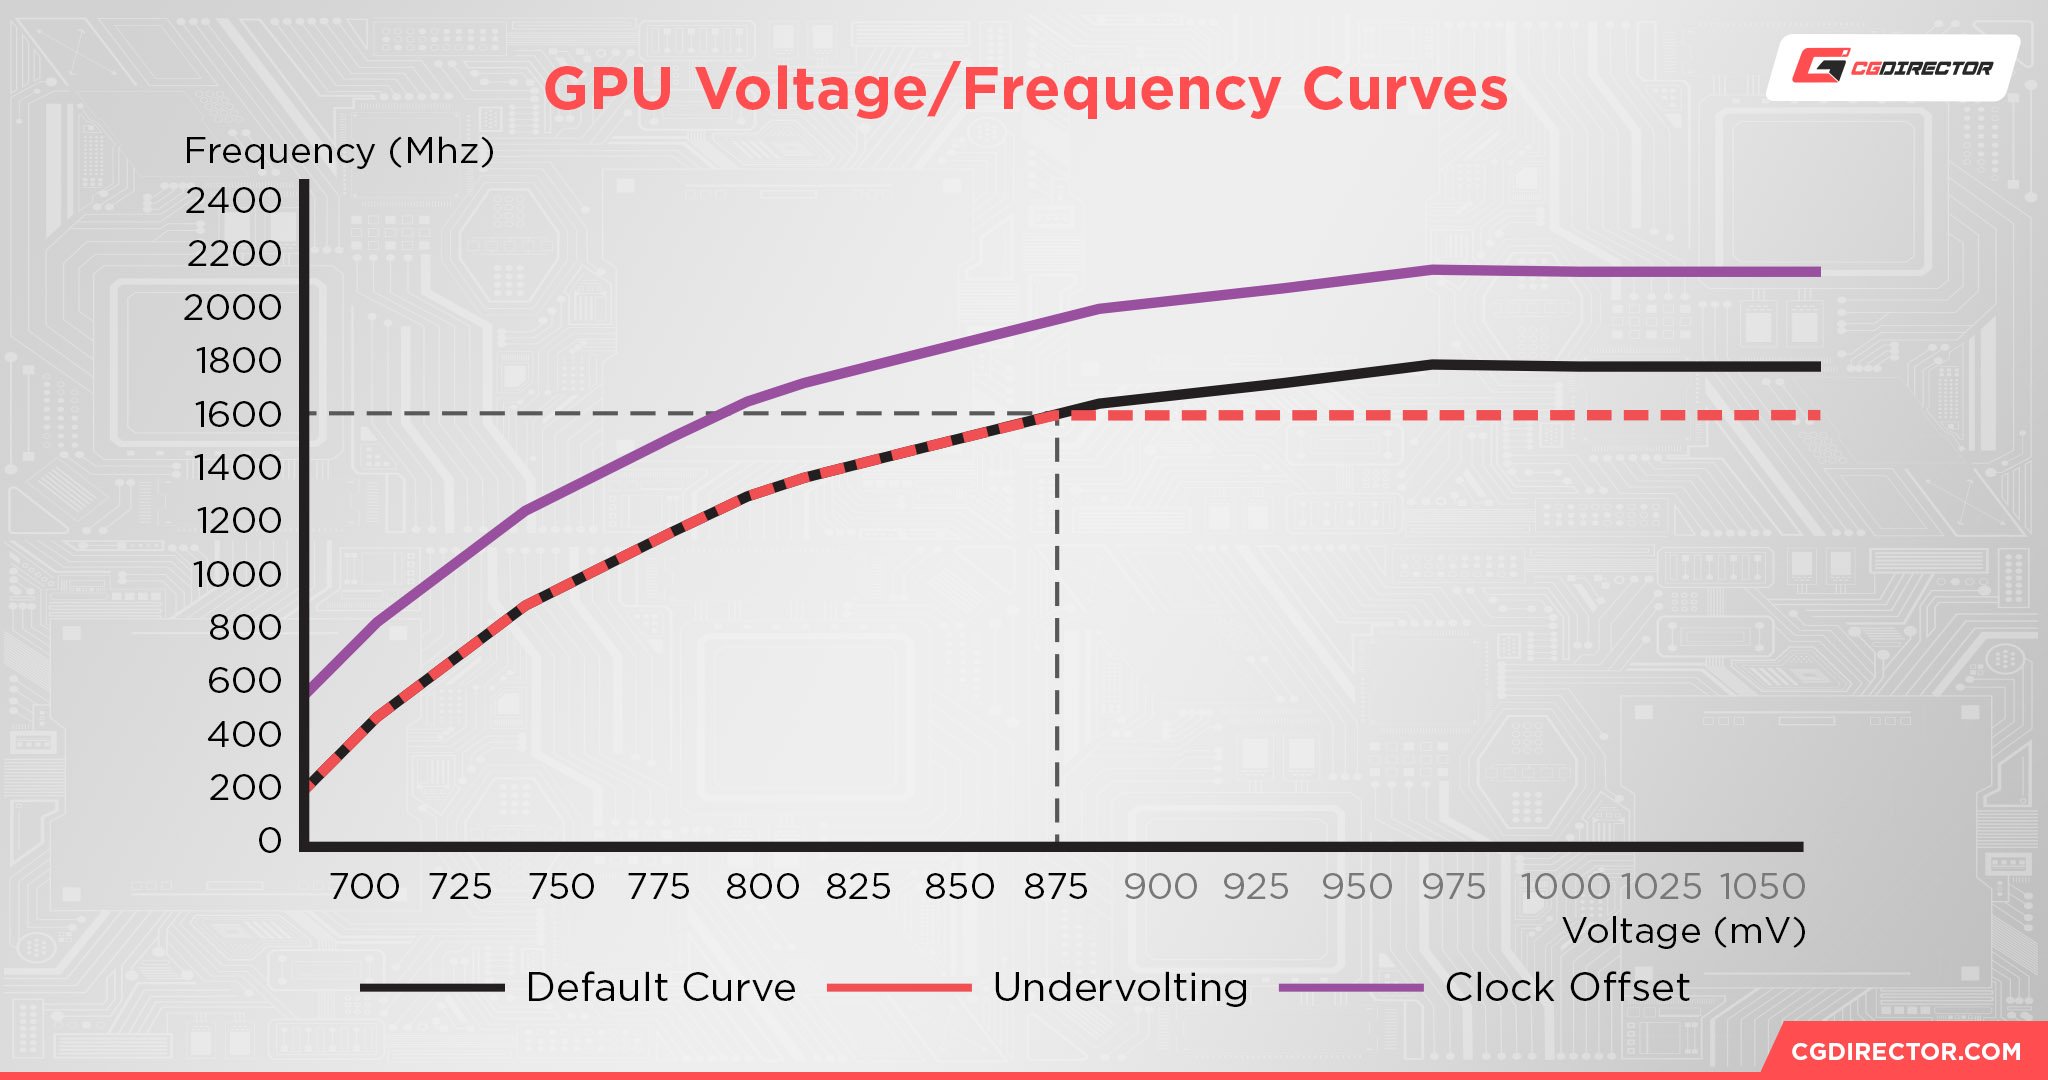
- Voltage-Frequency Curve / Voltage Curve: Refers to a graph plotted between voltage and frequency. It tells the GPU what voltage (in mV or millivolts) it needs to hit a certain clock speed (frequency in Hz). Playing around with this curve in various ways is basically undervolting, overclocking, etc.
- Default Voltage-Frequency Curve / Default Curve: Refers to the default curve set by your GPU manufacturer to maximize stability. Here, the manufacturer sets voltage values for every frequency your GPU wants to hit, adhering to a safe enough limit to ensure stability.
- Undervolt: Limiting the amount of voltage that can be sent to your GPU. This, in turn, limits the frequency your GPU can reach.
- Overclock: Pushing clock speeds higher than what the manufacturer originally set.
- Clock Offset: Adding a set bump/drop to clock speeds without caring about its current value. So, if your GPU is operating at 2000MHz and you set a +200MHz clock offset, your current clock speed becomes 2200MHz (2000 + 200).
Navigating MSI Afterburner: Understanding the UI
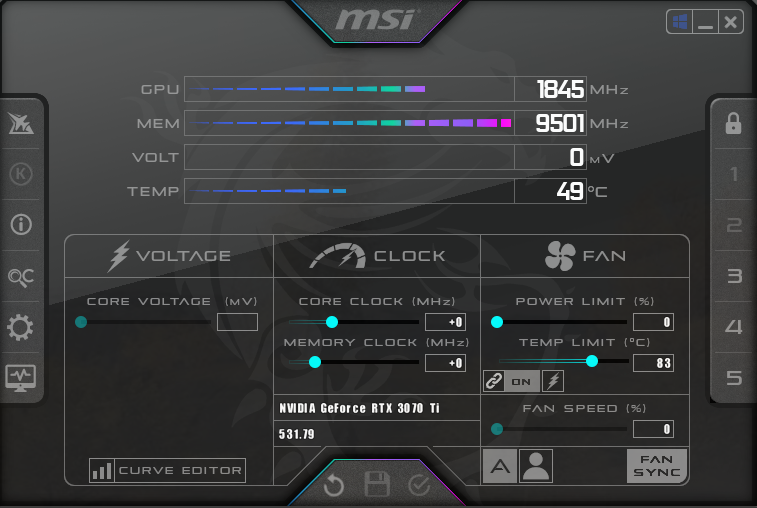
When you open MSI Afterburner, you’ll be greeted with a sort of intimidating interface that either looks like this:
Or like this:
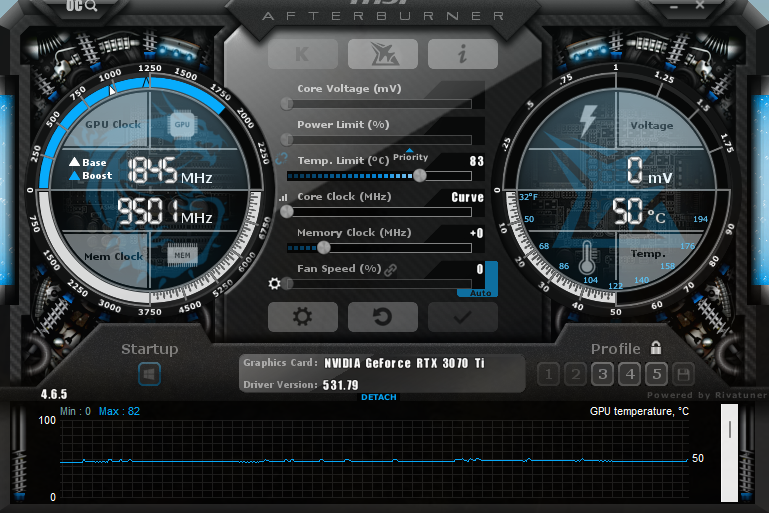
The interface you see depends on the version of Afterburner you’re using. If you got it from the MSI website, you’ll see the first interface, and if you’ve downloaded it from Guru3d, you’ll likely see the second one.
I like the MSI skin much better than other options, but some folks prefer the second interface. So, stick with whatever you’re most comfortable with.
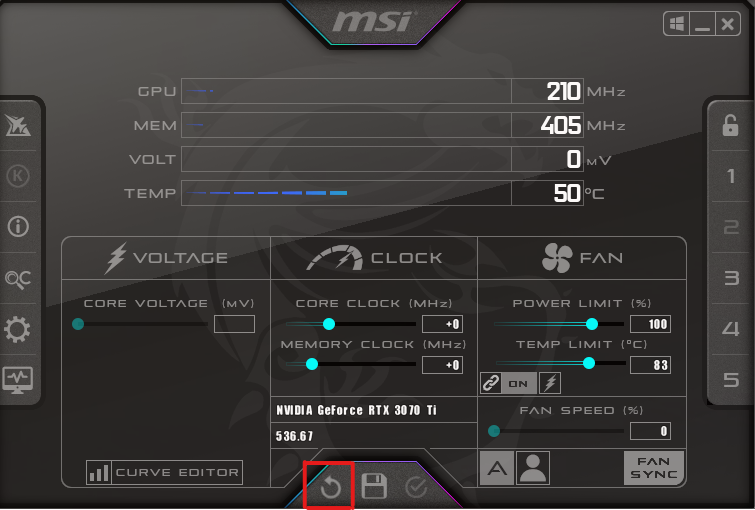
For this guide, I’ll use the MSI skin.
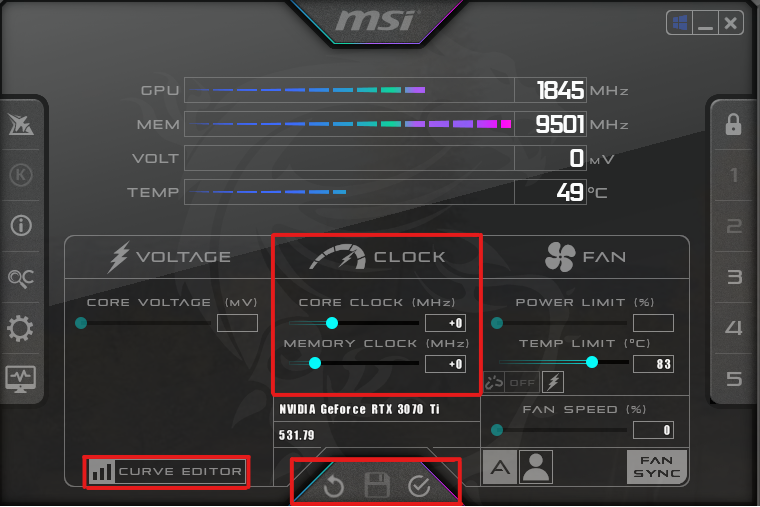
It’s important not to get overwhelmed by the interface. Focus on the highlighted parts. These 3 areas are all you need for now.
The bottom-center features 3 buttons: reset to stock settings, save settings, and apply settings. Next, you’ll also need the curve editor (left) for your undervolt.
Getting Started: Set a Baseline
Before we start tweaking dials and settings in Afterburner, it’s important to know your baseline level of performance. How?
We’ll use a combination of V-Ray (CUDA and RTX) and Unigine Superposition to find a good spot for performance. For the purposes of this guide, I’ll be using an ASUS ROG Strix RTX 3070 Ti Graphics Card.
While the V-Ray benchmark helps us get an idea of how rendering workloads will be affected, Superposition focuses on gaming performance.
Note – the baseline performance numbers shouldn’t be compared with other RTX 3070 Ti GPUs as the test system wasn’t clean and there were several video-related workloads running at the time. However, these workloads remained consistent throughout all tests, so shouldn’t affect our result.
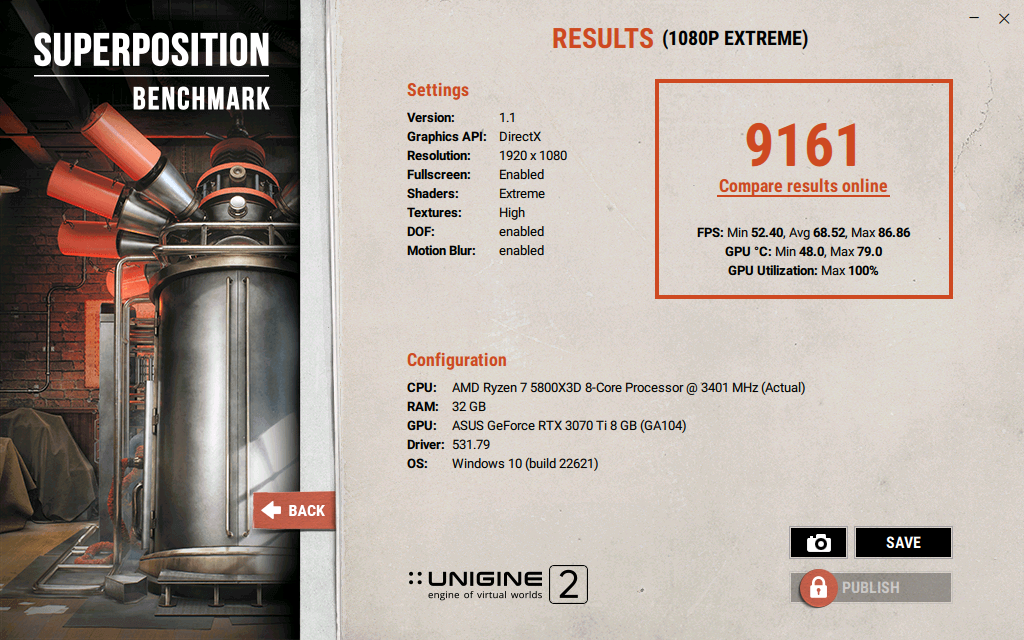
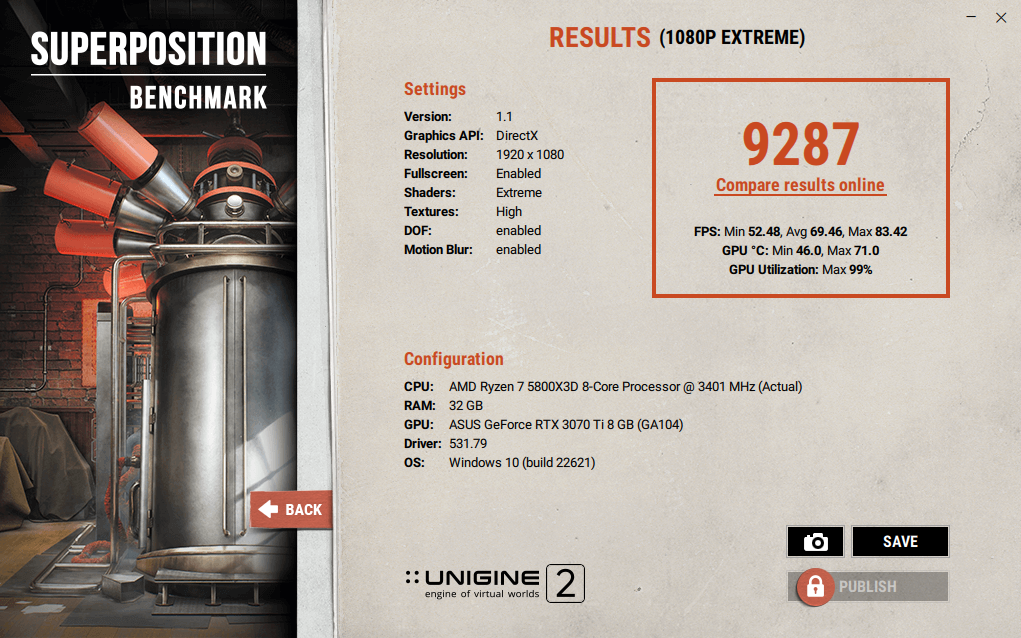
Unigine Superposition 1080p Extreme: Stock Settings
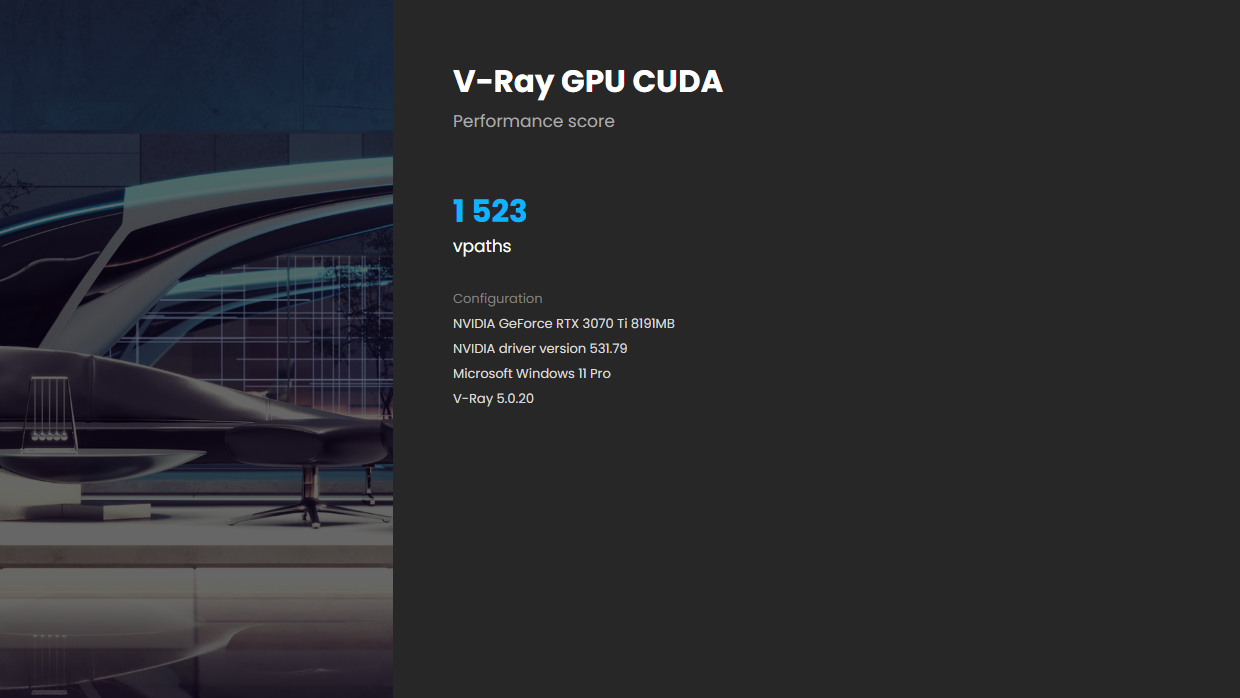
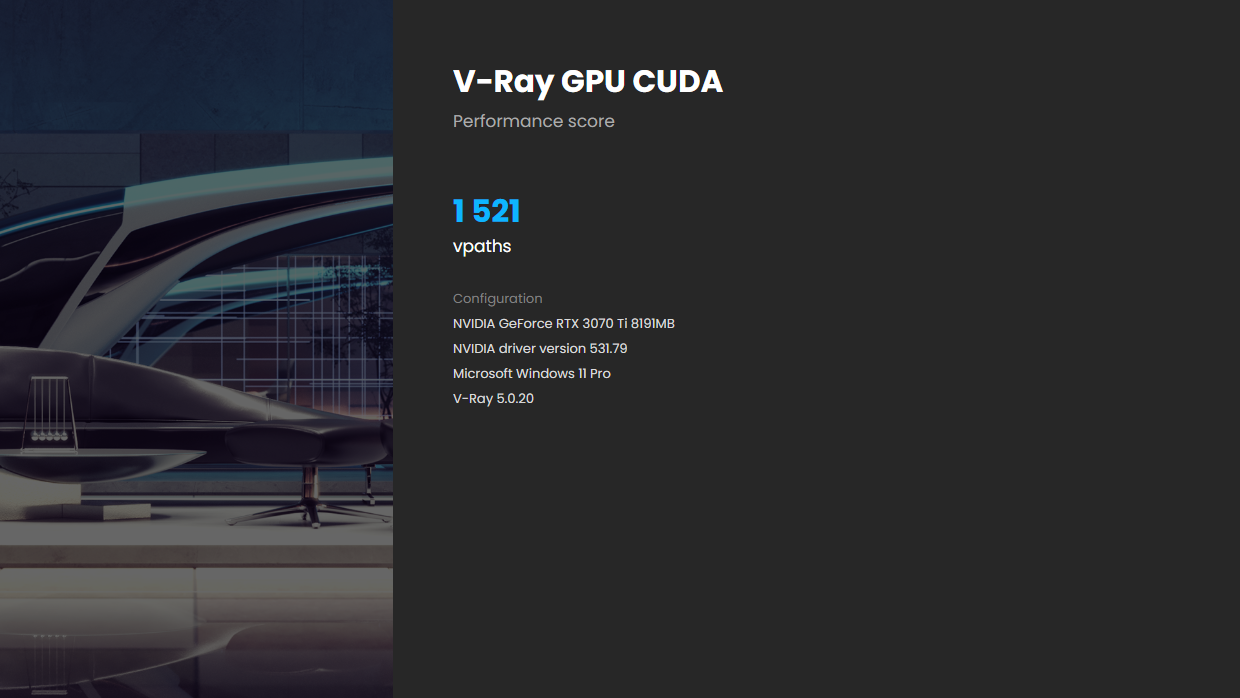
Chaos V-Ray GPU CUDA: Stock Settings
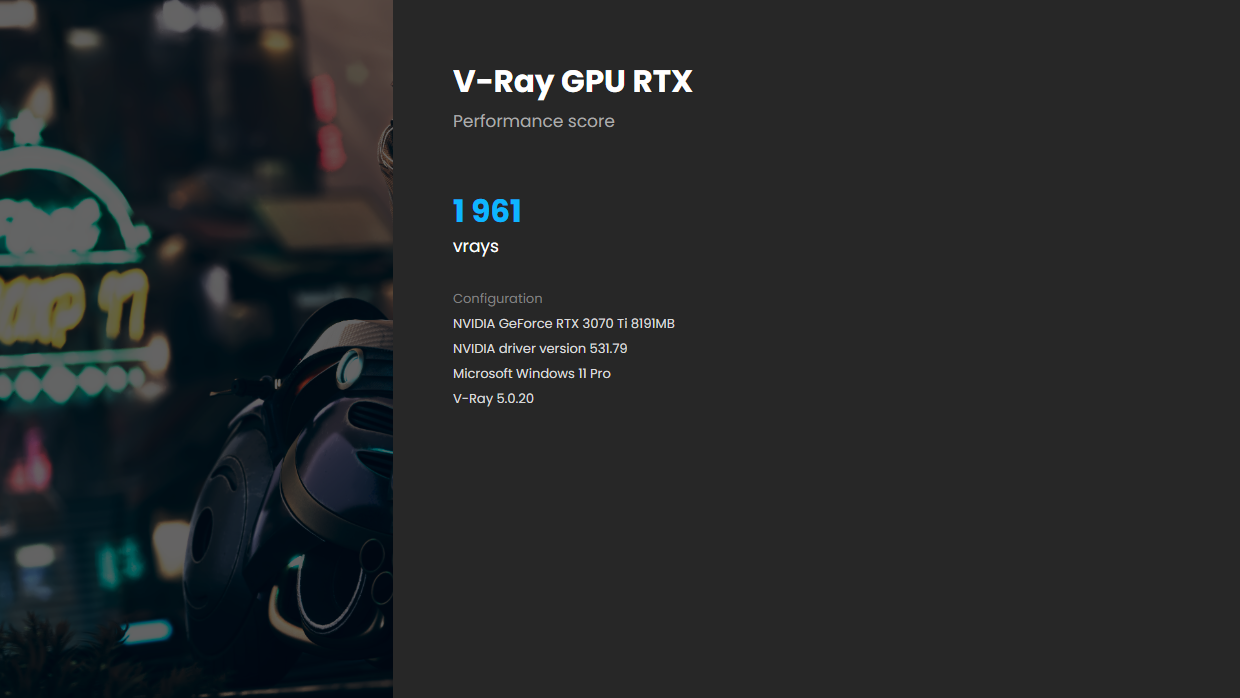
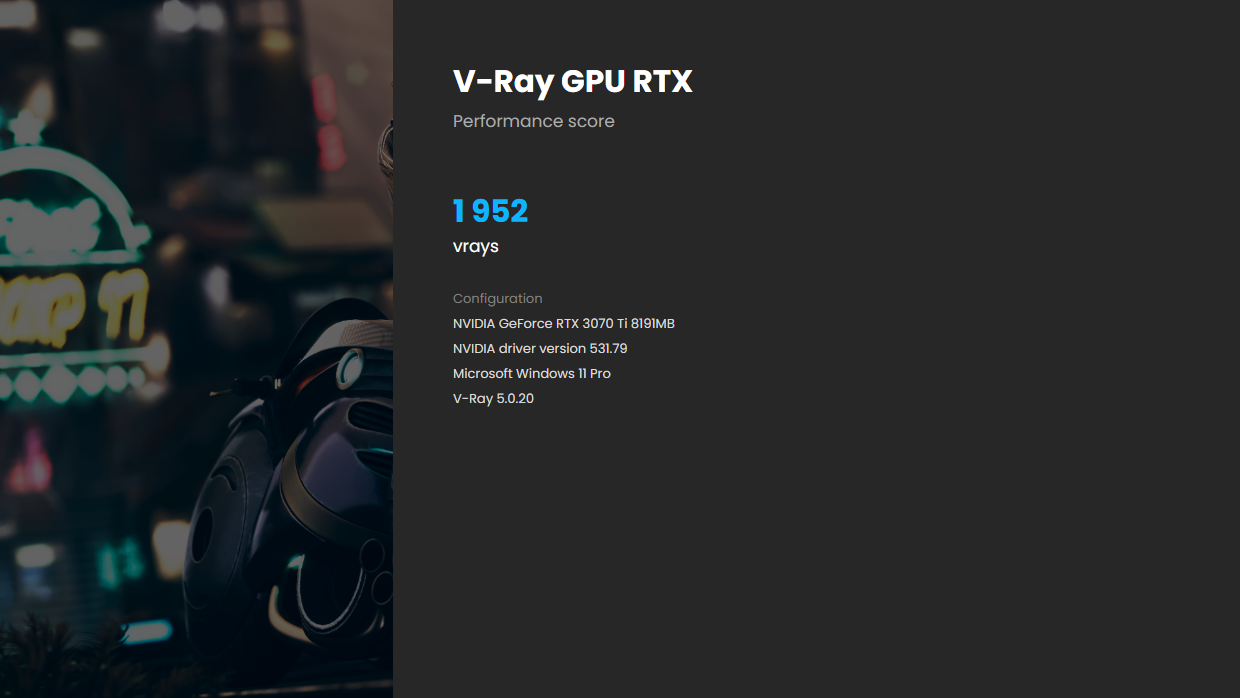
Chaos V-Ray GPU RTX: Stock Settings
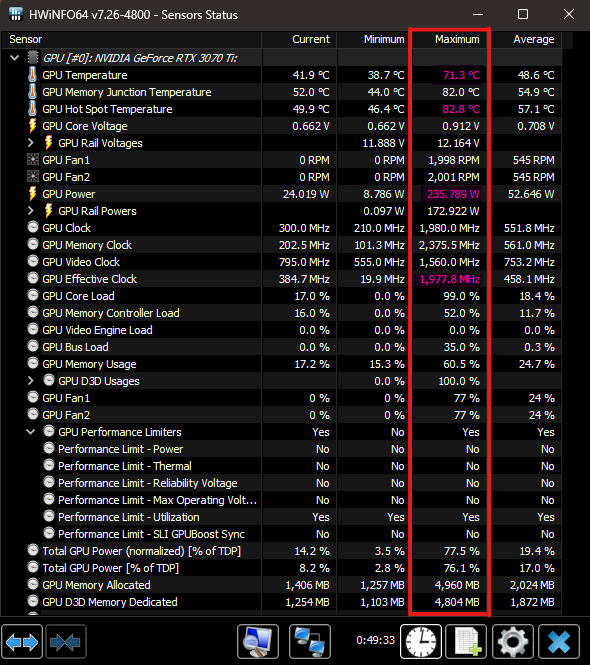
Monitoring: Stock Settings
So, during our stock benchmark runs, HWinfo shows us quite a bit of useful information.

A couple of things to note here:
- The hotspot temperature goes well over 90°C after several benchmark runs.
- Clock speeds start at around 1977 MHz and settle at around 1950-1930 MHz after a few runs.
- Power draw maxes out at 300W during these benchmark runs.
- Superposition 1080p Extreme: 9161
- V-Ray GPU CUDA: 1523 vpaths
- V-Ray GPU RTX: 1961 vrays
Getting Started: Undervolting on the Default Voltage Curve Using Afterburner
So, our first objective would be to lower temperatures and power draw without giving up too much performance. However, we also don’t want to compromise on stability at all.
Let’s get started, then, shall we?
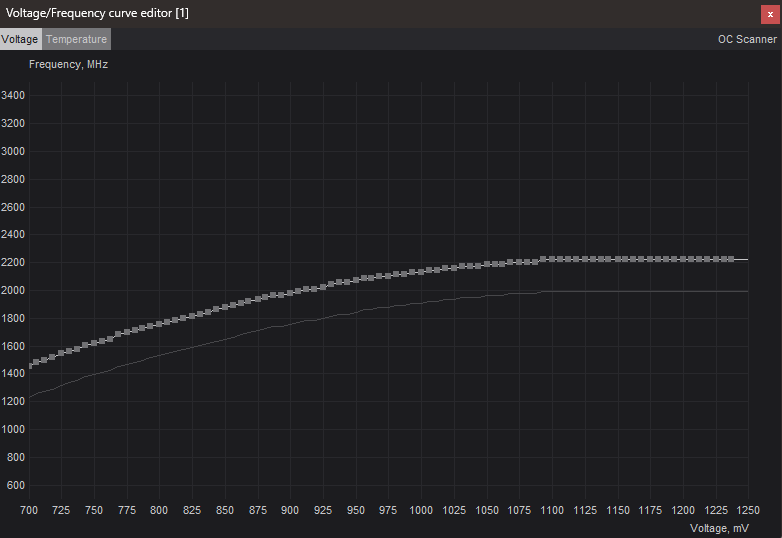
Now, bring up the curve editor in Afterburner by either pressing Ctrl + F or clicking the Curve Editor button.
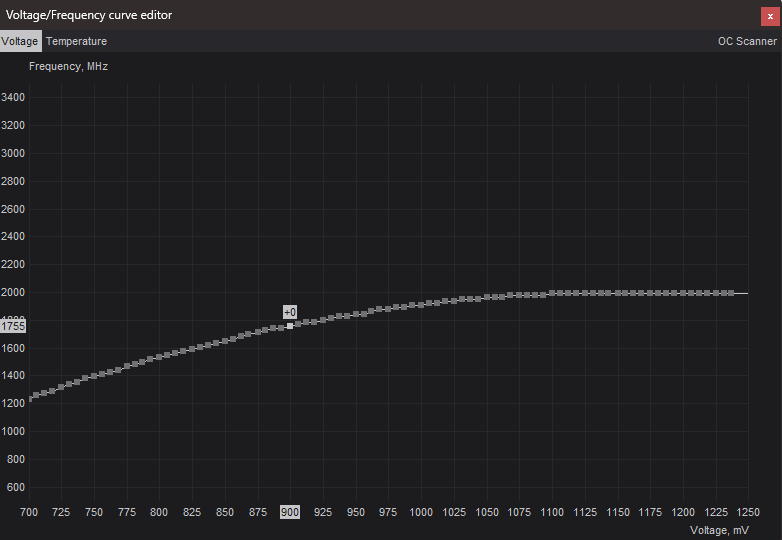
You should see this window:

This is your Voltage/Frequency curve editor. For now, ignore the temperature tab.
For a simple undervolt, pick a low-mid-ish voltage. Say, 900mV and mark that point on the curve with a left click. It’ll now look like this:
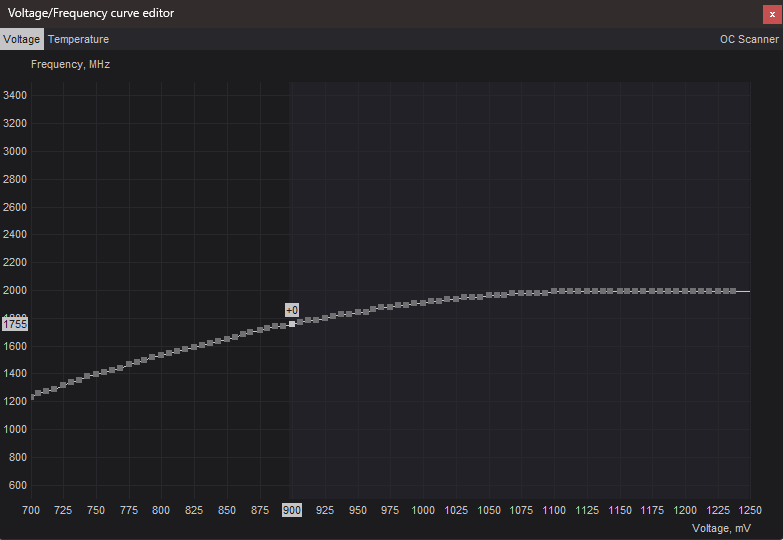
Next, hold down the SHIFT key and hold down left click anywhere on the most extreme right side of the graph (NOT ON THE CURVE) and drag to the left, selecting the entire area up to 900mV. Make sure that the 900mV point is also included in your selection.
Your curve editor should now look like this:
Almost there! Now, hold down left click on the curve on that point you previously selected, and drag it down. If your selection was done correctly, you’ll see the entire right side of the curve move down.
Drag it down past the lowest part of your old curve. In my case, this is 1200 MHz.
Note – Anywhere past that lowest point is fine.
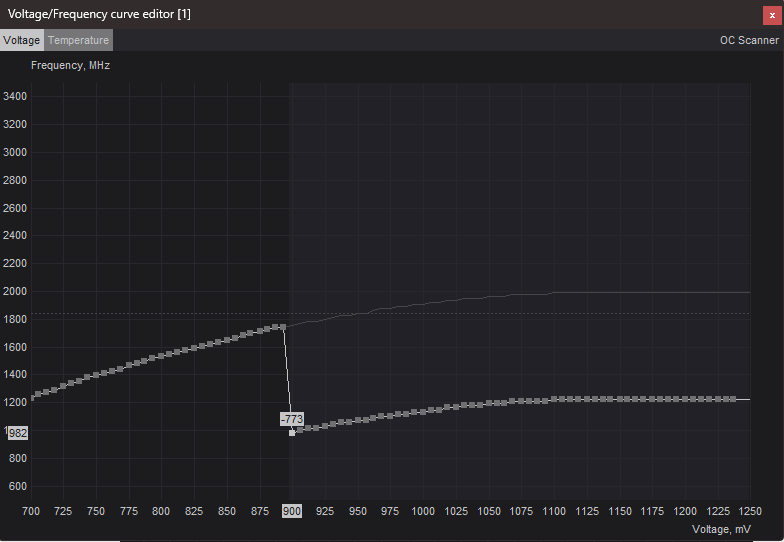
If you’re seeing your graph look something like the above screenshot, you’re on the right track! Now, go back to the Afterburner interface and hit apply (remember that button on the bottom?).
Your graph should now have a shape like this:
That’s it! You’ve successfully undervolted your graphics card. However, we’ve done it on the default curve, so you will theoretically lose quite a bit of performance here.
On the plus side, since we’re using the stock voltage curve, there’s no question of instability with this undervolt. So, let’s see exactly how much performance we’re giving up then.
We’ll run V-Ray and Superposition to confirm (again we’ll take the results of the 3rd back-to-back run).
Unigine Superposition 1080p Extreme: Undervolt (900mV)
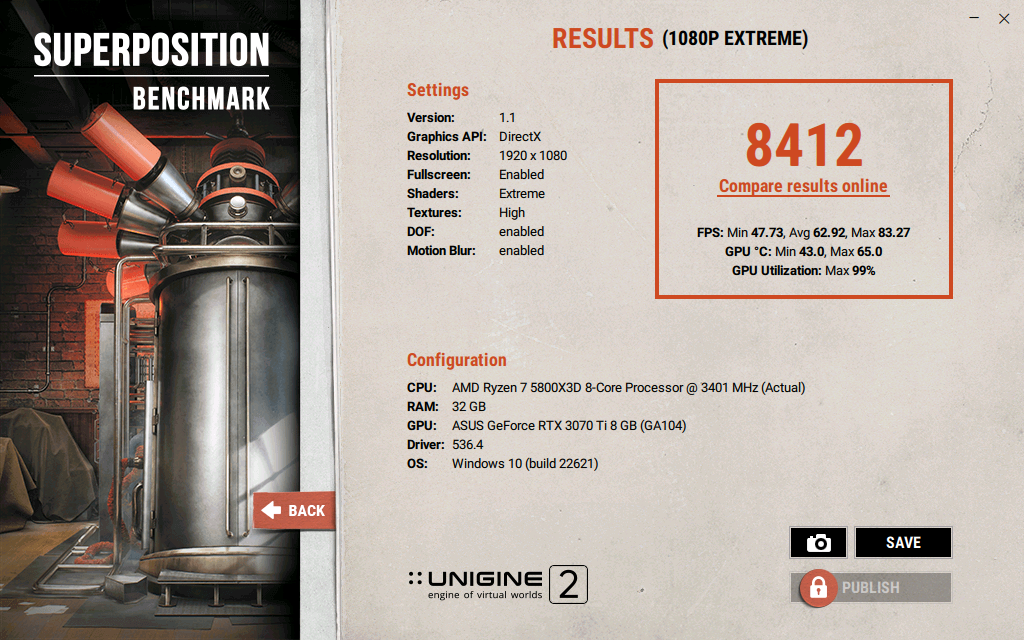
Our Superposition run shows that we’ve given up quite a bit of performance compared to stock. Let’s move on to V-Ray and check those numbers as well.
Chaos V-Ray GPU CUDA: 900mV Undervolt
We’re seeing a drop in performance for CUDA workloads. But this is expected as we’re using the default clock-voltage curve.

Chaos V-Ray GPU RTX: 900mV Undervolt
The ray tracing benchmark also tells a similar story.

Monitoring: 900mV Undervolt
It’s time to confirm whether our undervolt resulted in a noticeable drop in either power draw or temperatures, or ideally, both.
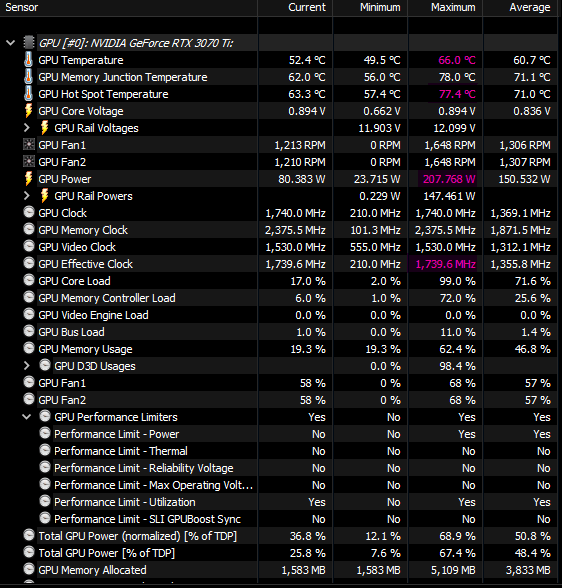
And yes, both power draw and temperatures have reduced significantly. Let’s reassess these numbers again:
- Unigine Superposition 1080p Extreme: A stock score of 9161 dropped to 8412 with an undervolt. That’s an 8%~ drop in gaming performance.
- Chaos V-Ray GPU CUDA: A stock score of 1521 dropped to 1390 vpaths in this CUDA benchmark. That’s an 8.6%~ drop in CUDA rendering performance.
- Chaos V-Ray GPU RTX: A stock score of 1961 dropped to 1826 vrays in this ray traced rendering benchmark. That’s a 6.8%~ drop in RT-accelerated rendering performance.
- Power Draw: The stock max power draw of 297.30W dropped to 207.77W with our undervolt. That’s a 30%~ drop in power draw!
- Hotspot Temperatures: At stock, the GPU hotspot hit a max of 92°C, which has dropped to 77.4°C with our 900mV undervolt. That’s a 15.8%~ drop in hotspot temperature.
Overall, we’ve given up 7-8% performance to enjoy 30% power savings and a 15% drop in operating temperatures. For workstations, I’d recommend sticking to an undervolt on the default curve to maximize stability.
Taking the Next Step: Undervolting with a Clock Offset Using Afterburner
But what if you don’t want to give up even this much performance? Well, that’s where an undervolt combined with a clock offset can help.
Note: You do compromise on stability here, so I do not recommend workstation users take this route unless you find the gains worth the risk.
Let’s get to it then, shall we?
If you followed the undervolt guide above, first reset your settings to default using the reset button (marked in red).
Now, bring up the curve editor using Ctrl + F. You should see your default curve now. Move the curve editor window to one side so you can see the main Afterburner window too.
Under the ‘Clock’ category of the main window, you’ll find a “Core Clock” slider with a text box next to it. Just type in the clock number that you want to offset.
So, for example, if you want an offset of +150 MHz, type in 150 into that box and hit ‘Enter.’
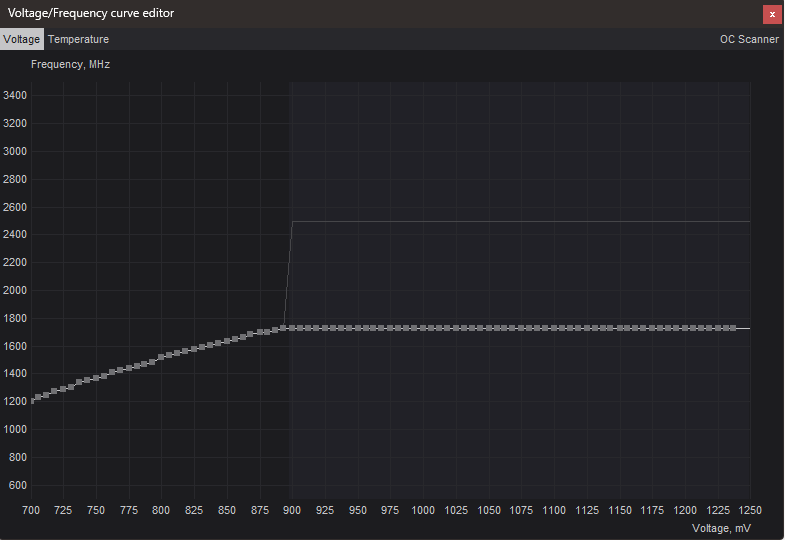
If you’re using an RTX 20-series or newer GPU, use 15 MHz steps to set an offset (multiples of 15). So, to start I’ll add a 225 MHz offset to the clock of my RTX 3070 Ti.
Once you hit ‘Enter,’ look at your curve editor. If you’ve done this step correctly (at any offset of your choosing), you should see your entire curve shift up like this:
That’s it! You’ve applied an offset to your default voltage curve.
Now, follow the exact same undervolting steps from above to limit the voltage your GPU can request.
- For a simple undervolt, pick a low-mid-ish voltage. Say, 900 mV and mark that point on the curve with a left click.
- Hold down the SHIFT key and hold down left click anywhere on the most extreme right side of the graph (NOT ON THE CURVE) and drag to the left, selecting the entire area up to 900mV. Make sure that the 900mV point is also included in your selection.
- Next, hold down left click on the curve on that point you previously selected, and drag it down. If your selection was done correctly, you’ll see the entire right side of the curve move down. Drag it down past the lowest part of your old curve.
Now, commit these changes with the Apply button and you’re ready to do some tests.
Note: If you encounter any crashes during these tests, remember to reset your settings, lower your offset by a bit, and repeat the undervolting steps. Rinse and repeat until you’re stable.
Unigine Superposition 1080p Extreme: Undervolt (900 mV) + Clock Offset (+225 MHz)
Well, that’s a promising start. Now, the Superposition 1080p Extreme score is even higher than what we got with our baseline test!
Chaos V-Ray GPU CUDA: Undervolt (900 mV) + Clock Offset (+225 MHz)
Although we haven’t quite beaten our baseline numbers in V-Ray’s CUDA benchmark, we’re still pretty close to the margin of error. Good enough!
Chaos V-Ray GPU RTX: Undervolt (900 mV) + Clock Offset (+225 MHz)
Again, we reach within spitting distance of our baseline numbers in V-Ray’s RTX benchmark.
Monitoring: Undervolt (900 mV) + Clock Offset (+225 MHz)
Now that our performance is somewhat in line with our baseline benchmark numbers, it’s time to see whether we even gained anything from this exercise.
Let’s compare against our baseline temperature and power numbers as our performance already lines up pretty evenly.
- Power Draw: The max stock power draw of 297.30 W dropped to 236 W with our undervolt and clock offset. That’s a 20%~ drop in power draw!
- Hotspot Temperatures: At stock, the GPU hotspot hit a max of 92°C, which has dropped to 82.8°C with our 900 mV undervolt and 225 MHz offset. That’s a 10%~ drop in hotspot temperature.
So, we brought down power and temperatures by 20% and 10% respectively and lost absolutely no performance from our stock settings.
But with an offset, you’re not done yet. Make sure you confirm stability using OCCT and run it several times. If OCCT reports errors, crashes, or freezes, lower your clock offset and try again.
Like I said, you need to invest some serious time into getting to the sweet spot for your GPU.
Conclusion
Keep in mind that even though most GPUs should be able to handle this undervolt without too much issue, there’ll be a few that refuse to do so. Bump the voltage up by 25mV and try again.
If you still encounter a crash, bump the voltage up once again until you’re absolutely stable. Before we finalize any of these settings, you can run a stress test and check for any instability using OCCT.
That said, this method isn’t ideal from a stability point-of-view. I wouldn’t recommend anything more than a very mild clock offset for a workstation.
Over to You
Have any other questions about GPU undevolting? Feel free to ask us in the comments below or you can reach out to our experts on the forum. We’re always around to help!
![Is PNY a Good GPU Brand? [Updated]](https://www.cgdirector.com/wp-content/uploads/media/2023/12/Is-PNY-a-Good-GPU-Brand-Twitter-594x335.jpg "Is PNY a Good GPU Brand? [Updated]")
![Does Temperature Impact My GPU’s Performance? [Absolutely!]](https://www.cgdirector.com/wp-content/uploads/media/2023/09/Does-Temperature-Impact-My-GPU-Performance-Twitter-594x335.jpg "Does Temperature Impact My GPU’s Performance? [Absolutely!]")

![How To Adjust Your GPU’s Fan Speeds [Step-By-Step]](https://www.cgdirector.com/wp-content/uploads/media/2023/07/How-to-adjust-your-GPUs-Fan-Speeds-to-prevent-it-from-overheating-Twitter-594x335.jpg "How To Adjust Your GPU’s Fan Speeds [Step-By-Step]")

1 comment
20 January, 2026
The guide is pretty straightforward, but misses a few steps:
Firstly the skin of MSI afterburner is customizable, you make it sound like if you download it from guru3d you are stuck to one skin, and if you download it from the MSI website you are stuck to another, you are not. Just go into the settings of afterburner, then go to the user interface tab, there you can set the skin of the application. Both sites just have different skin set as default.
– you also state that we need OCCT, but in the article itself you never use or explain how to use it. You use completely different tools.