 by
by ")
TABLE OF CONTENTS
Building your first PC can be daunting. The idea of setting a budget, researching the best hardware you can buy within that budget, and then finally assembling those components yourself can be scary the first few times.
But don’t worry! Everyone, including professionals out there, started exactly where you are. It’ll become second nature once you’ve done it a few times.
I’ve been working on this guide for quite some time now, and I’m positive it’ll help you build your very own custom PC.
We’ll begin with a primer on picking the right PC-Parts for your build. However, if you already have your parts picked out, skip down to the PC-Assembly section.
You might also want to keep the following Articles in mind before diving headfirst into building your first PC:
- How long does it take to build a PC?
- How to ground yourself when building a PC?
- Is it cheaper to build your own PC?
Well, with all that out of the way – let’s get started!
How to Pick Components for Your PC (Workstations/Gaming PCs/Office PCs)
The parts you choose should cater to your specific requirements. In fact, this is the beauty of custom PC builds – you can modify the configuration, size, budget, and performance to fit your specific use case without compromising on any aspect.
Your budget can range from a few hundred dollars to several thousand, just purely based on your picks!

That said, you should also spend more to get the hardware and performance that you’ll put to use.
Another critical aspect to consider is compatibility. Be careful when picking parts because every component isn’t going to be compatible with another on the market. I’ll go over compatibility as well when addressing each component to simplify your purchase decisions.
Every PC can be broken down into seven discrete components or parts:
- CPU/Processor
- Motherboard/Mainboard
- Memory/RAM
- Graphics Card/Video Card
- Storage (HDD, SSD)
- Power Supply Unit/PSU
- Case/Cabinet
In addition to these parts, you’ll need peripherals like a mouse, keyboard, and a monitor as well.
CPU and Motherboards: Picking the Right Combination
When it comes to desktop CPUs, there are two brands that you can choose from – AMD or Intel. This choice dictates what motherboard you can and cannot pick.
Motherboard Form Factors
Before picking motherboards, it’s important to understand the various sizes out there. Keep in mind – not every motherboard can fit into every case.
Some people prefer compact systems, while others like large ones. You can pick from a variety of motherboard form factors to suit your PC cabinet and personal preferences.
Intel developed the ATX specification in 1995 to standardize board design and improve on older implementations. Over time, we’ve seen smaller and larger standard form factors enter the market. The most common ones are:
- ATX (Advanced Technology eXtended) – One of the most popular form factors. It offers a fairly standard layout and usually features 4 DIMM (memory/RAM) slots along with multiple full-length (x8/x16) PCI-E slots.
- E-ATX (Extended ATX) – One of the largest form factors available for mainstream use. It typically offers the most features and extensibility – giving you flexibility with regards to peripherals. These motherboards should come with 3 or more full-length PCI-E slots.
- M-ATX (Micro ATX) – A compact implementation of the ATX standard. It usually features 2 or 4-DIMM configurations for memory and very rarely features more than 2 full-length PCI-E slots. It’s an excellent choice for those wanting a reasonably compact build.
- M-ITX (Mini ITX) – One of the most compact form factors widely available for mainstream computers. Although they have limited extensibility due to their diminutive size, they have no peer when it comes to building compact PCs.
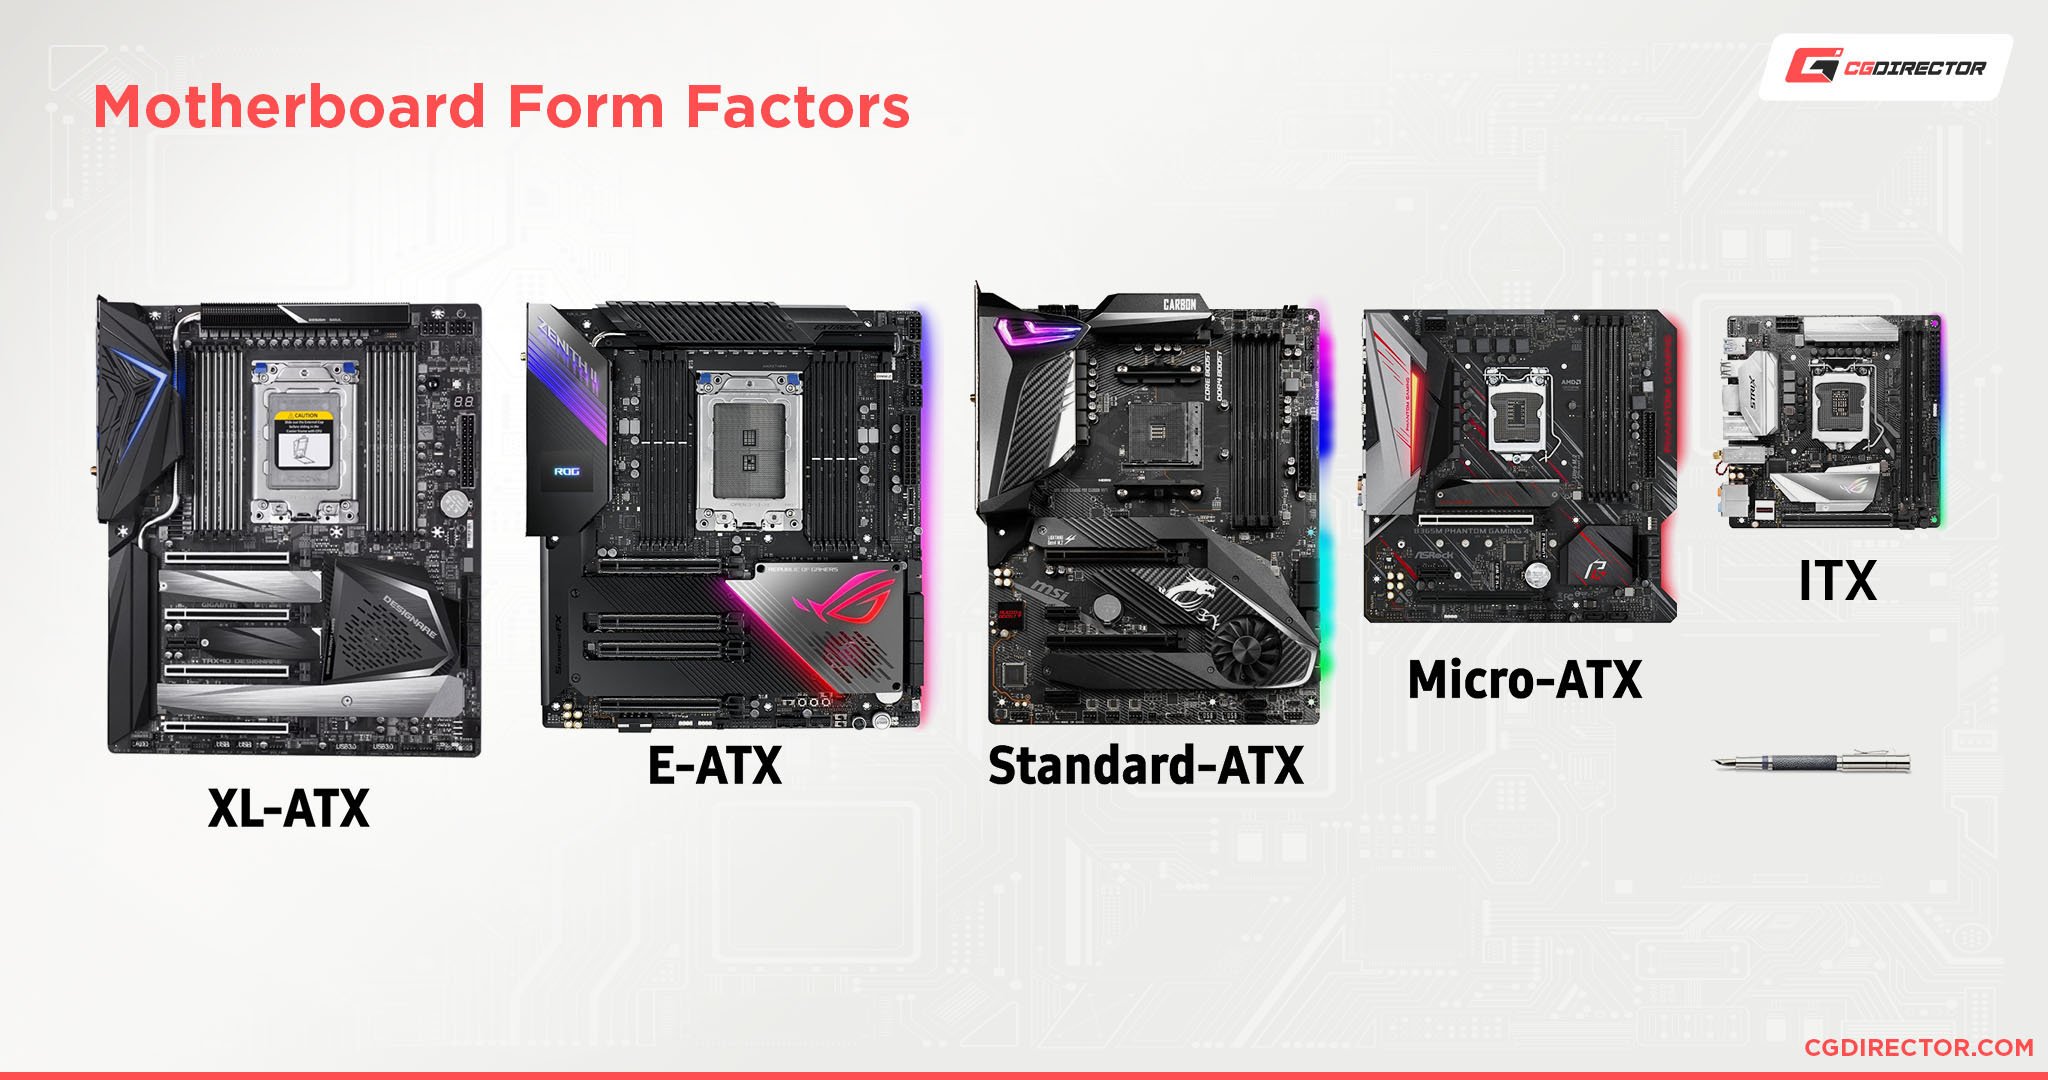
Motherboard Size Comparison Chart – XL-ATX, E-ATX, ATX, M-ATX, ITX
Sockets and Chipsets
You’ll need an Intel-compatible motherboard for an Intel CPU and an AMD-compatible motherboard for an AMD CPU.
Both brands use different socket types, and that is why you can’t swap CPUs from different brands. Sockets can even vary across processor generations from the same company.
For mainstream Intel CPUs, you’ll need a motherboard with an LGA 1700 socket. These motherboards will support 12th generation CPUs from Intel.
For mainstream AMD CPUs, you need a motherboard with the AM4 socket. These motherboards will support all AMD Ryzen CPUs and APUs.
However, the socket alone doesn’t determine compatibility, which is why I recommend shopping by chipset instead. A chipset controls the flow of instructions between any processor and external devices.
Here’s a table with recommended chipsets for the most popular processors out there. If you don’t find your processor in this list, do go ahead and leave a comment below. I’ll do my best to help out!
| CPU | Recommended Chipset | Reason |
|---|---|---|
| 12th Generation Intel Core i9, i7, and i5 Processors (K series) | Z690/B660 | ‘K’ CPUs from Intel have unlocked cores and can be overclocked. Only the Z690 chipsets support this capability. |
| AMD Ryzen Processors (1st, 2nd, and 3rd Generation) and AMD Ryzen-Based APUs (2400G, 3400G, etc.) | X570/B450/A320 | All motherboards with these chipsets come with an AM4 socket. Pick according to your budget and requirements. Follow this Ryzen motherboard guide for additional information. |
| AMD Ryzen Threadripper Processors (1st and 2nd Gen) | X399 | Only available Chipset for 1st and 2nd Gen Threadripper CPUs |
| AMD Ryzen Threadripper Processors (3rd Gen) | TRX40 | Only available Chipset for 3rd Gen Threadripper CPUs |
| Intel HEDT X-Series CPUs 9th and 10th Gen | X299 | Only available Chipset for 9th and 10th gen Intel X-Series CPUs |
RAM/Memory
Depending on its form factor, you’ll mostly have access to 2, 4 or 8 RAM slots on your motherboard of choice. This dictates the total amount of memory you can install in your system.
If you’ve heard the terms “single-channel,” “dual-channel,” or “quad-channel” memory and have no clue what it means in terms of performance, you can find an explanation in our memory guide.
Modern PCs in today use DDR4 memory.

The layout of different standards of RAM does vary, so, you can’t install DDR3 memory into a DDR4 slot.
There are a few factors you should consider before settling on what RAM to buy, most importantly – capacity, memory clock, and CAS Latency.
Currently, there’s no better value than a 16GB (2×8 GB) DDR4 3200 MHz CL16 Memory kit. You can find options from Corsair, Crucial, G.Skill, and a few others at attractive prices.
If you’re curious about how memory works and what factors you should consider before deciding on one, take a look at our RAM buying guide!
Graphics Cards
A graphics card (GPU) typically handles and generates a feed that outputs to a monitor.
If you’re only consuming media and browsing the web, you don’t need a powerful GPU. However, if you’re gaming, editing videos, designing 3D art, or generating complex scenes, and want the best experience, you should consider allocating a good chunk of your budget to this component.
Here’s a quick look at the best value options right now:
| Price Tier | Recommended Graphics Card |
|---|---|
| Under $100 | Geforce GT 1030 |
| $150-$200 | Radeon RX 580 |
| $200-$300 | GeForce 1660Ti |
| $300-$400 | Radeon RX 5700 |
The options listed above are great for most users. However, if you’re planning to play games at high resolutions or set up a workstation for professional work, you should consider consulting benchmarks charts and vary your budget accordingly.
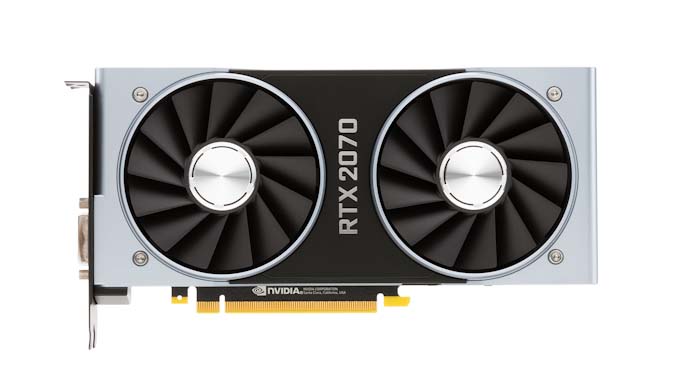
The currently most powerful (which is not specifically targeted at professional use) graphics card is the GeForce RTX 2080Ti with a price tag of well over $1000.
Storage
Storage is available in the form of SSDs and HDDs. HDDs or Hard Disk Drives offer high storage capacities but at much slower speeds. SSDs or Solid State Drives, on the other hand, offer relatively lower storage capacities but at much higher data read/write speeds.
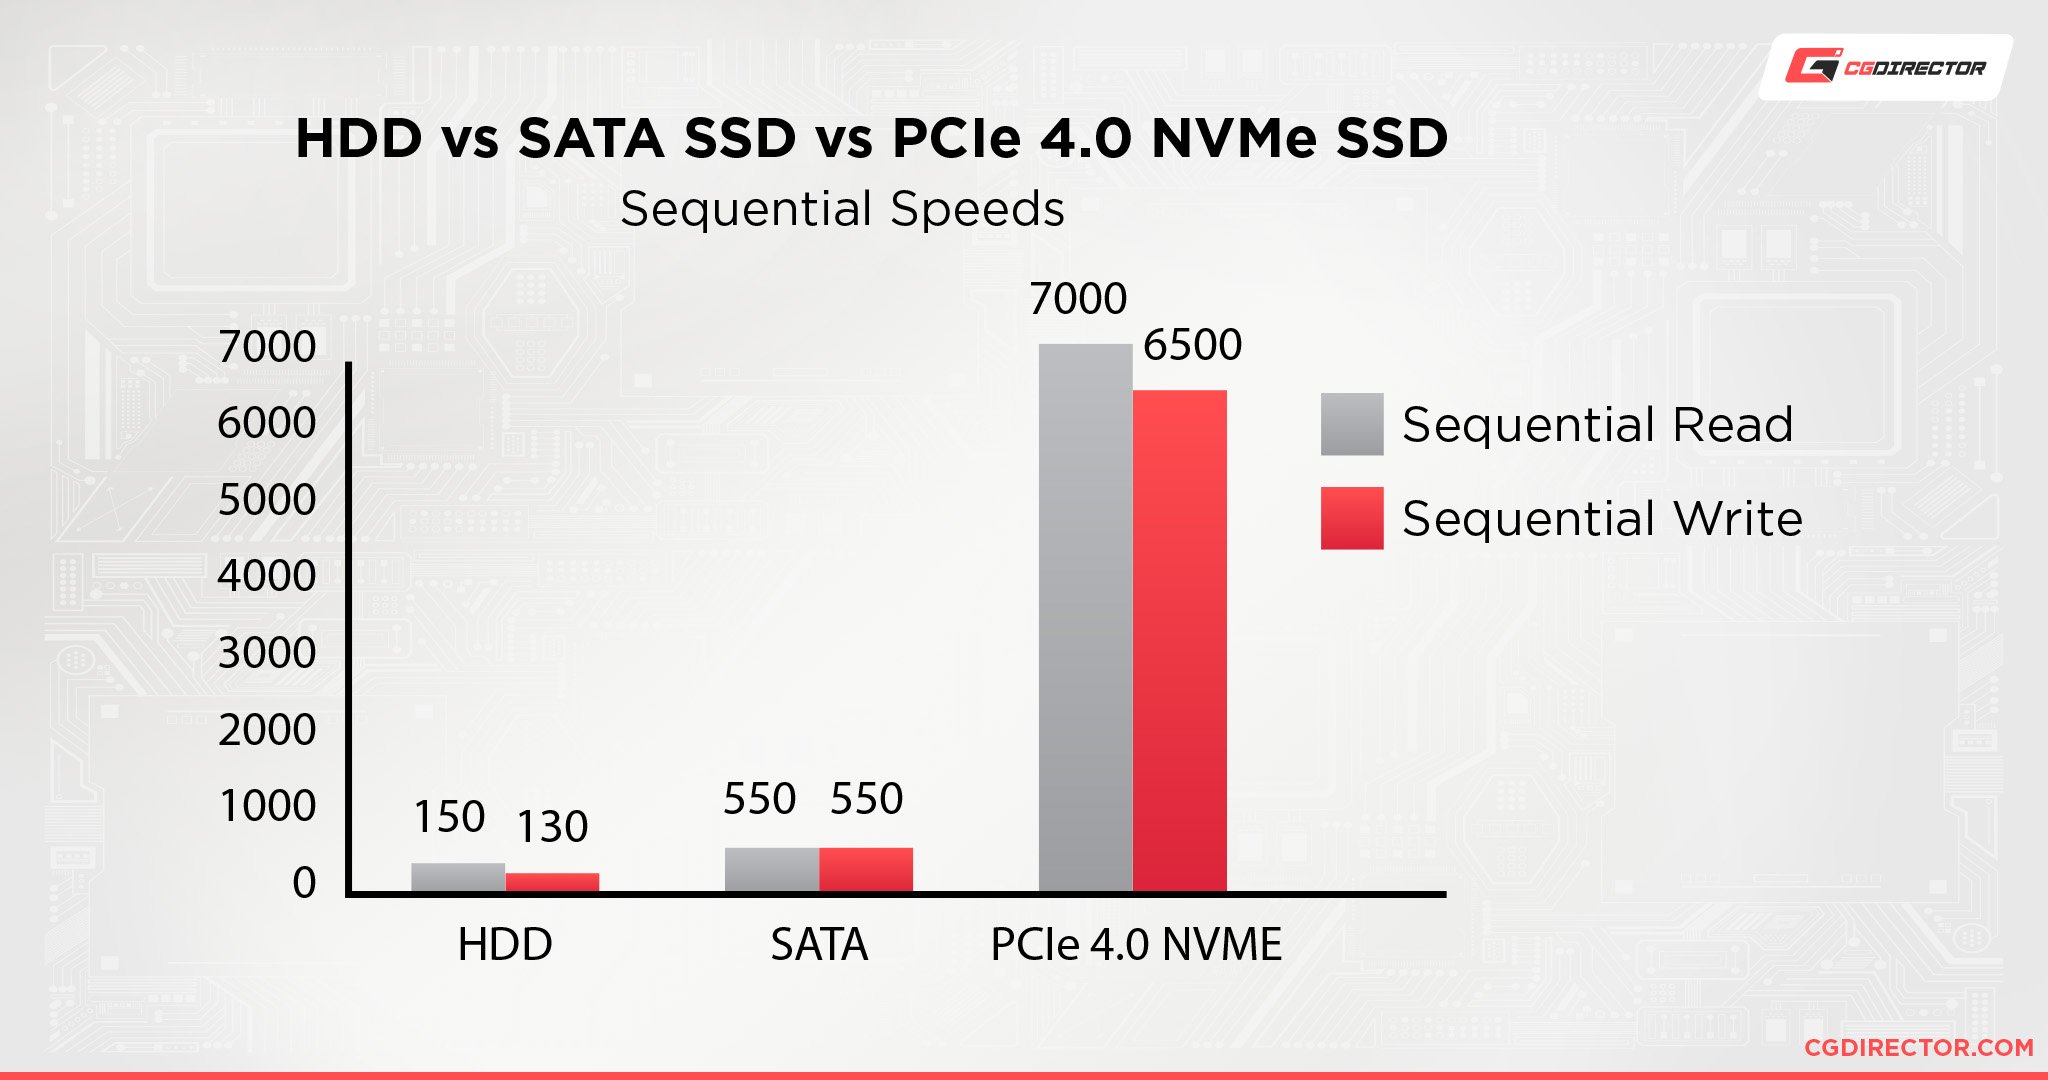
Unless your budget limits you from doing so, grab a couple of SSDs for your build.
NVMe SSDs are faster and pricier than SATA SSDs so consider your workload carefully. If you’re regularly handling production workloads with large raw files, an NVMe SSD is the way to go.
However, you can install your OS and other applications on a SATA SSD without compromising on performance.
Power Supply
All the components in your system need a reliable, steady supply of power. A Power Supply Unit (PSU) does just that!
They come in modular, semi-modular, and regular variants. If you’re pretty nitpicky about cable management and would rather avoid any unused cables, pick a modular or semi-modular PSU. They’ll ensure that you use only the wires that your system needs.
A widespread mistake is compromising on the quality of a power supply to focus your budget on other aspects of the system. Don’t do this. A cheap power supply can even cause permanent damage to your components.
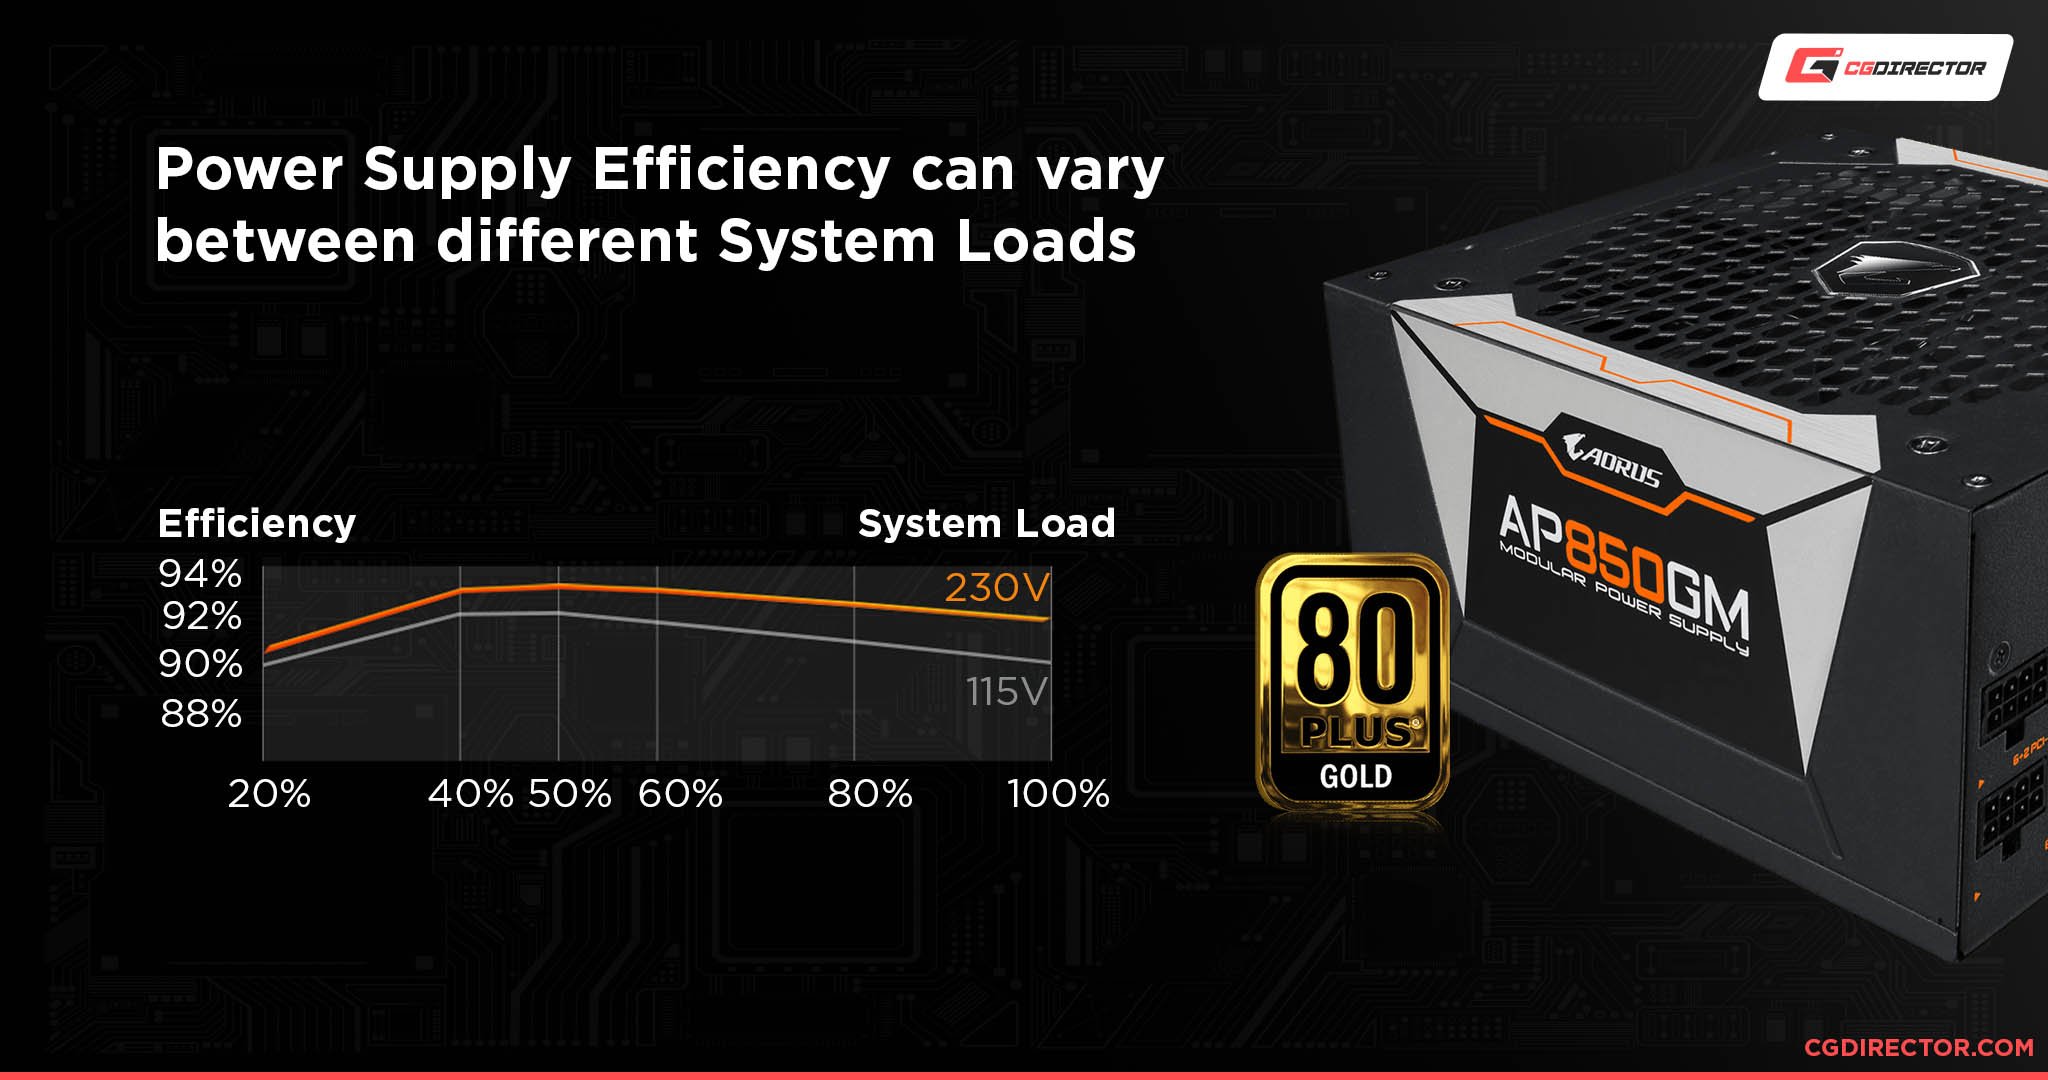
I recommend shopping for a 500W 80-Plus Bronze Rated PSU at the very least. Use this popular PSU tier list to lock down a choice depending on availability in your region; use this power supply calculator to check the wattage you’ll need for your system.
| 80 Plus PSU Rating | What Does it Mean? |
|---|---|
| 80 Plus | At least 80% efficiency at 20%, 50%, and 100% load. |
| 80 Plus Bronze | At least 82% efficiency at 20% load, 85% at 50% load, and 82% at 100% load. |
| 80 Plus Silver | At least 85% efficiency at 20% load, 88% at 50% load, and 85% at 100% load. |
| 80 Plus Gold | At least 87% efficiency at 20% load, 90% at 50% load, and 87% at 100% load. |
| 80 Plus Platinum | At least 90% efficiency at 20% load, 92% at 50% load, and 89% at 100% load. |
| 80 Plus Titanium | At least 92% efficiency at 20% load, 94% at 50% load, and 90% at 100% load. |
As you can see, unless you’re running a very power-hungry system, the power savings at each tier will be minimal. For most users, an 80 Plus Bronze PSU is the sweet spot between quality and price. If you do want to spend a bit more, I recommend a jump to gold and above.
Don’t bother with silver unless you’re getting a fantastic deal on one.
Case/Cabinet
Cases are available in different sizes. They’re named to indicate the motherboard form factors they support. For example, an ATX case can house an ATX, or smaller, motherboard easily.
So, you can use an ATX case with a Mini-ITX motherboard, but a Mini-ITX cabinet isn’t compatible with an ATX motherboard.
If you’re building a robust system that’ll generate loads of heat, airflow becomes paramount. However, most modern cases have good airflow, so you don’t need to worry too much in this regard.
A front-mesh style cabinet does offer the best air intake.
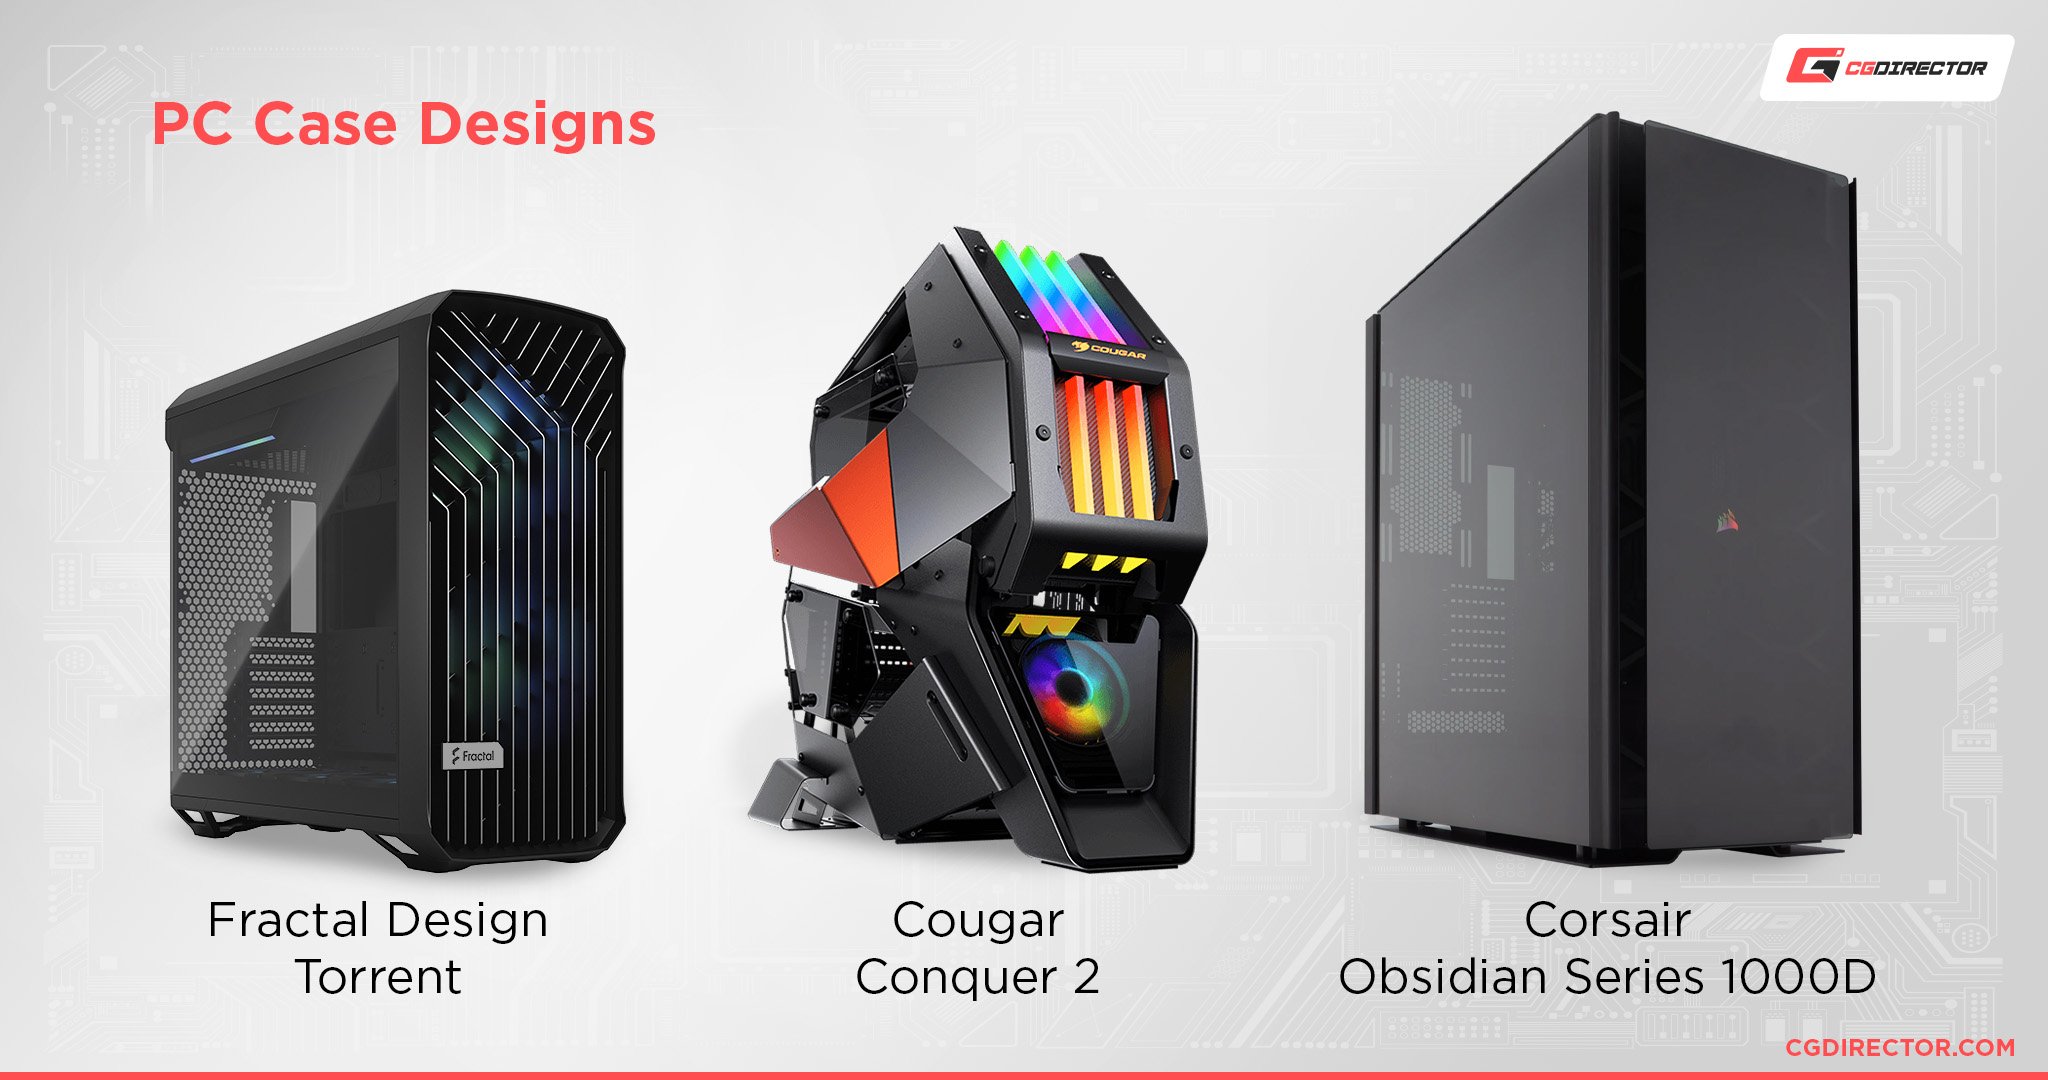
Nonetheless, base your choice on your preference more than anything else.
Although an ATX cabinet will be compatible with most of your components, make sure you check graphics card length and CPU cooler clearance. In case you’re using a third-party CPU cooler (and not the one included with your processor, if any), you have to make sure it’ll fit into your case.
Aesthetics play a significant role when getting a PC case. The case is not something that you’ll change a year or two down the line.
It’s a long-term commitment. So, choose wisely!
Building Your PC
Now that we’ve gathered all our components, it’s time to get building.
These are the Parts we will be assembling in this guide. Don’t worry if you don’t have the exact same components as most are assembled in a very similar way:
- CPU: AMD Ryzen 5 3600
- CPU-Cooler: Both Stock and a 3rd-Party Cooler (Cooler Master Hyper 212 EVO)
- Motherboard: MSI B450 Tomahawk MAX
- RAM: 16GB (2x8GB) Corsair Vengeance 3600Mhz CL16
- GPU: XFX Radeon RX570
- Storage: Samsung 860 EVO and Samsung 970 EVO
- PSU: Corsair CX550M
- Case: beQuiet Pure Base 500
Tools Needed
- Philips Head Screwdriver (ideally magnetic)
- Non-Carpeted Surface
- Zip ties (Nice-to-have / 10-15)
Now, you can use an anti-static strap if you’re concerned about static electricity ruining your components. However, you can avoid this by building on a bare, grounded surface and touching the bare metal of your PC-Cabinet before handling a sensitive part like a graphics card.
This might seem obvious, but you need to have a mouse, keyboard, monitor and a USB-Drive with a Windows 10 installer on it as well.
Getting Started
I recommend installing the CPU, CPU cooler, and RAM before installing the motherboard in your case. It’ll make things much easier!
1. Motherboard
Take the motherboard out of the box and protective wrapping (touch the metal of your cabinet first). If you don’t have an anti-static surface to work on, use the motherboard box. Place the board on top of the box before continuing.
2. CPU Installation
If you have an Intel CPU, then gently push down on the retention arm, slide it out and lift it – exposing the socket. Gently place the CPU in the socket.
Match the golden triangle on the bottom left of the CPU with the triangle on the socket. The CPU can only slot into its socket in this orientation. You won’t need to use any force.
If you have both triangles lined up, the CPU will fall into place without any effort.
Now, slide the bracket back. If it is secured, then the plastic cover should pop off automatically. It might fly off, so don’t worry. That’s normal.
On the AMD side of things, the installation process is simple and pretty much the same. Lift the retention arm, match the triangles on the processor and the socket. Once the CPU is in place, lower the retention arm back and secure it into place.
And a Closer Look:
That is all that you need to do to install the CPU. Simple, right? Let’s continue.
3. Memory
Next, let’s get our RAM installed. You’ll see latches on either side of the RAM slots (or just a single latch in a few budget motherboards).
Push down on the latches to open them. The contact pins on your RAM will have a longer and shorter side. It goes in only one way, so align them correctly.
Use the notches at each end to guide the stick down and push down on both ends together. This does take a bit of force, and you will hear two clicks – indicating that the RAM is now secure in its slot. If you don’t hear clicks, re-check if your RAM is correctly aligned with its slot.
If you’re using two memory sticks, install them in slots 1 and 3 or 2 and 4 – a standard configuration in most motherboards for dual-channel memory. Consult the Motherboard Manual to be entirely sure though.
And a closer look:
4. CPU Cooler
Now that the CPU and RAM are in place, you can install the CPU cooler. In some cases, you do not have enough room to install the RAM if you install the CPU cooler first. That is why I recommend installing the RAM first.
Thermal Paste usually comes pre-applied on a boxed CPU cooler. However, a few botched attempts at installing the cooler might necessitate re-application, so, keep some thermal paste on stand-by.
CPU-cooler installation processes vary from cooler to cooler. Even Intel and AMD stock coolers have different installation methods.
Nonetheless, if you’re using a stock cooler, the installation should be easy.
An Intel stock cooler usually doesn’t need any screws. Just place the cooler over the CPU, align the four pins with the four cooler installation holes in the motherboard. Push down on the pins diagonally and twist to lock into place. (always consult the CPU-Cooler manual too)
On the other hand, the AMD stock cooler needs to be screwed in with a common Philips Head Screwdriver. In this case, you’ll notice a backplate on the back of your motherboard. Make sure that it stays aligned with the holes in your motherboard. Now install the CPU cooler by placing it over the CPU and screwing it in diagonally.
If the backplate is aligned correctly, this should lock it into place.
Third-party coolers too come with their own instruction manual. They’ll also come equipped with brackets for all kinds of CPU sockets. So, it doesn’t matter whether you have an Intel or AMD CPU. Nonetheless, double-check for socket support when buying a CPU cooler.
AMD/AM4, The following Video shows the installation of an AMD Stock Cooler (In this case the AMD Wraith CPU-Cooler), which already has Thermal Paste applied to the bottom of the Cooler:
AMD/AM4, The following Video shows the installation of a 3rd Party Cooler (In this case the Cooler Master Hyper 212EVO), which does not come with pre-applied Thermal paste. Manually applying a pea-sized “blob” of Thermal paste onto the CPU before installation is required:
After applying the Thermal paste you can place and screw in the Cooler as per the Cooler’s manual:
As there are so many different CPU-Cooler manufacturers who all have their own method of attaching the CPU-Cooler to the Motherboard, consult the CPU-Cooler installation instructions.
We admit, the CPU Cooler Manual can be frustrating and looks complicated, but after some studying it turns out to be quite simple. CPU-Cooler installation manuals are usually so complex because the Cooler is supposed to fit on many different Socket types, each socket though usually requiring a slightly adjusted instruction.
Once you find your specific socket and instructions in the manual and read through it a couple of times, though, installation is usually a breeze.
5. Motherboard installation
Now that you have the CPU, RAM, and CPU cooler installed on the motherboard, you can fit the motherboard into your case. Strip your case by removing both side panels. You can remove the pre-installed fans if you want to use custom Case-Fans.
Check that the case has pre-installed motherboard standoffs and that they align with the holes on the motherboard.
Find the motherboard I/O shield and push it into the rectangular slot at the back of the PC case. Make sure that it is the right side up and matches the ports on your motherboard. You might have to use a bit of force to pop it into place.
Careful though; they are sharp little buggers. They will draw blood. 🙂
Place the motherboard inside the chassis and line it up with the holes in the I/O shield. Some motherboards come with integrated I/O shields so you can slide them in. Once you have done this, the standoffs should align with the holes on the motherboard, and you can screw it into place.
Do not use too much force when using screws on your motherboard. You don’t want to damage it. Also, make sure there is no odd standoff stabbing the back of your board. It’ll cause it to bend and might even damage it. Account for every standoff before continuing onto the next step.
6. Storage
Now that your motherboard is safely ensconced inside the case, we can add storage.
Most modern cabinets have storage bays for both SSDs and HDDs. All you need to do is slide the drive into place and screw it in.
Some mounting solutions are tool-less, and the drive will click into place when you close the storage bay. Some Cases might require you to screw the SATA SSDs onto the back side of the Case, as you can see in the following clip:
If you have an M.2 SSD, it will be installed directly onto the motherboard’s M.2 slot. You only need a single screw to hold it in place.
SATA SSDs and HDDs need to be connected to your motherboard via SATA cables, and they also need to be plugged into your PSU for power (PSU installation follows).
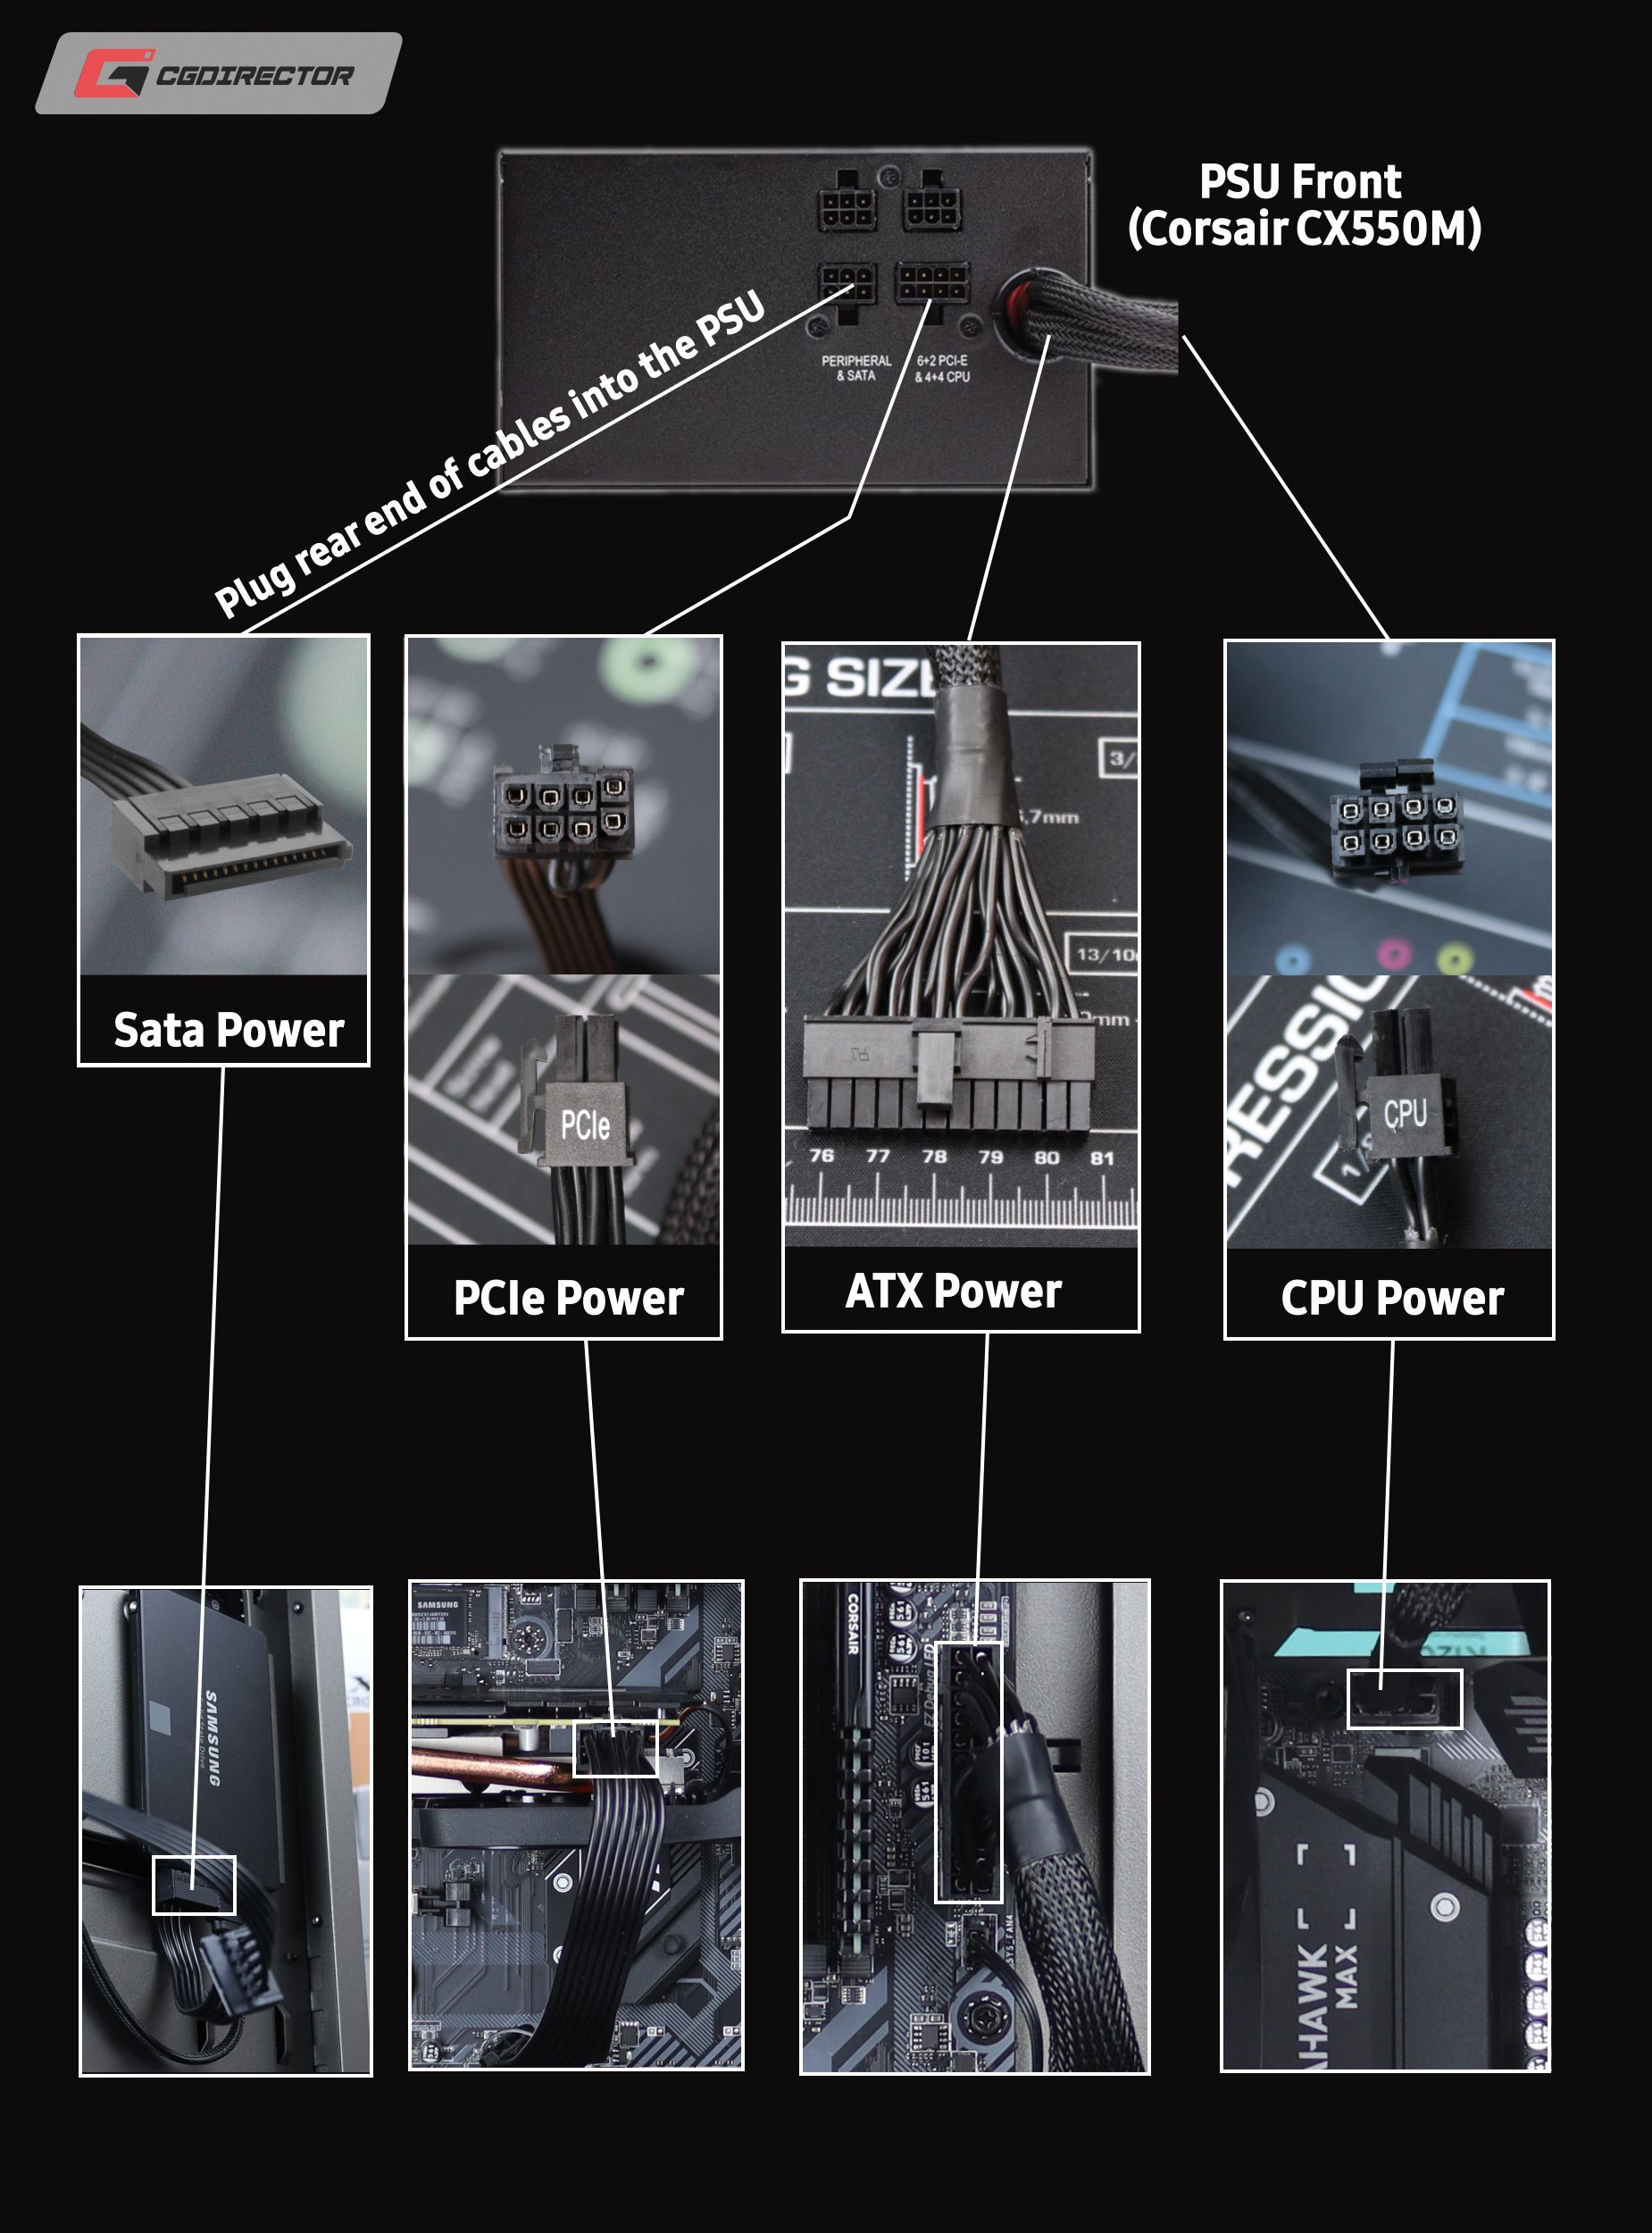
7. Power Supply Unit
Now that you have most of your components installed, you need to give them power. If you have a modular power supply, then you can use the cables that you need, if not then you will need to do some cable management (stuffing) later on.
If your case has a separate enclosure for your PSU, you’ll have to install it from the back of the case. If not, you can do it from the front.
Just slide the PSU into place and make sure the side with the D/C Power faces the right direction (towards the back/outside of the case, the same direction as the I/O ports of your motherboard). Also, the fan-side of the PSU should usually face where there is a grill in the Case, so it doesn’t suffocate when pulling Air in.
Screw the PSU into place with the included screws. Now that the PSU is in its place, all you need to do is plug in the different components.
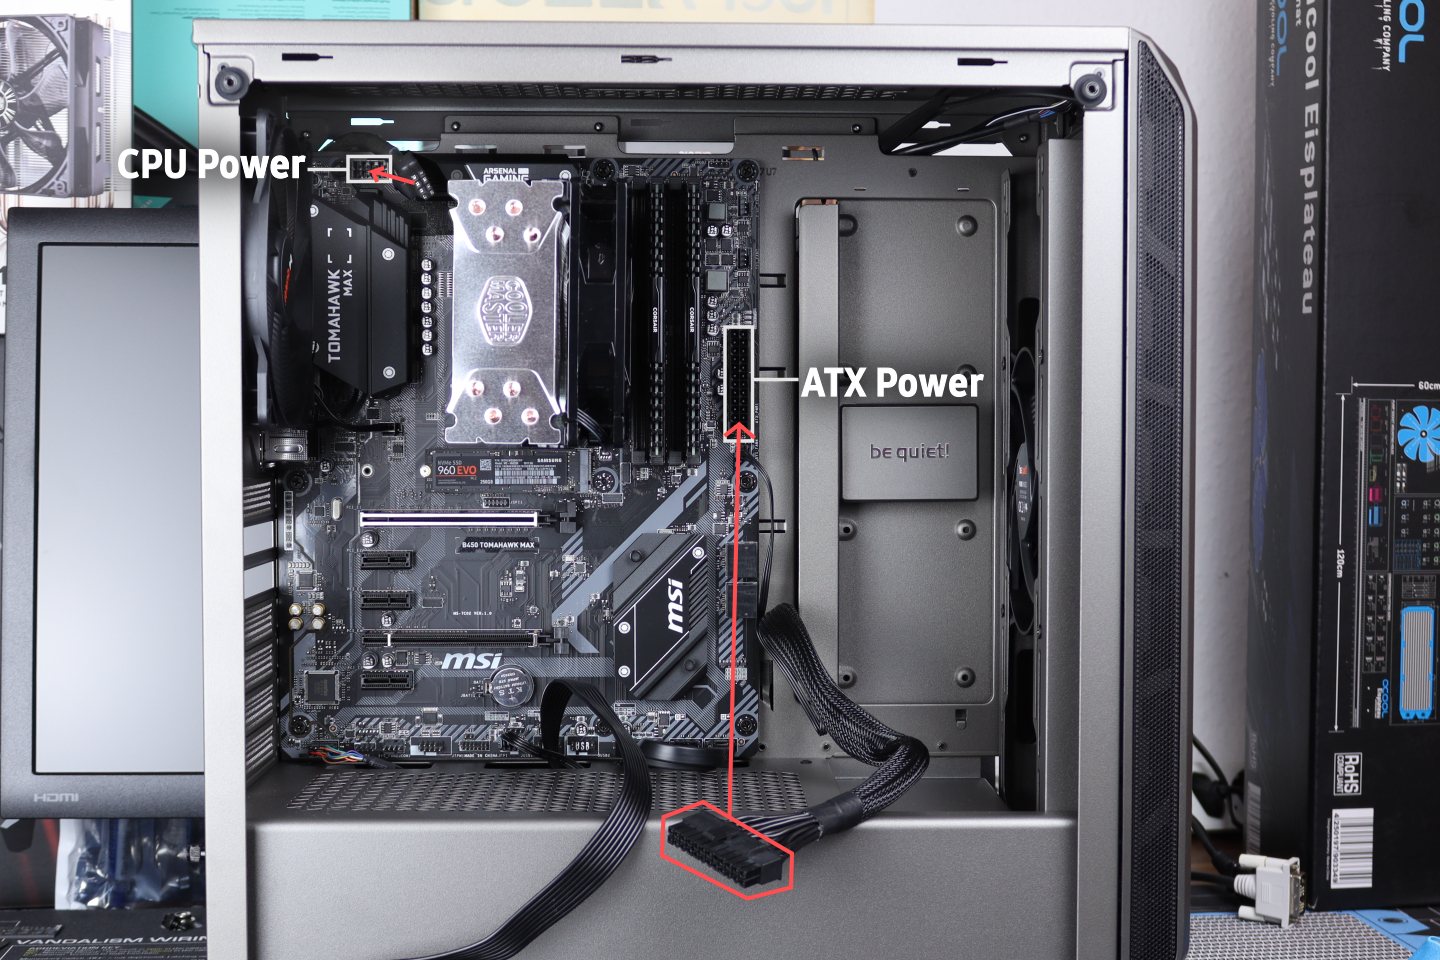
- The 8-pin power cable plugs into the top-left of the motherboard above the CPU.
- The long 24-pin power cable plugs into the far-right side of the motherboard.
- Remember to power your storage as well unless you are using M.2 SSDs.
And the SATA SSD Storage Power:
The graphics card is left for last so that you can access your components and cables quickly.
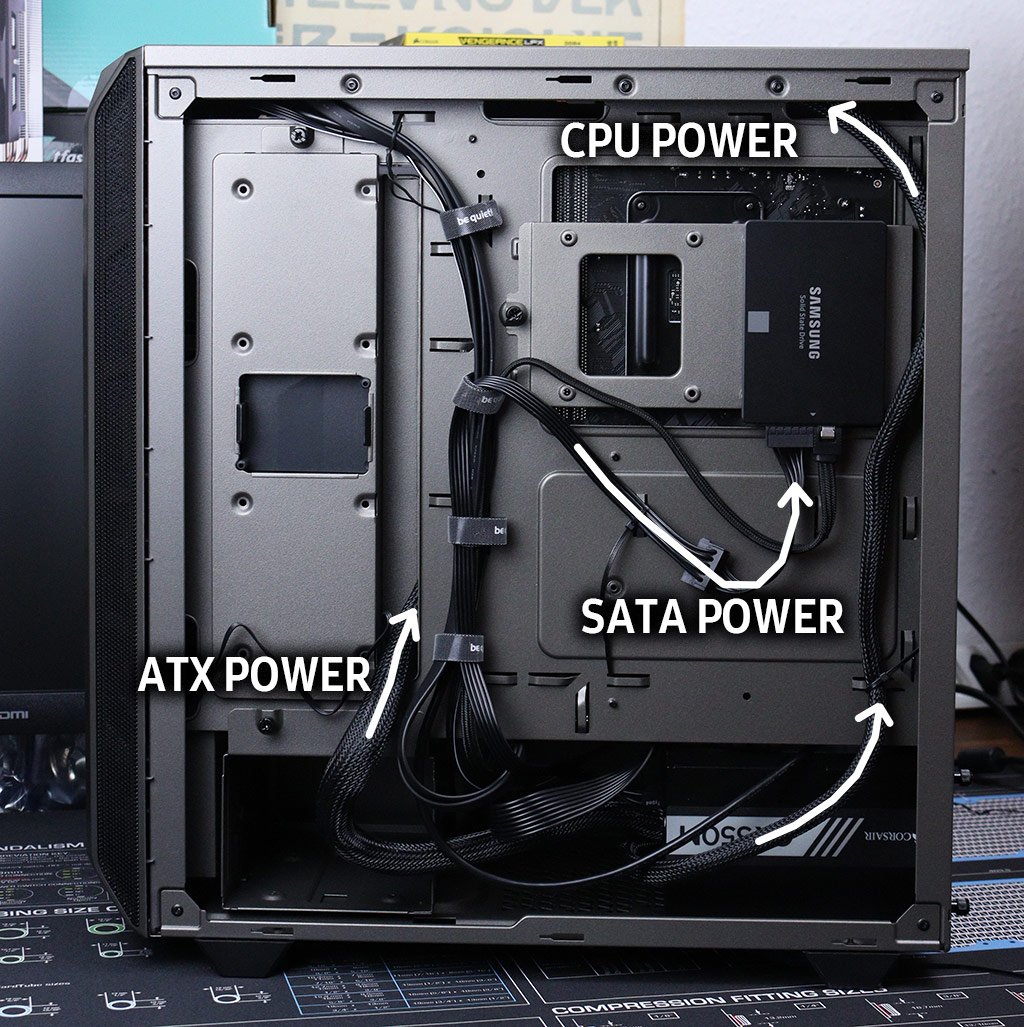
Here’s a graphic that shows what cables are plugged in where on the PSU and other Components:
And here is a quick look at how I routed the cables through the case. The CPU Power comes up top from behind and the ATX Power comes from the back through the middle Part of the Case to be plugged into its corresponding 24-Pin Plug on the Motherboard.
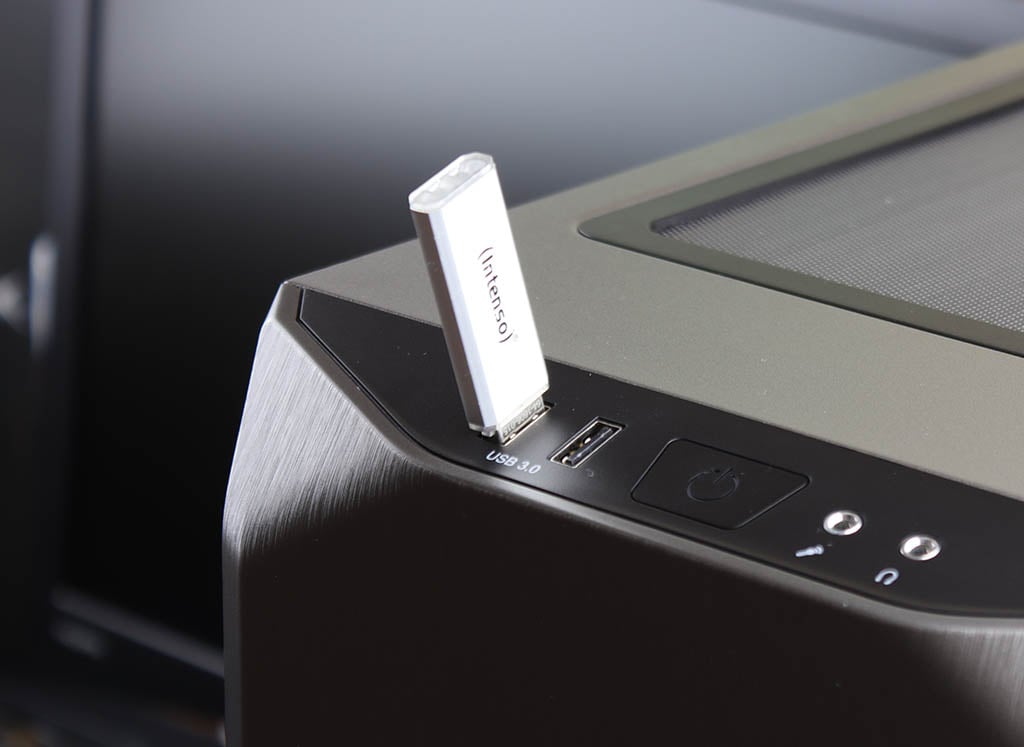
8. Front Panel Buttons and I/O
To get your front I/O (the USB and Audio plugs on the front of your Case) to work, you need to plug in the cables into the motherboard. The front headers are located at the bottom of the motherboard and are labeled. The cables are marked as well. All you need to do is match the names and plug them into the correct headers. Be careful not to bend the headers when doing so.
The cables for front panel lights have a positive and negative. Match them to ensure that your system indicator lights work properly.
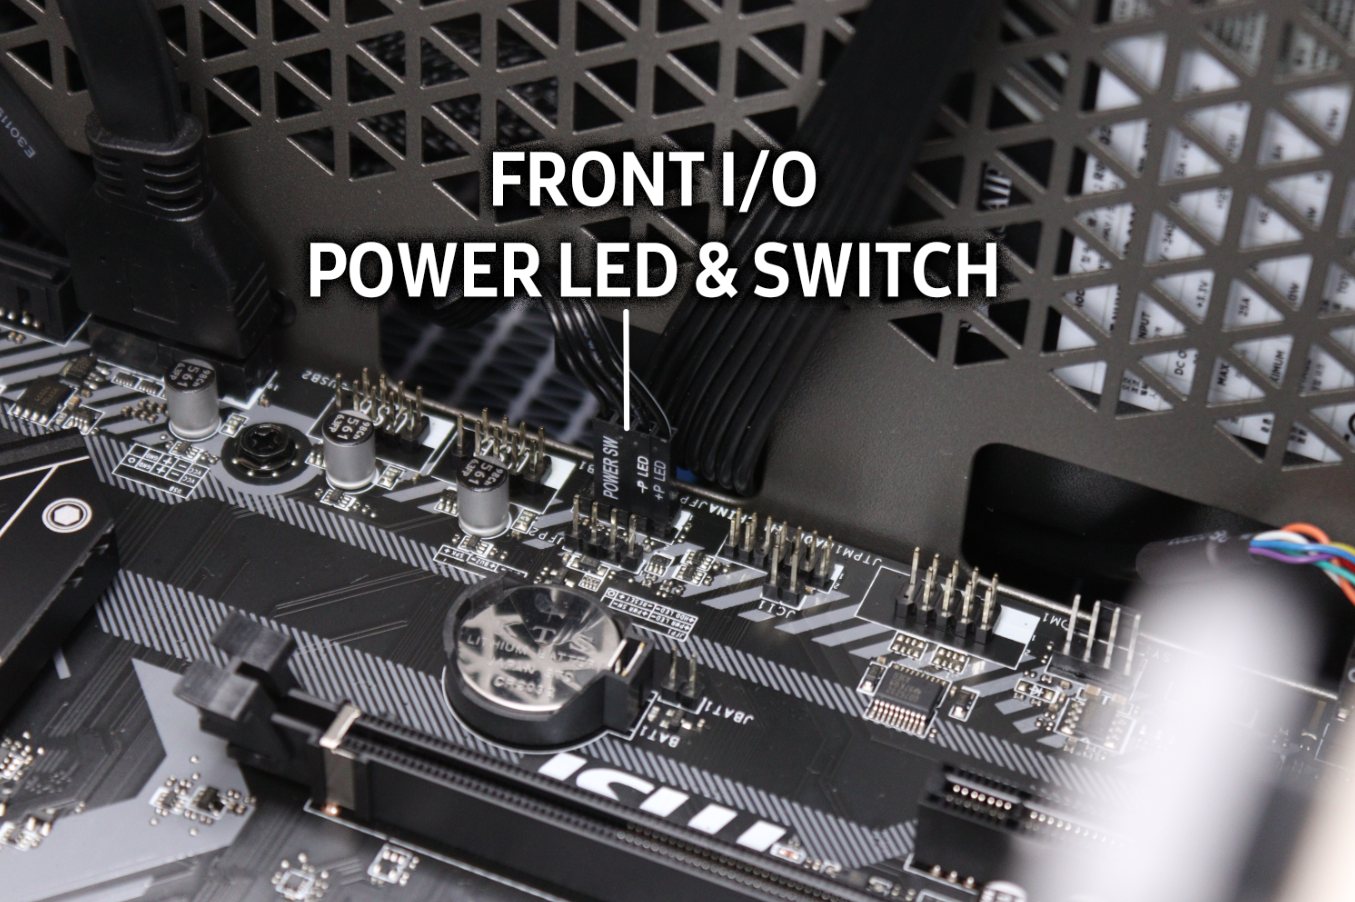
Case Front I/O Power LED & Switch Connectors
Consult your motherboard manual for detailed diagrams and instructions about the same.
Now that you are in the lower part of the motherboard, you should also plug in the USB headers and HD audio. These cables will be labeled as well and usually only fit into one specific plug on the Motherboard.
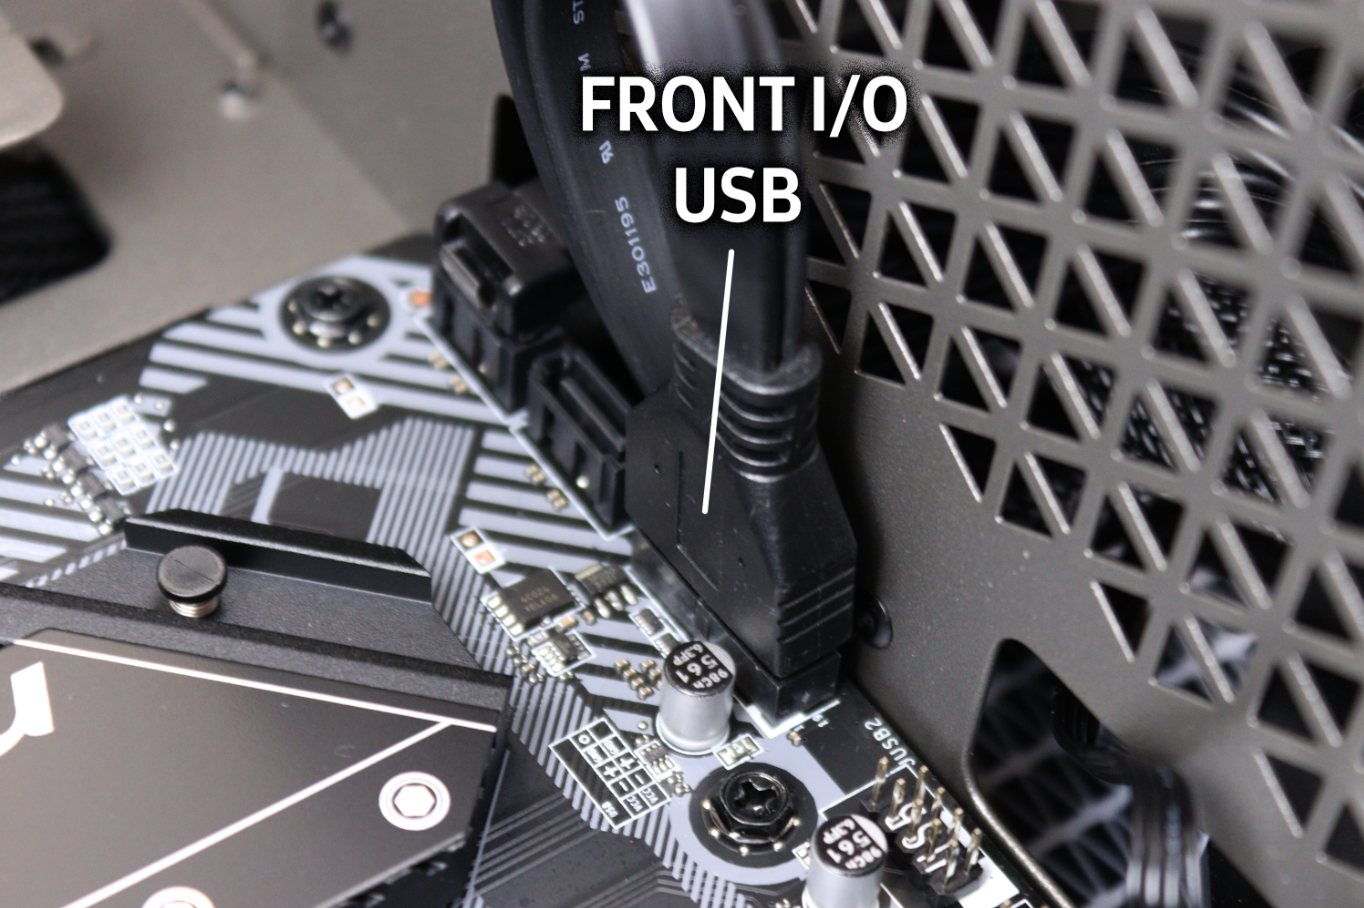
Case Front I/O USB Connector
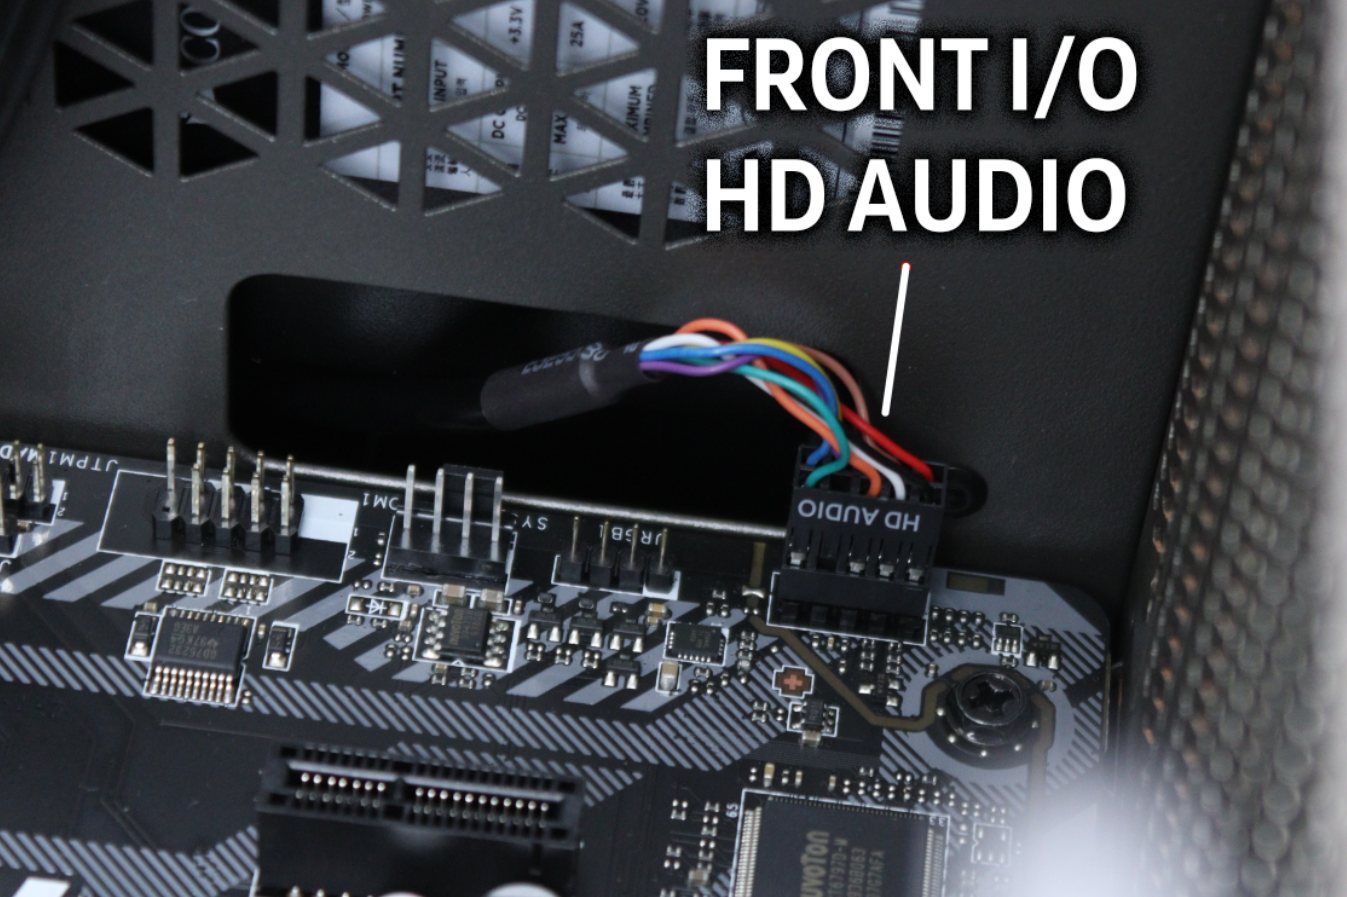
Case Front I/O HD Audio Connector
9. Graphics Card
Now that we have everything in place, we can install the graphics card. Most graphics cards have a dual-slot design, and you need to remove two slots openings at the back of the case for every graphics card you want to install.
Free up space directly behind the PCI-E slot and one below it by unscrewing the screws holding the slot cover in place.
Push down the latch of the PCI-E slot you want to use for your graphics card. This is similar to the latch on the RAM slots. Ideally, it would be best to use the very first PCI-E slot on your motherboard (first from the motherboard’s I/O ports).
Please note – some motherboards won’t have a push-latch (at the back of the slot). It’ll slot into place without pushing anything. However, you’ll need to apply downward pressure to a small lever at the back of the slot to get your graphics card out.
Align your graphics card with the PCI-E slot and gently push it in – you should hear a click. This tells you that the card is secure in its slot. Once done, secure the graphics card to the case using the screws you removed in the previous step.
Give your graphics card power, if needed using the PCI-E power cable from your power supply. If you have a powerful GPU, you’ll need two of these connectors for extra power. These cables will be labeled, so look for ones that say ‘PCI-E.’
However, many entry-level cards won’t need this power connector and can draw sufficient power from the slot itself.
That’s it for internal PC-Parts, let’s close the Case back up:
That’s it! Let’s hook everything up
You can also make sure that everything works fine before closing up the Case. If something’s wrong, you’ll have to take the PC apart all over again.
Plug a screen, keyboard, and mouse into the system and if you have a Wifi Stick or LAN cable, plug that in too.
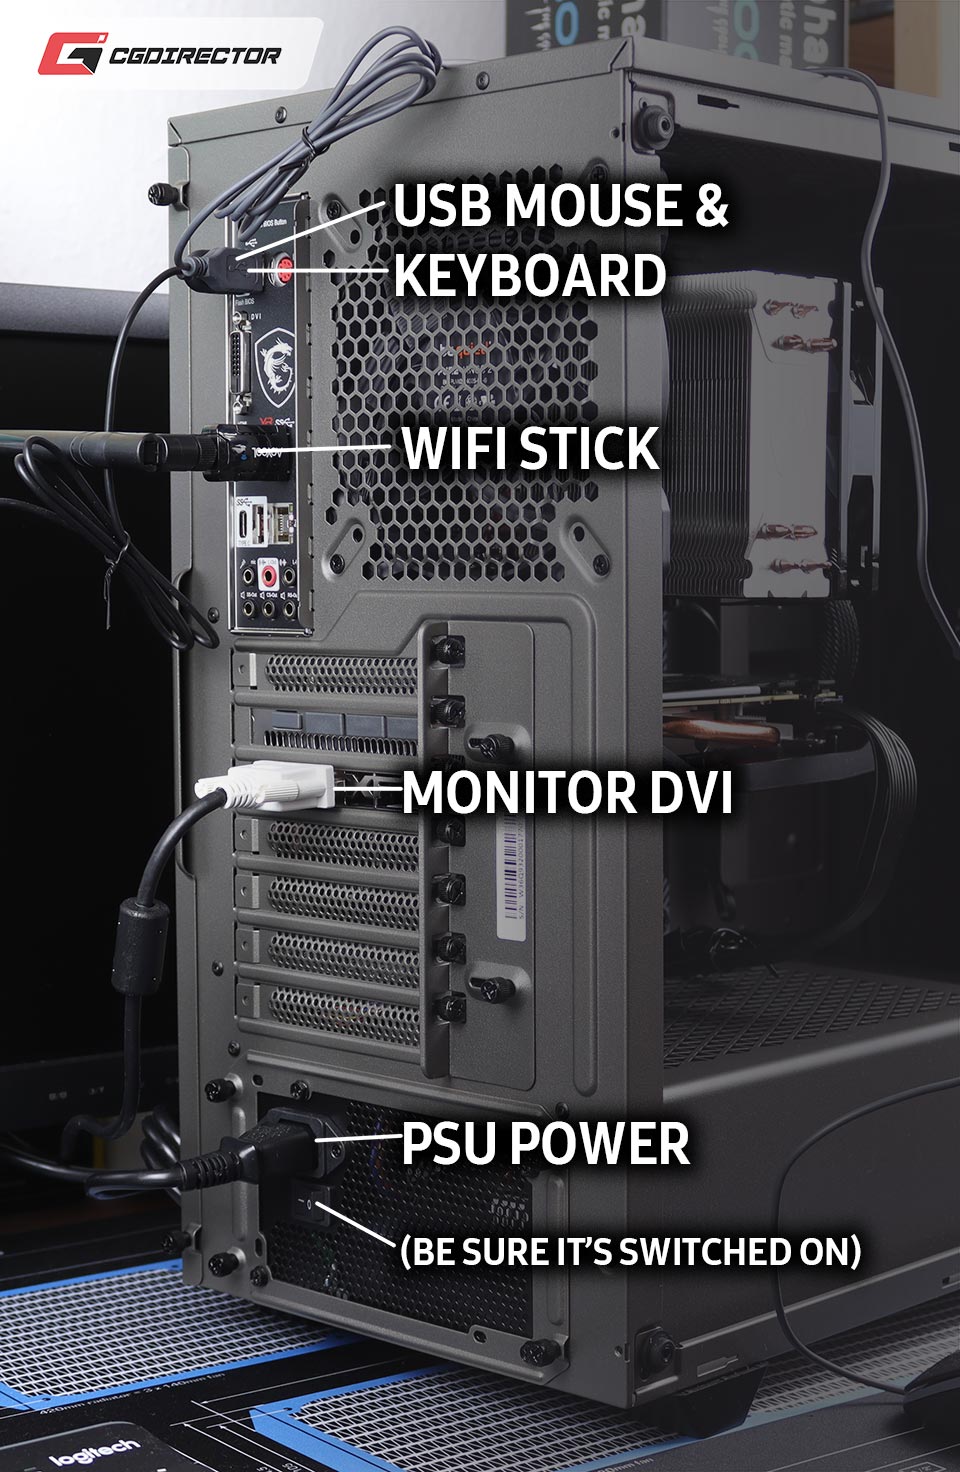
In the image above I used a DVI cable to hook up the Monitor. You might want to use HDMI or DisplayPort which works just as well (depending on your Monitor).
Just be sure the Monitor is plugged into the Graphics Card (if you have one) and not the Motherboard.
After you have plugged all external cables in correctly, let’s do a quick test-boot. Power up the PC and Monitor and see what happens.
If you’re using a new SSD/HDD (s), you should see a message like ‘Operating System not found.’ If you see it, we’re good to go!
Now that we know our System boots, and we won’t have to change anything inside the Case anymore, we can close the case back up. (If you haven’t done so already)
Before doing that, you can use cable ties to bunch multiple cables together. Cable cut-outs can be used to organize all the different cables. Tie these cables down for a cleaner build.
It’s quite normal that the cables at the backside of the case don’t look very nice, but you won’t see them anyway. Make sure the front is nice and clean, so the Air is not being blocked in its movement through the case.

If you build your own PC, one of the most difficult parts that doesn’t necessarily impact performance all that much, is cable management. But you’ll get the hang of it, don’t worry!
Install Windows / an Operating System
Now that we have everything in place and your system is booting correctly, the next logical step is to install an Operating System.
Windows 10 is the most popular Operating System currently available and the one you’ll want to install for modern PC Parts to work without issues.
Modern PCs don’t come with an optical drive so you’ll need a USB drive instead. You can either buy Windows 10 and have it delivered on a USB stick already, or download Windows 10 Media Creation Kit on another PC and install a Windows 10 image on one of your own USB drives.
Now, plug that USB drive into the new PC and boot (Or if you have an optical drive, boot with the DVD in your DVD Player). If your PC doesn’t boot from that USB drive automatically, you’ll need to change a few things in your BIOS.
Enter your BIOS. Depending on your motherboard, you can access it by repeatedly pressing ‘Delete,’ ‘F2,’ ‘F1,’ or ‘Esc’ on your keyboard when your system is starting up. Change the boot device priority and set your thumb drive as the first priority.
Some motherboards also allow you to boot to a specific device by pressing a specified key. Watch for the motherboard flash screen when your system starts for more info.
Boot from the USB drive and follow the ensuing instructions to install Windows 10. Don’t worry; you won’t need an activation key at this point. You can register Windows once the installation completes.
The Installation procedure is pretty self-explanatory, but I recorded a video for you to follow along if you need it:
That’s it!
At the outset, building a PC might seem like an impossible task. However, it’s quite simple when you take it one step at a time. Every component has a role, and slots perfectly into its place. Think of it as an advanced LEGO set.
Once you have the compatibility of the CPU, motherboard, and RAM out of the way, things are relatively straightforward.
The beauty of a custom PC is the flexibility you gain. Not only can you allocate the budget exactly where you need, but you also have an option of making incremental upgrades in the future.
Need more graphics horsepower? Upgrade your graphics card. Need some extra compute performance? Grab a more powerful CPU.
You get the idea.
FAQ
What to do after you’ve built a PC?
After you’ve assembled your PC, you install your Operating System and any additional Drivers that your OS might not have found on its own.
Once all your Hardware has been recognized you can run some Benchmarks to see if the PC is performing as it should.
Which workloads you run after that is up to you. Install your favorite games, download your 3D Software or set up your Antivirus Software.
Is building your own PC hard?
Building your own PC is about as difficult as putting together a LEGO set. The most difficult part is applying your thermal paste, but apart from that it’s mostly just plugging different parts into each other. It’s fun!
Over to you
If you have any questions about building a PC and/or picking components, feel free to leave a comment below! I’ll do my best to help out. 🙂
![Should You Build a PC? [7 Great Reasons]](https://www.cgdirector.com/wp-content/uploads/media/2023/11/Should-You-Build-a-PC-7-Reasons-For-Building-a-PC-Twitter-594x335.jpg "Should You Build a PC? [7 Great Reasons]")
![Is GIGABYTE a Good Brand? [2024 Update]](https://www.cgdirector.com/wp-content/uploads/media/2023/07/Is-GIGABYTE-a-Good-Brand-Twitter-594x335.jpg "Is GIGABYTE a Good Brand? [2024 Update]")


28 Comments
19 May, 2024
Bro you guys are awesome! This short guide on parts and what to look for is just what I needed for a beginner like myself.
After just an hour or two of reading this, I’ve gotten very comfortable with understanding the lingo for PC’s all together.
Might I suggest an additional Water Cooling option? I’m sure I won’t be the only person wondering what a “All in One Water Cooling System” but regardless I really appreciate the depth in the explanation within this blog.
Thanks again!
7 October, 2022
Thank you so much. I just finished building my first pc a few days ago and your articles have helped me massively. You manage to break down everything in an easy to understand and organized way. It was also very convenient having almost everything in one place. Without this site, building my pc would have been a whole lot more difficult.
Thank you
8 October, 2022
Hey Fiona,
That’s awesome and it’s why we do this!
Cheers!
Jerry
27 August, 2022
are my parts all compatible
RAM (Random Access Memory):Corsair-Vengeance-3200MHz 56.99
Motherboard: GIGABYTE-B450-AORUS-PRO-WIFI 119.99
CPU (Central Processing Unit):AMD-Ryzen-5600X-12-Thread-Processor 199.99
Graphics Card:ZOTAC-GeForce-192-bit-Graphics 229.99
SSD Chip:team-group-mp33-512gb $40.99
Second SSD Chip:team-group-mp33-512gb 40.99
Power Supply Unit:Thermaltake-Certified-Continuous-cooling 33.93
2 September, 2022
Heye Kamakau,
They look compatible to me, though I’ll need some more info on the following:
– What GPU SKU?
– How much wattage does the PSU have?
– Which CPU Cooler are you planning to use?
Cheers,
Alex
18 April, 2022
Hello, I was wondering if Team T-Force 32GB 3200MHz Desktop Memory would be compatible with an ASUS ROG STRIX B550-A GAMING AM4 AMD B550 SATA 6Gb/s ATX AMD Motherboard.
20 April, 2022
The Team T-Force 32GB 3200MHz Desktop Memory is compatible with your Motherboard, yes! 🙂
Cheers,
Alex