 by
by ![How to Build your own Render Farm [Ultimate Guide]](https://www.cgdirector.com/wp-content/uploads/media/2020/04/HowToBuildYourOwnRenderfarm_Twitter-1200x675-1-1200x675.jpg "How to Build your own Render Farm [Ultimate Guide]")
TABLE OF CONTENTS
Although building your own Render Farm might seem like an expensive or complicated endeavor at first, you’ll be astonished by how fast it pays for itself, how much time it frees up in a typical work-day, and you’ll wonder why you haven’t started building one much earlier.
I used to think a Render Farm is something so crazily expensive that only huge companies such as Pixar, Disney, or big VFX-Shops could afford it.
But all it takes is another somewhat specialized PC in addition to your workstation, and you’ve already started building your very own Render Farm.
Because this Guide is quite lengthy, you might also want to make use of the table of contents above.
Before we get into how to actually build your own Render Farm, let’s take a look at some general questions:
What is a Render Farm?
A Render Farm is a Cluster of individual Computers that are hooked up through a network connection. They are usually used to process or render Computer Generated Imagery as found in Animated Films, CG Commercials, VFX Shots, or Rendered Still Images.
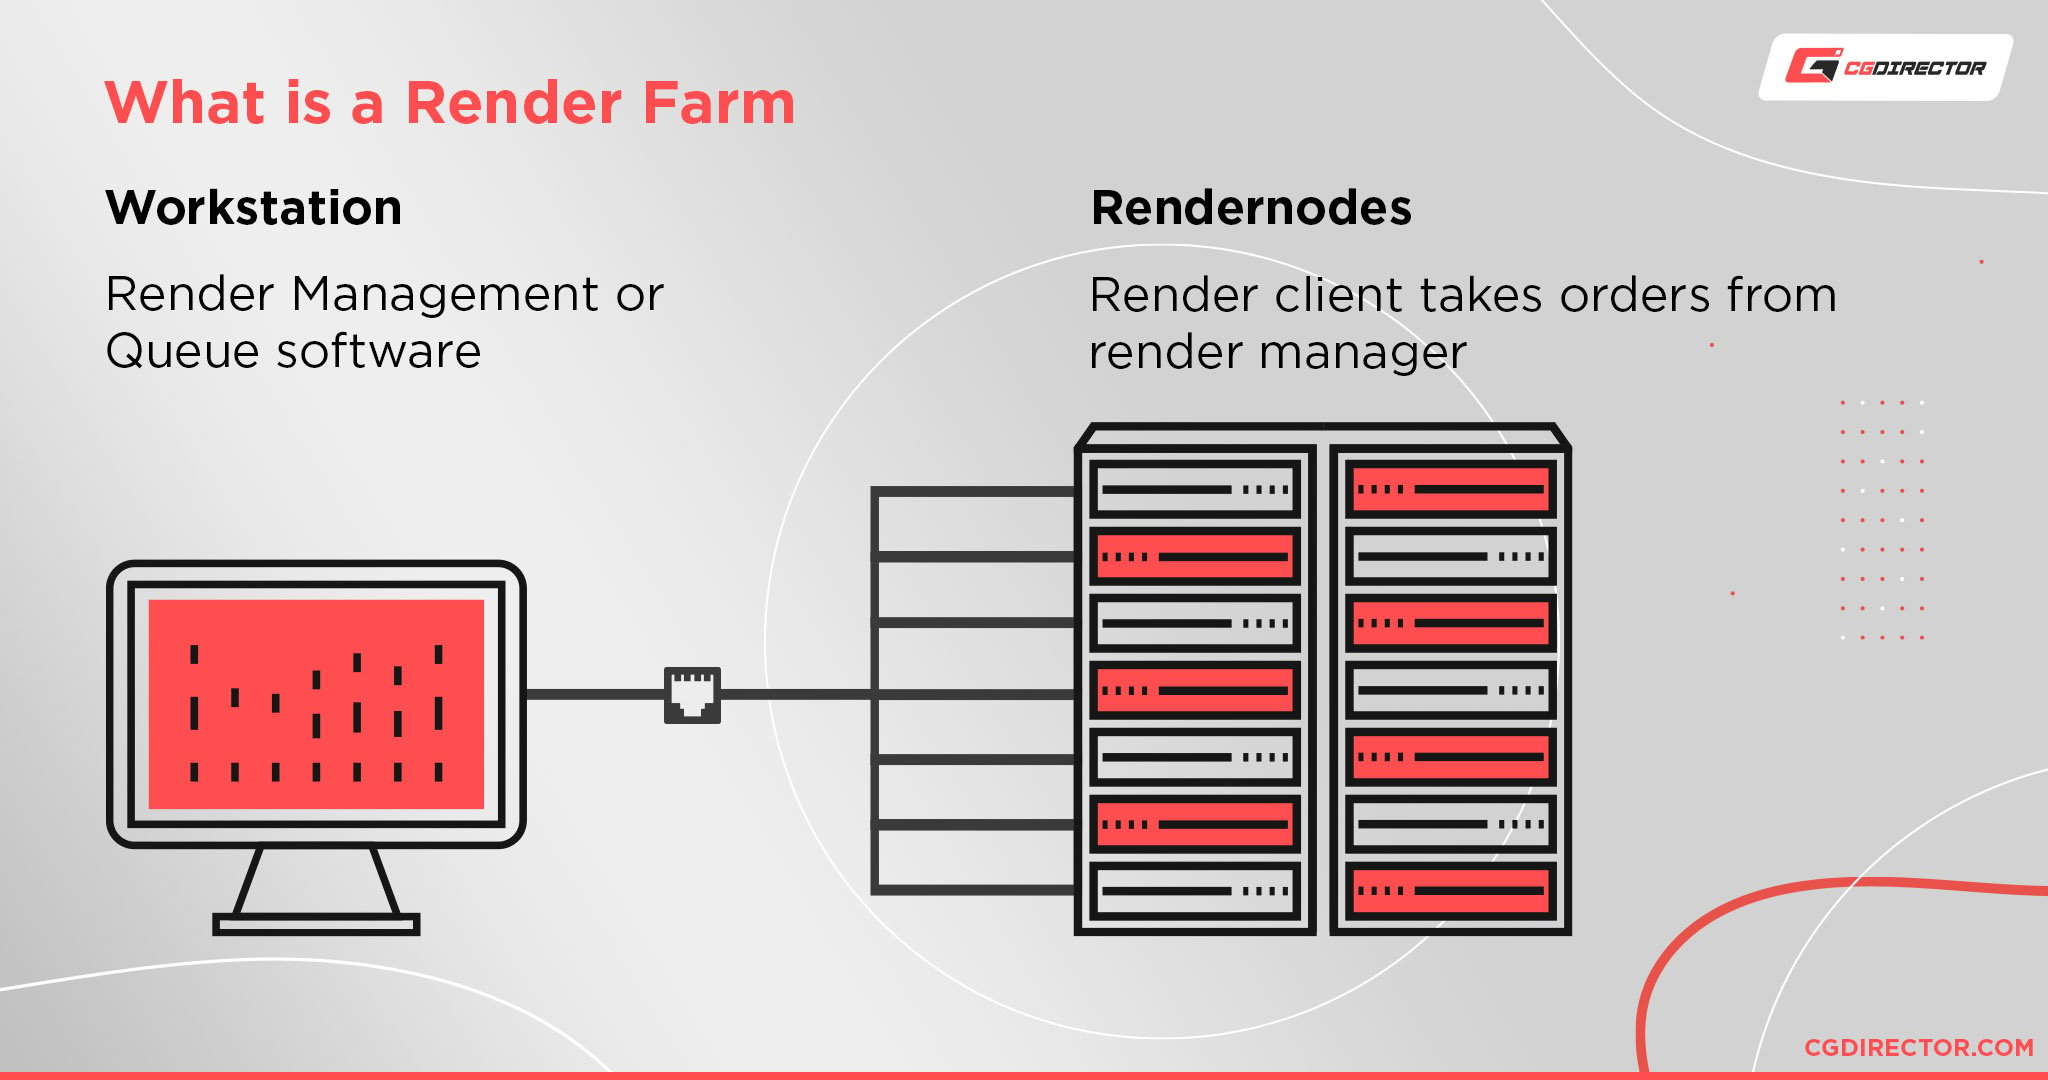
Each individual Computer in such a Render Farm Cluster is usually called a RenderNode.
The Wiki entry on Render farms states, the term Render Farm originated while processing frames for the animated short “The Bored Room”, animated in the Software formerly known as Autodesk 3D Studio.
The Autodesk technician was said to “farm” the frames after placing a bunch of Computers into a room to do just that. Back when that term was created (1990), the computers weren’t hooked up over a network yet; they had to be individually set up and assigned their tasks.
How does a Render Farm work?
A Renderfarm consists of a bunch of Rendernodes and one Rendermanager.
One Rendernode is one PC. Or one Server (Which is really just a PC in a different Form-Factor).
A Rendernode is basically just one instance of a machine capable of rendering or doing other processing tasks on its own. A Rendernode will have an operating System, such as Windows or Linux, installed, in addition to any Rendersoftware it needs to process Tasks that get sent to it.
A Rendernode also has installed, a Renderclient, which is just a fancy word for a small software application that listens for orders from the Rendermanager.
Which brings us to the Rendermanager (e.g. Thinkbox Deadline).
A Rendermanager is a Software that manages any Rendering/Processing Jobs. A Rendermanager, too, runs on any kind of ordinary PC or Server. And as long as all Rendernodes and the Rendermanager are hooked up to the same LAN (Network), they’ll be able to talk to each other. (Some work over the Internet as well)
Say, you have finished creating a 3D Scene in Blender or Cinema 4D, the next step is to send this scene to the Rendermanager.
Rendermanagers come with plugins for popular software, such as Blender or Cinema 4D. So what you get, is a command or Button within your Software of choice, that, when pressed, will send the scene to the Rendermanager Software.
The Rendermanager then takes this scene and distributes it among all Rendernodes, assigning chunks of tasks (e.g. different frame ranges) equally among the many Rendernodes, or depending on their performance capabilities.
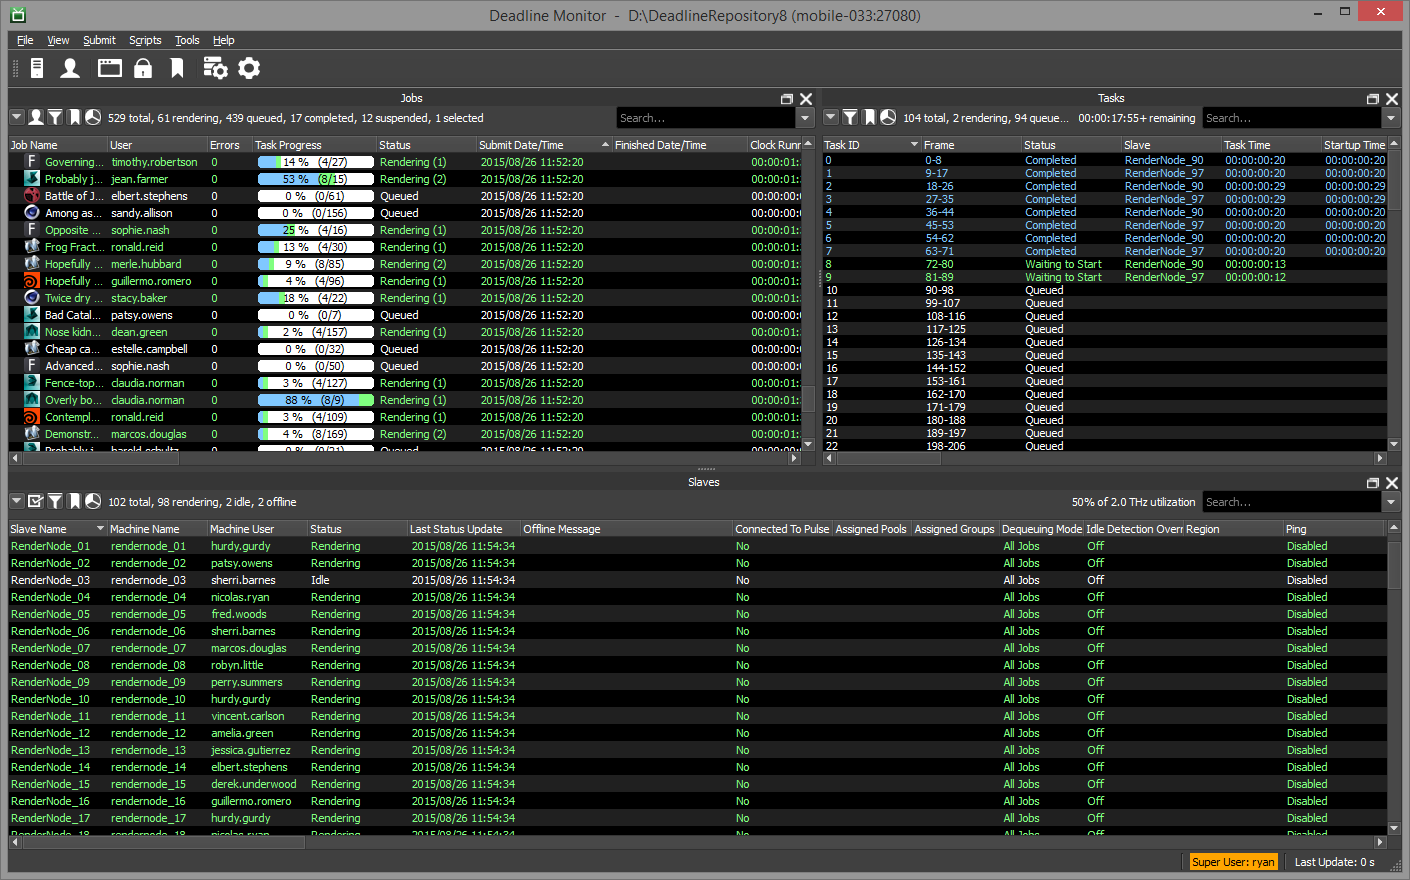
An efficient & automated Renderfarm is controlled through a Rendermanager such as Thinkbox Deadline
That’s about it. When the Rendernodes are finished with their Frames or Processing of Tasks, they send the result back to the Rendermanager, which makes sure everything is saved in the correct location for you to work with.
A Renderfarm is like raising a wooden barn.
One person (the rendermanager) will manage and delegate all work to the helpers (the render nodes) and together they can raise the barn in a much shorter time than a single person would have been able to.
Of course, a Renderfarm will only speed up tasks that can be split into subtasks. But more on that later!
Who needs a Render Farm?
If you are a VFX Shop, an Animation Studio, an Agency, or a Freelancer working in your own office / Home-Office as a one-man company, chances are you can make great use of a Render Farm as rendering faster brings many benefits.
Render Farms are used mostly for offloading, splitting up, and accelerating tasks that would otherwise require heavy processing from your active work PC or Workstation, freeing up your work PC’s resources so you can continue to work on your projects.
Of course, not all tasks can or should be offloaded onto the Render Farm. To make the best use of a Render Farm, you’ll need time-consuming tasks that would otherwise take hours, days, even weeks to finish, as well as tasks that can be split up into smaller tasks so that they can be distributed onto multiple PCs.
Here are some tasks that make the best use of a render farm:
- Rendering of Image Sequences for 3D Animation type work:
Anything you are outputting from Maya, 3dsmax, Cinema 4D, Blender, Houdini, Lightwave, Keyshot, AutoCAD, or other 3D-Software from internal or Third-Party Render Engines such as Octane, Redshift, V-Ray, Mental-Ray, Cycles … you name it. This is an excellent workload for offloading onto a Render Farm. - Rendering of Image Sequences or Animations from 2D / Compositing Software like After Effects, Nuke, Fusion, Mocha
- Processing tasks such as Denoising in Altus or Vray, Conversion/Rendering tasks from Media Encoder, DJV, FFMPEG, RVIO and Quicktime, VRIMG2EXR, and many others
- Simulation tasks from Software such as RealFlow or Naiad
- Command Line Tasks /Scripts of your choosing that can be parallelized and split up into smaller tasks
If any of the above are tasks that regularly take lots of time to complete on your PC, things are looking good for being able to benefit greatly from using a Render Farm.
Now, I am assuming you are making money off of your work, are usually reliant on client feedback and fast turnaround times, and finishing that work faster will help you get more clients or reap more money in other ways.
If you are doing personal projects, don’t have to adhere to any deadlines, and can basically have your own projects run as long as you like, then a Render Farm might not be entirely necessary.
After all, buying a Render Farm is not cheap, and it will only pay for itself if you get a return on your investment.
This brings us to our next section:
Is a Render Farm worth it?
To be able to measure the actual worth of a Render Farm, here’s what we’ll take a look at:
- Where do you lose most of your time & money without your own Render Farm?
- How your workflow changes when you have a Render Farm & How do you benefit from these workflow changes
Where do you lose most of your time & money without your own Render Farm?
So I myself am a Freelance 3D Generalist, Motion Designer, and Animator, and I work out of my Home-Office for various Agencies and Direct Clients but have also worked on-site and have been employed at different Animation Studios in the past.
Your own situation will probably differ somewhat from mine, but here’s where most of my time was wasted that could be fixed by a Render Farm, and I am sure you’ll find some things that apply to you too:
The client is breathing down your neck.
Your client has a set budget and a set deadline. The time you have to finish the project for a client is limited, and every time you wait for a decent-quality render to finish so you can show the client (without them asking, why is it so noisy?) is time you could spend improving the quality of your project.
Too few iterations & low-quality preview renderings
This is a big one. With limited processing power, you want to be able to keep working actively, so your preview renderings will be low quality, low-res, and those previews will be rare.
Every time you do a preview rendering, you lose time that you could spend actively working on your projects and improving them. Your iterations, therefore, are few, and the overall quality of your projects reflects this.
Revisions
Revisions become extremely stressful. You try to anticipate what the client might want to change last minute and prepare your scenes, layers, render-passes beforehand, wasting valuable time if the client ultimately does not want any changes or wants other changes you could not anticipate.
A day before the deadline, you can’t change anything major anymore without it cutting deep into your margins.
Final Rendering
Without your own Render Farm, you either have to utilize online Render Farms or render on your single PC. Utilizing online Render Farms is crazy expensive, and you pay out of your own margins for every frame you have to re-render because of some mistake.
Or you set up your project to render on your single Work-PC and set up a workflow with some fake flicker-free-GI, denoising, and rendering only parts of a Frame and sequence to patch over some render-mistakes … All this eats into your own expensive time – time that should be offloaded to a Render Farm.
Control
You have too little control over your work. Without a Render Farm, from the start, you have to consider how complex the project is allowed to get so you can still final render it in the amount of time it requires before the deadline arrives, and hope for as few revisions as possible, things that don’t maneuver you into a situation that makes you ask the client for more money.
You spend your own valuable time on things that would be unnecessary if you had the crunching power to offload to, limiting your ability to iterate and improve the project.
Ultimately my clients and projects control me and my night-shifts, and I find myself always being one step behind when I really should be one step ahead.
Now, let’s take a look at how having a Render Farm changes some of the above.
How your workflow changes when you have a Render Farm & How do you benefit from these workflow changes
The client is breathing down your neck.
Well, this will not change all that much. The Client will still want to see the milestones and pressure you for having them done by a specific deadline. What changes is that because you have much more processing power with a Render Farm, you can deliver these milestones quickly and in high quality. You can work on improving your project up until shortly before the deadline arrives and then have the Render Farm take over and push out those frames in no time.
More Iterations & high-quality preview renderings
Because of the added render power, you can view the fruits of your hard work more often and in better quality. You will be able to iterate more often, improving upon the quality of your project. Gone are the days of never seeing how your work will look like until it has been final rendered.
Revisions
Revisions that require re-rendering become much less stressful because you can count on your Render Farm’s processing power.
You don’t have to argue with the client as much anymore because changing a small thing in your scene and pressing that re-render button is a much smaller effort than it used to be.
The biggest time saver, in my opinion: You don’t have to over-optimize your scene anymore. You don’t have to fiddle around with trying to accomplish fake Global Illumination, or denoising scenes in post, rendering in lower resolution & upscaling in post, or render out a bunch of renderpasses so you can apply client change requests in post without having to re-render in 3D.
Or render patches of frames that you overlay in post, making your comp overly complex until even you don’t fully understand what your comp or edit consists of anymore, making change requests longer and longer, and that eats deeply into your margins and nerves.
Because re-rendering a scene is so quick with a Render Farm, you save a lot of time of your own work-hours and, in turn, let the Render Farm handle the heavy lifting (Just Brute-Force the GI!).
The time you used to spend trying to keep render-time down, you can now use in other ways – Improve the quality of your project, start another project in parallel to increase your revenue, or just enjoy your new free time.
Final Rendering
Your own time is much more valuable than the time a machine spends processing. You can bill a client tenfold for your own work-hours vs. what you bill for rendertime.
If the client wants an extra revision after you’ve final-rendered everything (this happens all the time), you start debating over what was agreed upon and what the client is willing to pay extra. I am sure these are topics that you, too, would like to avoid if possible, as it tests any Client-Contractor relationship.
How great would it be if you could just re-render a shot and call it a day (even though the client should pay for it)? You’d be the hero, strengthen your client relationship, you’d be the go-to guy for anything in your area of business, and secure long-lasting follow-up projects.
Control
You get back control. A Render Farm will take almost anything you throw at it and make sure it gets rendered in high quality and on time.
You spend your time on what you are best at & passionate about and why you are being hired: Creating awesome & creative stuff and not fiddling with optimization.
Disclaimer: It goes without saying that some level of project optimization should always be part of your everyday work – if you have a Render Farm or not.
Is it worth it?
So back to this section’s original question: Is an own Render Farm worth it?
If rendering / processing is part of earning your living – Yes, it is!
A Render Farm is not cheap, but if you make money through it, it will pay for itself faster than you’d think.
Let’s do some math:
Above, we took a look at all of the benefits a Render Farm brings to your work – ease of mind, better client-relationship, better quality, higher iterations, more time spent on stuff you like doing, more free time, and so on, but even if all that weren’t the case we’d still have the question of money. Is it worth it money-wise?
About 15 – 20% of what I bill clients (in my line of 3D work) would usually be marked as rendering / processing related tasks. This will vary on the type of work you do; editors might have less, 3D Animators that regularly output to 4K 60fps might have even more.
If, say, I average 5K$ per Project, that means I bill the client 750 – 1000$ per project for rendering / processing related tasks.
After just two projects, you could get another PC (1,5 – 2k$), after 4 Projects, a strong render node (4k$).
Take a look at your bills and see what you charge for those tasks and calculate how long it would take you until an additional render node pays for itself.
And the best thing is – an additional render node or more nodes (a Render Farm) doesn’t just pay for itself; AFTER it paid for itself, you can continue billing the client for rendering even though you have almost no render costs anymore. You can pocket all that additional money or invest it into more render nodes.
Or you could decrease the cost of rendering for your client and become even more competitive in the industry – landing more projects.
Online Render Farm vs. your own Render Farm… Cost comparison & benefits
We did talk a bit about how your own Render Farm is a lot more lucrative than rendering on just your single pc or using other means for rendering – and by other means, I mean an online Render Farm.
Couldn’t you just use an online Render Farm, that way you would just pay the costs of a Render Farm if you really need it and not have expensive machines sitting in your office doing nothing when they are not needed? Sort of like renting an apartment vs. buying one?
You could, but you probably guessed it: You shouldn’t! Here’s why.
Price & Control.
Price
Let’s do a quick price comparison. Say we are working on a fairly average 3D-Animation Project. We will be final rendering our Project that consists of 1 Minute of full-CG Animation.
Here are our rendertimes:
- 60 seconds FullHD Animation
- @ 30FPS
- = 1800 Frames
Our own RenderNode is a fairly standard 4x 2080Ti GPU PC, and we are rendering in Cinema 4D with Redshift.
Measuring the GPU Render Performance gets us 1184 Octanebench Points. Why Octanebench Points? Because those are a popular measurement of GPU Render Performance and easy to input in online-Render Farm calculations to get an idea of what it will cost to render our Project on an online Render Farm.
And since we measured how long an average frame renders on our own Render node (3 Minutes on our node that scores 1184 Octanebench Points) with these specs, the online Render Farm can figure out how long it will take to render on their online Render Farm servers.
So let’s input this into the Price calculator at one of the more popular online Render Farms, Ranch Computing:

Our Project will cost 1163€ (1264$) to render on the online Render Farm (at the lowest tier, which takes about 10 hours).
Now, how expensive will it be to render on our own Render Farm (or a single Render node)?
First, we have to buy the Render node and also get a Redshift License for our Render node:
- Cost of the Render node with 4x RTX 2080Ti, 64GB of RAM, Threadripper 1920X
~ 6000$ - Cost of a Redshift License: 500$
- Network stuff: Gigabit Switch and Cables. 50$
So our own initial Render node costs are at about 6550$.
Power Consumption while rendering: The Render node pulls about 1000 Watts when utilizing CUDA Cores on our GPUs, and it will take about 4 days to finish rendering the Project on our own Render node.
At, say, 25 cents per KWH, that would drive up our Power Bill by about 24$ for rendering this project. 24$ for 4 days of rendering is almost negligible, and you might already start to get an idea of how cheap it is for you to do (free-of-charge) re-renders once you have an own Render Farm (and be a hero to your clients).
So since the electricity costs are almost negligible, let’s take a quick look at how long it takes until our Render node pays for itself.
After some easy math: 6500$ (Cost of Render node) / 1264$ (Cost of Rendering a project on an online Render Farm) = After just ~5 (similar sized) Projects, the Render node already pays for itself.
And the best thing: After it paid for itself, with every additional project, the charge for rendering goes right into your pocket (theoretically), earning you ~1200$ every time. (Of course, depending on the type/size of your projects)
On online Render Farms, you always pay full price for rendering. No matter how many years you’ve been doing it, every time you render a project, the online Render Farm of your choice will open its hands and ask to be paid. This is not very sustainable.
If you are in a creative field and know you will be doing this for a long time to come (at least 5 projects), then by all means, get your own Render Farm! 🙂
Control
Apart from the cost, here’s the second reason why you should start building your own Render Farm: Control.
Although it seems like an online Render Farm blazes through your frames in no time, there are some things to consider here –
You will have to up-, and download your scene files and finished frames. Live in a more remote location? Expect that to take hours or more every time you want to start a new rendering or get back the rendered frames.
Go collect and pack a scene with all its dependencies and see how big it is (usually in the gigabytes). How large are your rendered frames? Doing EXR or other high-bit-depth formats with lots of layers and renderpasses (usually in the 10s of gigabytes)?
You’ll need really strong internet to make use of online Render Farms effectively. Do some math on your internet connection speeds.
On your own Render Farm, the network connection lets you copy or send jobs in a matter of seconds. With a proper local render manager, you won’t even have to think about copying anything at all.
In online Render Farms, the cheapest tier also has the lowest priority. If you want to save money with an online Render Farm, you usually turn down the priority, which makes the job cheaper – Need a quick re-render of a shot before the deadline? Expect to double or triple the cost.
On your own Render Farm, you always have top priority at no extra cost.
Online Render Farms are fixed servers with pre-installed versions of software and plugins. If you use a specific version of a render-engine plugin, for example, chances are the Render Farm will use a different version, potentially messing up how your renders look.
On your own Render Farm, you have full control over what versions are installed.
Also: Your own Render Farm can be much more easily automated. You want the rendered frames to be put into your comp automatically and render the comp after the 3d rendering is finished? You can set that up.
With render managers, you can set up a whole pipeline of things that your own Render Farm should work through, and when you get up in the morning, you will be freshly presented with a finished edit / mp4, containing all the new renders.
But more on Render Managers later.
The speed of an online Render Farm is without competition.
Now, there surely is at least one thing where an online Render Farm clearly takes the lead vs. your own Render Farm, and that is render speed in huge projects when money is of little criteria.
You will find an own Render Farm makes much more sense when you are working on small to medium-sized projects (In your home office or small agencies up to 10-15 people), but when you are working on huge productions or VFX for feature films and have a rather large budget set aside for rendering, an online Render Farm will be the way to go.
There is just no way your own Render Farm can compete with an online Render Farm that consists of hundreds of servers and costs millions to build.
But this really only comes into effect when your own Render Farm is incapable of rendering your projects in the time you need them done.
Disclaimer: By no means is this article meant to degrade the right of online Render Farms to exist. They have their very own niche and target group, and many people use them successfully.
If you belong to one of these people you will have to decide for yourself. Maybe this next section will make it easier for you:
Conclusion for “Do you need your own Render Farm?”
Here are a short summary and overview for you to quickly figure out if a Render Farm makes sense for you:
3D Animation Rendering
Absolutely!
Consider at least 1-3 Rendernodes per 3D-Artists. Both GPU and CPU Render Engines make full use of all of your resources and scale almost linearly with added Render nodes. Image Sequence Rendering can be split up into per-frame tasks without any issues and can therefore be offloaded perfectly onto multiple PCs.
3D Still Image Rendering
Yes, if the projects are large enough to require it.
When rendering many still images, they behave in the same way as the above described 3D-Animation Image-Sequence Rendering, meaning they can make full use of a Render Farm and can be easily offloaded onto multiple render nodes.
If you only render a single image at a time, though, using multiple PCs gets a bit more difficult. Optimally your 3D Software would be able to split your single image into smaller parts (usually called buckets) that can then be worked on by multiple PCs in your Render Farm, but in my experience, oftentimes, this can get tricky and doesn’t work as expected.
Having a single extremely powerful Render node might make more sense to those rendering, say, very large but only a few images.
VFX, Particles, Fluids,
Yes, but make sure your workload / software supports this.
VFX itself consists of a lot of subdisciplines and will mostly fall into the category of 3D-Animation Image sequence Rendering, so you’ll make great use of a Render Farm here.
Particles and Fluids and other Simulation Processing as found e.g. in the Cinema 4D Plugin X-Particles, are often processes that are attached to dependencies, meaning that subsequent frames in a simulation are usually dependent on previous frames.
This means you won’t be able to offload individual frames onto different Rendernodes to speed up the actual simulation process. There are tricks like having multiple sims that don’t depend on each other in scenes to circumvent this, though.
It all depends on your workflow and scene setup. Meshing of Fluids (for example, in realflow), and similar tasks, then again, is something that can be easily offloaded onto multiple PCs, and you can make great use of a Render Farm here.
Compositing
Yes, absolutely!
Comps are 99% Frame-based and outputted to image Sequences, so you can make full use of multiple PCs for accelerating your Comp processing & rendering.
Video Editing
Yes, but with restrictions.
Similar to 3D Still Image Rendering, it will depend on a few factors if you can make good use of a Render Farm. The main question always is, how far can you break down any subtasks that can then be offloaded onto multiple individual Rendernodes?
If you output Image Sequences from your Edits, then you can easily make full use of a Render Farm. If you output to a Video Container Format such as MP4, MOV, AVI, and so on (so your output is a single file), this task can usually not easily be broken down into smaller tasks.
Video Conversion
Yes, but with restrictions.
If you have hundreds of mp4s (or other video containers) to convert, then yes, this is a great task to be offloaded onto multiple PCs. If you only have one (really long) Video to convert, this is something that a single PC will have to do.
Photo Editing / Photogrammetry
Yes, but with restrictions.
If you can make full use of a Render Farm for Photo Editing or Photogrammetry depends a lot on the features of your Software. Processing a huge number of photos in Lightroom, for example, is something that you can easily task a Render node to do for you, to free up your main Work-PC’s resources.
In Photogrammetry, you’ll need to find your bottlenecks to optimize and speed up this process.
Often, the bottleneck in Photogrammetry is loading the images, and if this is through a network connection, it might slow down the process. Having all Images on a fast NVME SSD and do the processing locally might be better than offloading onto multiple PCs.
Graphic Design, Illustration
No, not really.
I can’t think of any way a Render Farm would benefit Graphic Designers or Illustrators. Help me out here if you can think of some ways?
Conclusion
I, myself, clearly fall into the category of a 3D-Artist who is constantly rendering small to medium-sized animation projects, and I have made great use of my Render Farm, which currently consists of 3 render nodes with 4 GPUs each (I mostly do GPU rendering), and I am consistently upgrading.
What category do you fall into, and do you already have your own Render Farm, or considering buying one?
Be sure to let me know of any questions you have in the comments!
In Part 2 of this article series, we will take an in-depth look at how to actually build your own Render Farm.
Building your own Render Farm
In the first part of this article series, we took a look at the many benefits of having an own Render Farm and figuring out if you actually need a Render Farm for your workloads.
Let’s now dive into actually building your own Render Farm. What parts do you need for your workloads, how do you configure your Network and set up your software and Rendermanager to make full use of the additional performance:
Figuring out what Hardware you need
What we’ve already learned is that a Render Farm basically consists of a bunch of Computers, also called “Rendernodes,” that are hooked up through a network.
The first step in building a Render Farm, therefore, is figuring out what hardware components these Computers should consist of. And this requires you to take a look at what specific workloads you’d like to run on your Rendernodes / Render Farm.
Because we will usually only run a few workloads on this Render Farm, we don’t have to build “allrounder” Rendernodes but can specialize and optimize them to run these few tasks extremely well.
The Difference between a PC / Workstation and a Render node
And this is also where the difference between a “normal” PC / Workstation and a Render node lies. A Workstation will have to be able to do many things – Active Work, Viewport Speed, The occasional Render, Conversion, Editing, Compositing, you name it.
A Render node can be specialized in being good at only one or two things, and that is where the benefit lies. Additionally, a Render node usually just sits in a dark room somewhere, and there is no Monitor or Keyboard / Mouse attached to it.
Therefore you can save on some more Components such as peripherals and the GPU if you don’t need them. Also: A Render node can be the ugliest thing you’ll never see because it is usually hidden away and accessed through a network cable.
An example: If all you do is render in Co-rona, a bunch of expensive GPUs will do you no good, as this is a CPU-Render-Engine that only makes use of your CPU’s resources.
Likewise, if you usually render in GPU-Render-Engines like Redshift or Octane, Having an expensive 64-Core Threadripper 3990X will do you no good; it would even decrease your performance because GPU Render Engines perform better when paired with CPUs that have high core clocks and not necessarily a huge number of cores.
What will you use your Render Farm for?
So ask yourself, what will you use your additional PCs (Rendernodes) for? For most of you, this will be an easy decision because you’ve already taken the first few steps in deciding you need a Render Farm. But also consider that you might be able to run more than just your main workload on the Render Farm.
Doing lots of 3D Rendering? That’s great to offload to a Render Farm – But you will most likely also be doing compositing or editing after your 3D-Rendered Frames are done.
And outputting Frames from your comp or edit too can be offloaded to the Render Farm.
Some tasks might not be possible to break down into smaller tasks (so several render nodes can work on them simultaneously, as is the case with rendering image sequences), but when offloading tasks to a Render node, at least you can free up your main work PC, so you can continue working smoothly and without lag.
Hardware & PC-Parts you’ll need for a Renderfarm
So let’s dive into what kind of hardware you’ll need for specific types of Software/Workloads so they perform the best they can (and therefore what type of hardware component in your Render node(s) should be the strongest):
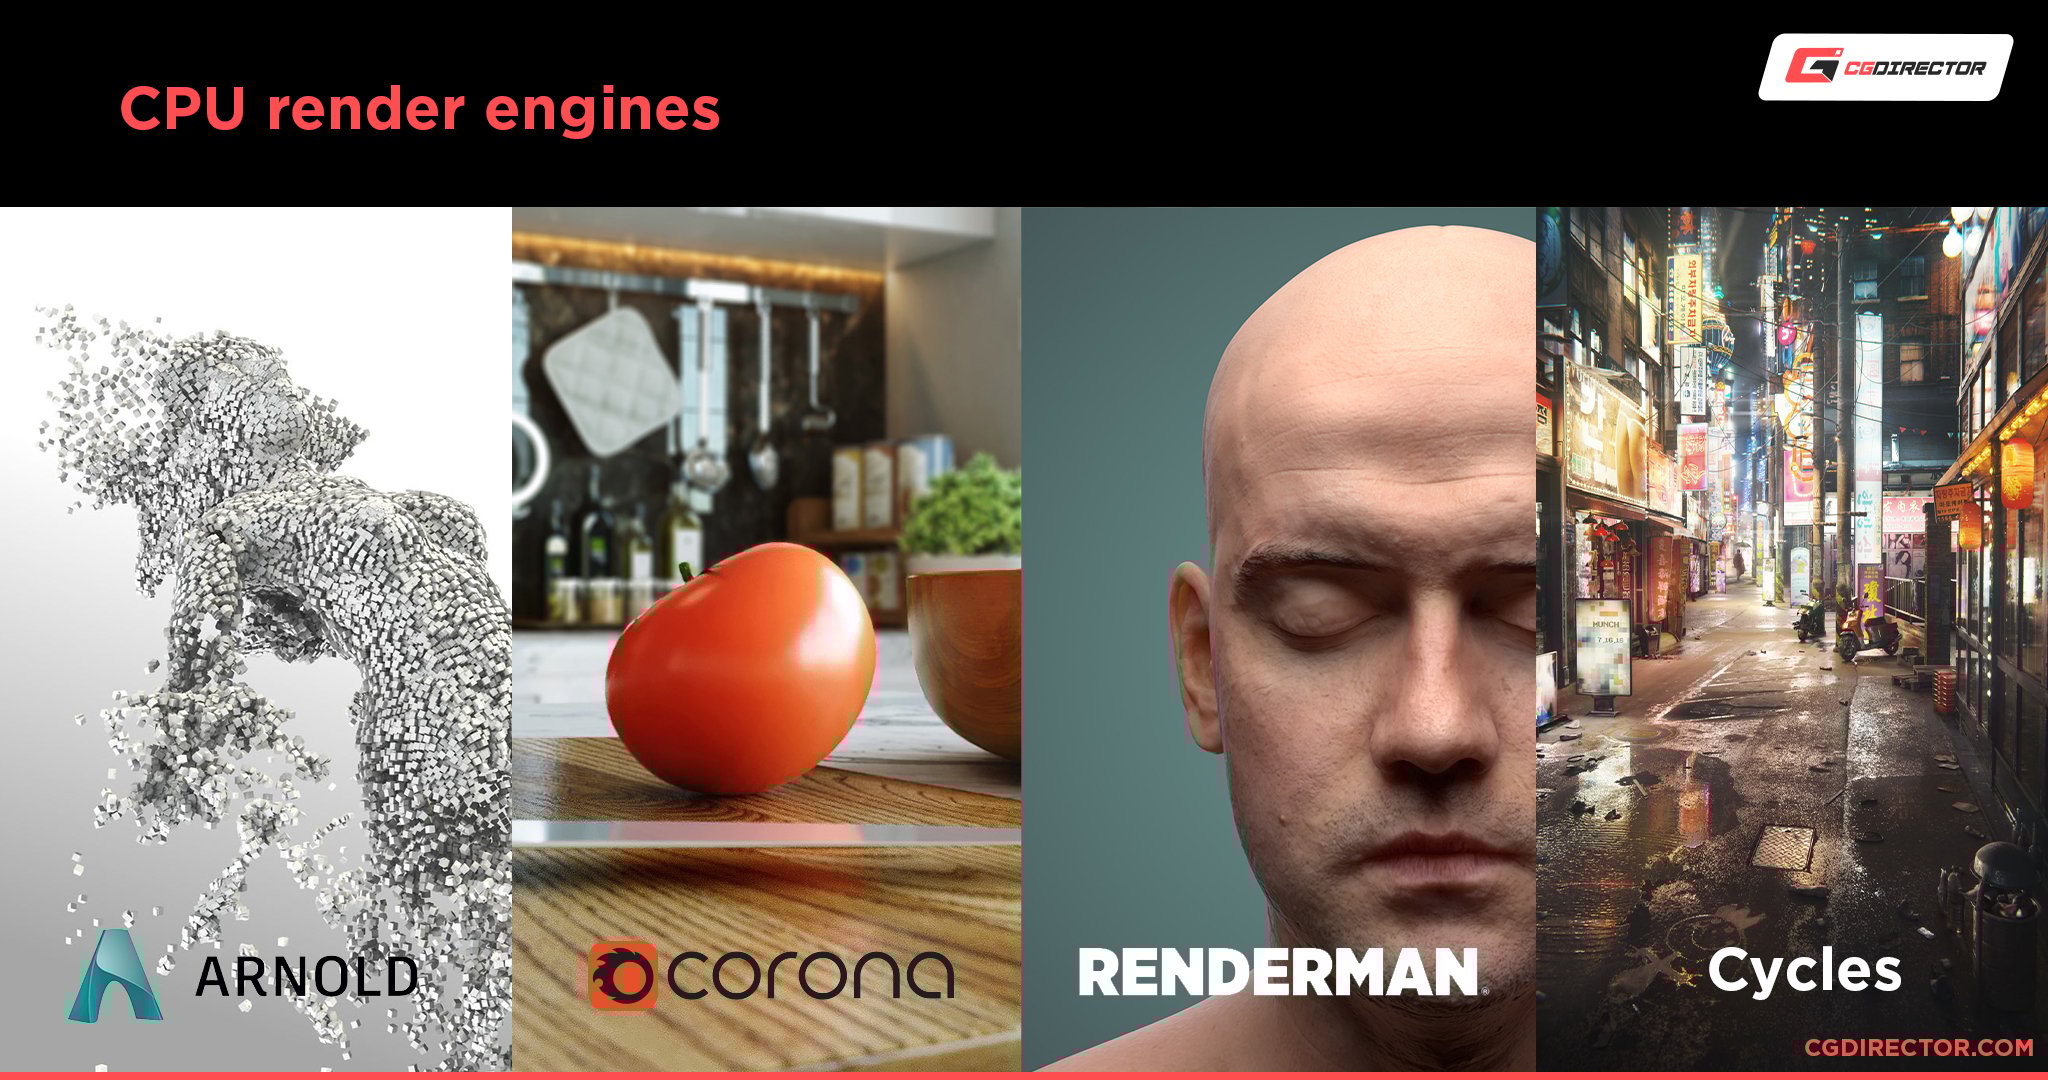
Render Farm / Render node for CPU-Based Rendering
CPU based Rendering includes Software such as Vray-CPU, Blender-CPU, Cinema 4D (Physical/Standard), Maya, 3DSMax, Arnold-CPU, and more
CPU
As the name implies, the most important component in a Render node (or PC) for CPU-Rendering Workloads is the CPU.
The best CPU for Rendering is usually one with as many Cores as possible that clock as fast as possible. You’ll need to consider the Price and Power-draw of the CPU, too, though, and find that sweet spot that fits your budget.
Also, check out our Threadripper 3990X 64-Core CPU Review.
CPU Recommendations for a CPU-Based Render node
- AMD Ryzen Threadripper 3990X
- AMD Ryzen Threadripper 3970X
- AMD Ryzen Threadripper 3960X
- AMD Ryzen Threadripper 2990WX
- AMD Ryzen 5950X
Why no Intel Xeon CPUs or Intel X-Series CPUs? Intel’s high-core-count CPUs are still playing catch up to AMD’s offerings and are currently lower value when looking at performance per price.
RAM
For CPU Based Rendering, RAM, too, is fairly important, depending on the complexity of your scenes. 32GB of RAM usually gets the job done, but you might want 64GB or more when rendering fairly complex scenes.
RAM Recommendations for a CPU-Based Render node
GPU
The great thing about a Render node that is optimized for CPU Rendering is the fact that you can save some $$ on the GPU as it will just be sitting there doing nothing. You don’t have a monitor attached to it, and it isn’t utilized when you are CPU rendering, so go ahead and get a cheap one.
You still want to be able to use the remote-desktop tool to troubleshoot software that might have stalled, so the minimum requirements here are a fairly common OpenGL capable GPU.
GPU Recommendations for a CPU-Based Render node
SSD
Any run of the mill SSD will do just fine. All the Render node does is load the OS and Software that will do the rendering. It might cache or temporarily save some textures and frames for the jobs it renders, but other than that, the SSD will never be the bottleneck of a CPU Render node.
SSD Recommendations for a CPU-Based Render node
Motherboard
Your Motherboard, of course, has to fit the CPU you are getting and should have networking capabilities. A Gigabit Lan Port usually suffices, but if your Network runs on 10G, some Motherboards come with built-in 10G.
Also, check our Motherboard Articles for Threadripper CPUs and AMD Ryzen CPUs.
Motherboard Recommendations for a CPU-Based Render node
- For 3rd Gen Threadripper: ASRock TRX40 Creator
- For 1st + 2nd gen Threadripper: Gigabyte x399 Designare Ex
- For Intel X-Series CPUs: MSI X299 Gaming Pro Carbon
Cooling
When utilizing the CPU for long periods of time under full load, good CPU-Cooling is a must.
Without it, you risk throttling the CPU’s performance and defeating the purpose of getting a high-end, specialized Rendering machine.
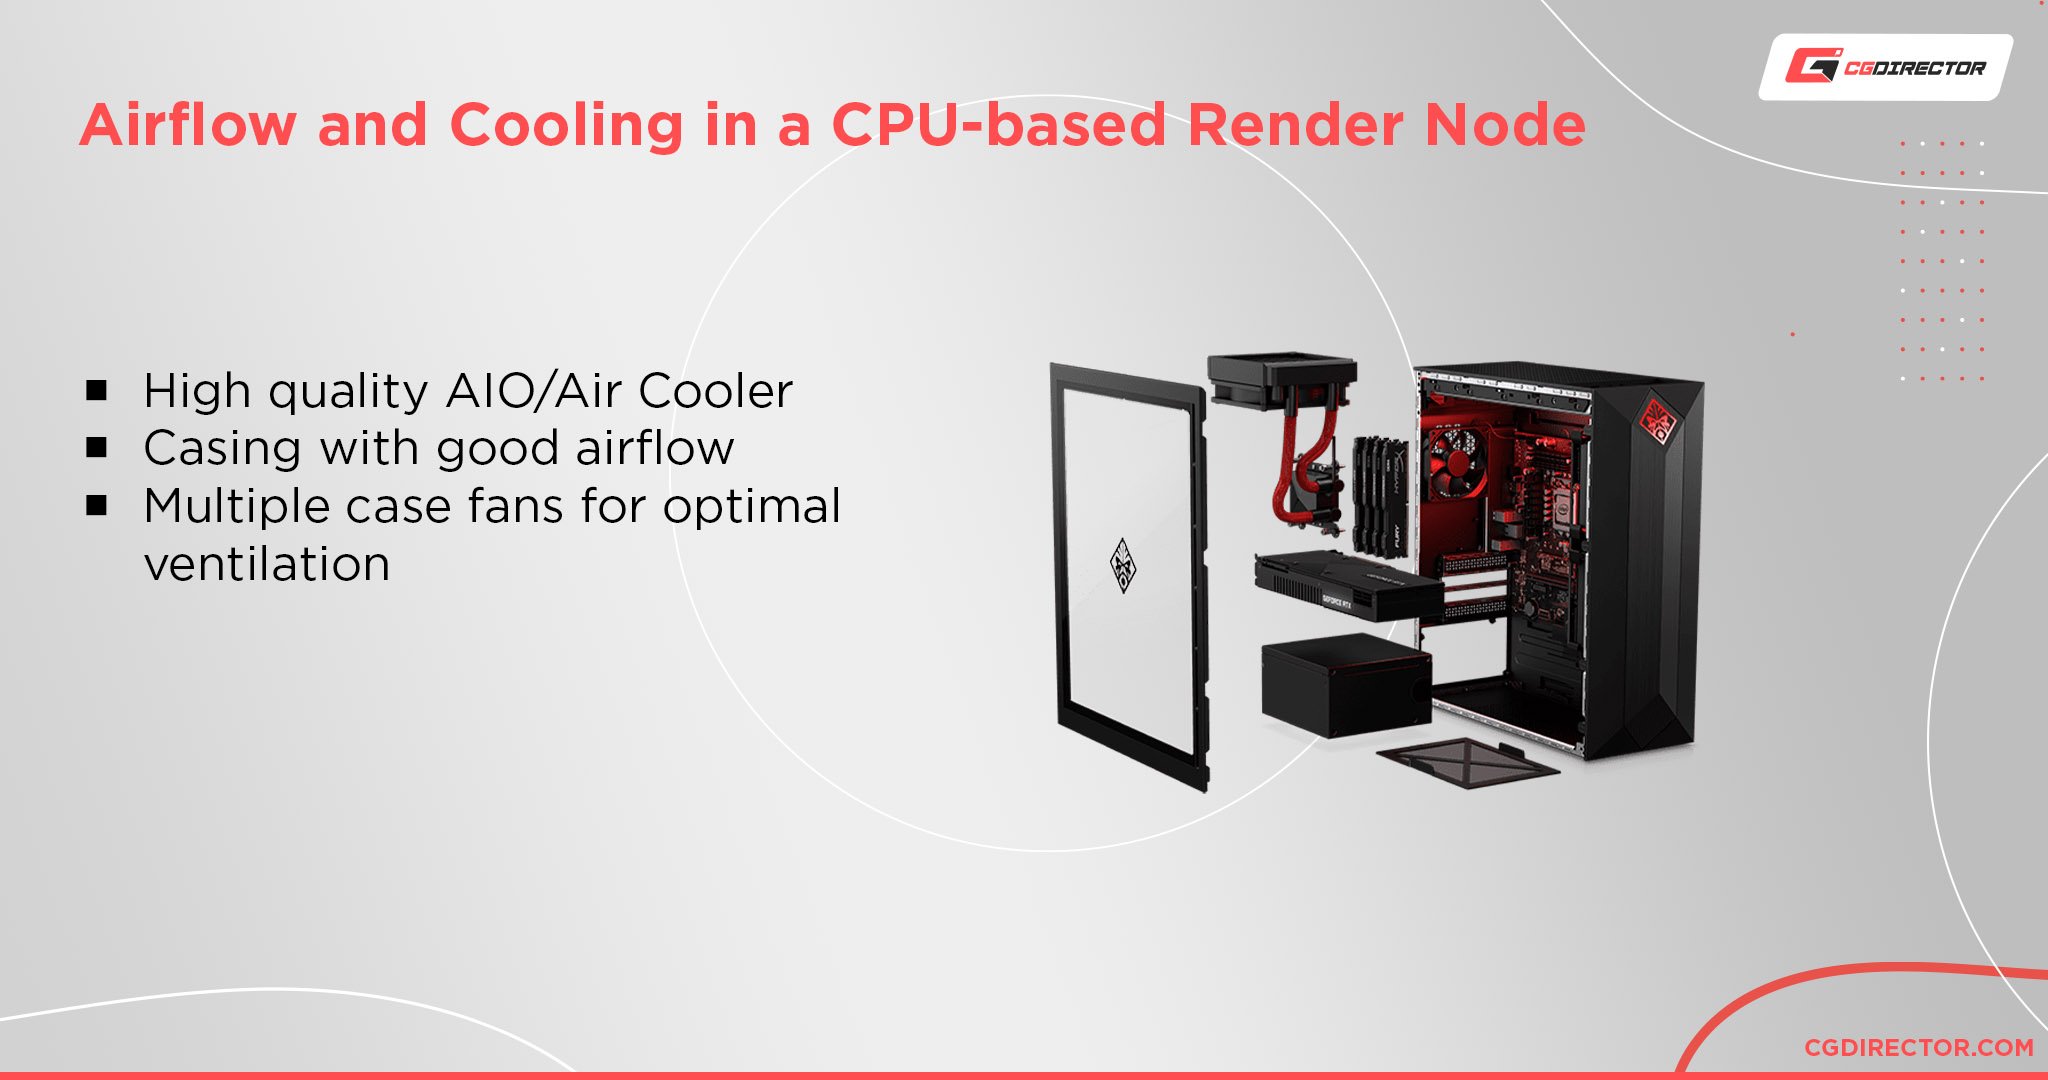
AIO (All-In-One) Watercooling solutions usually perform best for sustained loads, but some higher-end Air Coolers can work well too.
For all Rendernodes, be sure to have ample ventilation in your PC-Case as this machine will be doing sustained loads that can drive the temperature inside the chassis up considerably. And with every extra degree, you might be throttling the performance.
CPU-Cooler Recommendations for a CPU-Based Render node
- beQuiet Dark Rock Pro 4
- Alphacool Eisbaer 360
- Corsair H150i Pro
- (Always check socket compatibility between the CPU-Socket and your CPU-Cooler)
Case-Fan Recommendations for a CPU-Based Render node
- beQuiet Silent Wings 3
- (many cases already have case-fans included, check this first)
PSU
You won’t need an overly strong PSU to power a CPU-Only Render node. A 650W PSU will usually suffice. That said, be sure to get a PSU with high efficiency, as chances are you won’t constantly draw the amount of power that lies at peak-efficiency.
Your Render node might idle for longer periods of time, and having Platinum or Titanium PSUs will save you some money in the long run.
PSU Recommendations for a CPU-Based Render node
Case
The PC-Cabinet does not have to be big at all, as you are only housing a Motherboard and a single GPU (if at all), so a normal sized ATX Case will do just fine (as long as your motherboard is ATX).
Case Recommendations:
- For Budget Builds: Phanteks Enthoo Pro
- For Tinkerers: be quiet! Dark Base Pro 900
- For Sleeper Workstations: Nanoxia Deep Silence 3
- For Compact Quality: Cooler Master Silencio S400
Our example build shows what such a Render node for CPU Rendering could look like:
—-
Render Farm / Render node for GPU-Based Rendering
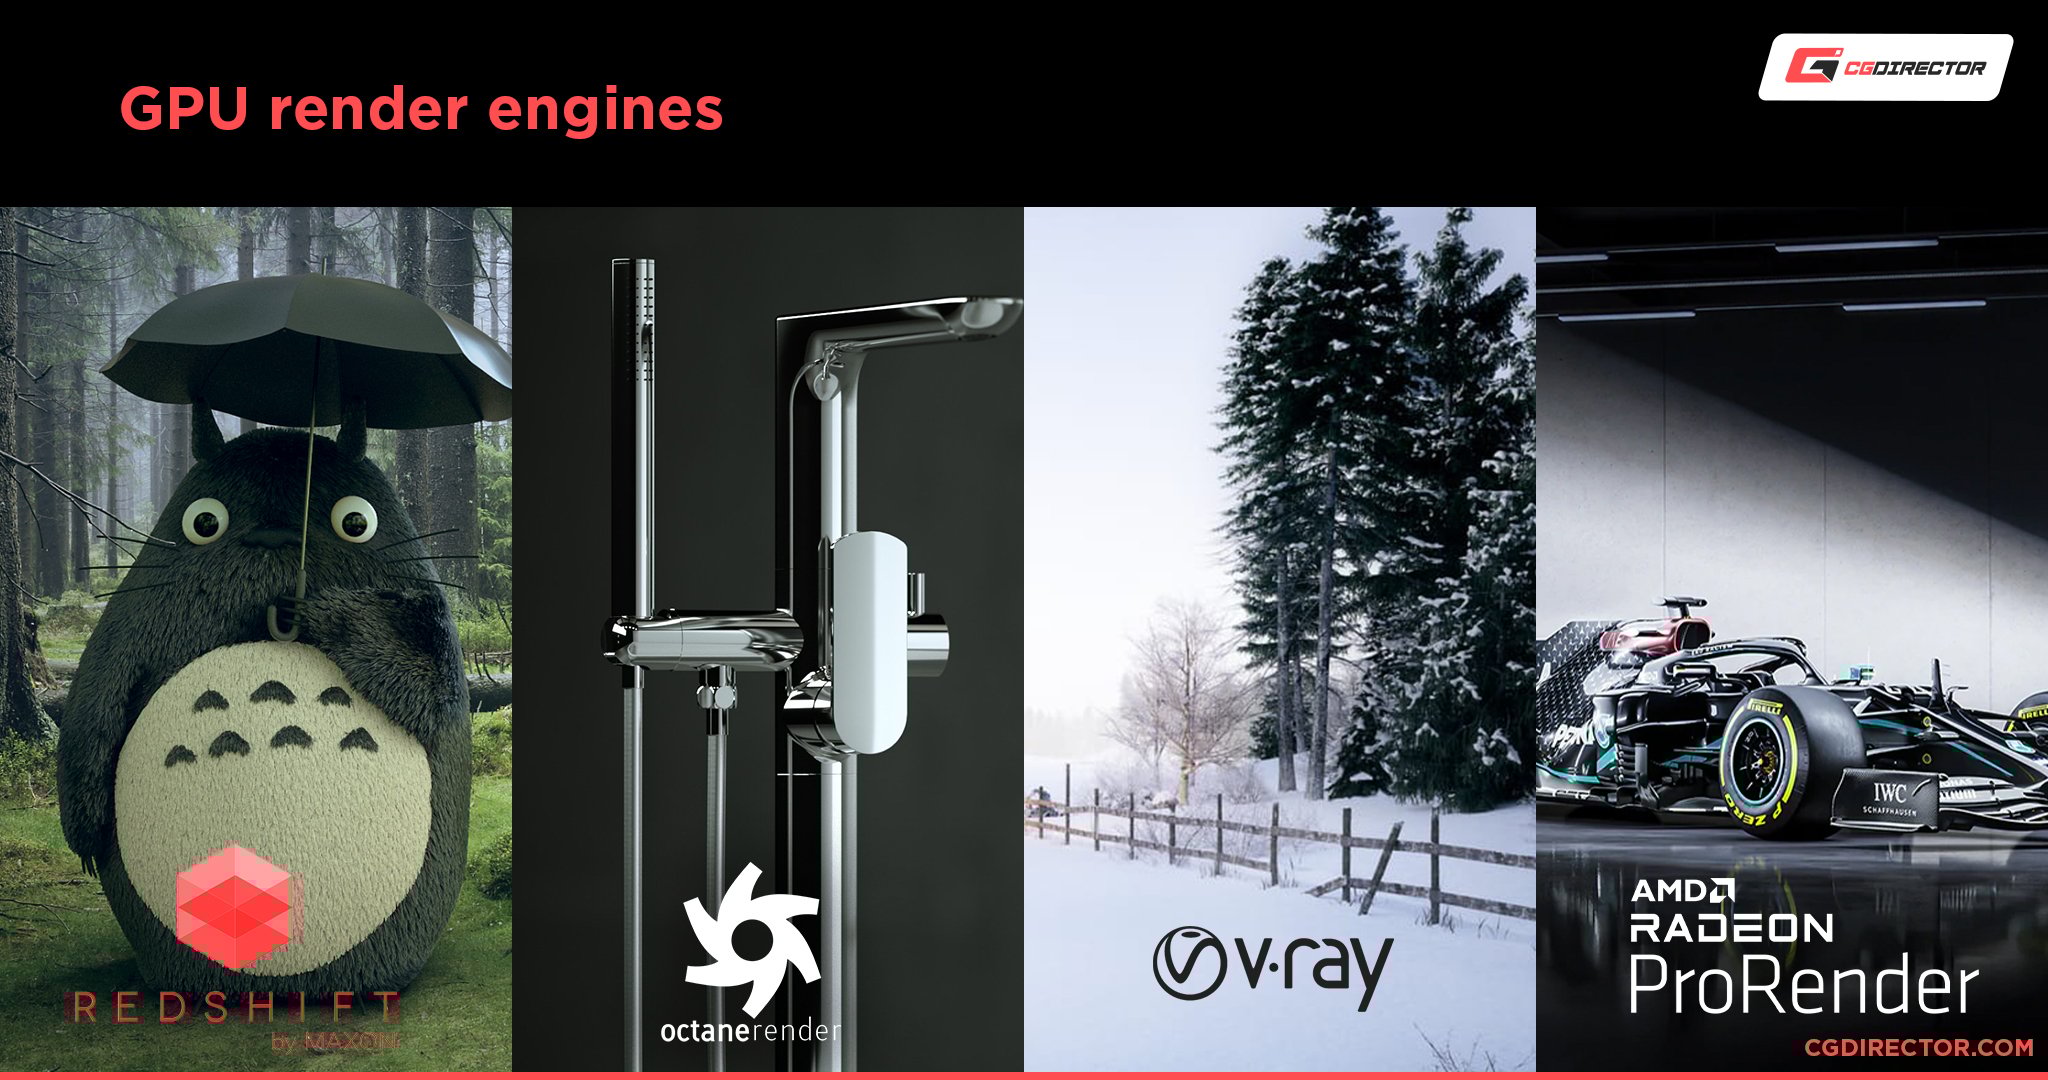
GPU Based Rendering includes Render Engines such as Redshift, Octane, Vray-GPU, Cycles, and more.
CPU
To make the most out of a GPU Rendering Render node, the CPU should be clocked as high as possible. Although the CPU is not doing the heavy lifting when using your GPUs to render, it is still responsible for some tasks that can’t be executed on the GPUs.
As the GPUs are usually dependent on these CPU tasks, they must be finished as quickly as possible, enabling the GPUs to continue rendering.
CPU Recommendations for a GPU-Based Render node
RAM
You might have heard of the rule of thumb that for GPU rendering, you need at least 2x the combined VRAM size as system RAM. This would mean for a 4x GPU Rendering Rig (with 11GB of VRAM each), you would need at least 88GB of RAM.
In my experience, this is excessive. It all depends on the complexity of your scenes and if you have to out-of-core (if the scene doesn’t fit into the VRAM of your GPU).
It also depends on the number of frames you render simultaneously. If you only ever render one frame per render node (so, say, the 4 GPUs in your rig render on 1 frame at the same time), your RAM requirements will be much lower.
32GB to 64GB of RAM is usually sufficient, and only in rare cases will you need to increase that to 128GB of RAM per Render node.
RAM Recommendations for a GPU-Based Render node
GPU
The most important components in a GPU-based Render node, of course, are the GPUs. With each added GPU, your render performance will increase almost linearly, so it’s safe to say that a multi-GPU setup should be our goal here to make the most of our GPU-Render node.
Finding the right GPUs to add to your render node is a balancing act between the number of GPUs you’ll want or need, the budget you have, the amount of VRAM you’ll need per GPU, and the power draw.
You will usually get the best performance per dollar with mid-tier GPUs such as the RTX 2070 Super, but of course, 4x of those will never get you the same performance as 4x 2080Tis, which are much more powerful but also cost disproportionately more.
Be sure to check our benchmark lists for octanebench and redshift to get an idea of how different GPUs perform. Also, take a look at our hardware guide for GPU rendering for a more in-depth look at building an optimized GPU-rendering pc.
Here are a couple of other important things to take note of when building a multi-GPU setup:
Your GPUs should be cooled blower-style. Because you stack multiple GPUs right on top of each other, there is just not enough space for open-air cooled GPUs to get enough air. Blower-style GPUs are much better at this and blow the hot air out the back of the pc, keeping the inside of the pc nice and cool.
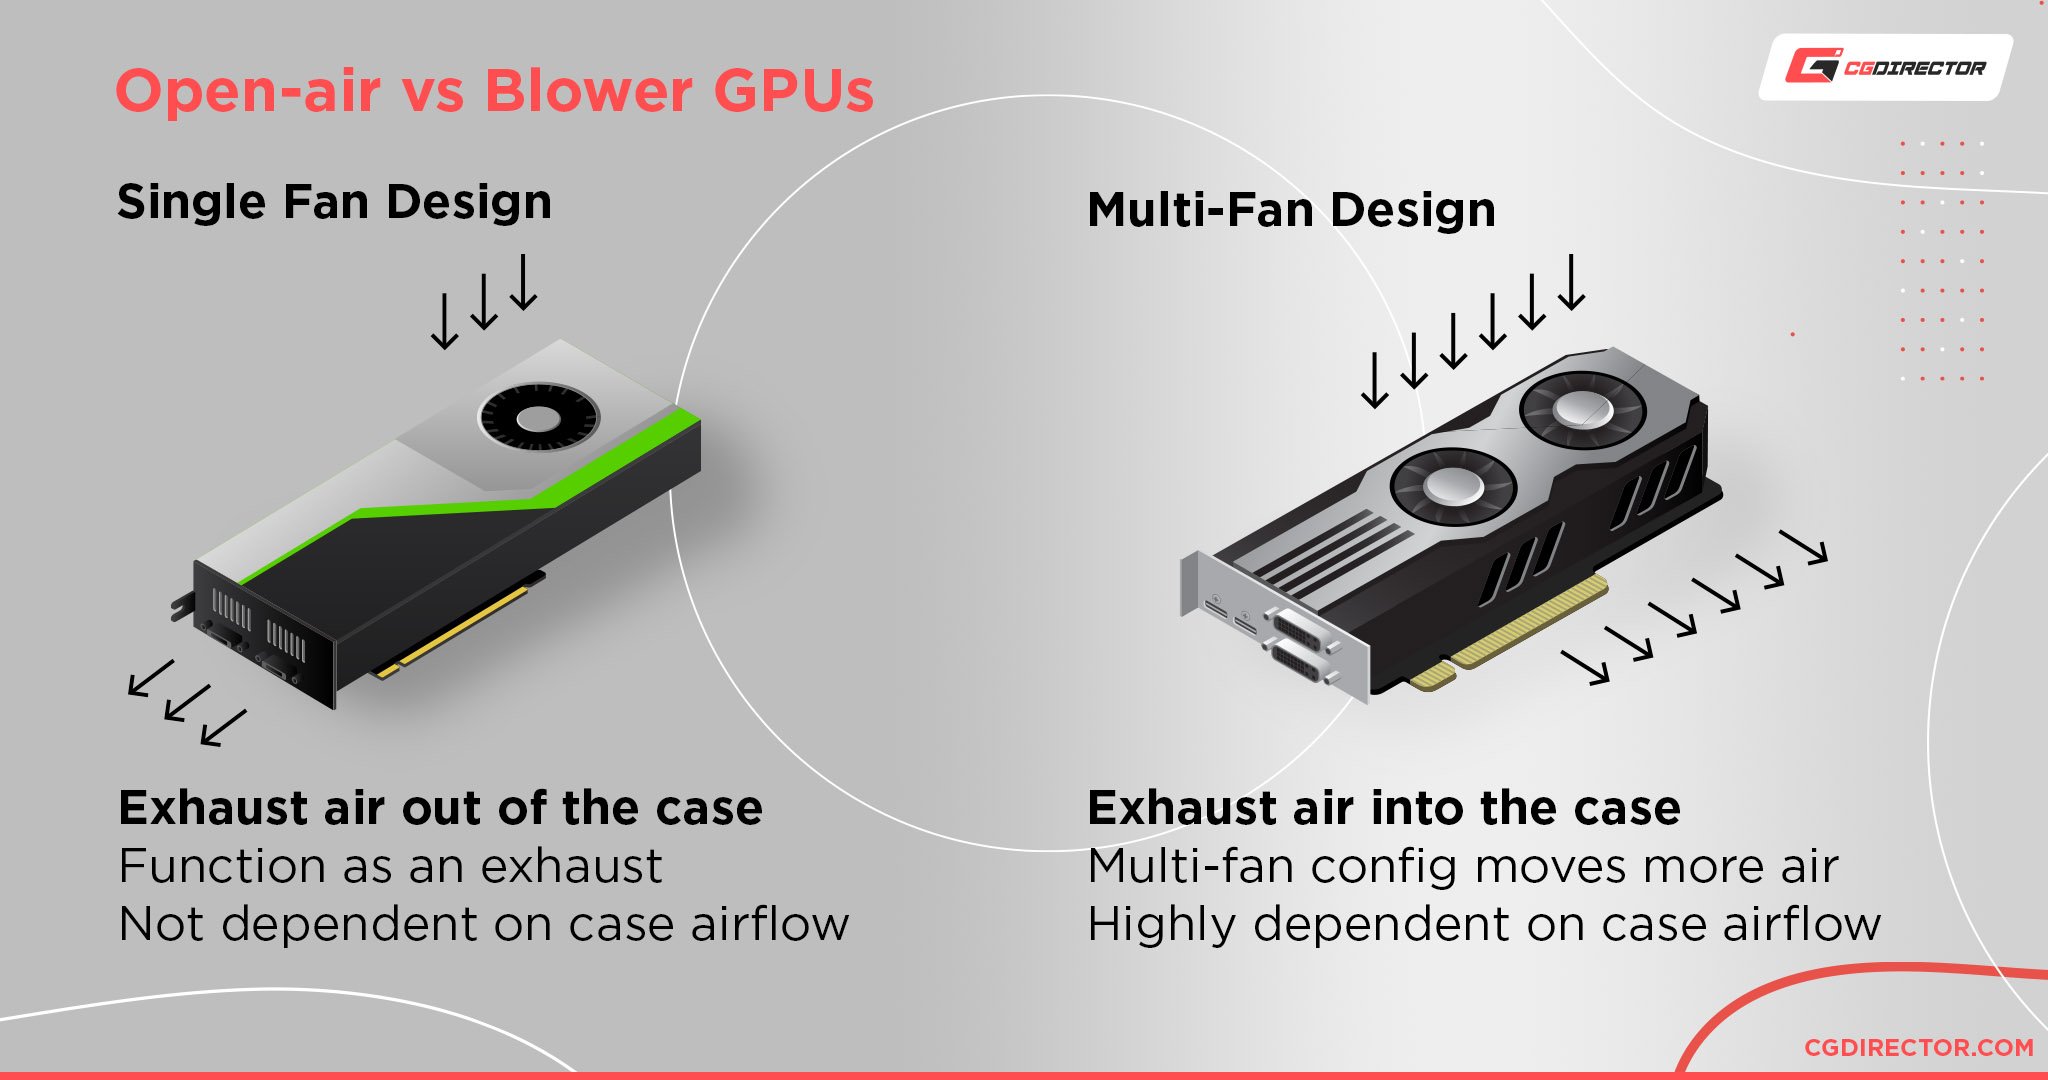
Your GPUs should have a maximum thickness of 2 slots. Because PCIe-Slots are spaced 2 slots apart, your GPUs will have to be 2-slot-height GPUs, so they all fit.
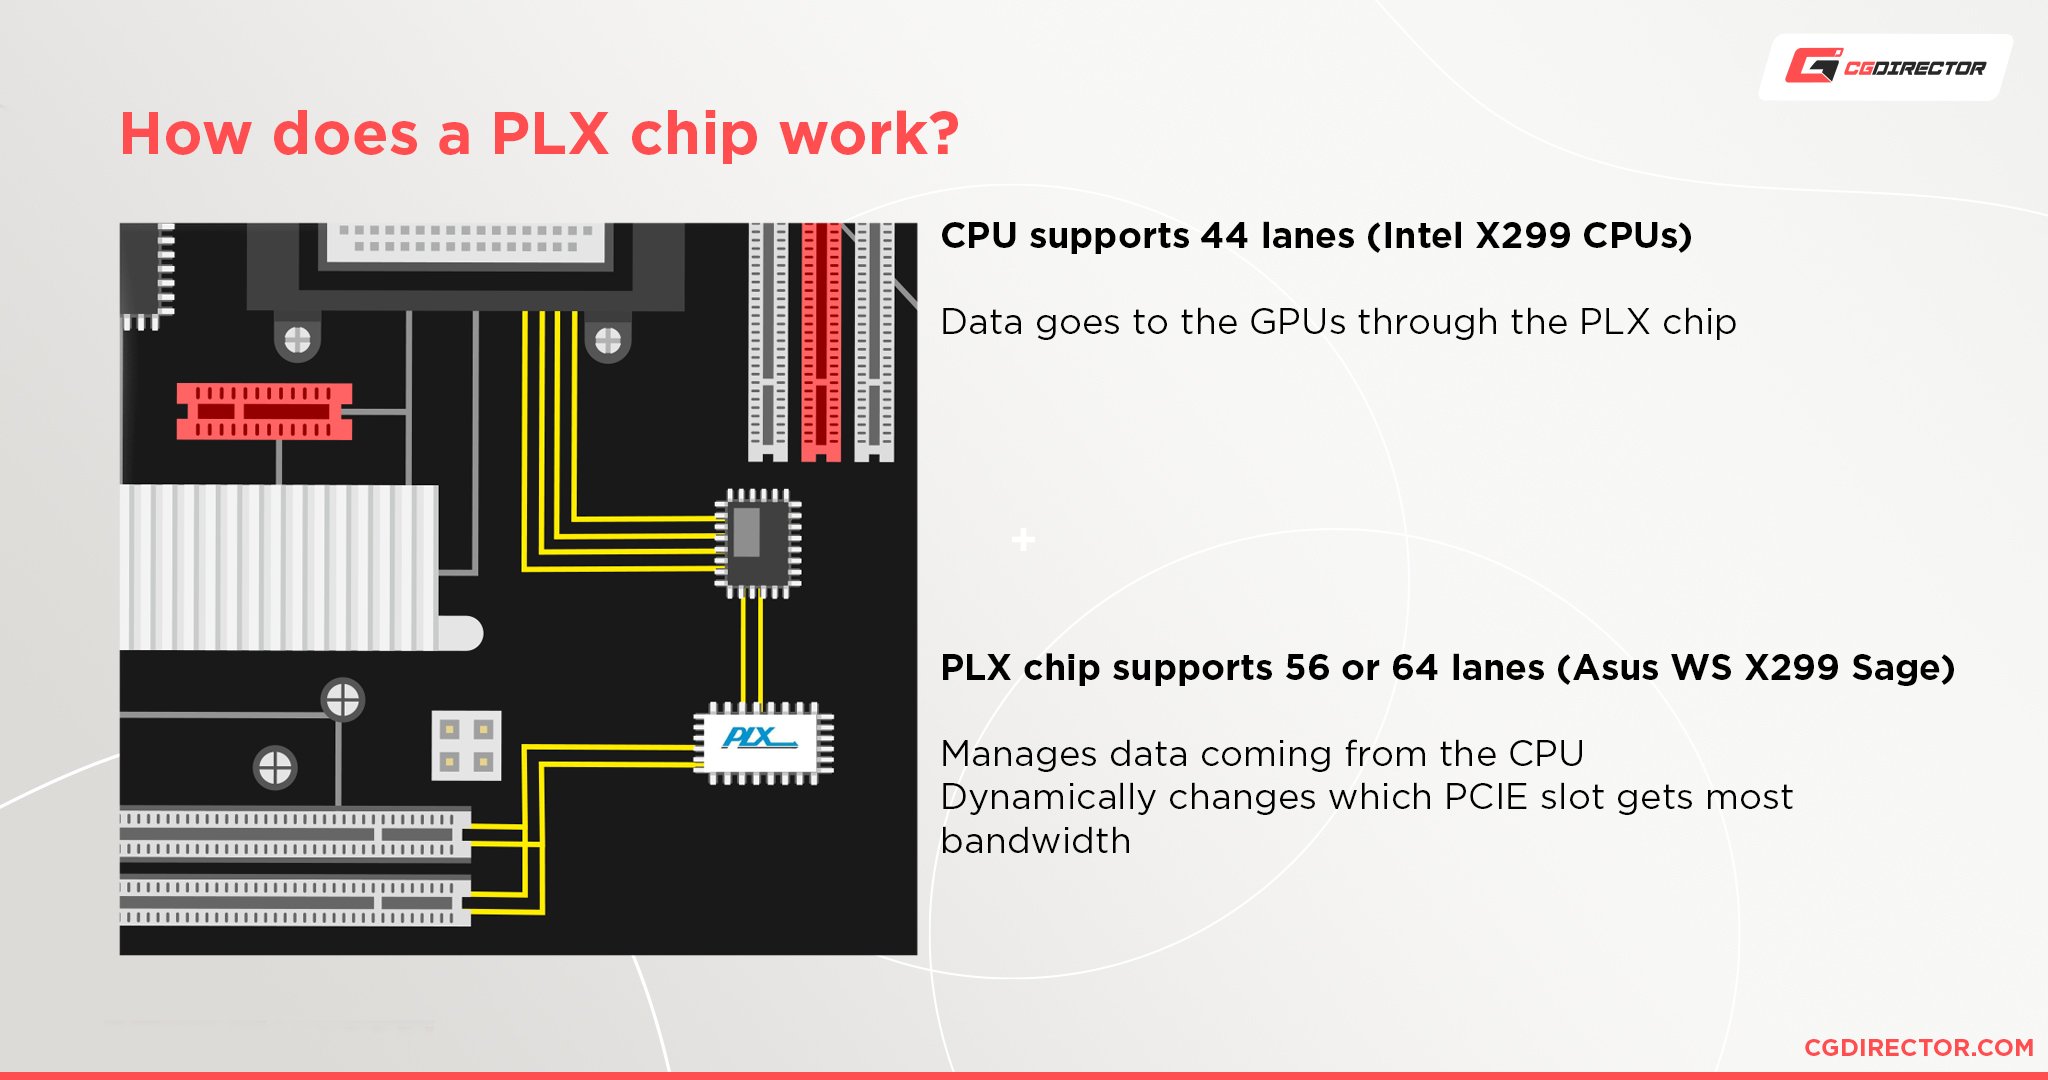
For 3 or more GPUs to run at reasonable speeds, your System has to be HEDT, meaning you will get more PCIe-lanes to the CPU to drive all of those GPUs at higher speeds. Either that or get a Motherboard with a PLX chip (check our GPU rendering guide for more info).
GPU Recommendations for a GPU-Based Render node
- Nvidia RTX 2070 Super – e.g., Asus Turbo, Gigabyte Turbo, MSI Aero, Zotac Blower
- Nvidia RTX 2080Ti – e.g., Asus Turbo, Gigabyte Turbo, MSI Aero, Zotac Blower
- Nvidia RTX 3080 (Check if Blower style GPUs are available; Asus Turbo, Gigabyte Turbo)
- Nvidia RTX 3090 (Check if Blower style GPUs are available; Asus Turbo, Gigabyte Turbo)
Why no AMD? We recommend Nvidia GPUs for GPU-Rendering here out of the practicality that all GPU-Render Engines we know of support Nvidia CUDA Rendering, but most of them don’t support AMD GPUs.
Of course, if you only render in ProRender or Blender’s Cycles Render Engines, for example, (that also support AMD GPUs), then you could choose an AMD GPU.
SSD
Very similar to a CPU-based render node, your storage plays a minor role and can easily be covered by a low-tier SSD.
SSD Recommendations for a GPU-Based Render node
Motherboard
You should take special care of the right motherboard for the GPU Render node. For one, you’ll need a motherboard that fits your choice of CPU. Furthermore, you will want a motherboard that has at least 4x PCIe-Slots that have at least x8 PCIe-lanes each (better x16).
Those slots all have to be regularly spaced 2 slots apart from each other to make 4 GPUs fit.
Motherboard Recommendations for a GPU-Based Render node
- For 3rd Gen Threadripper: ASRock TRX40 Creator
- For 1st + 2nd gen Threadripper: Gigabyte x399 Designare Ex
- For Intel X-Series CPUs: MSI X299 Gaming Pro Carbon
Cooling
You’ll want to make sure your case is well ventilated with at least 2 intake fans and one exhaust fan. Your CPU doesn’t need any crazy cooling, but the CPU-Cooler should, of course, be sufficient for stock operation.
The GPUs themselves come with a cooler attached, so you won’t have to get anything extra for them. Be sure, though, that the GPUs you select have blower-style cooling. (Some Brands include Asus Turbo, Zotac Blower, Gigabyte Turbo, MSI Aero)
CPU-Cooler Recommendations for a GPU-Based Render node
- beQuiet Dark Rock Pro 4
- Alphacool Eisbaer 360
- Corsair H150i Pro
- (Always check socket compatibility between the CPU-Socket and your CPU-Cooler)
Case-Fan Recommendations for a GPU-Based Render node
- beQuiet Silent Wings 3
- (many cases already have case-fans included, check this first)
PSU
Take special care of the PSU you get for a GPU Rendering build. Each GPU in your Render node draws a lot of power, and your PSU should be equally strong in providing that power. Use PSU-Calculators such as this one to find the amount of Wattage your PSU should have.
For a 4x GPU Build, you should get at least a 1200W PSU.
PSU Recommendations for a GPU-Based Render node
- 2x GPU Build: Corsair HX850 80 PLUS Platinum 850W
- 3x GPU Build: Corsair Professional Series Platinum AX1200i 1200W
- 4x GPU Build: Corsair AX Series AX1600i 80 PLUS Titanium 1600W
You might prefer some other brands, but I have found Corsair PSUs to be very reliable for multi-GPU builds.
CASE
Your case should be big enough to house all of the GPUs that you plan to get. First of all, match the Form Factor of your Motherboard with the compatible Form-Factors of your Case. If you get an E-ATX Motherboard or XL-ATX Motherboard, your case will have to be compatible with those form-factors.
Most cases are already compatible with standard ATX sized Motherboards, but it is better to check this in any case.
Be sure your case has the required amount of PCIe-slots on the backside. If you get 4x GPUs, you will need 8x PCIe-slots in the back of your case. Don’t rely on the tech specs in a datasheet, but rather find some images of the Case online and count the number of back slots the case has.
Big towers usually have an adequate number of slots for 4 double-height PCIe-cards, so go looking for that size first.
Case Recommendations:
This is how such a Render node could look like:
—-
Render Farm / Rendernode for Video Editing & Compositing
Video Editing & Compositing includes Software such as After Effects, Nuke, Fusion, Premiere Pro, Davinci, and more.
CPU
The best CPU will depend heavily on the specific Software you are using for Video Editing and/or Compositing. After Effects, for example, just can’t make good use of all the CPU Cores you might have, so getting a high-clocking, lower-core-count CPU would be the best choice.
If you are using Editing or Comping Software such as Premiere Pro, Nuke, or Fusion, though, these tools make great use of most of your cores as they have just been developed with a multi-threaded approach in mind. Here you can easily get high-end CPUs with lots of cores.
CPU Recommendations for a Video Editing & Compositing Render node
- Apps that don’t make great use of lots of cores
AMD Ryzen 5950X, AMD Ryzen 5900X, Intel i9 10900k - For everything else, go high core count with decent clock speeds:
AMD Ryzen Threadripper 3960X, 3970X
RAM
Chances are high you’ll be working on some heavy RAW or EXR footage, which is in 10bit, 16bit, or even 32bit float, at 4k resolution and will have a bunch of layers and passes in your comps and timelines.
You’ll need loads of RAM for a top-performing Video Editing & Compositing PC or Render node.
32-64GB of RAM minimum and better go 128GB of RAM if you are serious about what you’re doing.
RAM Recommendations for a Video Editing & Compositing Render node
GPU
Most of your compositing Apps will only have little use for a high-end GPU. Sure, some Effects might be GPU accelerated, but the CPU does the heavy number crunching in most of your Video Editing & Compositing workloads.
This changes if you use plugins or tools that you know are greatly GPU accelerated, like Denoising tech, time-remappers or GPU accelerated Image trackers.
GPU Recommendations for a Video Editing & Compositing Render node
Most of the Editing & Comping Apps don’t make use of multiple GPUs, so you can skip that. (Again, if you know a certain plugin you use makes use of a multi-GPU setup, then, by all means, get some heavy GPU power! 🙂 )
SSD
Usually, all the footage and image-sequences will have to be loaded from your local disks, but in most cases, the Render node in your Render Farm will load this directly from the File Server or NAS where your Project resides.
This means your render node’s storage device is really only used for storing your OS and Apps and doesn’t necessarily have to be all that fast. Any old SATA SSD will do just fine.
SSD Recommendations for a Video Editing & Compositing Render node
This, of course, is a thing that you should keep in mind: If all of your Rendernodes load the needed files from the same NAS or File Server, the Network and the Files Server better be VERY fast; otherwise, that is the first component in your Render Farm that will become the bottleneck.
Motherboard
Apart from Socket compatibility with your CPU and the required amount of RAM slots, a Compositing Render node does not demand any special kind of Motherboard.
Take a look at some of our best-of lists to find a suitable motherboard one for your Video Editing & Compositing Render node:
Motherboard Recommendations for a Video Editing & Compositing Render node
- For 3rd Gen Threadripper: ASRock TRX40 Creator
- For 1st + 2nd gen Threadripper: Gigabyte x399 Designare Ex
- For AMD Ryzen CPUs: Gigabyte Aorus Elite
- For Intel X-Series CPUs: MSI X299 Gaming Pro Carbon
- For Intel LGA 1151: Asus Prime Z-390 A
Cooling
Similar to our CPU-based Render node, Compositing and Editing strains the CPU quite a lot and will have to be cooled decently.
AIOs or high-end Air Coolers are recommended:
CPU-Cooler Recommendations for a Video Editing & Compositing Render node
- beQuiet Dark Rock Pro 4
- Alphacool Eisbaer 360
- Corsair H150i Pro
- (Always check socket compatibility between the CPU-Socket and your CPU-Cooler)
Case-Fan Recommendations for a Video Editing & Compositing Render node
- beQuiet Silent Wings 3
- (many cases already have case-fans included, check this first)
PSU
You won’t need a special PSU for this kind of Render node. As always, be sure you have enough wattage to power your components, but other than that, any modern ATX PSU will do just fine.
PSU Recommendations for a Video Editing & Compositing Render node
Case
The Case can easily be normal ATX-sized, as you’ll mostly only be housing a Motherboard and a single GPU:
Case Recommendations:
- For Budget Builds: Phanteks Enthoo Pro
- For Tinkerers: be quiet! Dark Base Pro 900
- For Sleeper Workstations: Nanoxia Deep Silence 3
- For Compact Quality: Cooler Master Silencio S400
Here’s an example Build:
—-
Didn’t find your specific workload listed here? Check out our PC / Workstation builder Tool for more Categories and Recommendations, or ask us in the comments! 🙂
Render Farm: Desktop PCs or Rack-Mounted?
Up to a certain size of your Render Farm, having consumer Desktop-Tower Rendernodes usually is much easier and cheaper to set up. For a consumer Tower-Desktop Render node, you can pretty much pick a bunch of consumer PC-Parts at retail prices and configure a high-value Render node.
Up to about 10 such Rendernodes, I’d say going the Desktop-Tower route is the way to go, after that, though, maintaining and managing them all gets cumbersome.
For one, they are not neatly stacked at an optimum size in a 19” Server Rack, but they usually have lots of empty space inside the case that is just sitting there doing nothing. Stacking Tower-Desktop PCs on top of each other becomes risky, and you usually just place them on the ground.
With Tower-Desktop Consumer PCs, you don’t get any kind of Server Management interfaces such as IPMI, meaning you cannot remote log into them until the OS is loaded. Have a problem beforehand? The Node is not POSTing? You’ll have to attach a monitor and Keyboard/Mouse to it to find out what the problem is.
Want to turn them on or off all at once? No chance. You’ll have to turn them on and off individually.
Rack Mounted Nodes have their benefits but also come at a usually much-increased price point, so you’ll need some good reasons to opt for a Rack instead of consumer Desktop-Tower PCs.
Go Desktop Rendernodes if:
- You only need a few or have lots of room to place them in a naturally cool area.
- Want to save money
- Want consumer Parts that you won’t easily get for Rack Mounted servers (e.g., Threadripper CPUs)
Go Rack Mount Rendernodes if:
- You need a lot of nodes (10 or more)
- If you have little space available
- If you want access to server-grade hardware (e.g., AMD Epyc, Intel Xeon, 8-GPU Rigs, and so on)
Where to place your Render Farm / Rendernodes?
There are two main factors that you should consider when deciding where to place your Render Farm or individual Render nodes. Noise and Cooling.
Cooling
Both rack-mounted and Tower-PC Rendernodes draw a lot of power, and this means they get hot. Even with just two or three nodes, in a standard-sized room, you will quickly notice how the room will gradually heat up until you have to do something about the heat.
In a best-case scenario, you’d have a small room that you can actively cool with an air conditioning system that pushes out the hot air and pulls in cold air from outside, but this may not be possible for everyone.
You may have heard how big a deal cooling is in data centers and that entire warehouses full of thousands of serves are preferred to be set up in remote locations where it is nice and cold outside to be able to cool them more easily.
Noise
Depending on the workloads you are using your Render Farm for and the type of components they are fitted with, chances are very high your Render Farm will be noisy.
Rackmounted Render nodes are usually a lot louder than our standard Tower-Desktop PCs / Rendernodes, but even with a bunch of consumer desktop Render nodes in the same room or where you are working, this can become unbearable quickly.
Because of this noise, I recommend setting up your Rendernodes in a separate room that you can easily access by connecting a network cable.
There’s not much you can do about the noise. You could make sure to get a high-quality case, CPU, PSU, and GPU fans, but at the end of the day, you’ll want these machines to perform as well as possible, and lowering your fan curves will only throttle your components and bring the risk of them overheating.
To conclude, here’s where to set up your Render Farm:
- In a separate room with good cooling or a window if you don’t have an AC.
- Place them far enough away from your workplace so they don’t disturb you.
- You should be able to easily access them through a network cable.
- Place them with ample space around them, so they don’t suffocate or sit in a hot air bubble.
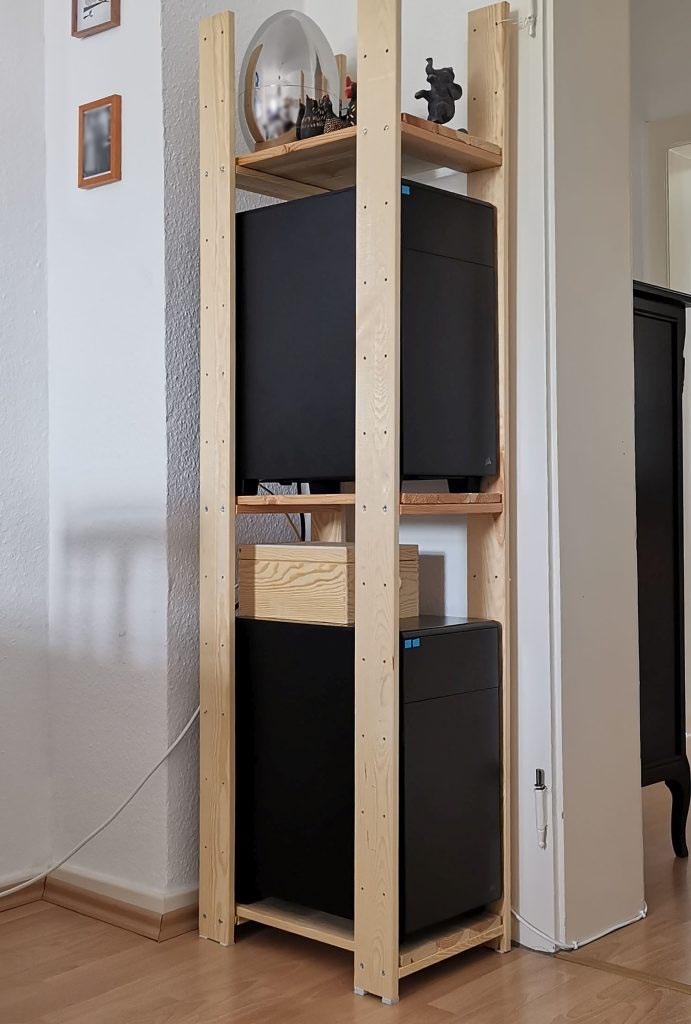
For those of you in a Home-Office or running a one-man Business from your Home, there are many ways you can integrate your ATX Tower-Rendernodes into a living area without them making a too technical impression. You can get an Ikea Shelf and stack them neatly. Those black cases can even make a great impression.
Network Hardware
Nowadays, setting up a Local Area Network (LAN) is dead simple.
All you’ll need are:
- A LAN (Gigabit) switch
- Some LAN Cables
- Your PC’s should have Network capabilities (all of them do nowadays)
A perfectly good Switch that you can get is this one from Netgear or this one from TP-Link. They both have 8 ports for you to connect up to 8 devices (or Render nodes).
Each of your Devices that you want to hook up to the network, of course, needs a LAN cable. Here are some cables that you can get in all kinds of lengths.
Set Up Your Render Farm / Render nodes
So after you’ve bought one or more Rendernodes, let’s quickly run through the most important steps to set them up properly.
Drive Cloning
You’ll most likely want all of your Rendernodes to have the same Software installed. The easiest way to do this, without tediously & manually setting up x Number of Nodes, is to set up one Node and create a Drive Clone (Drive-Image) that you can then just copy over to your other nodes.
That way you:
- save lots of time
- make sure all of your Nodes have the exact same configuration
- have a backup, and in case a node breaks, you can just copy the drive-image back onto the node, and it will work as if it’s new
Note: If you only have one Render node and never plan on getting more, then you can, of course, skip this step.
There are two ways you can Clone a Drive:
- With Software like Macrium Reflect (free for home use)
- With an external docking Station that can clone drives such as this one
That’s all and good, but before we clone our drive for use in additional render nodes, first, we have to set up a single render node properly.
Render node Assembly
I won’t go into assembling your Render node too deeply, as we have covered this in another Guide.
If you are buying a regular Desktop-Tower PC, then the assembly will be exactly the same as for any other PC, though you might have more GPUs that you will plug into the Motherboard than normally.
Operating Software
What OS you want to use is ultimately your choice. My Rendernodes all run on Windows 10, but you might prefer Linux or another version of Windows. This guide will cover setting up your render nodes on Win10.
After assembling your nodes (or maybe they have come pre-assembled), you’ll have to attach them to a Monitor and Keyboard/Mouse.
Although they will later run headlessly (meaning no Monitor, Keyboard, or Mouse), to be able to run headlessly, we first have to set them up properly.
You can follow the usual routine in setting up your OS.
Make sure all of your drivers are installed and updated, especially those GPU drivers!
Software Installation
Next, you’ll have to install any of your Software-Packages that you want this render node to be able to run.
This might be Cinema 4D with its Team Render package or After Effects or a Realflow Render node.
Most Software Licenses include additional Licenses for several instances that you will run without GUI (User Interface) or that run in the command line, meaning they include licenses for running Render Farm workloads. You will have to check with your Software vendor if this is the case or if you need additional licenses (usually at a greatly reduced price) for installing on a Render node.
Some Plugins, though, like 3rd party render engines such as Vray, Octane, or Redshift, will require you to buy an additional License.
Headless, Autostart Software
Now, remember, because these Nodes will usually sit in a corner without a Monitor and Keyboard/Mouse, we won’t be able to directly access them easily.
We will want these Rendernodes to run as autonomously as possible. So all we want to do is turn them on or off (usually via the power switch), everything else they should do on their own.
First, you have to tell Windows to log on automatically; otherwise, it will sit and wait for you to type in the username and password every time you turn a render node on.
Next, you’ll want all of the Software that you use for Rendering to launch automatically. You can do this by configuring the Autostart Apps. This will most likely be either one of your Rendermanager Clients or other means of your desired Software to pick up Jobs to work on automatically.
Render Manager
Some Software Packages come with an inbuilt Rendermanager of sorts. Cinema 4D, for example, has their Team Renderer, or After Effects has something called the “Render Engine,” which picks up jobs in specific folders automatically.
Many though have no such means of automating Job distribution across multiple PCs or make it extremely difficult to do so.
My recommendation, and I strongly recommend this, is to use a dedicated Render Manager Software that will manage all of the job distribution for you and that you can easily call from out of your favorite Applications that you might be running.
The best Render Manager I’ve used so far is Thinkbox Deadline (recently bought by Amazon).
Dead cheap, at just 48$ per year / node, Thinkbox Deadline really brings with it everything you didn’t know you needed yet.
Just take a quick look at the Software it supports, and you’ll understand why this tool is A MUST for anyone using multiple PCs / Rendernodes or a full-blown Render Farm.
You’ll have everything in one place, you can queue jobs from multiple applications, and you can even automate your workflow. You can add a 3D Renderjob to the queue, after which an after effects comp will automatically render out the new comp, after which the final edit will automatically export a preview mp4, you name it.
This tool can do it all.
Don’t let the interface frighten you too much; it looks complicated, but it is not.
Here’s the best thing: It’s free for up to 10 nodes, so you can test it indefinitely in a smaller environment without any restrictions before you decide to buy it for all of your nodes. (Or use it for free forever as long as you only have 10 actively rendering PCs / Rendernodes)
Don’t want to use a Rendermanager?
For those of you who don’t want to use a Rendermanager, the old school way of splitting up jobs on to different PCs is to, well… manually split up the frame ranges and individually start each of those split up project files on the respective render nodes. This is time-consuming and quite annoying, so I can’t recommend it. But it works.
Network Topics, NAS & Network Drives
So with all your PCs, how do you do file management? Do you have to copy all of the output files from all of your pcs over into your project folders?
No, here’s how you do it:
If you are a 1 man show and the only one using these Rendernodes / Render Farm:
Let’s take this environment here: You have 1 workstation that you work on, create your projects, and so on. In addition to that, you have 2-3 Render nodes.
On your Rendernodes, create a Network drive to map your workstations project drive. Use the same drive letter for the best functionality.
So if the projects on your workstation are saved under z:\Clients\Project\, map a network drive on your render nodes to z:\ too.
This means all the output files from your render nodes will directly be saved on your workstation drive in their correct folders as you have already configured in the project output settings.
Easy as that.
If you have multiple Users working with the Render Farm that need access to the project files:
Chances are, with multiple users, you already have a NAS (or File Server); if not, get one! You need a central location to save all your Project files to. A location all of your Employees / Artists / Users can access.
On each of your PCs and Rendernodes, map the network drive to the NAS (same drive letter).
Easy as that.
Remote management
So optimally, with a Render Manager like Thinkbox Deadline configured correctly, you’ll never have to change anything on your RenderNodes ever again, right?
In a best-case scenario, yes, but chances are you’ll still have to be able to click around on your render nodes every now and then. Maybe to update a driver or to check why it stalled.
The easiest thing if the PCs are within your Local Network is to just use Remote Desktop to get access to your headless PCs. You can also use tools such as Team Viewer if you are outside of your network and need access through the Internet to check up on them.
Overclocking
Don’t overclock your RenderNodes. These PCs should first and foremost be reliable and stable. Since they are under prolonged, sustained load most of the time, they will be hot, even if they are not overclocked.
Usually, multiple of those nodes will heat up the room considerably, and you won’t want to overdo it by cranking up the strain on your components by overclocking the CPU or GPU.
I strongly recommend staying clear of overclocking for Render nodes.
Optimization
Here are some tips for those of you who want to optimize your Rendernodes / Render Farm even more.
Render multiple tasks per node
So usually, you let one Render node render one task (usually a single frame) until it’s done and starts work on the next frame.
For most Jobs, this is usually fine, but sometimes the PCs resources aren’t used optimally. Say your render job prepares very long, it takes 3 minutes to prepare (usually just single-core loads) and 3 minutes to actually render (full-core full-GPU loads).
If this is the case with some of your scenes, you can increase the number of tasks a node works on simultaneously. Usually, it then uses much more of your resources, and some of the idle periods get filled with the second or third job it is rendering simultaneously.
This is especially helpful when you do GPU Rendering and have multiple GPUs in your Render node. You can render 2 tasks at once, reducing your idle or wait times. Or render 4 tasks at once (if you have 4 GPUs – one task per GPU) instead of one task on 4 GPUs to make this even more efficient. You’ll have to find a sweet spot here.
Render Job Batches
Rendering image sequences one at a time adds a lot of overhead. Usually, after each job, the Software is closed and reopened again, and it has to reinitialize the scene.
Consider rendering in Frame batches of, say, 10 frames or 20 frames per job. That way, the Render node will open the Software once, initialize once, render 20 frames and close it again instead of doing this on every frame.
Turn on & off your nodes only when they are needed.
Thinkbox Deadline, for example, brings the functionality of turning your Rendernodes on and off when they are needed or idle. This can save lots of power.
Conclusion to Building your own Render Farm
Building your own Render Farm seems like a complicated task, but in the end, it’s really just a bunch of regular PCs hooked up through a simple Network.
Ever since having a few Rendernodes for my Freelancer 3D and Compositing / Editing Business, I have made a huge jump forward in terms of efficiency and ease of mind. I can improve my output quality and iterations by a huge number, and you can even learn a thing or two about building, setting up, and configuring an optimally running PC.
To start, all you need is an additional (somewhat specialized) PC.
Need help? Let me know in the comments. I am happy to answer any of your questions!
![Why Did EVGA Exit The GPU Business? [And What It Means For You]](https://www.cgdirector.com/wp-content/uploads/media/2022/09/EVGA-Exits-GPU-Business-Twitter-594x335.jpg "Why Did EVGA Exit The GPU Business? [And What It Means For You]")

![CPUs with the highest Multi-Core Performance [Updated List]](https://www.cgdirector.com/wp-content/uploads/media/2022/12/CPUs-with-high-multi-core-performance-Twitter-594x335.png "CPUs with the highest Multi-Core Performance [Updated List]")
 in BIOS and Should You Use It?")

100 Comments
17 November, 2023
Hi;
I’m planning to build a render farm, mostly for Autodesk or Autocad Architectures projects to render. Thus having a rendernode of 4PC with ECC support of Mainboard, CPU, RAM and GPU professional like RTXA has big advantage? I have a Intel Workstation with 128GB DRIMM and RTX A5000 GPU for master PC. I hope you can give me advice regarding my plan to build a render farm. you can send me thru my email: cubiomichael@gmail.com for more info. Thank you so much.
17 November, 2023
Hey Micheal,
Yes this is certainly possible. What render engines are you using for your architectural renders?
Alex