 by
by ![How to Fix Photoshop Brush Lag [Try this first]](https://www.cgdirector.com/wp-content/uploads/media/2022/07/How-to-Fix-Photoshop-Brush-Lag-Twitter-1200x675.jpg "How to Fix Photoshop Brush Lag [Try this first]")
TABLE OF CONTENTS
Adobe Photoshop is one of the most universally known programs around. Used for countless things, it’s a juggernaut of a program that helps countless creatives worldwide.
But with all those features come some performance hitches as well, especially when it comes to resource-intensive tasks such as drawing and painting.
It’s a real pain when you’re 16 hours into a complex drawing and Photoshop starts lagging and slowing down.
So, in this article, I’ll be going through everything you can do to potentially gain back some performance in Photoshop!
Photoshop Fixes/Changes
These fixes focus on changes within Photoshop itself. We’ll be tinkering around with performance settings to try and squeeze out just a little bit more performance and hopefully fix our lagging issues.
1. Reduce Brush Size
This is something you’ve probably already noticed if you’ve ever messed around with large brushes. They’re slow.
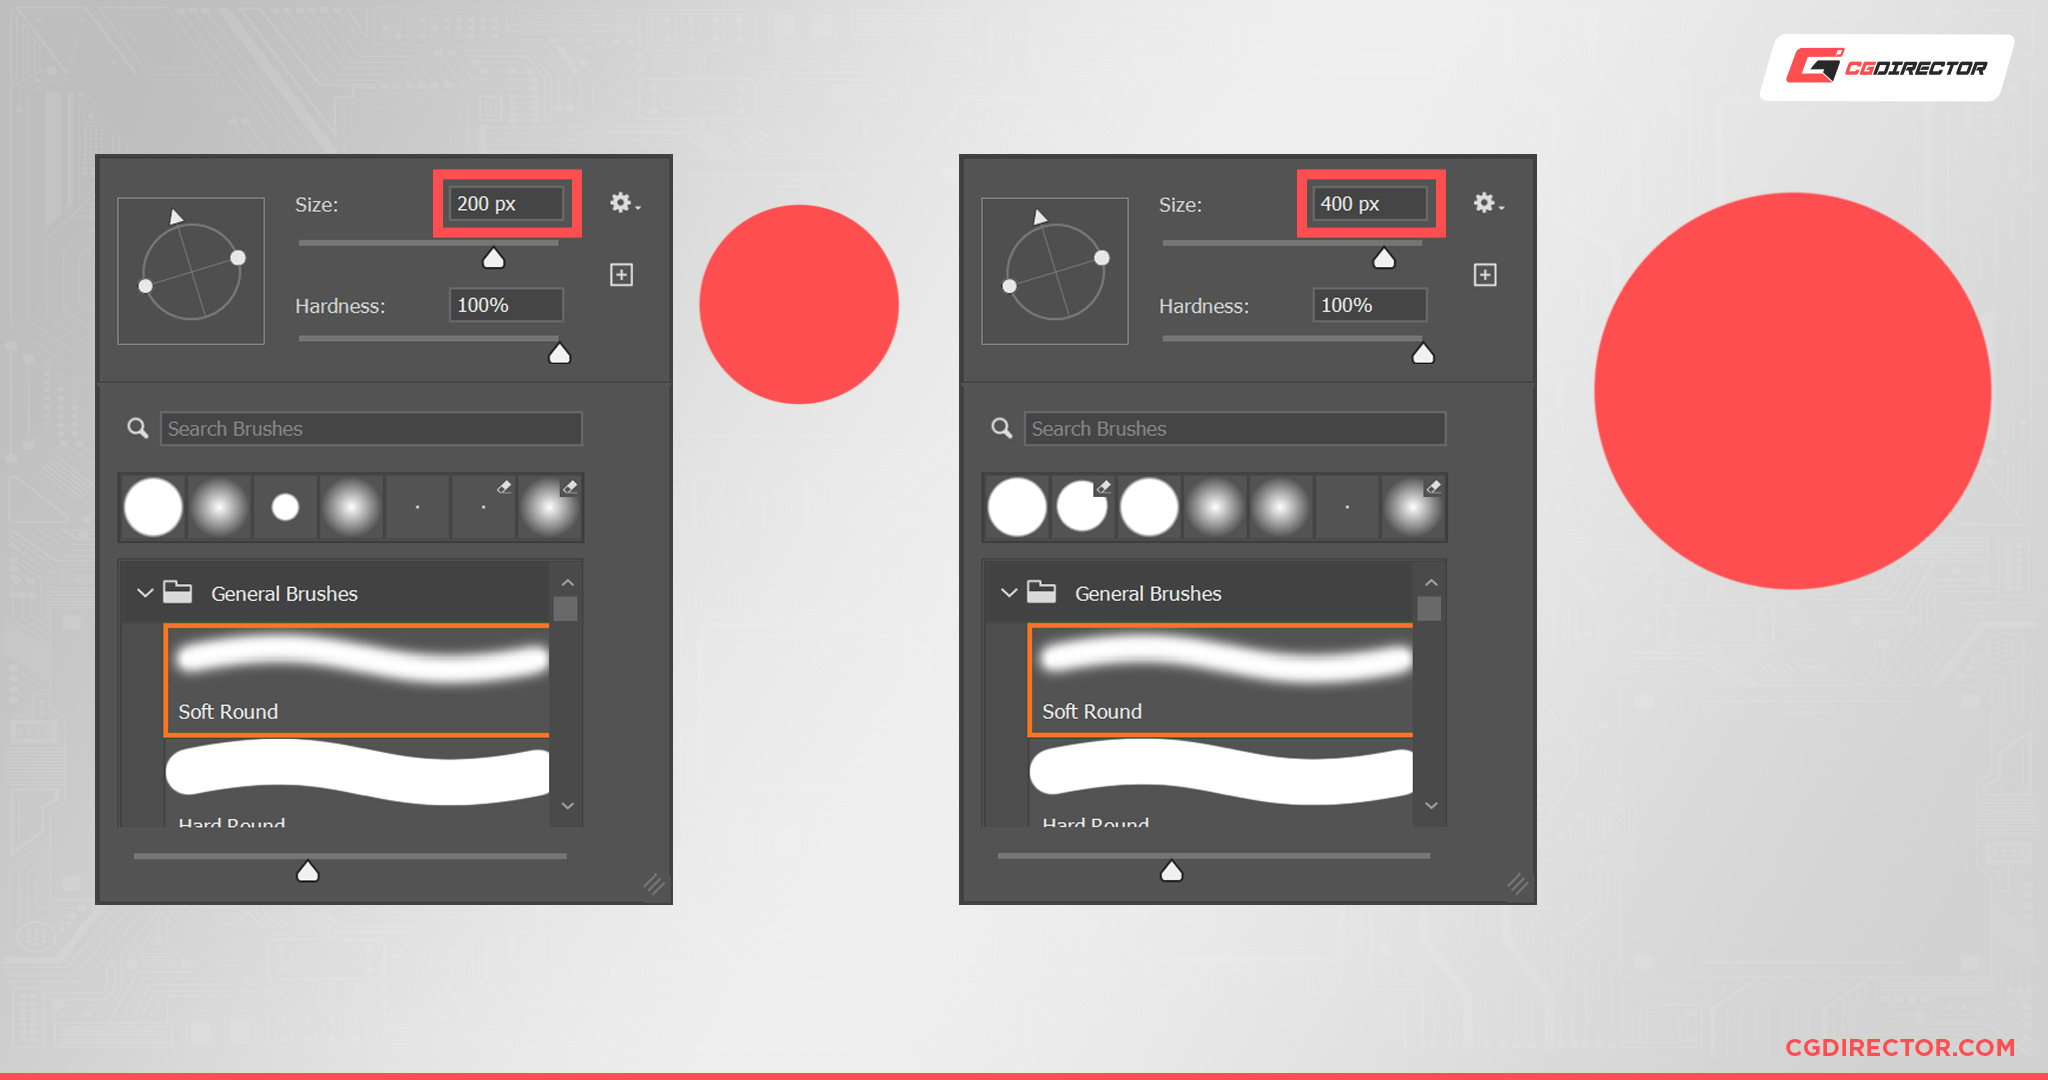
Photoshop, and pretty much every other drawing program, run all or most of the brush calculations on the CPU. And to be completely honest, they aren’t really all that optimized.
You don’t notice it ’cause people usually use small brush sizes, but it becomes increasingly apparent when you increase your brush size above 100 pixels.
So it’s not much of a “fix” to just reduce the brush size, but sadly there’s not much else you can do if the brush size is what’s holding you back.
If you want to color in large areas, a more efficient workflow would be to select an area and then fill it in.
You could try to feather the selection to get a more “natural” brush look as well. Or you could use a smaller brush to draw it in. It’s not ideal, but it is what it is.
2. Reduce Canvas Size
In the same vein that large brushes cause lag, large canvases do the same thing.
Photoshop has to keep track of every pixel and its state. So, more pixels equal more things to keep track of. Which will slow down Photoshop and your computer.
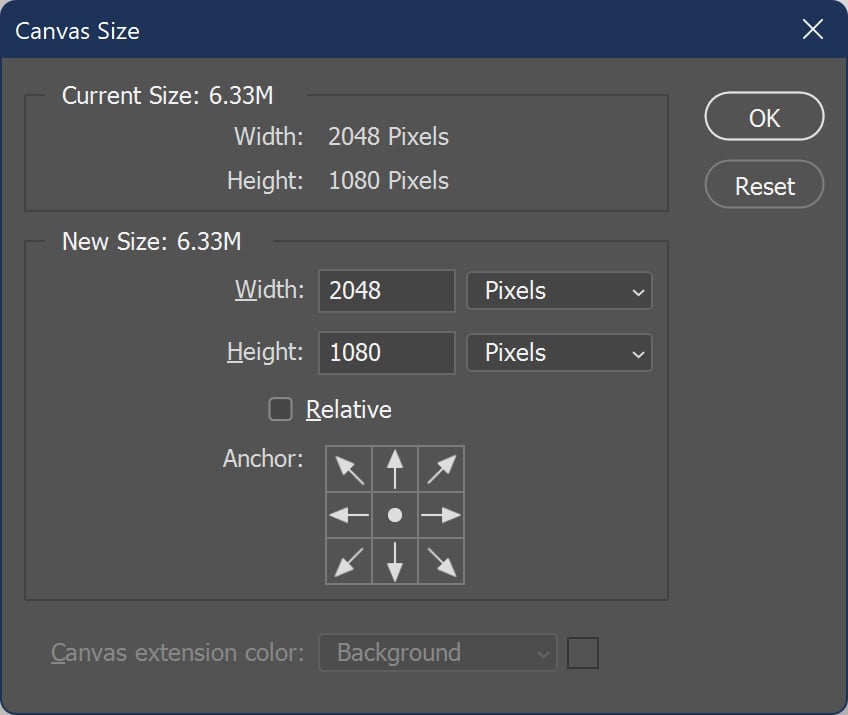
Generally, even for print media, you don’t need to go any higher than 16k. And for stuff that will only be seen digitally, there’s usually no point going above a resolution of 4 – 8k.
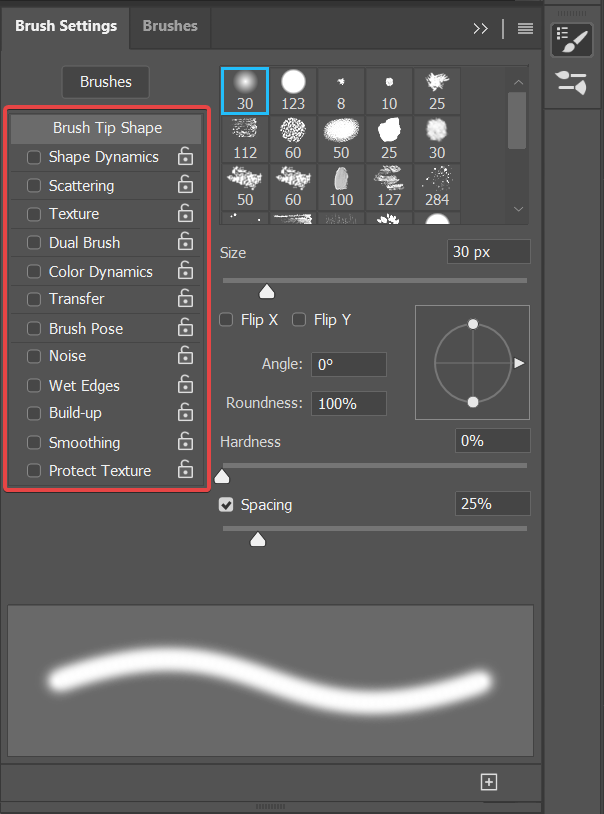
3. Increase Brush Spacing
Fun fact: When you draw something in most digital art programs, you’re not “drawing” anything. What you’re actually doing is placing extremely small dots, thousands of times every stroke. So close that they appear as one long line/stroke, but in reality, are just a bunch of dots in a line.
So what you’re doing by increasing or decreasing “brush spacing” is you’re increasing/decreasing the distance between each dot.
Basically, the less distance between the dots, the more dots you have and the smoother your line looks. And it’s the opposite when you turn up the distance.
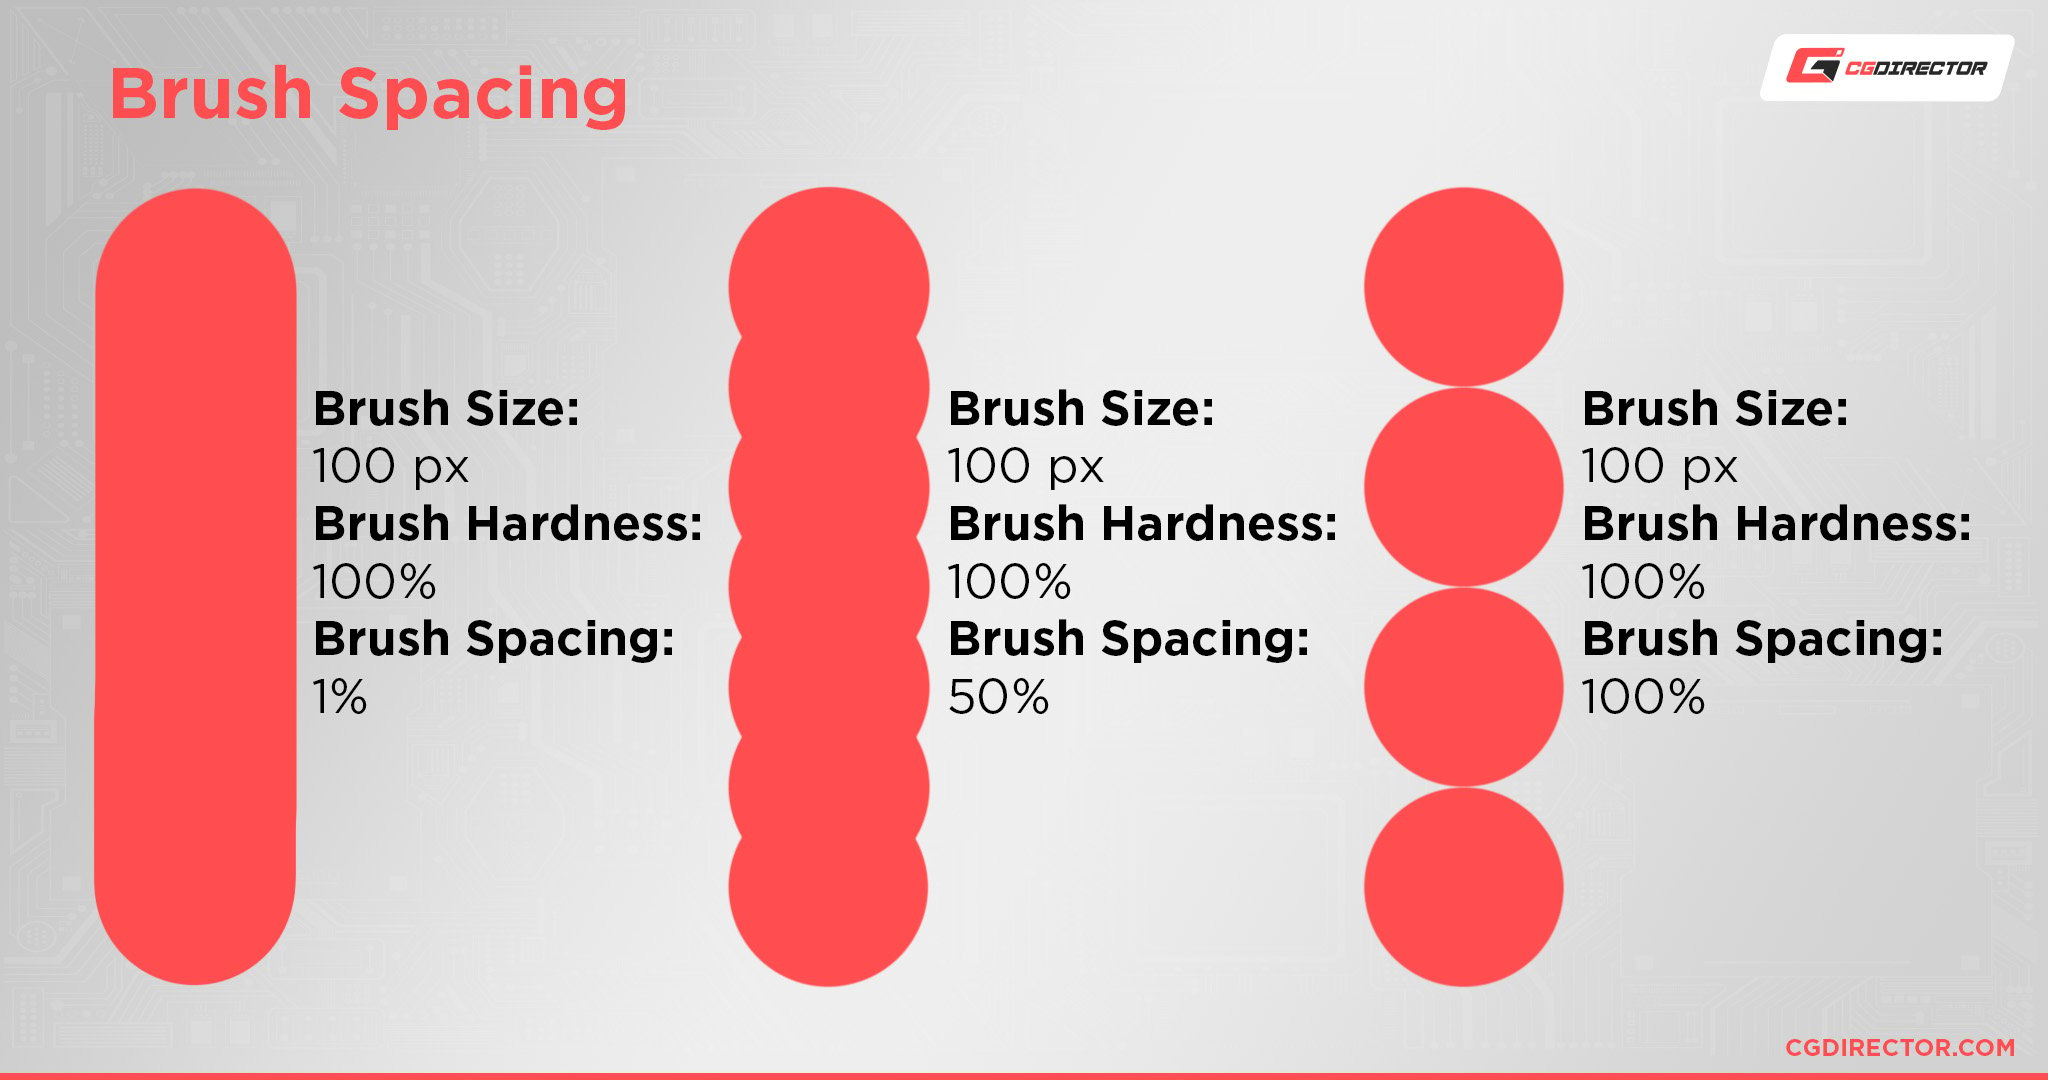
And as you might imagine, more dots equals more resources needed. Meaning lower brush spacing values need more processing power than higher values.
There’s no set value you can set brush spacing to; it depends on what you can give up. Generally, you can bring up the spacing of a brush to around 15 – 30% without the individual dots being too apparent. So play around with it to figure out what works for you without causing too much lag.
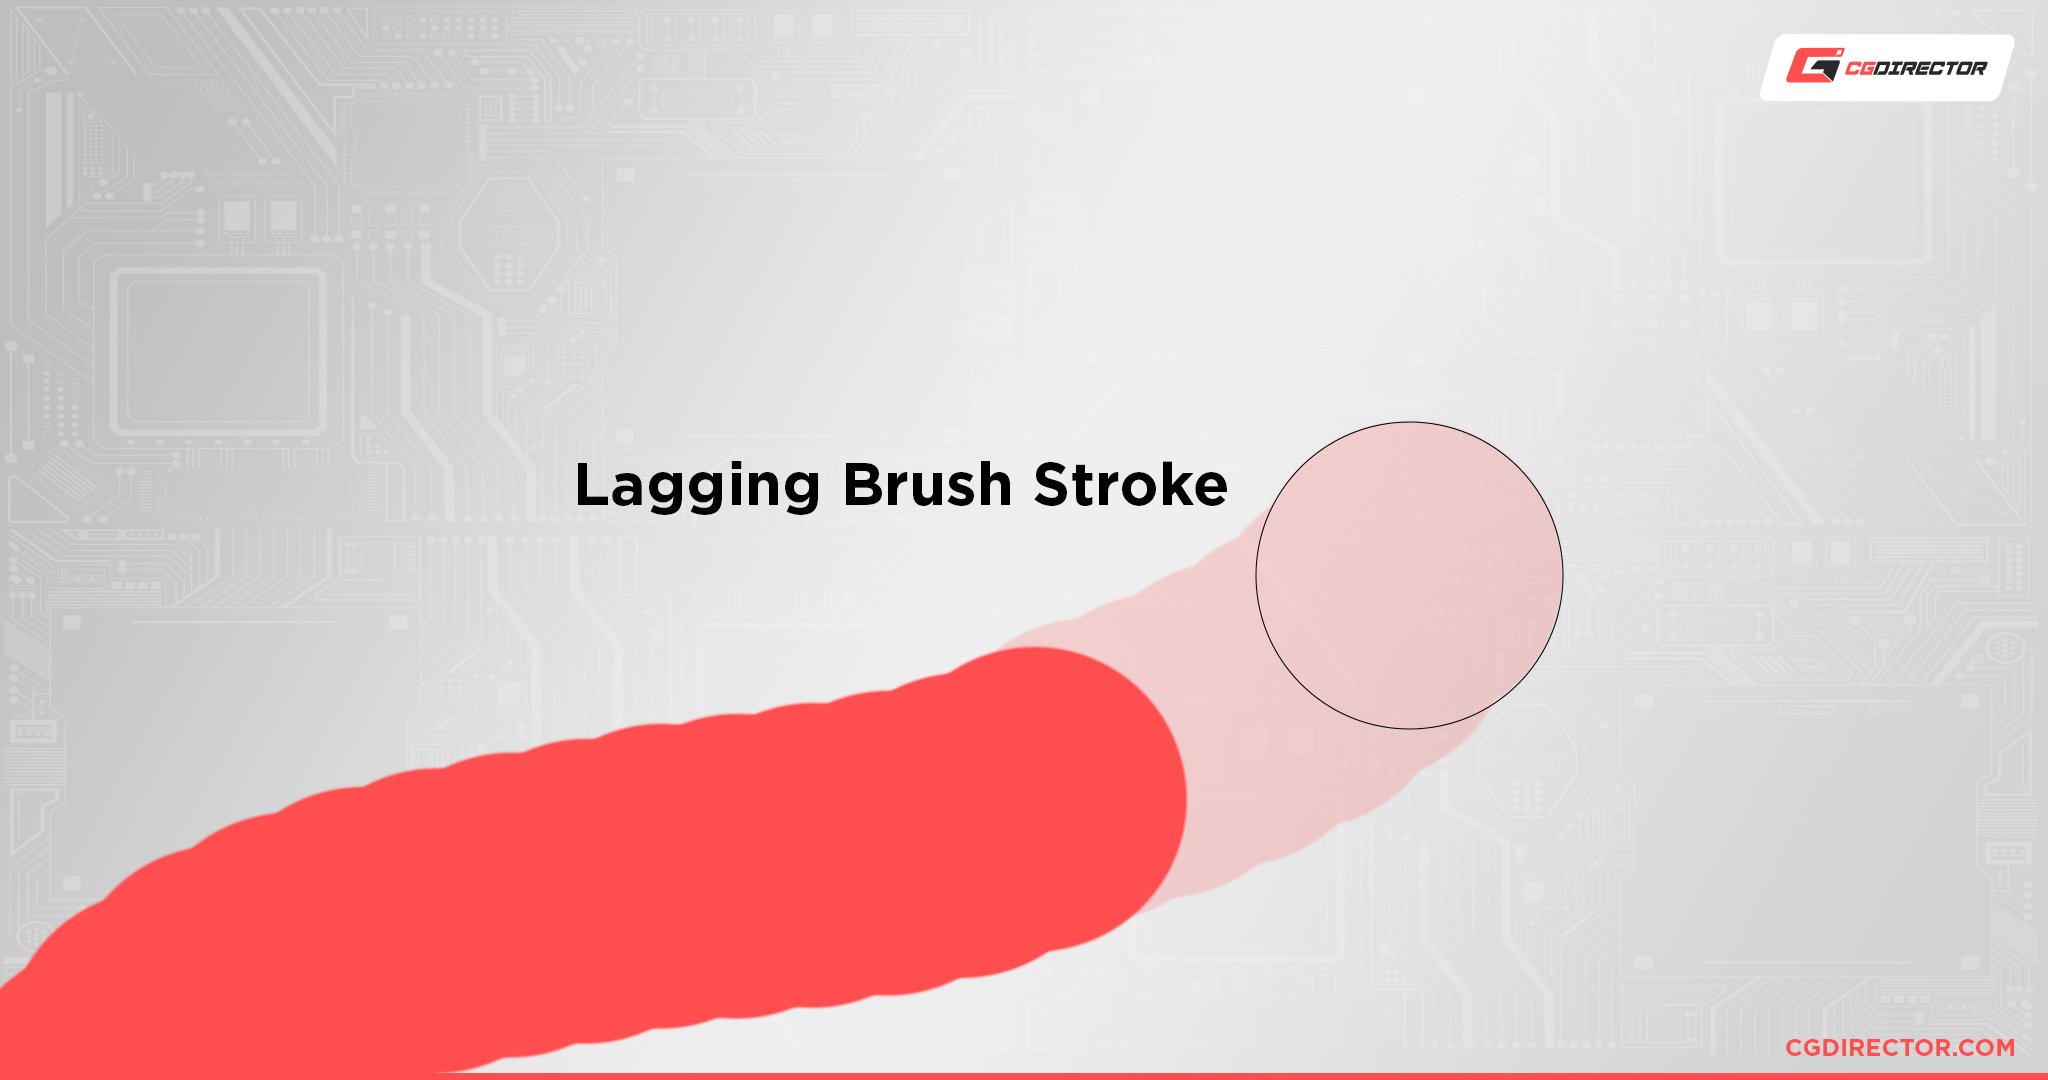
4. Reduce Brush Smoothing
This isn’t exactly something related to performance, more so just something that beginners can miss.
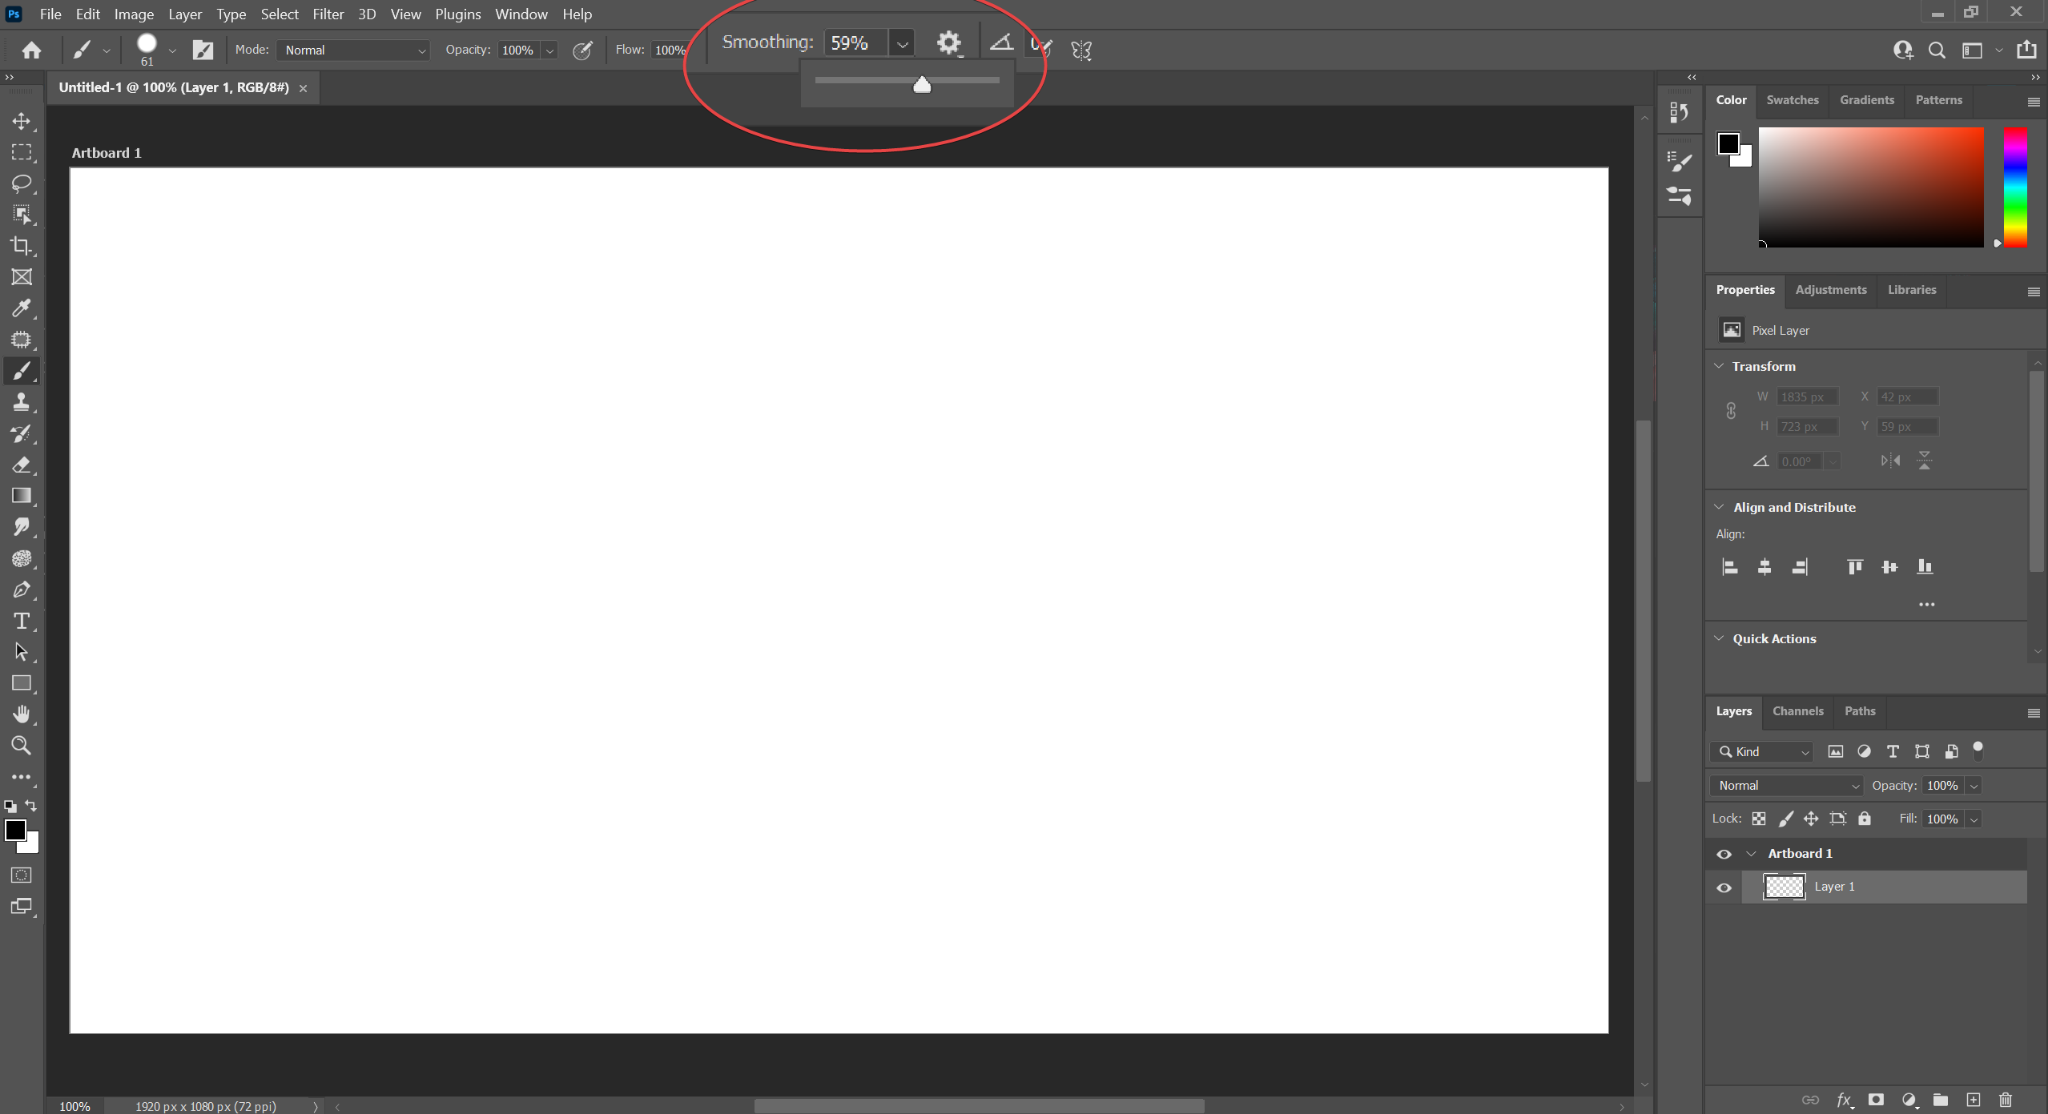
The “Smoothing” setting in Photoshop slows down your stroke so that it’s easier to make clean strokes. But it also makes it appear like your stroke is lagging behind your cursor.
This gets compounded by the brush spacing setting on your brush as well.
If you have a low brush spacing value, the brush will appear to smoothly lag behind your cursor.
If you have a high brush smoothing value, it’ll appear to “snap” into place when you have smoothing enabled.
So make sure that you don’t have your smoothing turned on (set it to 0% or a low value when you don’t need it) if your brush appears to be lagging.
5. Reduce/Turn off Advanced Brush Dynamics
Brush dynamics are basically effects that you can apply to your brushes.
These effects can give them interesting patterns, interactions with colors, and many other things.
But they can also slow down your brushes because they’re essentially adding more steps between when you first click and when your stroke gets drawn.
You have to be careful with turning off some of the brush dynamics, however, because some special brushes rely on these dynamics to look the way they do. So if you turn everything off, it might look plain and boring.
But if you’re having extreme brush lag issues, you should try and see if turning off some of the brush dynamic effects help.
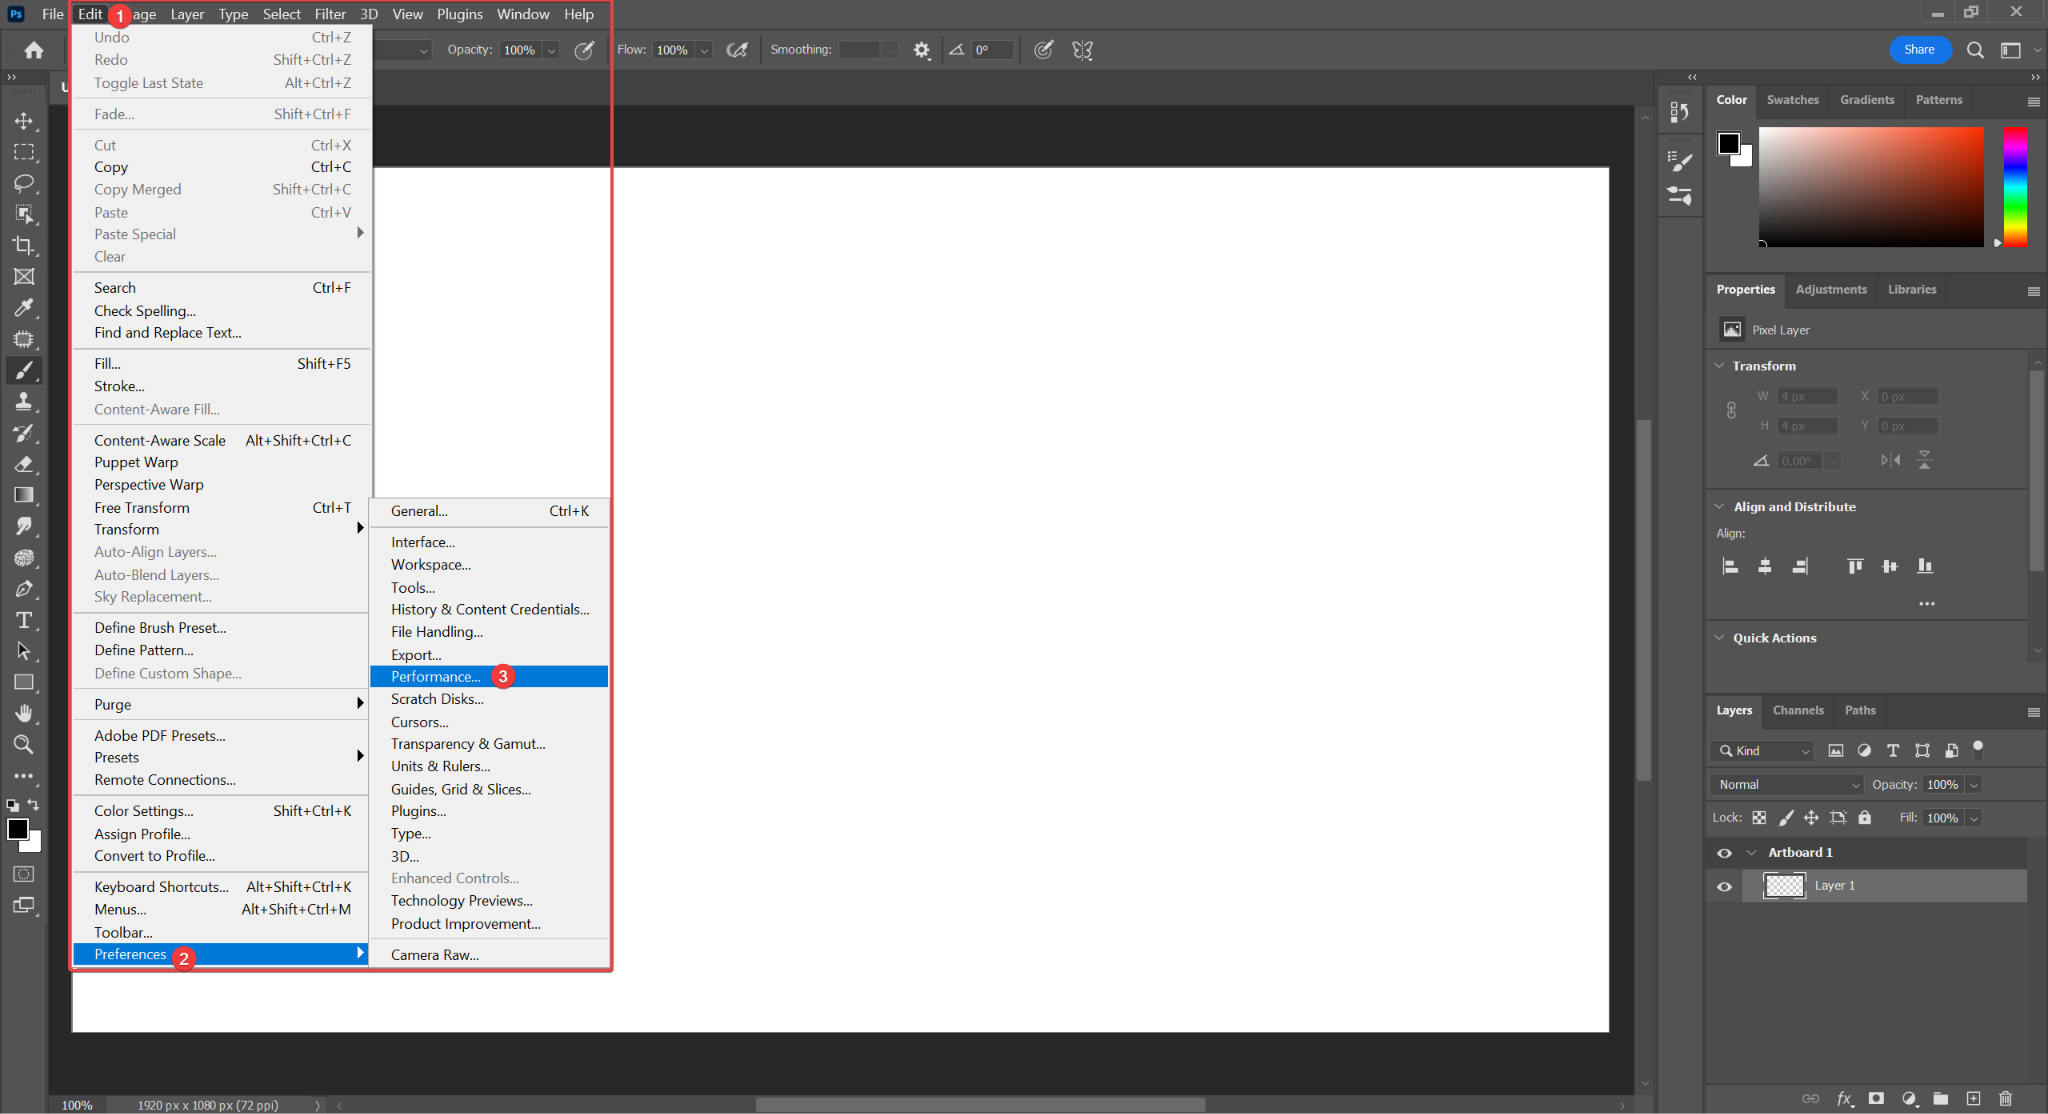
6. Allocate More RAM to Photoshop
One of the reasons that Photoshop could be slowing down is that you don’t have enough RAM. This is especially prone to happen if you have less than 16 GBs of RAM and are working on projects with tons of layers or frames.
Photoshop generally does a good job of picking a decent amount of RAM to allocate to itself; if you find that that’s not enough, you can manually change it as well.
Simply click on the “Edit” button on the top left, go down to “Preferences” and then click on “Performance.”

Photoshop Performance Settings
After that, you can adjust the amount of RAM you have allocated in the highlighted area.
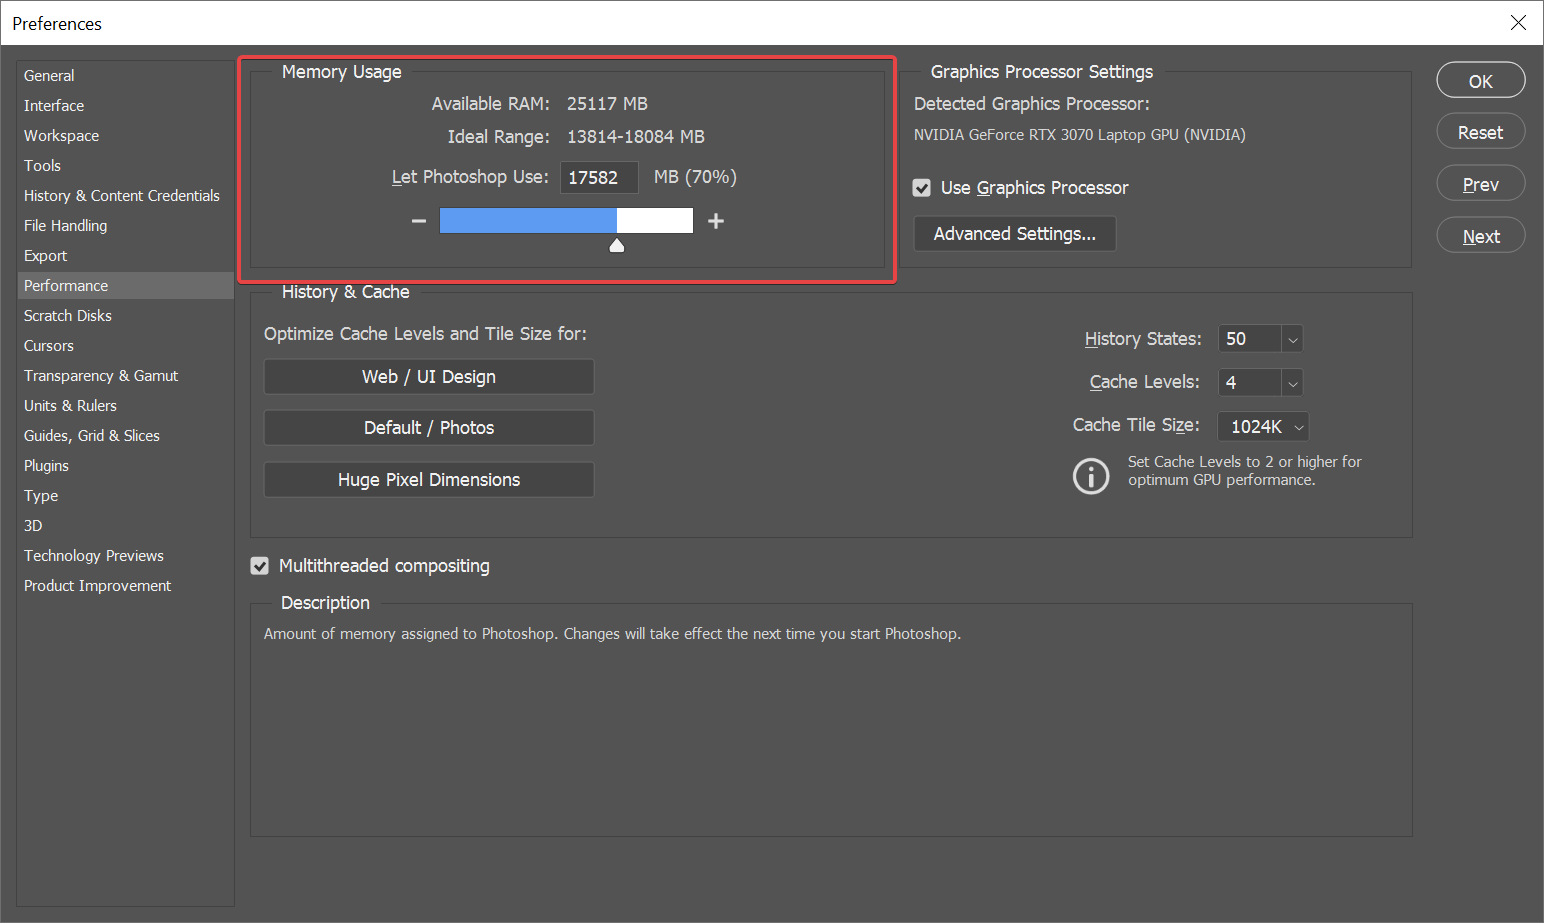
Depending on how much RAM you have, I would generally advise not going above 90% allocation. The other parts of your system also need some RAM to work, and if they don’t get enough, you might face system-wide lag and hangups.
7. Make Sure You’re Using Your Dedicated GPU
This setting and the one right after this are quite new additions to Photoshop, but they’re extremely welcome.
This setting specifically makes it so that certain processes of Photoshop that previously relied on the CPU to function can now use the GPU instead, significantly speeding up those processes and freeing up valuable CPU processing power for other uses.
If you’re using the latest version of Photoshop and have a compatible Graphics Card, this setting should automatically be turned on for you, but if it’s not, here’s how you can turn it on yourself.
First click on the “Edit” but on the top left, go down to “Preferences” and then click on “Performance.”

After that, simply click on the “Use Graphics Processor” box, and you will begin using your GPU.
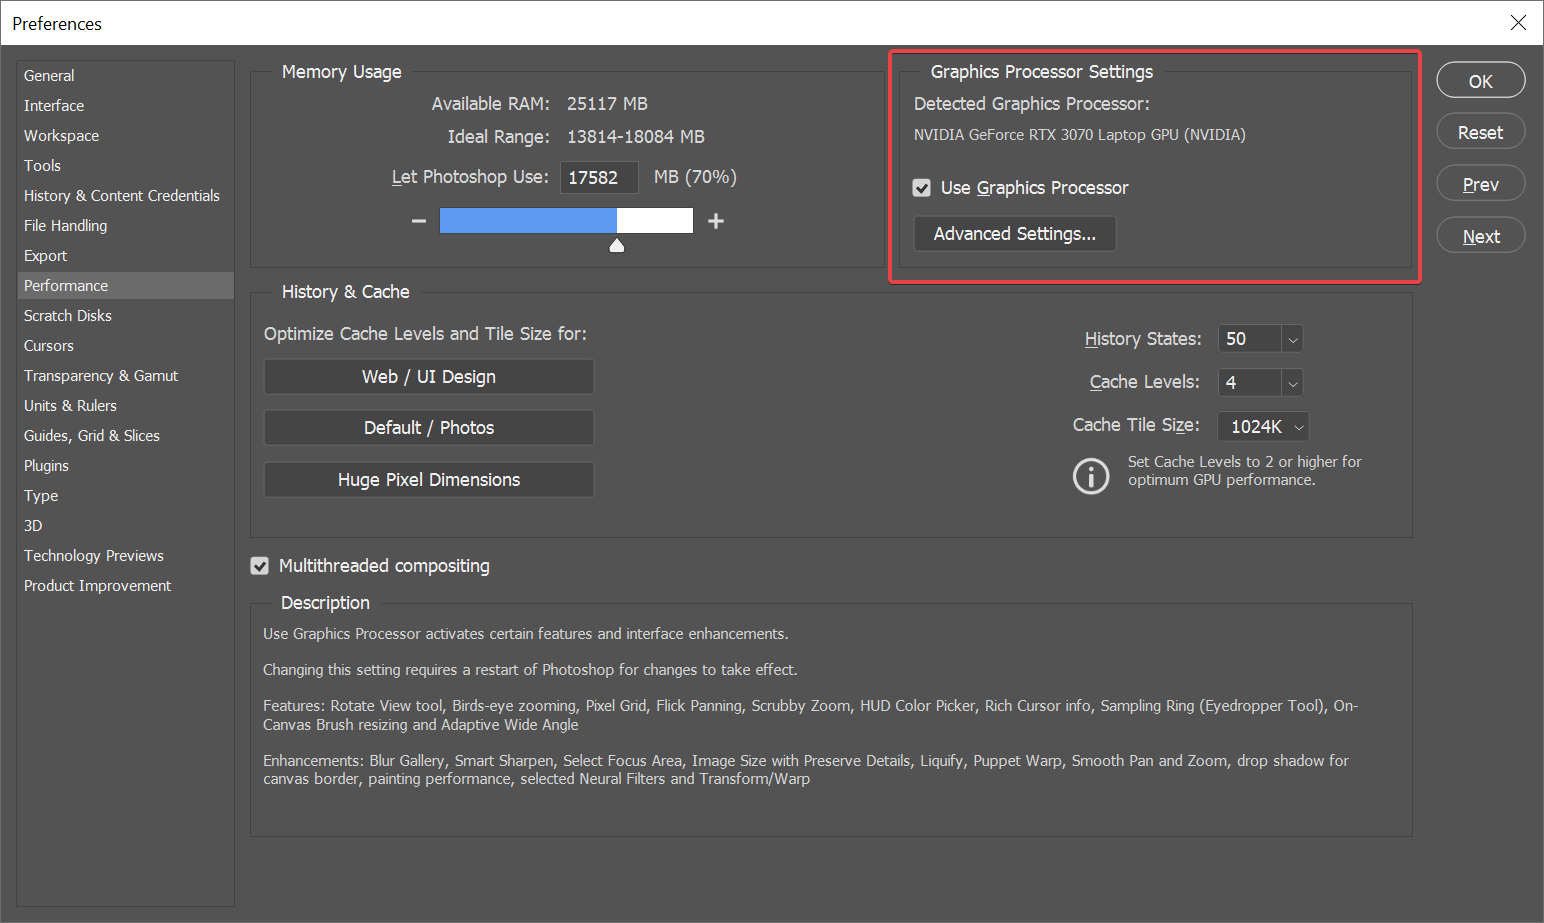
I suggest restarting Photoshop after you first turn on the option.
8. Make Sure You’re Using Multithreaded Compositing
And the other amazing new addition to Photoshop is called “Multithreaded Compositing.”
It’s a great feature that speeds up a lot of CPU-bound aspects of Photoshop by allowing Photoshop to use more cores than it previously could. This means that Photoshop as a whole is much faster with Multithreaded Compositing turned on.
Same as using your GPU, this option is also automatically turned on if you have a compatible CPU on new Photoshop versions.
But if you want to make sure, here’s where you can find it.
Click on the “Edit” but on the top left, go down to “Preferences” and then click on “Performance.”
Simply check the box in front of the highlighted “Multithreaded Compositing” option, and you will start using this new function.

As with using your GPU, I would suggest restarting Photoshop to make sure that the change in setting has been put into effect.
9. Make Sure That Your Scratch Disks Use Fast SSDs and Aren’t Full
In Photoshop and other Adobe products, “Scratch Disks” are closed-off temporary storage locations created by the application to store data while you’re working on a file. They can be in one or more storage drives on your PC.
You can think of them as a “temp storage” location for Photoshop to store and retrieve temporarily saved data relatively quickly.
As you can imagine, these scratch disks benefit from being on fast drives with plenty of storage. Pretty much everything in Photoshop is affected by scratch disks, so it’s important to make sure you have enough storage for them.
By default, Photoshop creates a scratch disk on the main OS drive (usually the “C:” drive).
If your main drive is getting full, or you want to move your scratch disk to a different drive, here’s how you can do so:
Click on the “Edit” but on the top left, go down to “Preferences” and then click on “Scratch Disks.”
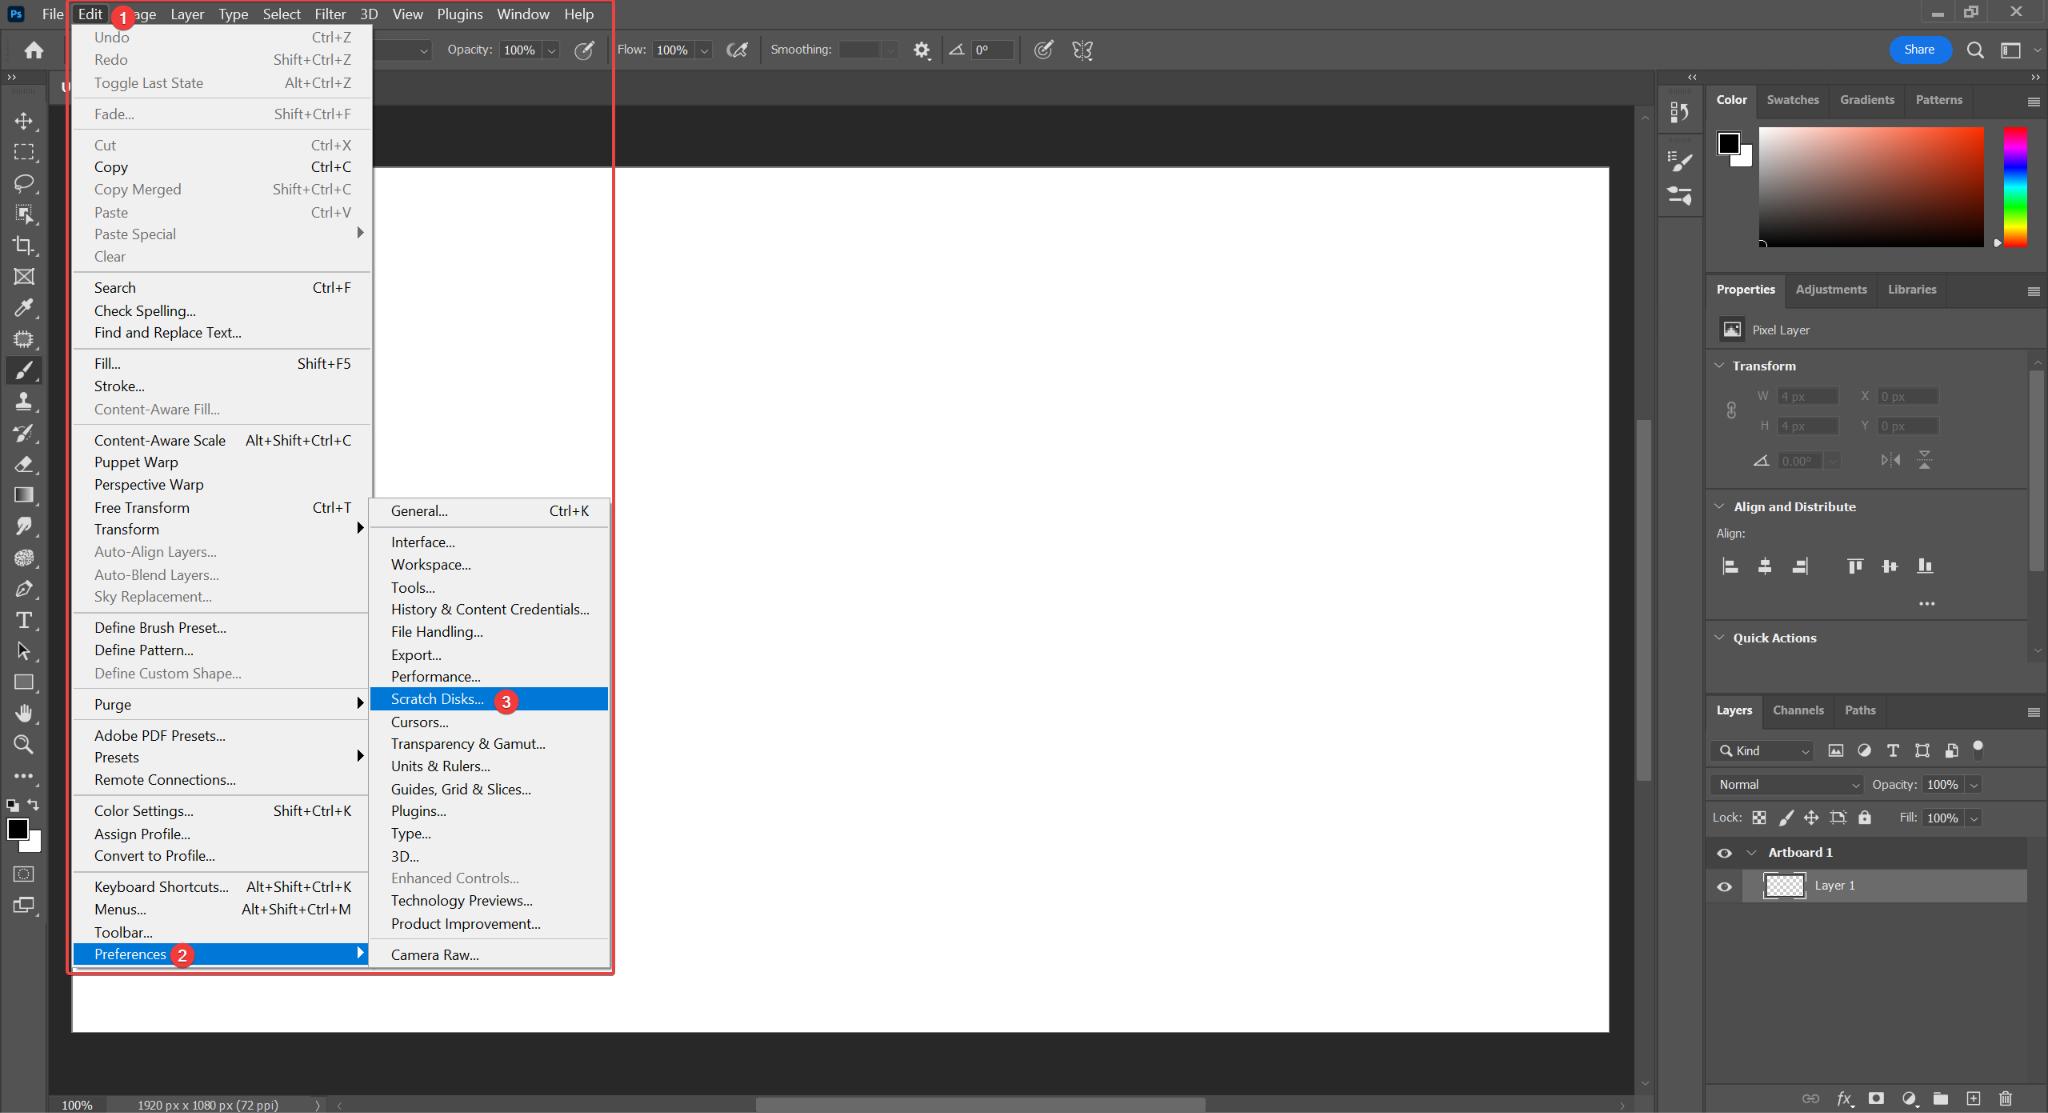
After that, you’ll see the scratch disk selection screen. This screen will show you how much space you have left in each drive and allow you to pick what drive(s) you want to use as scratch disks.
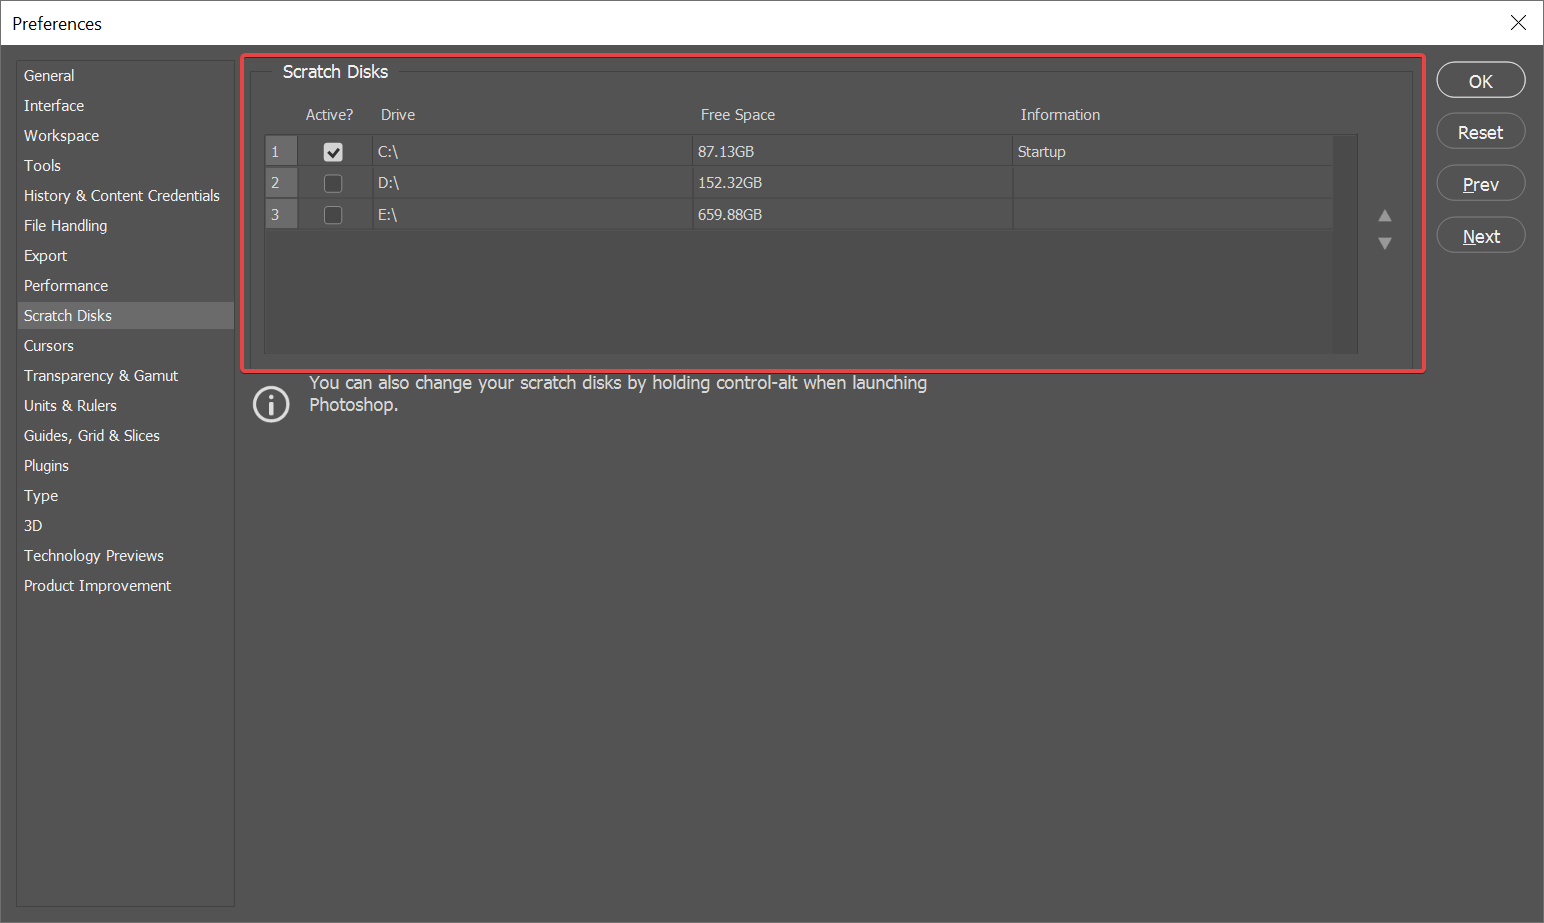
I suggest you make sure your scratch disk is on a fast SSD with at least 50 – 100 GBs of free storage.
Operating System Fixes/Changes
These are changes made at the operating system level to potentially get Photoshop to run faster. You can get a surprising amount of performance from optimizing the applications running on your PC.
1. Close Background Programs
This is a common issue that can cause slow-downs: Background programs that hog your resources.
When you’re running resource-intensive tasks such as Photoshop, you need all your PC’s resources going towards it. But many applications have a nasty little way of embedding programs into your PC that run in the background.
Sometimes these programs are needed and important, but most of the time, they’re useless if you are not using them actively.
And then there are the programs that you have opened in the background intentionally, whether that be a browser (especially Chrome with many opened Tabs), a chat program, an E-Mail Software, or something else. They can consume a significant amount of resources.
I can’t really tell you to close something specifically, so you have to make a judgment call here to figure out what background programs you need and what you can get rid of.
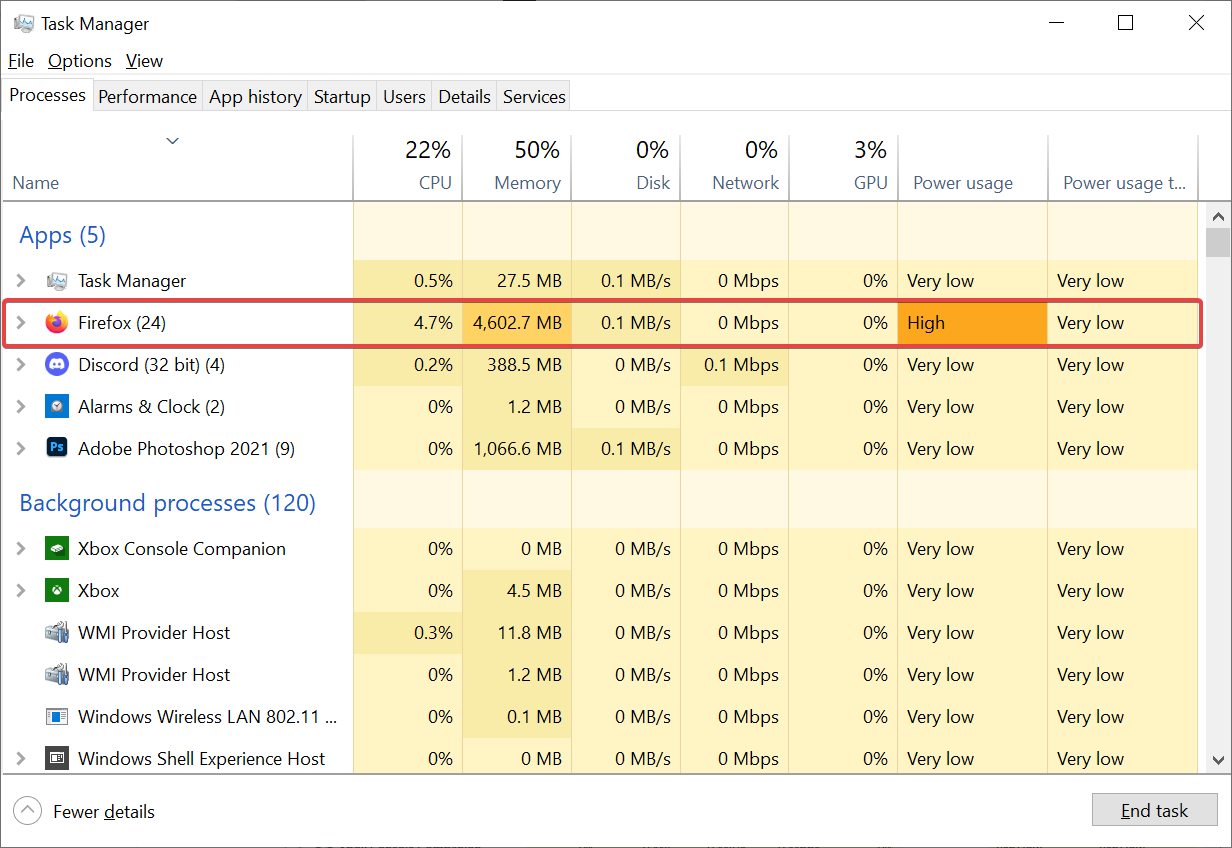
Open the Windows Task Manager (Press Ctrl + Shift + Esc) and sort the running Applications by Memory usage or CPU usage to find the biggest culprits.
2. Give Photoshop Higher Process Priority
Giving Photoshop higher process priority basically means that you’re telling your PC that Photoshop is an important application and that it should get the first share of the pie (PC resources), even at the potential detriment of other applications.
This is especially important for Photoshop because process priority mainly determines CPU resource distribution, and the CPU is the most important component for Photoshop brush performance.
It’s important to understand that this isn’t free performance, though. You’re simply depriving some other application of CPU resources by giving it to Photoshop.
Most of the time, this is fine. But if you have some CPU-critical application running in the background, you might want to give it a higher priority as well.
Now that the preamble is out of the way let me show you how to actually do it.
Firstly, open up Task Manager. You can do this by simply pressing Ctrl + Shift + Esc.
Next, open up Photoshop and create/open a project.
After that, expand the Photoshop application in Task Manager by clicking the little right facing arrow next to its name and right-click on the project that you created/opened. Then just click “Go to details.”
After you’re done with that, you will be taken to a different section in the Task Manager, and you will see an application named “Photoshop.exe.”
Right-click it, and then go to “Set Priority.” A new menu will open up with different options; select the “High” option here.
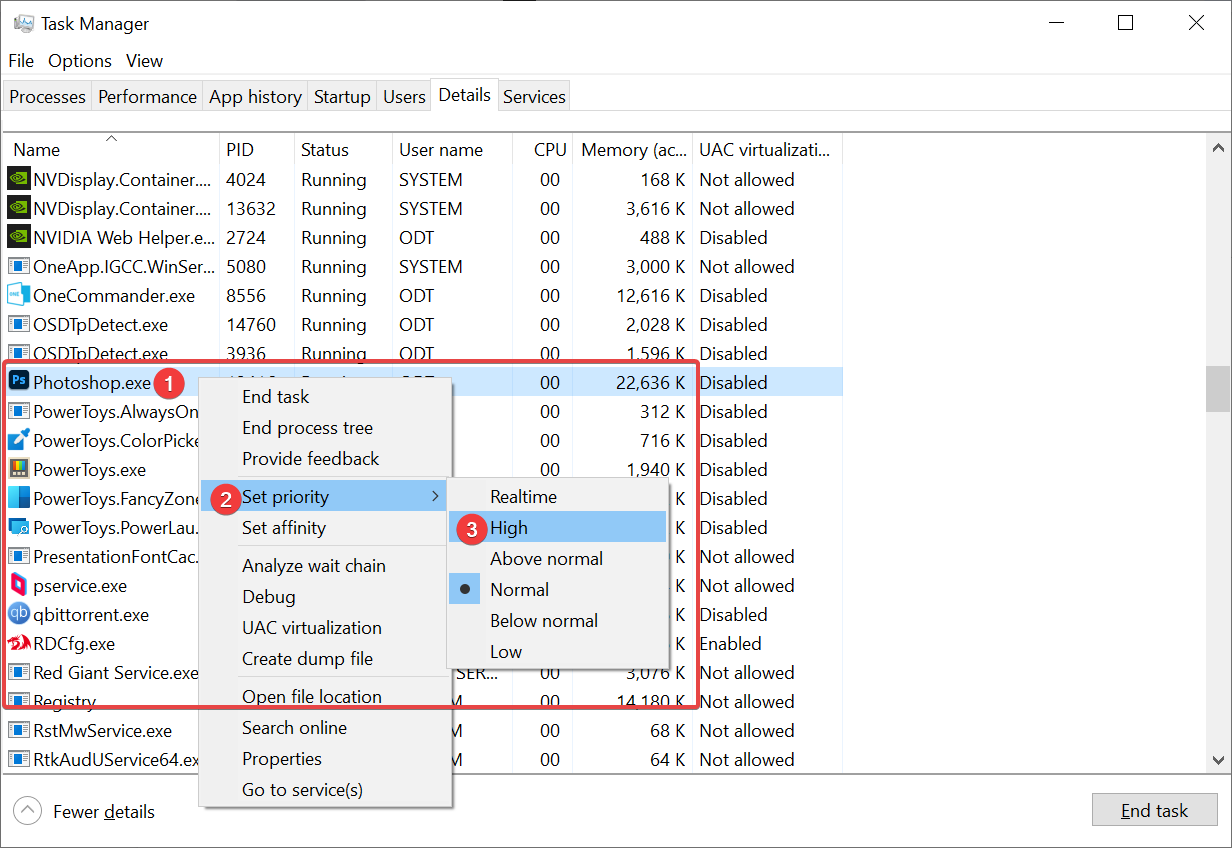
And that’s it! That’s all you need to do to change the process priority on Photoshop or any other application.
Computer Fixes/Changes
These are physical changes that you can make to your computer to potentially get Photoshop to run faster. If none of the previous fixes worked, these might be your last options.
1. Clean Your PC
Let’s be honest here, none of us do this as much as we should. But, it’s undeniably a critical part of maintaining your PC. If your PC is choking on dust and grime, it will overheat and slow down massively.
So it’s important to keep your PC clean. Depending on how badly your PC needed cleaning, this by itself might solve your lagging issues.
However, if you already had a relatively clean (I.e., not caked in dust) PC, it most likely won’t give you any noticeable improvements.
2. Cool Your PC
Having a powerful PC is all well and good, but it’s all useless if you can’t cool it well. Your PC will just thermal throttle and slow down dramatically.
The most important thing to remember is to keep your PC well ventilated with plenty of ways to get cool air in and expel hot hair.
The main way to do this is to use case fans. So make sure to get some good case fans.
The other, possibly more important thing when it comes to Photoshop specifically, is to keep your CPU cool. Your CPU is responsible for most of the work that makes Photoshop function, so if it’s overheating, you’re going to be having a bad time.
So make sure to get a good CPU cooler to keep your CPU cool.
This section is connected to the last section about cleaning your PC as well. If your PC is choking on dust and grime, it obviously won’t be cool, so keep your PC clean to keep it cool.
3. Upgrade Your PC
If cleaning and cooling and all the other fixes don’t do much, it might be time to look into upgrading your PC.
Sometimes your PC just doesn’t have the horsepower to run stuff no matter how much you optimize it. It’s a sad realization for your wallet, but there’s not much else to be done about it.
I can’t give specific help here because the upgrade requirements are different for every PC, depending on your current specifications.

However, the main things you should be looking into should be the CPU and RAM for Photoshop specifically.
4. Get a New PC
At the end of the day, there’s only so much cleaning, cooling, and upgrading you can do to an old and decrepit PC. Sometimes you just need to scrap everything and start over from the beginning.
If nothing else worked, it just might be time to do that.
Thankfully for you, we got you covered.
Go take a look at our article covering Photoshop’s system requirements to get an idea of what you need from your new PC and then take a look at our PC building guide to help you figure out how to actually make your new build.
And as always, if you have any questions, feel free to ask us over at our forums or in the comments! We’re always here to help 🙂
Over to You
Hopefully, that helped you out with your brush lag issues!
There are many different ways you can tackle the issue, and I hope I gave you enough options to pick the one that fits you best. Have any other questions about Photoshop? Feel free to ask us in the comments or our forum!
")
![Best Custom Mechanical Keyboard Websites [2024 Update]](https://www.cgdirector.com/wp-content/uploads/media/2023/03/Best-Custom-Keyboard-Websites-Twitter-594x335.jpg "Best Custom Mechanical Keyboard Websites [2024 Update]")


0 Comments