 by
by ![How to Get a CPU Cooler off of a CPU [Un-stick Glued-On Cooler]](https://www.cgdirector.com/wp-content/uploads/media/2024/03/How-to-get-CPU-Cooler-off-CPU-Twitter-copy-1200x675.jpg "How to Get a CPU Cooler off of a CPU [Un-stick Glued-On Cooler]")
TABLE OF CONTENTS
A CPU cooler protects your CPU from thermal throttling, stability issues, and heat-related damage.
Put simply: It’s a vital hardware component that unleashes your CPU’s full potential.
However, there are times when you may need to remove the CPU cooler, whether because of a troubleshooting step or upgrading the cooler itself.
In theory, this sounds like a simple task. You switch off your device, wriggle the cooler back and forth, and gently pry it off. Viola.
But… what happens when your CPU cooler is so determined to protect your CPU from harm, that it refuses to come off, no matter how much you pry and try?
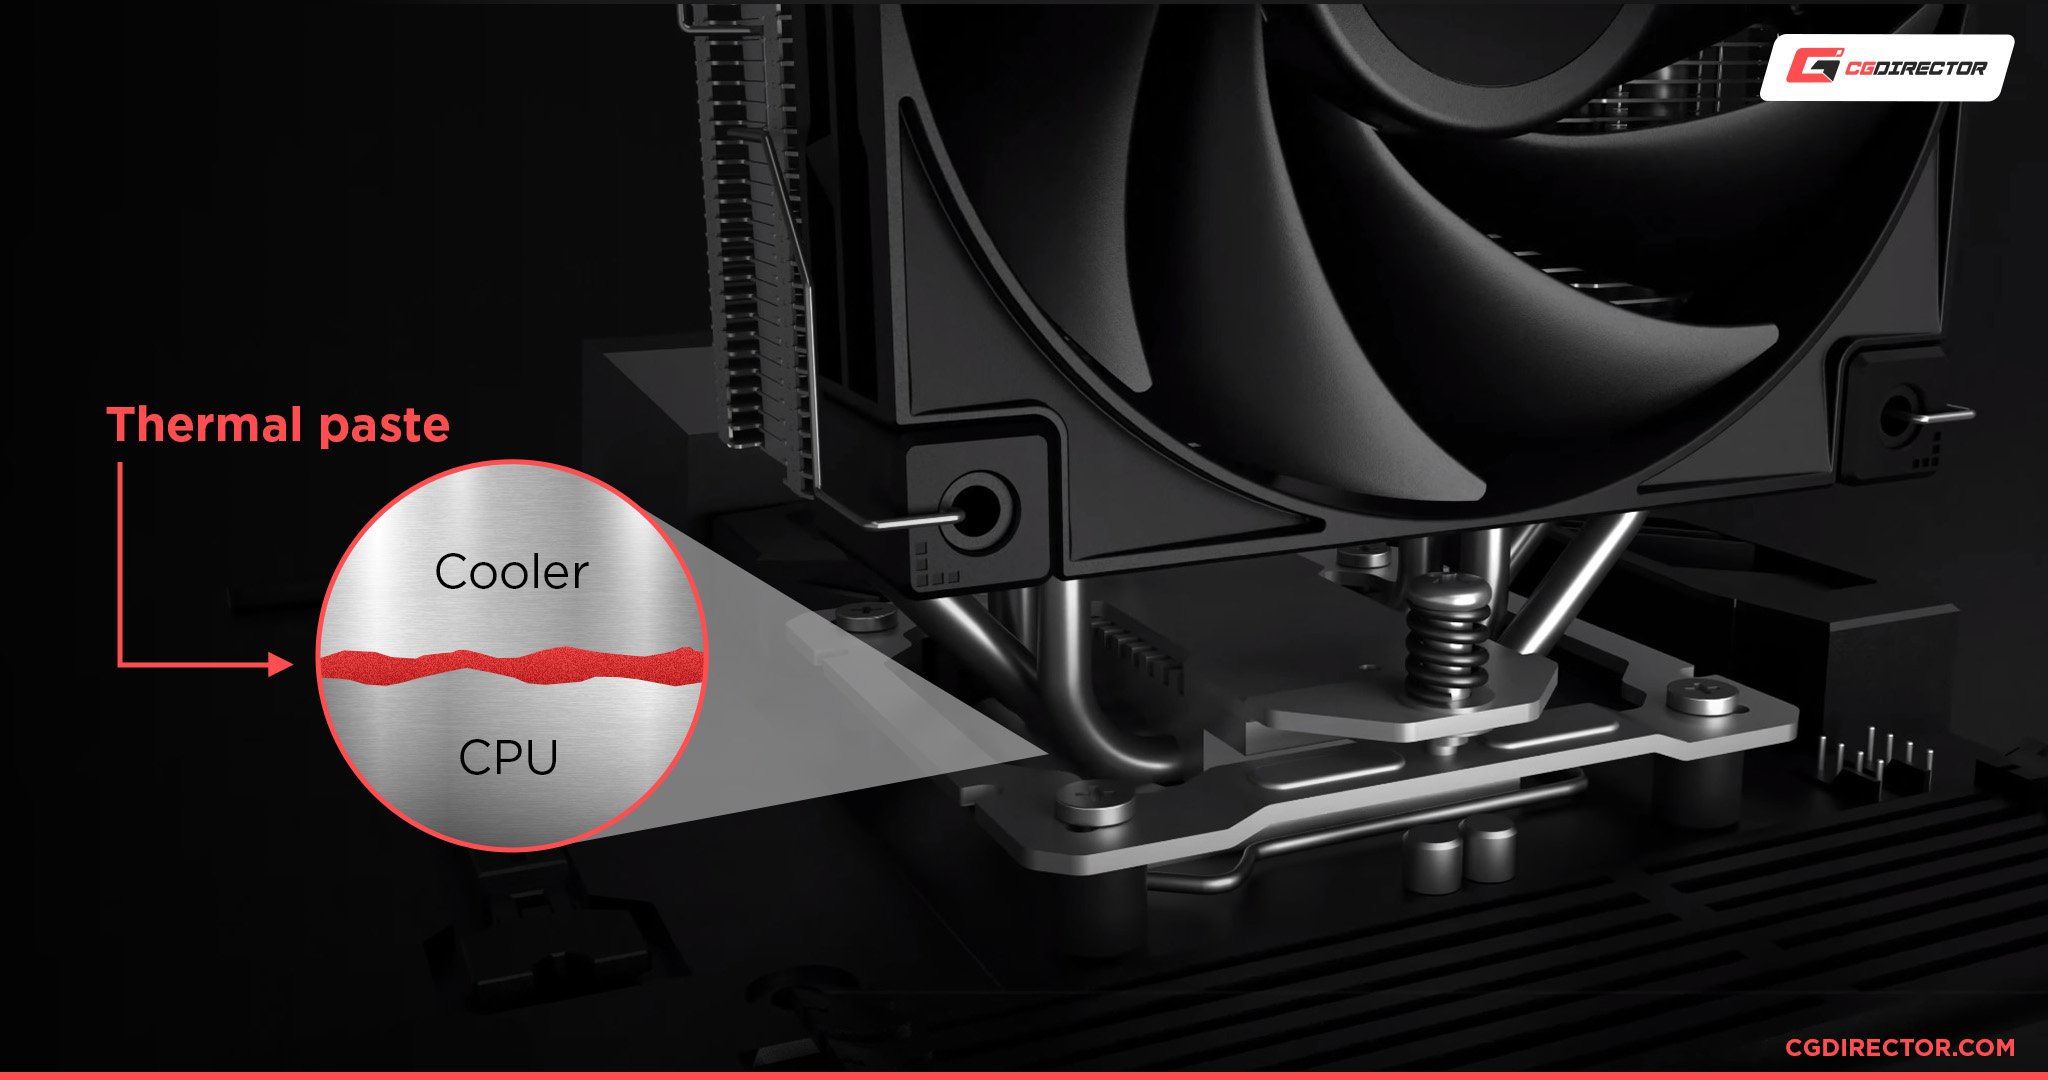
Thermal paste, the sticky substance that’s applied between the CPU cooler and the processor, is the likely culprit.
Its main job is to minimize the microscopic air gaps between the two surfaces — something which can significantly improve thermal conductivity and keep temperatures low. But in certain situations, it can cause the CPU cooler and CPU to get stuck or “glued” together.
In this article, we’ll share a few methods that’ll help you safely remove a stuck CPU cooler. We’ll also delve a little more into what exactly thermal paste is and how to reapply it.
What Is the Role of Thermal Paste?
A Central Processing Unit (CPU) generates a whole load of heat and can reach scorching temperatures (up to 100 degrees Celsius), especially if it’s put under heavy load.
If this heat is left unchecked, it can lead to thermal throttling and cause your PC to stutter, slow down, freeze, or shut down entirely. It can even result in permanent hardware damage if continued for lengthy periods.
So, nothing fun.
That’s where a CPU cooler comes in (cue superhero music). It uses fans or a liquid coolant to keep temperatures low, ensuring your processor will never reach the “danger zone” and be put at risk of all the bad stuff.
However, for the CPU cooler to be effective, it needs to be perfectly attached to the processor’s integrated heat spreader (IHS) — something that’s not exactly feasible because of the tiny, air-trapping imperfections that naturally occur on the IHS and CPU cooler plate surfaces.
Thermal paste is the substance that makes this perfect attachment possible. It spreads onto these surfaces and “plugs up” all their imperfections.
When properly applied, and with a high-quality cooler in place, CPU temperatures usually stay below 70 to 80 degrees Celsius.
Why is My CPU Cooler Glued to the CPU?
Thermal paste starts as a soft, greasy substance. However, over time as the thermal paste is exposed to numerous heating/cooling cycles, it can dry up and harden, resulting in a “cement-like” grip that glues your CPU cooler to the CPU.
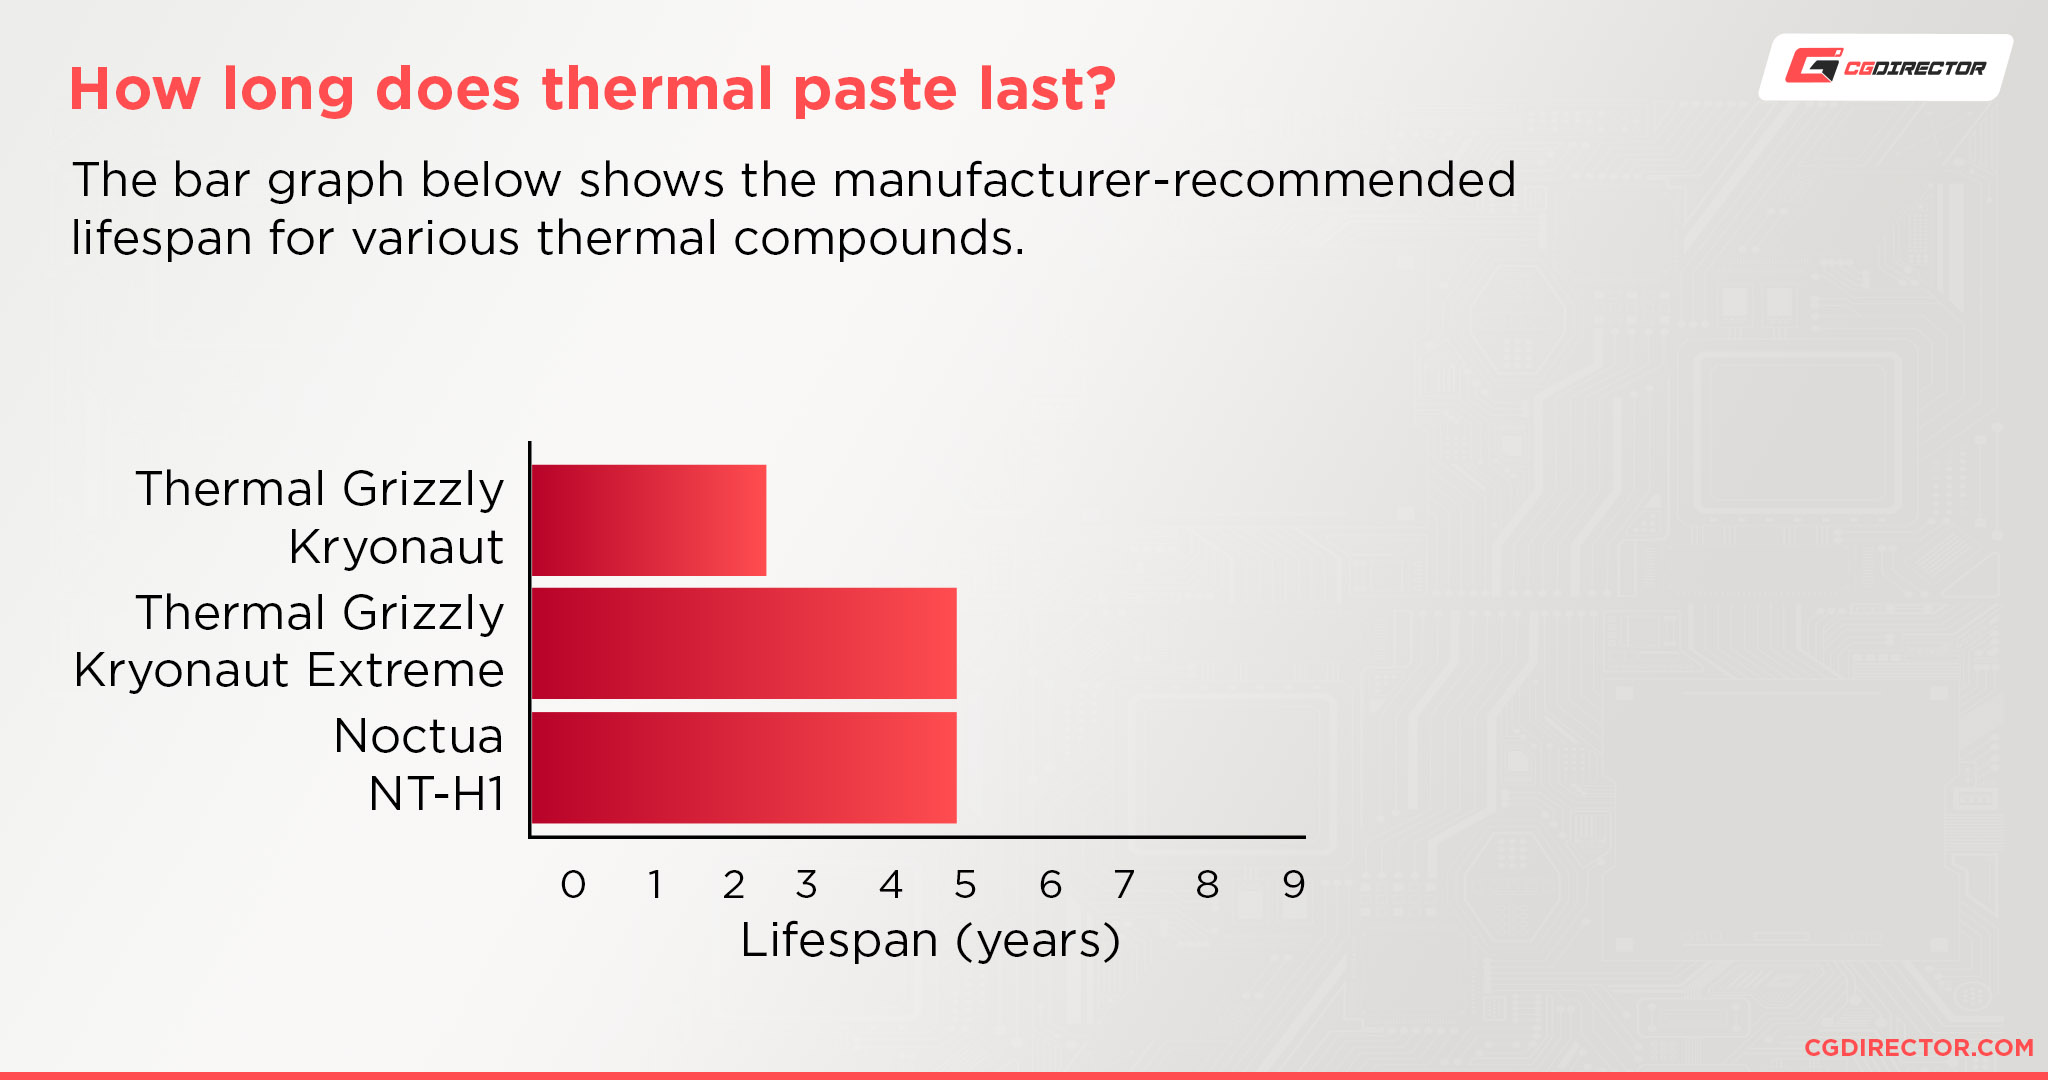
Most thermal pastes can last for several years before they dry up and cause noticeable issues, but there are some instances where it can happen a lot earlier, including:
- You’re using a low-quality thermal paste
- The thermal paste wasn’t applied properly
- You used an old thermal paste product that was poorly stored or past its shelf life
- Excessive exposure to heat (i.e. putting your PC under heavy load constantly)
A high CPU temperature is the first red flag that the thermal paste is drying up and losing its heat transfer efficiency. This will typically be followed by performance issues.
Dried-up thermal paste will also appear crumbly, hard, and flaky in texture.
How to Get a CPU Cooler Off of a CPU: A Close Look
We’ll start with the safest and most common methods to get a CPU cooler off of a CPU.
Once we’ve covered the basics, we’ll then introduce some less “conventional” methods — these are generally safe as long as you’re extremely careful and confident around hardware.
As always, we recommend taking your PC to an expert if you’re not a hardware-savvy individual.
1. Warm Up Your PC
You’ll first want to run your PC and make it nice and toasty; heat helps loosen and soften dried-up thermal paste, making the CPU cooler much easier (and safer) to remove.
In mild cases, you usually only need to run your PC for 15 minutes to generate enough heat to warm the thermal paste. However, don’t just switch it on and leave it idle.
You need to put your device under some form of load to ramp up those internal temperatures. Great tasks for this are gaming, 3D rendering, editing, or just opening a zillion browser tabs.
Once you can hear your fans whirring and battling the heat, switch off your PC and try removing the CPU cooler. If it’s still stuck, repeat the process, but this time take the heat up a notch by performing a stress test on your CPU.
2. Perform a Stress Test
A stress test is pretty much what it says in the name: It involves putting your PC under an extremely heavy load to figure out what its limits (or capabilities) are in terms of performance.
Unsurprisingly, a stress test also generates a high amount of heat — significantly more than what you would be able to generate through your own usage.
Perform the stress test specifically on your CPU to hone in on the thermal paste.
There are plenty of great stress test applications (aka benchmarking software) out there, but we personally recommend Cinebench. It’s free to download and the test on your CPU will take around 10 to 30 minutes, depending on which option you choose.
Once the stress test is complete, switch off your PC and try to remove the CPU cooler again.
Hopefully, the stubborn thermal paste will now be soft and pliable. But if you’re still struggling to remove the CPU cooler off of the CPU? You may just be using the wrong removal technique.
3. Use the Twist n’ Lift Technique
Removing the CPU cooler isn’t as simple as just yanking it up until it releases from the thermal paste. Not only will this probably not work, but it also risks damaging your CPU and wrecking the pins.
There’s a specific technique for loosening the seal the thermal paste has created — I like to call it the twist n’ lift method — so you’ll want to try this if you haven’t done so already.
As its name suggests, the technique requires you to gently twist the CPU cooler back and forth to break the seal.
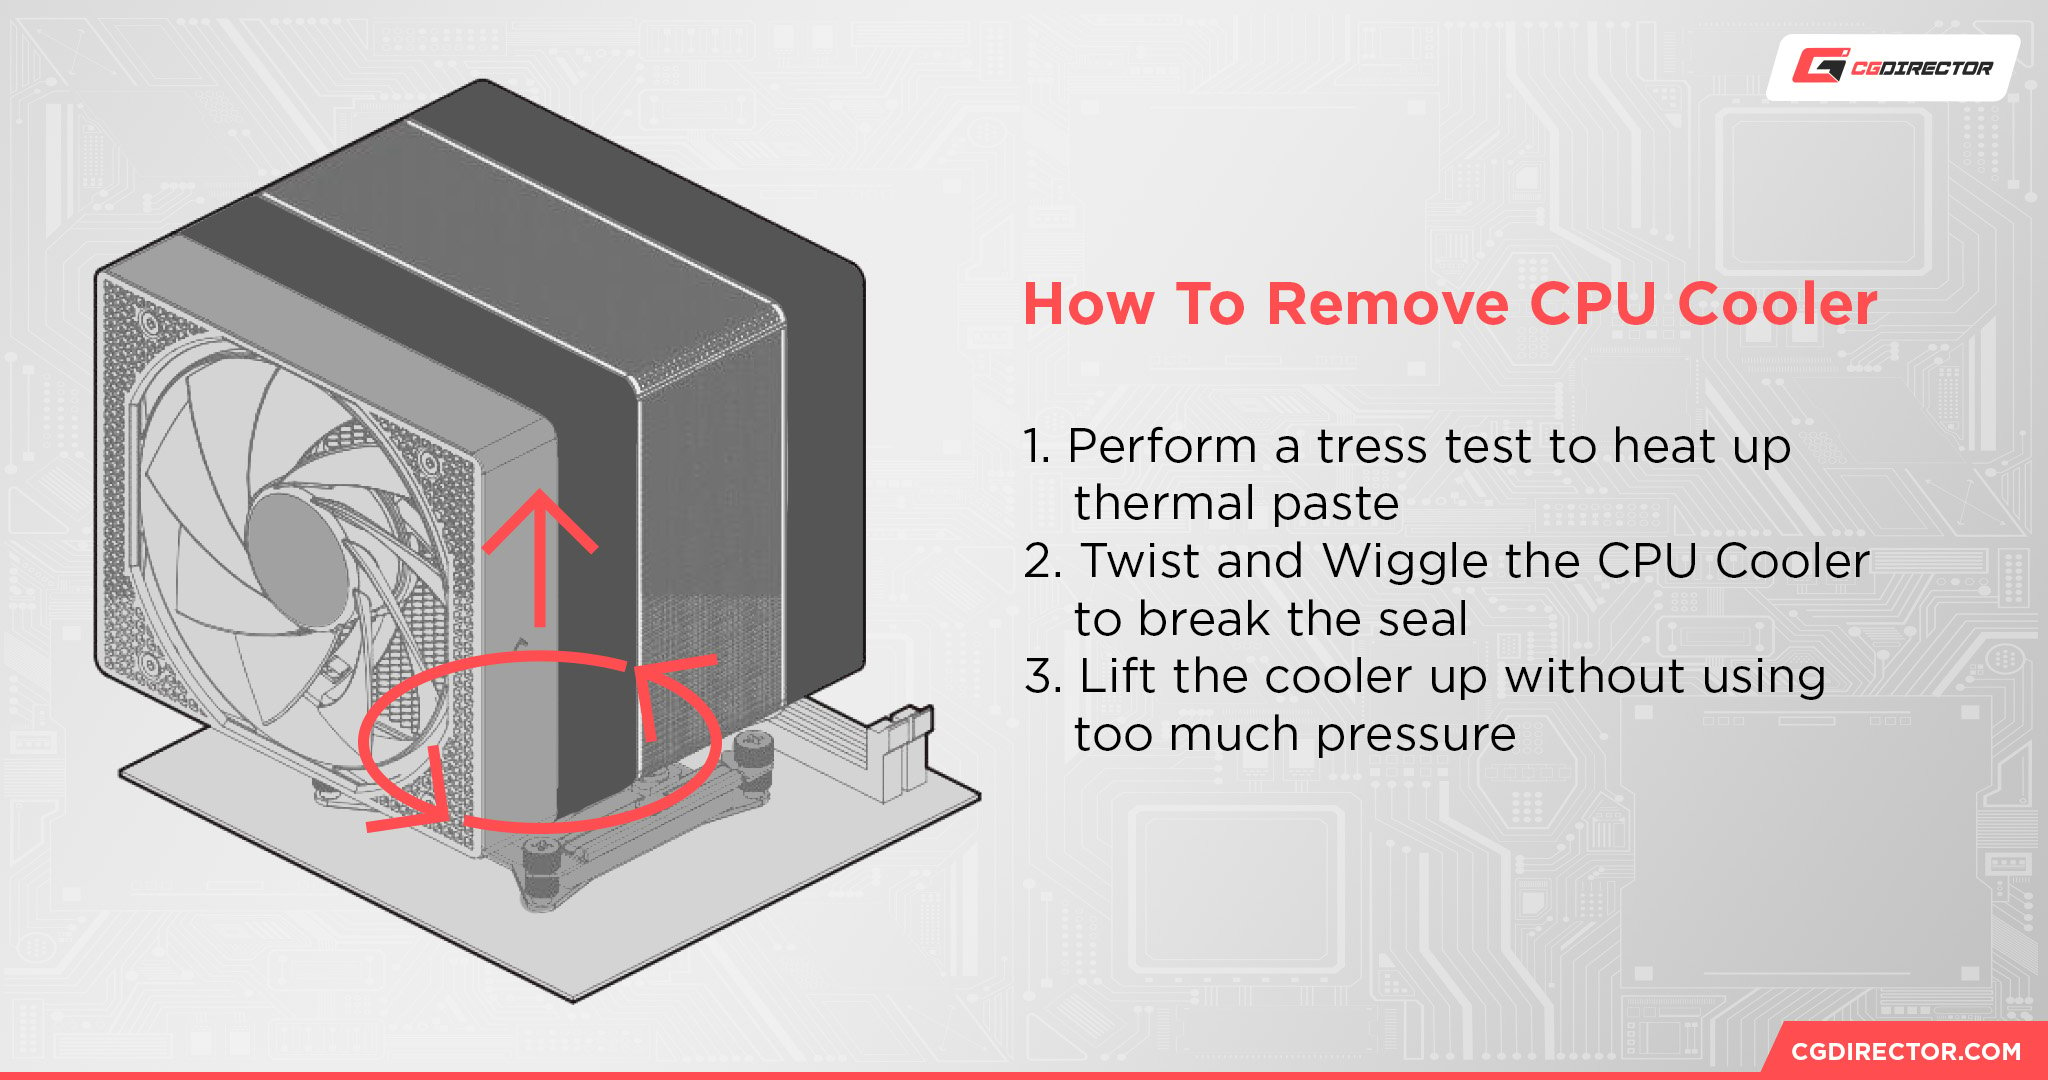
You’ll feel some slight resistance with each twist. Once the seal is broken, you should be able to easily lift the CPU cooler off of the CPU. Use light pressure while lifting the cooler or you risk pulling out the CPU from its socket.
If you’re still experiencing issues, you can wriggle it ever so slightly to help break the seal. However, never pull up while doing this as it can damage the hardware.
Do double-check that you’ve also properly released the cooler’s locking mechanism before attempting to remove it.
For example, if your cooler has push pins, you usually need to turn them all counterclockwise, while if your cooler has retention clips, you need to first pull the cam lever to unlock it from the retention frame and then release the clips.
Refer to the manufacturer’s manual if you’re not sure how your cooler’s locking mechanism works.
4. Use a Heat Gun
CPU cooler still stuck? Then try using a heat gun or hair dryer to apply external heat onto the CPU cooler.
Yes, believe it or not, this does actually work and it has helped many PC users in the same boat:
- Ensure everything is switched off from the power and any cables are disconnected
- Set the heat gun or hair dryer at low-to-medium heat and hold it a few inches away from the CPU cooler
- Apply the heat for a few seconds, rotating around the CPU cooler. Then, check if the thermal paste has loosened
- If you still can’t remove the cooler, repeat this process a few more times
If heating the thermal paste directly doesn’t work, you’ll next want to swap out your hair dryer for some dental floss (yep, we’re being resourceful today).
5. Pry with Dental Floss and Isopropyl Alcohol
Yes. Dental floss — or another thread-like material — is likely going to be your savior if heat isn’t working its usual magic.
This is especially the case if you’ve managed to pull the CPU out of its socket and it’s now stuck to the cooler (more on this shortly).
The method involves carefully sliding a piece of floss in between the cooler plate and IHS to physically break the thermal paste’s seal.
Here’s how to go about the process. Again, ensure everything is switched off before attempting this:
- Dampen a cotton swab with a 90% isopropyl alcohol solution
- Gently dab it around the edges of the IHS, making sure not to get it anywhere else
- Carefully slide a piece of dental floss underneath, in between the cooler and CPU. You may need to slightly wriggle it back and forth if you feel some tension (but keep to light pressure)
- The adhesive bond will usually break as you slide the dental floss across, especially when you hit the middle. You may need to work on it from each corner if it’s particularly stubborn
If you don’t have dental floss or sturdy thread on hand, you can use a business card instead.
This final method should solve the problem, but reach out to a professional for help if your CPU and the cooler remain glued together.
CPU Came Out of Socket: Are Bent CPU Pins Salvageable?
Right. We’re not here to judge. If you’ve yanked out the CPU from its socket while trying to hastily remove the cooler, don’t panic just yet.
The CPU may still be okay; inspect the socket as well as the pins closely for bends or breaks. Use a magnifying glass to do this (unless you have Hawkeye-level eyesight).
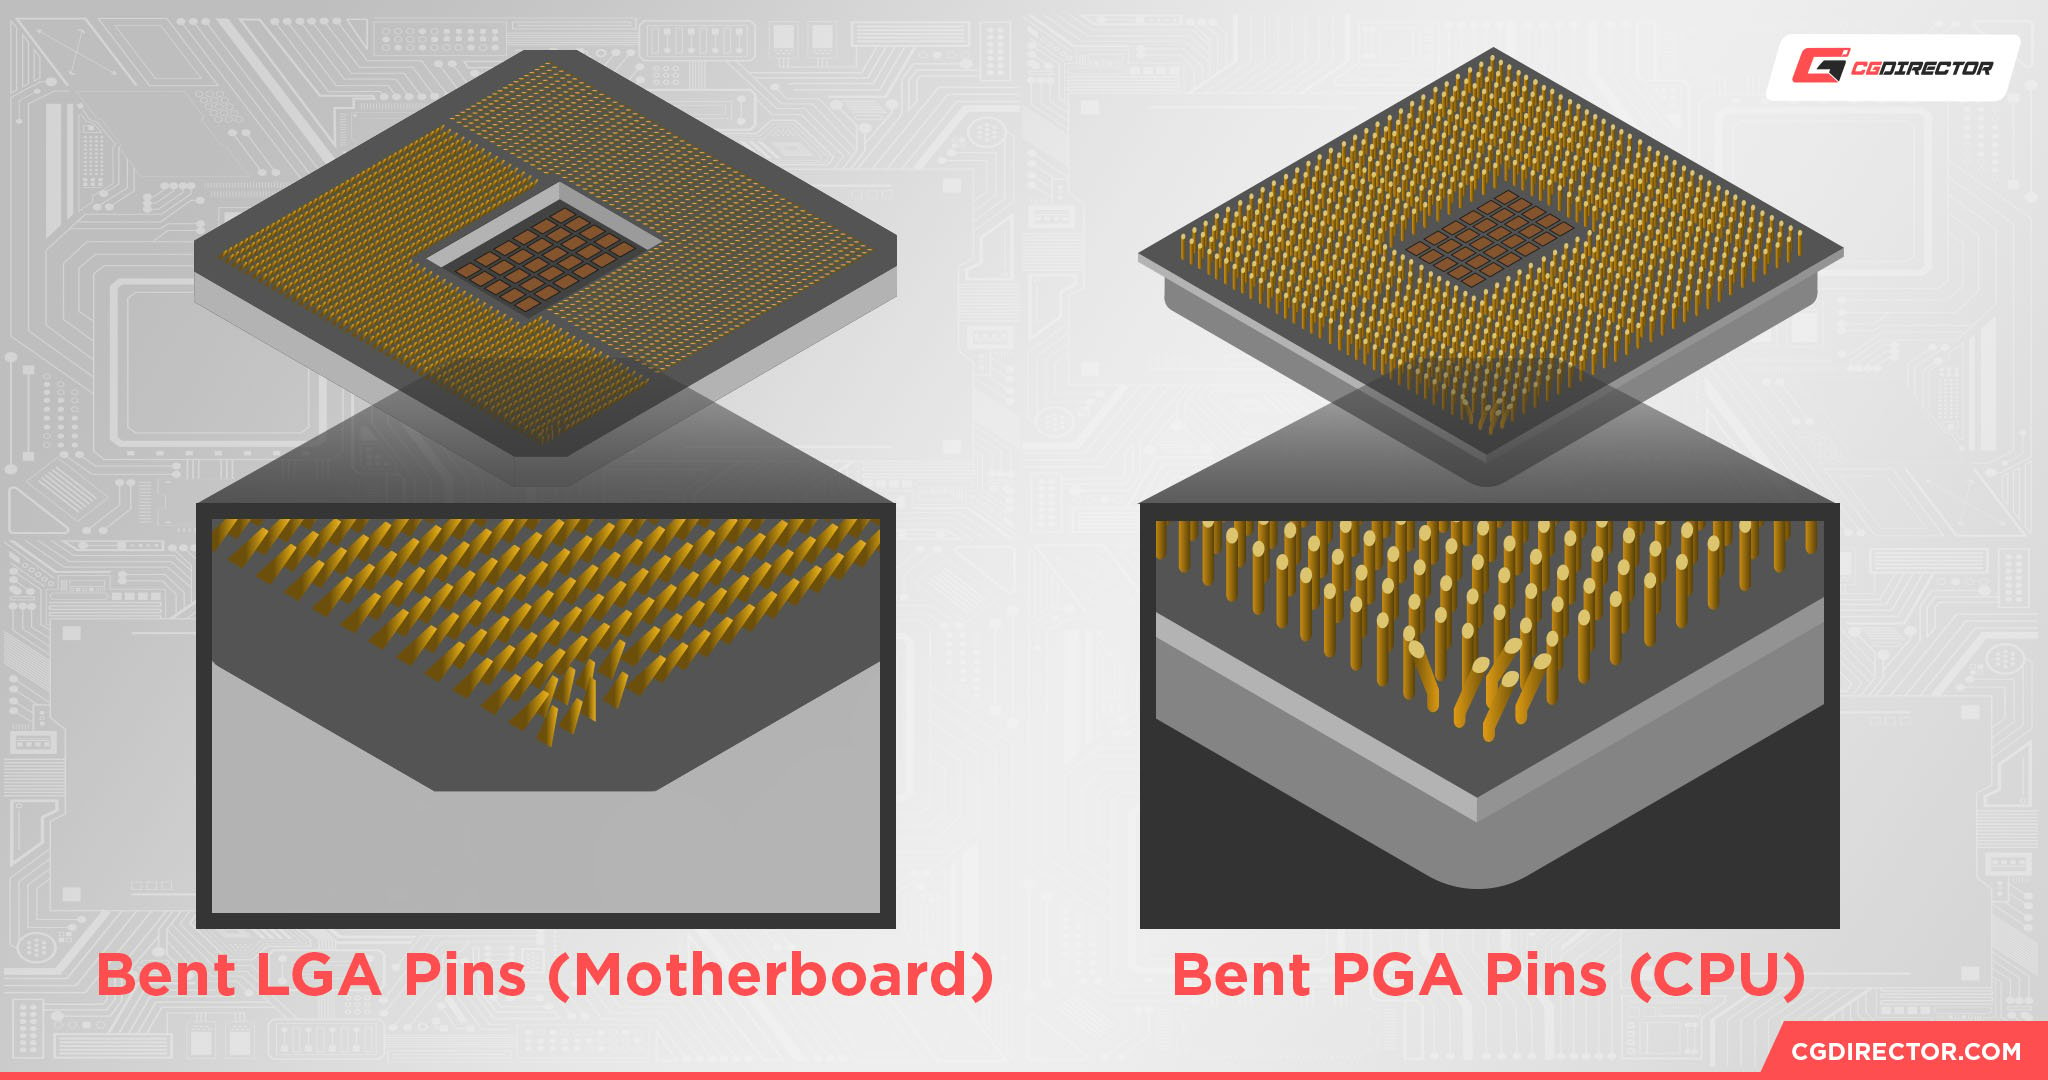
If the CPU pins are bent, it doesn’t mean all hope is lost. You can potentially fix the pins by carefully bending them back into place. We have tips on how to do that for both PGA and LGA pins here.
Plus, even if some pins are broken, your CPU might still be able to run okay depending on which pins have broken off.
For example, if the broken pin was just a reserved pin, your processor is still likely going to perform solidly. But if your pin was dedicated to a critical function? Yeah. That doesn’t bode well. It’s luck of the draw really.
As a side note, don’t be too hard on yourself. Some CPUs are notorious for having issues with this, like older AMD Ryzen processors.
You’ll find many complaints online about these processors from both beginner and experienced PC builders alike.
Reapplying Thermal Paste
Great! You finally freed your CPU cooler from the thermal paste’s grip. Sadly, your journey isn’t over yet. You’ll now need to reapply some fresh thermal paste.
This time, make sure to use a high-quality paste that won’t dry up in an instant. It’ll save your future self the trouble of having to go through this traumatic process all over again.
You can find some CGDirector-approved thermal paste products in our dedicated buyer’s guide, so do have a browse before splurging on the first thermal paste you see in your local tech store.
Make sure to consider your needs and hardware experience too. There is a whole range of different types of thermal paste, each having its share of perks and cons.
Luckily, reapplying thermal paste isn’t as stressful as removing a stuck CPU cooler. The process essentially involves ensuring the CPU is secure in its socket, applying a pea-sized amount onto the IHS, and then carefully placing the cooler on top.
Some CPU models like AMD’s large Threadripper CPUs may require slightly more thermal paste, so do keep that in mind.
You can also apply the thermal paste by placing tiny dots in each corner of the IHS and another in the center, but that’s a little more finicky than the good ol’ blob method.
Gamers Nexus has a great, in-depth video on the different methods of applying thermal paste (and how efficient each one is):
When placing the CPU cooler onto the CPU, keep it as flat as possible. You want the thermal paste to distribute evenly across the IHS surface, otherwise, it can introduce air bubbles and you’ll have to start from scratch.
As much as we would like to, we can’t provide a step-by-step process here. However, do check out tips for reapplying thermal paste if you’re new to the whole concept.
You should also familiarize yourself with the proper way to store thermal paste to ensure it lasts.
FAQ
How often does thermal paste need to be reapplied?
Thermal paste typically lasts for 3 to 4 years before it begins to degrade. However, its exact lifespan can depend on the quality of the paste, your cooling system, and how much wear you put your PC through.
It’s good practice to reapply the thermal paste every few years.
How do I clean thermal paste off my CPU?
You can use microfiber cloths and a 90% isopropyl alcohol solution to clean old thermal paste off of your CPU.
Dip the cloth into the solution so that it is damp but not drenched, and then use this to gently clear away the old thermal paste. Apply light pressure if it’s particularly stuck. Then, clear away the remaining paste with a new microfiber cloth.
Don’t get the thermal paste anywhere else on the motherboard during the cleaning process.
You will also need to give your CPU time to dry before you can reapply the thermal paste and attach its cooler back on. Usually, this will just be a few minutes since alcohol evaporates fast.
Is it okay to run a CPU without thermal paste?
No, you should never run a CPU without thermal paste.
While your system will run, there’s an incredibly high risk of it throttling, and constant exposure to high temperatures can shorten the lifespan of your CPU.
You’ll need to add thermal paste as soon as possible if you haven’t already done so. However, do note that if your PC was prebuilt, it likely already has thermal paste on the CPU, even if it wasn’t explicitly specified in the product information.
We do recommend reapplying the thermal paste as soon as you can though; many manufacturers of prebuilt PCs opt for cheap paste which doesn’t tend to last long.
Over to You
While a CPU cooler that’s stuck to a CPU can be stressful, in most cases, there are ways to ease it off safely. Heat will always be your best friend, so make sure to use benchmarking software like Cinebench to get your PC toasty before attempting the removal.
If the cooler still isn’t budging despite all the heat, then your best bet is to pry it off with dental floss or a business card.
We hope our guide has helped, but remember to consult your manufacturer for further advice and tech support. Alternatively, you can reach out to our experts on the forum or leave us a comment down below. We’re always around to help!
")

![How to fix a CPU Fan that’s not spinning [Or does it not need fixing?]](https://www.cgdirector.com/wp-content/uploads/media/2023/03/How-to-Fix-CPU-Fan-Not-Spinning-—-Does-It-Even-Need-Fixing-Twitter-594x335.jpg "How to fix a CPU Fan that’s not spinning [Or does it not need fixing?]")


1 comment
3 December, 2024
Can I use ryzen 7 3800xt stock cooler fan (came with CPU) to ryzen 7 5700x or ryzen 7 5800x