 by
by 
TABLE OF CONTENTS
We all want to render faster.
The ability to iterate more quickly, and more often, because your preview renders are shorter won’t just save you time – it makes you more competitive, less frustrated and keeps those creative juices of yours flowing without disturbance.
Iterating during a project you are working on is just one side of the equation, though, Final Rendering is the other.
Having almost completed a project and all that’s missing is final rendering so you can refresh your comp and send your client or boss an MP4, preferably yesterday, makes any 3D-Artist’s alarm-bells ring and heart beat faster.
The project is finished, right? All you have to do is render it.
Easier said than done…
The deadline is in 24 hours, you’ve got a 1000 Frame Project, and no matter how you look at it, at 5 minutes a frame, there is just no way you’ll be able to make it in time.
That’s my cue for telling you to just read this article, hit a few buttons, and your renders will be done with time to spare and get some relaxing done.
Unfortunately, it’s not quite that easy…
Yes, there are a lot of methods, tricks, tips that will make you render faster now, and we’ll discuss them below, but most of what I will be discussing here, is how you can render faster in the future.
The reason is simple: 3D Scenes are complex, no one scene looks and works exactly like another, and going back through your current project to make it render faster, might be too time-consuming to allow you to hit your deadline that is creeping ever closer.
Going through this article, however, will hopefully allow you to tackle future projects with a mindset that lets you recognize where optimization is possible and act accordingly from the start – before being stuck in the no-time-left-zone.
Just a heads up: This article tackles improving Rendering speeds in 3D-Render-Engines such as Redshift, V-Ray, Octane, Arnold, and others. We are working on a separate article for improving render performance in 2D / Compositing and Video Editing.
Some methods described in this Article are quite advanced. If you ever feel like you didn’t understand something please let me know in the comments so I can explain in more detail! 🙂
Overview
For those of you that are just on the lookout for a quick summary, here’s the overview:
Stuff that lets you render faster without a lot of scene changes:
Sometimes you can’t make any changes to your scene but still want to speed up that Final Render as much as possible. Here are a couple of things that you can do:
- Buy a faster/more PCs, better/more hardware (This is a no-brainer, but might not be possible for everyone) [Jump to section]
- Use a Renderfarm (Either your own or an Online Renderfarm) [Jump to section]
- Check for Software Updates (sometimes there are feature improvements and bugfixes that let your render faster) [Jump to section]
- A different Render Engine might be much faster for your type of projects (not viable for an active project, but future projects might benefit from you gradually transitioning to another render engine) [Jump to section]
- Utilize the Power of a Rendermanager and the possible optimizations that come with it (Such as rendering multiple tasks at once) [Jump to section]
- De-noise your renders in post / compositing, optimally using Renderpasses [Jump to section]
Stuff that lets you render faster but needs changes to your scene:
If there’s one consensus that can be applied to all scene optimizations it’s this: Only use as many Scene components and elements as you absolutely need. Anything more might make almost no difference visually, but will potentially cost you a lot in time spent rendering.
Polygons, Rays, Samples, Lights, Subdivs… use the absolute minimum you can get away with to achieve your look.
Anyway here’s the overview of this section:
- Reduce the number of Polygons of your Meshes, Subdivision Surfaces, Generators, Cloners, Instances, NURBs [Jump to section]
- Use less individual lights and place them so they light the scene easier with fewer ray bounces or use uniform Lighting that covers a larger area, such as a Sky or HDRI [Jump to section]
- Simplify your materials without losing quality through limiting trace depths in reflections / refractions and optimizing those type of Materials that let the ray-count explode [Jump to section]
- Optimize your Render-Settings: Limit Ray-Bounces, Set Cut-off Thresholds, Utilize Adaptive Sampling, Clamp ray intensity, Reduce your AOVs, Use faster GI-Settings [Jump to section]
- Use Render Regions / Masks and Renderlayers to only render part of the frame [Jump to section]
Of course, this overview just hints at what is possible and you might need some more in-depth info to fully understand how to go about implementing the above. If that’s the case, read on or jump to the section that interests you the most.
I’ve only listed the most important sections that work for most users in the lists above. There are some hidden gems throughout the article, though, that might be just what you needed.
What Render Engines can make use of this article?
All of them.
The guiding principles of optimizing a Scene and Render Settings can be applied to all render engines, as they are all based on very similar functionality.
GPU Render Engines like Redshift, Octane, Cycles, or CPU Render Engines such as V-Ray, Arnold, or Corona all get their information from your 3d Scene. And as we all know, most render engines can be plugged into a lot of different 3D Software, be it Cinema 4D, 3ds Max, Blender, or any of the others.
This makes it easy to understand that there has to be a common denominator between all of these Apps and how they work, and this similarity also lets us apply Render optimizations across the board.
How to Render faster – An Overview:
I’ll be dividing this article into two main sections:
- Internal Render factors that can be optimized
- External Render factors that can be optimized
You’ll find internal Render Factors to be closely tied to the Scene(s) you want to optimize / render faster, requiring alteration of scene elements and render settings.
Optimizing external Render Factors on the other hand will need no, or almost no, changing of your scenes at all. These are external factors such as overall Hardware performance, or the way your scenes are being picked up by render managers.
You can optimize either of the two and achieve some decent speed-ups, or you can tackle both internal and external factors and see your rendertimes decrease even more!
Time is of the essence, so let’s get started!
How to Render faster – Methodology
There are two ways to go about this: You can blindly try out some of the items below and hope it helps, or analyze your scenes and environment and then apply the right fixes.
The steps required for that latter option are simple:
- Find out why your scenes are rendering so slowly
- Fix it
Which brings us to another thing: What is “slow” in relation to?
Your scene might very well be extremely well optimized, your hardware the best of the best – but your 25K panoramic rendering of a forest with millions of trees still takes 5 minutes?
Well, considering the complexity of that scene, that’s actually not slow at all. But that’s not what you are here for, right?
You want your scenes to render faster than they do right now, and that’s what we’ll try to achieve.
This brings us back to our 2 steps involved in speeding up our scenes and we’ll change that to:
- Find the biggest bottlenecks that need the least amount of time and money to fix
- Fix it
We are almost done with this introduction, just one more thing: I am sure you’ll be building a lot more 3D Scenes in your career and working on a lot of projects in the future. Apply the ideas in this Guide throughout the process of creating any of your projects – from the start.
Don’t build your scenes with no regard to viewport or render performance, optimizing only when it’s time to hit the final render button –
Being able to render faster lets you iterate more often while you work on your scenes, increasing quality, decreasing time spent, and ultimately makes you a more competitive 3D Artist who can demand higher rates or more salary in the long run.
How render engines work
We’ll start this section by taking a very high-level look at how render engines work and what increases your rendertime to be able to better pinpoint what we will have to change to make our scenes render faster:
For sake of simplicity let me say this – Generally speaking, we have just 3 types of objects in any given scene:
- Objects that emit light, like lamps or the sun
- Objects that reflect & refract light to varying degrees
- A camera that is our viewpoint
In fact, our real, physical world is built similarly, with our eyes being the camera at times.
Render Engines “render” or calculate how a 3D Scene is supposed to look, very similar to what our real physical world does.
Light sources, like the sun, emit light, which bounces off of one or multiple surfaces until it hits our eye and the resulting light is what makes us see objects in different ways.
What is done by physics in the real world, has to be “calculated” painstakingly by your computer when rendering.
Take a light ray that bounces off of a surface for example. The Computer has to calculate some of the following:
- What angle does the light ray bounce off of the object at
- How much of the light ray is absorbed
- How much of the light ray is scattered in different directions or into the surface
- How much of the light is reflected or refracted
And that’s just a single ray in a simple scene. Imagine having to calculate many, many rays for each surface of your scene.
Fortunately, the PC’s CPU (Processor) and GPU are fast and pretty good at doing such calculations – much better than we humans are – and the GPU (Graphics Card or Video Card) in particular is custom made for such graphical and “ray-tracing” calculations.
Now, where am I going with this?
Although we could dive in much deeper into how Render Engines work, the above description should already be enough to analyze and optimize our scenes to render faster:
Since the majority of what a render engine does is trace a bunch of rays through the scene, which then bounces off of objects, we can already deduct the following:
- The fewer rays we need to render a noise-free image, the faster the render process will be complete
“Noise-free”: That’s a new term we’ll take a quick look at:
You’ve most likely seen it before. Images that are rendered in low quality are not smooth or clear. They have noise or grain all over the place making it difficult to discern details.
The reason is simple, and that’s the last of the introductory theory we’ll need for this article, so bear with me just one more time.
Here’s where that noise comes from and how we get rid of it:
Any image (rendered or not) consists of pixels. The render engine takes a sample for each pixel.
The render engine, which we’ll place inside the scene’s camera for simplicity, traces one ray, through each of the pixels and then knows what is behind that particular pixel. This is also known as “taking a Sample”.
Trace a ray through a pixel and hit wood, there’s wood there. Trace a ray through a pixel and find metal, there’s metal in that area of the image. Simple enough.
BUT, and this is the important part: A pixel is not one-dimensional, it’s two-dimensional. Basically, each pixel is a two-dimensional square. A bunch of the squares together is an image.
So why is this important? Because a ray, or sample, that we trace through a pixel to see what’s in the 3d scene behind is one dimensional. To get the average of what’s behind the entire square area of the pixel, we would have to trace multiple rays (take multiple samples) through that and each pixel.
Take this example:

If we trace just one ray through the X and hit the orange triangle, the Render Engine thinks the entire Pixel is filled/covered by the orange triangle, while it actually just covers the bottom right part of that pixel.
With multiple rays/samples taken of that pixel, we would know that 90% of that pixel is in fact white/grey and not orange (Some is green too). So with multiple samples taken, we can deduct an average color for that pixel.
So if we use only one or a low number of samples per pixel, we don’t exactly know what is behind the entire pixel, just behind the one-dimensional point that our sample was taken from.
The result: Our error threshold is high and we get a noisy image.
The more samples we trace through each of our pixels the lower the error-, or noise-threshold and the less grainy our resulting image will become.
Phew! That was quite an excursion into the inner workings of how rendering actually works.
Now keep in mind that all render engines have their own ways of optimizing certain things, and there are ways to fake or optimize certain processes, but the general functionality can be applied across the board for any render engine.
The more samples you take of your scene, the smoother the result.
We can say this too: If there’s not much going on in your scene, you’ll be able to get away with fewer samples than when your scene is full of complex objects, complex materials, or complex lighting.
How to render faster
Internal Factors: Optimizing your Scene
Enough theory, let’s render faster.
A big part of some of the optimization methods we will take a look at now will involve reducing the complexity of the scene, so we can get away with fewer samples while still achieving a noise-free resulting image.
Remember those two steps involved in reducing rendertime? Step one is to find what is actually causing the slow-downs.
Find the bottleneck first – Exclusion principle
The easiest way to find what is causing your slow-downs is by utilizing the exclusion principle.
Take this example: If we had a hundred objects in our scene and one of those objects is causing the render slowdowns, the fastest way to find this single object is through the exclusion principle.
Now, I could just delete one object at a time, and eventually, in a worst-case scenario, after a hundred tries, I’d find the culprit, but there is a faster way.
Always delete (or disable) half of the objects and test the result (re-render). Why? Because by deleting half of your objects you can already reduce the number of objects you have to go through to find the culprit by 50%!
So now we have 50 objects. Does it still render slowly? Yes? Delete half of those remaining 50 objects again.
Does it still render slowly? No? Great! We now know that the culprit is within those 25 Objects that we deleted last.
So now we are down to just 25 objects from a hundred, in just 2 steps.
Continue doing this until you have found the object.
(Obviously, this is just for finding and testing where the problem resides, don’t save/overwrite your scene.)
The exclusion principle can be applied to anything. To meshes, materials, lights, keyframes, you name it.
Always narrow down the area of your problem as much as possible. Get as close as you can to the culprit, and you’ll often find the fix is a lot easier than you thought.
Which of the following Forum requests do you think will allow others to help you better?
- “Please help: My scene renders slow”
- “Please help: Why do my trees in my scene render much slower than the rest of my scene (Redshift)?”
I can guarantee you, if you get an answer to the first, it’ll be this: “Please narrow down on the source of the problem first”.
The second, though, might get an answer right away: “Most 3D Trees have leaves that usually have transparent materials on them. Try limiting the transparency trace depth and see if rendertimes get better or if your render engine has a shader that works better with high transparency depths.
Redshift has a stencil mat that has no slowdowns even with high transparency depths. Try using that.”
Now, that second one sounds like it’ll fix your problem right away. Because you already knew what object was causing your slowdowns, others could help you much faster.
By excluding things you can factor them out of the equation.
Exclude scene objects? Still rendering slow? Your scene itself will most likely be fine.
Reduced your render settings? Still rendering slow? Your render settings were most likely fine.
Swapped your CPU or GPU? Still rendering slow? The CPU or GPU will most likely have nothing to do with your render slow-downs.
You get the gist. Easy as that.
Of course, the problem can always be a combination of different areas, but we’ll get to that a bit later.
Remember, reduce what can cause the slowdowns to find the culprit.
Then we can work on a fix.
In this article, I’ll address some typical areas that are often found to be the reason for rendering slow-downs and you might be able to fix your problem with those methods.
They won’t always work though, so try to learn the skills of analyzing and dissecting your scenes yourself, then you’ll never need outside help for this ever again.
People will come to you because you’re the expert. All it takes is some insight into problem-solving in the world of 3D (not just rendering).
Find the bottleneck first – Check your samples
Almost every modern Render Engine has the ability to visualize the number of samples taken for each pixel. Here’s how this looks in Redshift:
Dark Pixels represent a lower number of Samples, bright Pixels a high number of Samples.
Being able to render your Image and see at a glance what areas need the most samples, can tell you a lot about your scene and where to start with your optimization.
A sample distribution visualization tells you if your render settings are configured badly, or if there are certain scene objects, materials, or lighting that just need too many samples to clear up.
Find the bottleneck first – Check your viewport
A lot of times, all you need is to check your viewport in “lines Mode” so it displays all of the Polygon outlines in the viewport.
Take the following scene as an example. It is clear at a glance which objects have a lot of polygons that should have some potential for reducing:
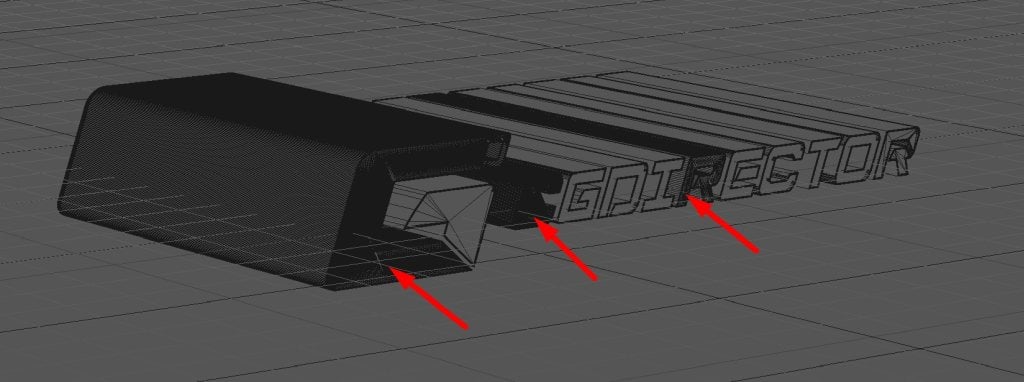
Viewport Screenshot set to (Hidden) Lines View
Find the bottleneck first – Check your Scene & Object info
Every 3D App can display Polygon counts for the entire scene or for the objects you have selected. Here’s how this looks in Cinema 4D:
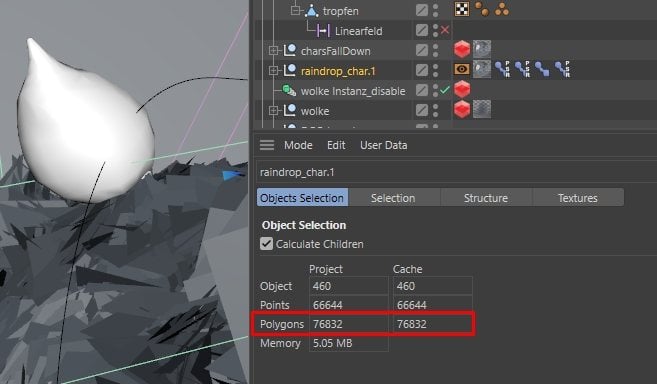
Remember that Principle of exclusion from before? Check the Polygon Count of the entire scene first. If it seems high, select half the Objects and check it again.
Reduce the number of Object selections until you find the Objects that have unreasonably high Polygon counts and optimize those.
If you have a well-structured scene with a couple of main Object Groups, you can also just step through those and work yourself down through the hierarchy, which might be faster.
Reduce the number of Polygons
A big factor in rendering performance is the number of Polygons in your scene. As a rule of thumb, you can say that for most scenes, the fewer polygons you have, the faster you’ll be able to render it.
Here’s a list of where those high number of Polygons come from most of the time:
- Raw Meshes that already come with a lot of polygons. E.g. imported CAD Data or Sculpts
- Modifiers that subdivide your Meshes, quadrupling the number of Polygons with each subdivision (E.g. HyperNurbs in Cinema 4D, Subdivision Surface in Blender, and so on)
- Cloners
- Any kind of NURB Objects that are generated from combining / extruding Curves
- Parametric Objects with too many Subdivisions
- MicroDisplacements
Now, you can’t just get rid of those, right? They are essential, but we do want to optimize them as much as possible.
The process is simple: Reduce the number of Polygons until you start seeing a visual difference in your render.
Let me explain: Do you need a parametric Cube with 100 subdivisions on each side? Will it look any different when you have just one polygon on each side? It won’t!
Let’s take a quick look at each of those:
Raw Meshes
A raw mesh with too many polygons can quickly become the reason your renders are slow.
The thing with raw meshes is, they can be very difficult to optimize.
Apart from adding some poly-reduction modifiers to them, that usually screw up the UV Layout and poly-flow of the mesh big time, there really isn’t much you can do about this, apart from manual poly reduction and retopo.
Of course, if you have the source files for these Raw meshes, the files where they originated from, you’re saved!
Has your client sent you STEP or other CAD Data that you have to convert to polygons to use it in your 3D Scene? It’s easy to specify how many polygons are supposed to be generated from it. Experiment with it a bit.
Have a Character that was sculpted in ZBrush in your scene with millions of polygons? Maybe you can get the source files and use subdivision modifiers instead of baking that crazy resolution right into the mesh. That way you can adapt the level of subdivision to the on-screen size of your character.
The baseline is this: Only use as many Polygons or detail required for the screen-size of the mesh.
If your character is in the background, you should be able to get away with much fewer polygons than if you are rendering a close-up.
(Let’s just ignore the fact that rigging and animating a high-poly raw mesh is something I would never want to do … yikes!)
Remember, I’m not saying you should go Low-Poly and change the look of your scene. You should have the minimum amount of Polys required to achieve the look of your scene.
Here’s what else you can do to reduce the number of Polygons even further:
Delete/disable anything that the camera doesn’t see.
Rendering an Airplane flying through the sky? I bet most of the internal Objects can’t even be seen by the camera. Disable those seats, wheels, and other internal construction meshes.
Rendering a Forest? Delete all trees and grass that is behind the camera. No need for those.
Rendering a living room? I bet anything that is just seen in reflections can be reduced a lot. You can’t really tell if the plant that is reflected in that vase has a million or just a thousand polygons.
Subdivision, Modifiers, Generators, Cloners, Instances
Modifiers, Generators, and Cloners are a blessing. They make Scene construction that much easier without having to destructively bake the mesh you are working with.
The easier they are to work with, the larger the danger that they are not optimized to their best potential.
Take subdivision surfaces as an example. They subdivide an entire mesh, quadrupling the number of polygons with each level. Not just that, you usually have the option to set the viewport-subdiv and render-subdiv individually.
This might seem obvious, but this brings with it the danger that you might not notice the difference in polygons between your viewport display and the actual render.
Your viewport might be smooth sailing because the subdivs are set to 0, but they might be set to a much higher level than that when rendering. Check this!
Generators such as Extrude, generate new Polygons of the underlying mesh based on some specific parameters.
Again, you often have the ability to set Render settings and Viewport settings individually, so be sure those extrude substeps are as few as possible.
Cloners are a major culprit in slow renders. As easy as they are to set up, make sure the instances that are generated, are true memory instances, also called render-instances at times (or Multiscatter in 3dsmax).
This allows the renderer to have only one of these cloned objects in memory that it references, allowing the memory consumption of a cloner to be a fraction of what it would need if you had non-render-instances.
Cloning Millions of leaves on a tree? Your cloner will only need as much memory as a single leaf needs (more or less), making truly high amounts of clones possible.
Even if you’re just using Instances outside of a cloner or array object, be sure to set it to be used as a render-instance, so you save memory.
NURBs / Curves combinations
Similar to Extrude, any kind of Sweep, Loft, or Lathe NURB Generator will take a Spline / Curve or many of them and create a NURBs Object from it, which is then converted to Polygons non-destructively at time of rendering.
Because Curves can have so many vertices to make them smooth, be sure you optimize your resulting, Sweep, Loft, or Lathe to only use the minimum amount of substeps needed to achieve the look you are after.
Sometimes you can set the substeps in the Generator itself, sometimes you’ll have to reduce the subdivisions on your curves, to optimize the resulting object.
Parametric Objects
Every 3D-Software comes with some default Objects that are parametric, meaning they can be altered to a certain degree without destructively having to convert them to a basic mesh.
These default objects usually include planes / surfaces, cubes, spheres, cones, cylinders, tubes, and so on and you can usually set radius, height, number of sides, and other parameters.
Because these are default objects, they come with predefined parameters that might not be optimized enough for your scene or the way you work in general.
Example: If you add a surface that you’ll need as a floor, chances are the default setting for this plane already has a bunch of subdivs on it, making the plane consist of hundreds of polygons.
This is entirely unnecessary, all you need for a ground plane is a single polygon (unless you want to displace it somehow).
Check your default objects and reduce the polygons as much as possible without altering the look of your scene too much.
As a matter of fact, most 3D-Apps let you save the default settings for your parametric objects, so if you find yourself making the same adjustments every time you create a parametric object, you might want to set the default parameters from the start, saving you some time in the long run.
Micro-Displacements
Micro-Poly Displacements are another one of those things that create lots of new Polygons when rendering, that you don’t usually see in the viewport.
Again, make sure you actually need them or if you can fake them with a normal or bump map, especially if they are in the background or can only be seen in reflections.
If you do need them, check how far down you can go with the number of subdivisions until the displaced mesh gets too rough.
Polygon Conclusion: Why do fewer Polygons render faster?
Here’s the thing: If you’re rendering a character turntable with a default grey material in bright daylight, you will most likely see no difference if your character has 10k or 10mio Polygons.
Polygons on their own don’t increase the number of samples the Render Engine needs to clear up an image all that much.
Polygons do however slow down the overall performance of the ray-tracer and building of the ray-tree (which is a preparation process before the actual rendering starts – see the section on Rendermanagers).
So although you won’t see a difference in Samples taken, the speed in which these samples are calculated will be faster in a scene that has fewer polygons.
Lights
Every light emitter, be it an object with a glowing material or an actual light object, adds more rays to your scene that have to be traced at rendertime.
Especially with Global Illumination, which you are likely to use in most of your scenes, every light will create rays that bounce around the scene for a couple of times – and each and every one of those rays has to be calculated by your GPU or CPU.
Now, here’s the thing:
In some cases, adding a light can speed up your rendering: If you are using GI and have a lot of dark areas in your image, where no direct light can easily reach, adding another (very dim) light to brighten those areas can help clear up those noisy pixels quickly.
Adding lights so your subject is illuminated directly lets you render extremely fast. Lights only get really slow, if they have to bounce around a couple of times to reach your subject, or if they themselves are of a more complex nature.
Area Lights for example are computationally expensive, as there are a lot of rays the ray-tracer has to sample to cover the entire area of an area-light, also making sure the resulting shadow is soft.
Compared to a Point light, an area light is a major slowdown – Especially with large area lights.
Try using portal lights where possible, especially when illuminating indoor scenes that are lit through windows. Portal lights are more efficient than area lights and render much faster.
Use spotlights and non-raytraced, shadow-map, soft shadows where possible. Calculating soft shadows can be done much quicker with these, and might speed up your rendertimes considerably without altering the look of your scene.
Render a scene in outdoor lighting from an HDRI or sky-object and Sun is usually pretty fast as you have uniform lighting from a full (or half) dome, meaning your rays don’t have to do bounce around a lot to illuminate everything.
If your 3D Software and Render Engine has the ability to Limit Light bounces and light reach, do so. There is no point in having your scene subject be influenced by lights that are very far away, or that are obstructed / difficult to reach from other lights.
Rays from lights that have to bounce many times to reach your scene subject, or lights that have decayed into almost being invisible, can introduce a lot of noise into your render.
Sometimes you can just use your Render or Project Tags to limit what your lights are supposed to illuminate to clean up the noise. Exclude whatever is unnecessary.
Materials
There are a lot of Material Features that can slow down your render, after all, Materials make up the entire Surface area of your scene.
There are three basic ways your Lighting can interact with your Scene’s Materials. Light can be:
- Reflected (e.g. chrome)
- Refracted (e.g. a glass)
- Partly absorbed, scattered, and reflected (e.g. skin)
Remember what we said about keeping the number of rays and ray bounces inside your scene as low as possible to render faster? Materials are a major factor in exponentially increasing the number of rays that have to be computed.
Any Material property that either increases the number of rays in your scene or needs many samples to clear up, makes your render slow.
Let’s take a look at some of the major culprits:
Glossy Reflections and Refractions
Having light rays reflect off of a chrome ball (hard reflection) is about the simplest thing you can do in 3D.
Here’s a side-by-side of a Chrome Ball with a hard reflection, and the sample-distribution needed to clear up the noise in the image (White = More Samples, Dark = Fewer Samples):
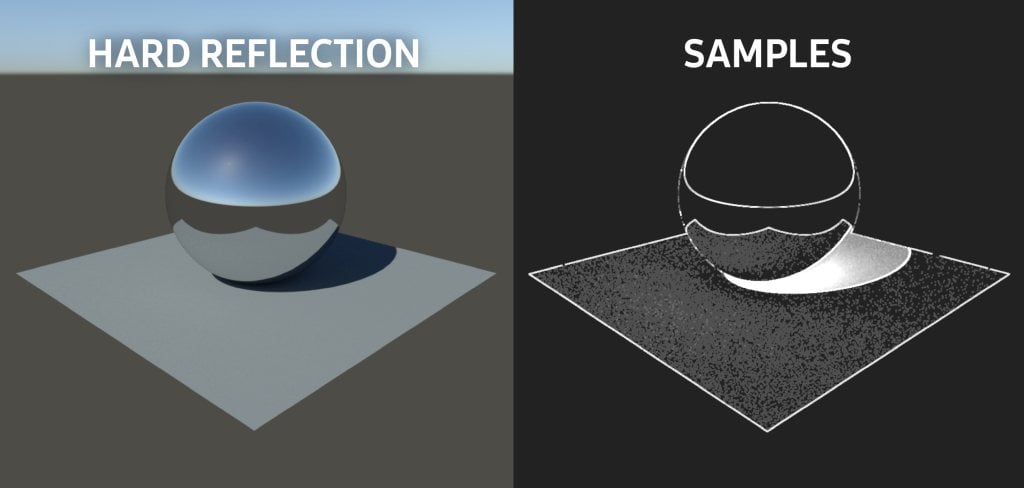
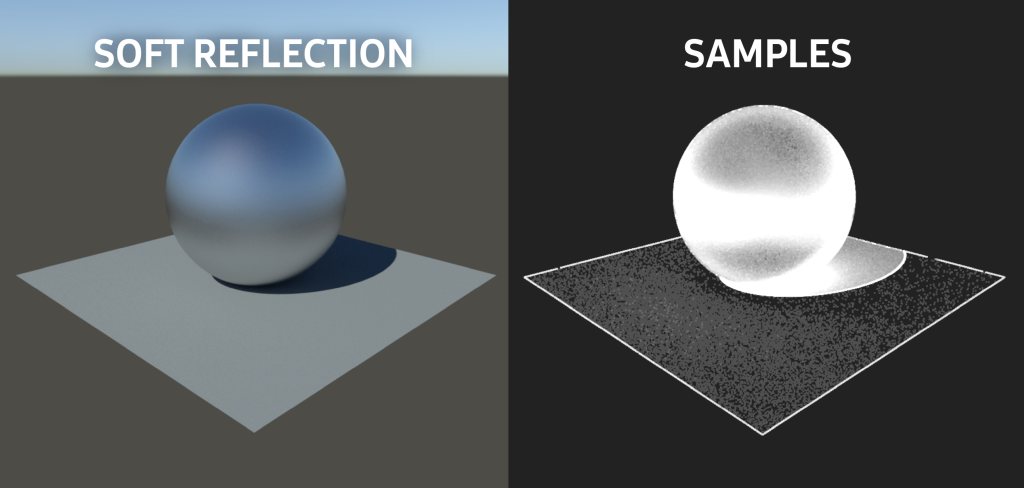
Take this chrome ball and make the reflection soft (glossy) and you’re creating a multitude of new rays that have to be computed. Depending on the softness of your reflection, incoming rays are now scattered uniformly in all kinds of directions.
The more Samples and Rays the Render Engine has to calculate, the longer it needs to finish the rendering.
The same can be applied to glossy refractions. A combination of both, glossy reflections and glossy refractions would increase the rendertime even more.
Now, I am not saying, don’t use glossy refractions or reflections – they are an integral part of most materials, but when you do use them, make sure to optimize them as much as possible.
Here’s how to optimize refractions and reflections:
- Limit their ray bounces (Trace-depth)
- Optimize with cut-off thresholds
When your reflections or refractions are glossy (blurry), you can’t really make out details in the reflection or refraction, and we can use this to our advantage.
Because the reflected/refracted Scene in the material is so blurry, we won’t be able to tell if the reflected/refracted scene is 100% accurate or not – meaning we can reduce the complexity of the scene in refractions/reflection without anybody really noticing.
By limiting trace depths, we tell that particular glossy material to only reflect or refract other objects, but not those objects’ own reflections or refractions (up to a certain number of depth / bounces).
This means we can save a lot of rays because we artificially limited the trace depth. We can do this in most render engines, either in the material settings directly, or sometimes you need to apply a render-tag to certain objects to be able to make use of this.
Here’s how this looks in the Redshift Render Engine:
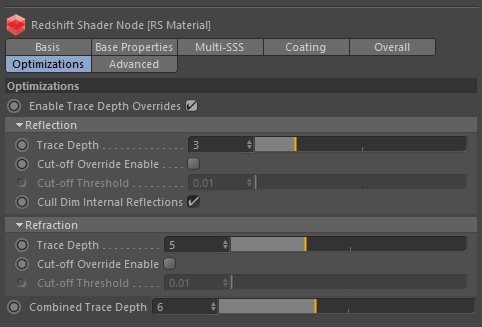
The other optimization we see in the image above is “cut-off thresholds” – Basically, what this does is tell the renderer to only take rays into account that would alter the appearance of the pixel more than the defined threshold.
Seems logical, doesn’t it?
It should only use computational resources on stuff that would actually make a noticeable difference in the rendering.
The thing is, by default these thresholds are so low that they don’t influence your rendertime at all. You’ll have to increase the threshold to make the best use of it. Play around with it a bit to see the difference. Use these for speeding up glossy reflections and refractions.
Of course, you can use them on hard reflections or refractions too, but because everything is crystal clear in hard reflections, you’ll likely notice where cut-offs occur more quickly.
Material Bump / Normal Maps / Displacement Maps
Remember how glossy reflections increase the number of rays that are created by a material and the number of samples needed to clear up the noise?
Using Bump, Normal, or Displacement Maps is very similar in this regard. Because these Maps try to fake mesh detail, the incoming rays are also being scattered by them.
The finer the detail, the more rays are created. Even if your mesh has just a couple of polygons, i.e. a Cube, if you have a complex bump map on top of it that scatters rays all over the place, your renders will slow down considerably.
Material Textures / Bitmaps
There are almost no 3D Scenes that can be created without the use of some great Bitmaps / Textures. They add detail to your meshes that most of the time would be too much work to model.
Be sure you don’t overdo it with your texture resolutions. Having a bunch of 8k Textures throughout your scene, even though 2k or 1k Textures would be enough (given the object’s screen-size), makes it more difficult for the render engine to work through your scene.
Render Settings
Adjusting your render settings is one of the most efficient things you can do to speed up your rendering.
As always, though, we don’t just want to turn down the quality, we want to stay as close as possible to the quality we need, but still want to improve rendering performance.
Here are some of the most important factors to take a look at to improve your render performance:
Adaptive Sampler
The single most important thing for most modern render engines is to set them to use an adaptive sampler.
The thing is: Modern render engines are extremely sophisticated and have methods of determining themselves, how many samples they need to make a good quality render.
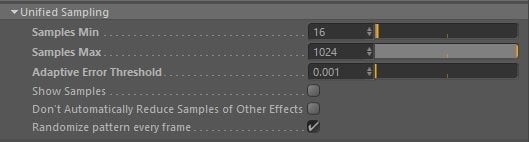
The very first setting that you should take a look at are the sample limits of the adaptive sampler. Every Engine has a slightly different name for this section, but here’s how it looks in Redshift:
And Vray:

All of these Adaptive Samplers across different Render Engines have this in common:
- Min Samples
- Max Samples
- (Noise / Error) Threshold
How this works is simple: The Sampler traces the minimum amount of samples through each pixel to get a good average look at what color the pixel has.
It then compares it to the pixels next to it and checks if the difference (e.g. in lighting) is too big / too noisy. If the difference / noise / error is above the Threshold it traces more samples through the scene until it dips below the error threshold (simplified for convenience).
Simple as that.
So even if you set your max Samples to 10000, the sampler only ever uses the amount it needs to dip below the error threshold.
So technically, all you have to change here for preview renderings is increase the threshold to something like 0.1, and for final-render to something like 0.01.
As always you’ll have to do some testing and find the sweet spot and the amount of noise you are willing to live with.
The functionality of the adaptive sampler makes sure it uses only the amount of samples needed to clear up the image. That means in well-lit areas it uses only a few samples, and e.g. in areas that are badly lit, it can use more samples to clear up the noise.
Make sure you use the functionality of the adaptive sampler to never use more samples than absolutely needed.
Limit Ray Bounces (Trace depth) & Cut-off Thresholds
In the Material section, we already took a look at how you can limit the trace depth in reflections and refractions, but in most render engines you can set this globally.
Here’s how this looks in Redshift:
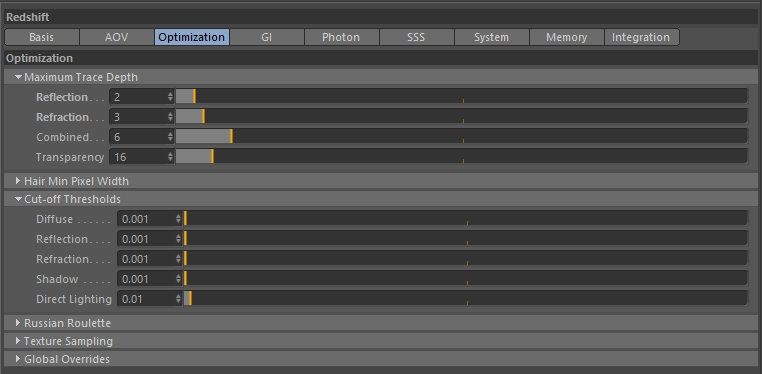
The idea behind this is simple: We want to hinder specific rays from bouncing too many times. We can usually set bounce limits for Reflections, Refractions, and Transparency.
The lower these are set, the fewer bounces are allowed, and the faster the scene renders. This is one of the major factors in speeding up your renders.
But, of course, if you set this too low, you’ll see some black holes or stuff disappearing from reflections, refractions, and transparent areas.
Do some experimenting with each of your scenes to find the sweet spot.
In the image above, below the Maximum trace depth, we see the cut-off thresholds, which can also speed up your rendering.
Basically, what this does is tell the renderer to only take rays into account that would alter the appearance of the pixel more than the defined threshold – on a global scene level.
The higher you set these, the earlier a ray will be ignored or canceled, speeding up your rendering.
Of course, the same applies here: If you set these too high you’ll start seeing black pixels or rough edges in your shaders and lighting, so find your sweet spot here too.
Clamp your Max Ray intensity
Using this feature not only speeds up your renders but usually also gets rid of random highlight pixels across your scene.
In Redshift (C4D):
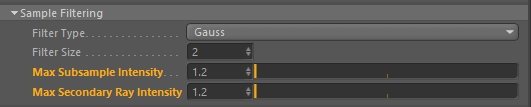
In Vray (C4D):

By default, most render engines will allow rays and samples to be a lot brighter than what your monitors can usually display. It makes sense, really, after all, light sources are usually very bright.
Most of the time though, you’ll see no difference between a reflected light that has an intensity of 2 or 10. Both will appear to be 100% white (or 100% brightness).
You’ll see a difference, of course, if your resulting reflection or refraction would absorb 90% of the incoming light.
In most cases, though, limiting the ray intensity to something closer to 1, will improve your render performance, clean up random bright pixels, while not changing the look of your scene all that much.
Go try it out and find your sweet spot.
AOVs
Arbitrary Output Variables, Multi-Pass Images, Render Passes, or other names they carry, are Images that are created alongside your Beauty Render, usually for further use in compositing and other means of post-production.
I didn’t know this for a long time, but, yes, AOVs slow down the actual rendering phase.
I was under the impression that AOVs just need a short amount of time to be stored next to my beauty pass at the end of the render process, but, no, they slow down the entire rendering.
This will not be noticeable with only a couple of Render Passes, of course, but have 10 or more Puzzle mattes, Depth mattes, object buffers? In many render engines you can expect a noticeable increase in render-time with each AOV you add to your final render.
Do make sure you only render the AOVs that you absolutely need.
Global Illumination Settings
There are a multitude of hacks to get your GI to render fast and be flicker-free, but that’s content for an entirely separate article.
Let’s look at just a few of the things that you can make use of in almost any render engine which will most likely impact your render performance considerably if used correctly:
First, use Brute force / QMC GI only if you’re rendering animations and you see a lot of flickering between frames. Brute forcing your GI is the slowest possible method of utilizing GI.
True, it works like a charm almost every time, but takes a huge amount of time to render.
Many types of scenes that aren’t too complex or have tiny details, can get away with Light Caching or Photon Mapping, which is usually a lot faster to render.
Especially if you’re only rendering still images, where some minor frame differences are unimportant, using a Light Cache on the second or even first GI Bounce can be a life-saver.
Generally, of course, you can and should limit your GI bounces. Do a couple of test-renderings with your GI bounces set to 1, 2, 3, or more and see if the difference really is noticeable or needed. The lower your bounces, the faster you’ll render.
Some scenes might even get away with no GI at all. I know, it’s my habit too to just turn on GI for every new scene, but many times you don’t need it.
Take outdoor scenes for example. A dome-light with a sky texture and sunlight might render a lot faster than trying to shade your shadows through sky GI bounces – and will in most cases look very similar.
If your overall scene is fine to be rendered with a light cache, but your Character with its hair just messes up everything and throws flickers throughout the frame, just render two passes.
Render your background scene with the character shadow set to using light caching, and render another pass with just the character set to using brute force GI.
We all know how to combine this in post. Don’t try to do everything in one pass or one layer.
Even simpler: Some render engines let you set your GI-method per object, usually through a render tag / compositing tag.
In general, you’ll obviously be able to render faster with lower GI quality settings, such as lower GI samples, and using this in conjunction with de-noising in comp is a powerful tool. But more on that in the “De-noise in post” section.
Render Visibility and Include / Exclude for Scene & Object Relations
By default, Rays just bounce around the entire scene, with no regard to how far they travel or if that particular Ray is important to the overall look of the Image.
Some Rays, Objects, Materials, or Lights might just be eating away at your performance without doing all that much else.
Some Objects might be important to see by the camera, but you can’t really see them in all of those blurry reflections, so just turn off the visibility of that object for reflection rays. Simple as that.
In almost any Render Engine you can turn on and off the visibility of an object for all kinds of ray types such as reflection, refraction, ao, shadow, gi, you name it.
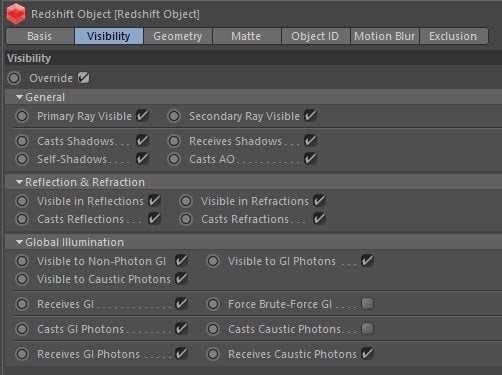
Does a certain object throw a computationally intensive shadow onto the floor of your scene, but since the shadow is so transparent, it can’t really be seen? Just tell that object to not cast any shadows!
The ability to individually control the visibility of every object or group is one of the most powerful features in the world of 3D, and it’s useful for speeding up your renders as well.
The same is valid for Include/Exclude capabilities: Do you have a sun shining through a slightly glossy window making the resulting scattered rays inside the room render forever?
Just exclude the glass windows from being seen by the sun so the sun rays travel through the window without being scattered!
This kind of scene will probably render 10x times faster, just because you are not scattering those sun rays through the window glass (creating a huge number of new rays).
This can work well: Use Render Regions and Render-layers
Especially when you’re on a tight deadline and the client or boss requests some final changes that would just take too long to re-render entirely, you can just render patches, certain objects, or just parts of an image or sequence.
Of course, patching stuff is sort of a last resort, as it does make your project unnecessarily complex.
Here’s an example: Your 60 Second animation has been final-rendered because the client has approved a preview version of it, but as we all know, they always come back and want one last change.
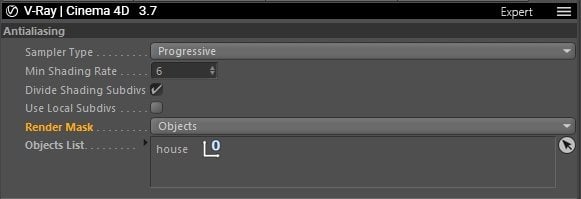
So the client would like one of the houses in the background of that shot to look differently. To speed things up, you now have the possibility to use “render masks” as they are called in some render engines.
What this does is render only the objects you have selected, and skip the rest of the pixels in the scene, filling them with alpha. That way you can re-render the house and just layer it over your already existing final render in comp.
Here’s how this GUI looks like in V-Ray (C4D):
Some other Render Engines can do this through using mattes, usually found in Compositing or Render Tags that are placed on the object groups you’d like to hide or show (e.g. Redshift).
So given our house in the background takes up about 1/4th of the frame, that would mean we can re-render that client-requested change much quicker than when re-rendering the entire full frame.
If you have a still camera, you can even use Render Regions, also called Border Render in some Engines, which just specifies a rectangular area of the frame that is supposed to be rendered.
Of course, if you do some planning ahead – especially because you learn pretty quickly what clients and bosses like to change – you can set up your shots with render-layers, and separate important elements onto different render-layers so you can adjust them easily in comp, or re-render them individually if needed.
For example: Separate each of your characters onto its own render-layer, the foreground on a render-layer, and the background on to a render-layer. That way you have much finer control over your shot in compositing and can re-render much smaller parts of the final image if needed.
Especially in shots where the camera does not move, there’s mostly no need of rendering your background or foreground for each frame, if all that moves are the characters. Render a single frame of your background and foreground, and just render those character render-layers with shadow catchers in a full image sequence.
Using render-layers can also take care of some annoying issues that keep popping up when using post mblur (Motion Blur), post DOF (Depth of Field), or depth mattes for fog – especially when you can’t use deep EXR-mattes.
Thinking ahead to make changes easier in the later & stressful parts of the project can be a life-saver. But you’ll have to find a good sweet spot here because setting up projects so they are easier to change later-on, of course, also takes time. 😉
External Factors: Optimize everything outside of your scene
Optimizing internal settings and the complexity of your 3D Scenes is just one part of the equation.
Sometimes your scenes are already optimized to their fullest, or you can’t make any changes to the scene at all because you’re just in charge of rendering, or can’t risk making in-depth changes to the scene anymore that have not been approved.
There are a lot of things you can do to render faster, that are controlled outside of your 3D scene, though sometimes the following options do need some minor preparation within your scenes to then unfold their full potential:
Renderpasses & Compositing
Let’s start with renderpasses. We’ve all used them to some extent and we covered them shortly in the AOV-section of this article, as they do tend to eat some performance at times.
Oftentimes though, using renderpasses saves more time (If used correctly).
Renderpasses are not just for outputting some extra Image information such as depth or object or puzzle mattes.
When used correctly, they can be combined in comp to build your beauty pass.
A Render Engine’s Beauty Pass, which is your standard final RGBA Image that is output by default, is an Image that is internally made up of a couple of Renderpasses such as the Diffuse Pass, GI Pass, Light Pass, Shadow Pass, AO Pass, Reflection, Refraction…
Those individual passes can be added or multiplied on top of each other in comp to re-make the final beauty-pass.
And you’ve probably already guessed it: Combine this with some Puzzle or Crypto-Mattes to be able to select your Individual Objects and you have a crazily powerful tool to alter your scene in comp, without ever having to re-render another frame in your 3D-Software for that shot.
Here’s an example: You finished final-rendering a Car-commercial at 4k, 60FPS which sports a nice red pickup-truck. You rendered days to get this finished, but now the client requests the pickup truck to be blue.
The first thought would be: “Great, another 5 days of re-rendering the entire Commercial”.
But, since we all know what clients and bosses like to change all the time, we anticipated this and rendered the entire commercial with all of the AOVs needed to build our beauty pass from scratch.
All you need to do now is add a hue change to your diffuse pass, and voilà, you’re done. No re-rendering is necessary! (Apart from the comp, of course)
Compositing (fix it in post!) is such a powerful tool, possibilities are limitless. Any 3D-Artist worth their salt can also do at least some compositing.
This brings us to our next section:
Denoise in Post
Yes, there are ways to utilize de-noisers even in 3D-Render Engines. Some have Plugins such as Altus De-noise or OptiX De-noising tech built-in, but I can’t recommend using them for production or final rendering.
Instead, utilize your render-passes and de-noising plugins in your favorite compositing App.
Most of the time, a lot of your passes are just fine, they have almost no noise in them. Your Diffuse pass for example is usually squeaky clean. GI or Shadow passes though tend to be quite noisy.
So all we have to do is de-noise those two passes with a de-noising plugin in post (such as Neat Video De-noiser in AE).
If you have no time to set up your renderpasses or are looking to reduce noise on an already existing render, you can usually also apply de-noising to your beauty pass.
It can work well but often messes up some areas with fine textures, as the de-noiser doesn’t really know what’s noise and what is texture detail without looking at additional passes.
De-noising in post usually lets you get away with much faster 3D-Renders as you can set your noise threshold higher.
Knowing when to do something in 3D and when to do something in post is a skill that we all have to learn – de-noising is one thing that works well in post.
Utilize Post / Compositing to its fullest
A lot of times you can do something in compositing that would take a long time to set up inside your 3D scene and knowing when this is the more efficient way is a mark of a good 3D-Artist.
Especially when you are working on changes after you’ve already finished final rendering your frames, adding patches or doing some masking work to fix smaller issues can save you a lot of time that would have otherwise been invested into re-rendering the entire shot.
Some examples: If you see small render glitches, like objects doing z-depth fighting on a frame, a caustic glitch on the floor, or even just an object that has the wrong color, most of the time you can just mask and patch these without anyone noticing.
Sure, a clean render that has no errors in them is preferable, but we can all overlook minor things that we then notice after final rendering is already finished.
Knowing what you can do in compositing to a rendered sequence will bring you peace of mind, even on high-profile jobs.
Learn some masking, rotoscoping, tracking in e.g. After Effects to fix minor render issues.
Of course, you can do more in comp than just fix stuff that has been messed up in the rendering phase.
With proper render-layers, object mattes, depth mattes, or even normal map mattes and UV mattes, you can do a lot in post that will save you time usually spent on rendering.
Utilize 3D Camera exports from your 3d scene to set up static backgrounds or foreground layers, saving you the time to render backgrounds and foregrounds of your shots that don’t really change at all.
Use Motion Blur Plugins, Depth of Field Plugins, and others in compositing to have more control over the look of your shots, even after you’ve finished rendering them – and without baking those effects into your rendered images permanently.
Rendering a Product Visualization turntable animation? Have dozens of products, each with a different label? Just render the product once and swap out the labels in comp.
Easy as that.
Use a Rendermanager
Making use of a render manager is a logical step for any serious 3D-Artist or Creative-Agency, as it brings a lot of benefits.
Some of the benefits include better control over the jobs you are rendering, which don’t have to be 3D-Render jobs only.
Most modern Rendermanagers such as Thinkbox Deadline (which is free for up to 2 nodes, so give it a test-drive), support running all kinds of jobs, from 3D-Rendering over Video Rendering, Particle Caching, File Conversion, Image Processing to batch processing.
A Rendermanager will cut down on the time you usually spend setting up and checking your renderings, and with render automation, you can even set up entire chains of a render pipeline.
A simple example: You’ve got some 3D Scenes that have to be rendered, after that, you refresh those in your comp and make image sequences for editing. In Editing, you refresh those image-sequences and render out a preview for your boss or client.
Well, with a Rendermanager you can automate that entire process. Just create a comp job that starts automatically when the 3D-Scenes are finished rendering. Create an Editing-job that will re-render your previews once those comp-jobs are finished.
When you come back in the morning, the entire thing will be finished before you even start working.
BUT, there is another thing Rendermanagers can be used for: Improving Render Performance.
You see, Render Engines all work very similarly. A rendering Process usually consists of 3 stages after you hit that render-button:
- Prepare the scene for rendering so the Render Engine can make the best use of it
- Render the scene (either in buckets or progressive mode)
- Save the finished Render and AOVs to storage
Usually, that second phase, the actual rendering-phase, takes up the most time. This is especially the case when you are doing final rendering and you are trying to achieve a noise-free image that needs a high amount of samples.
The great thing about the actual rendering phase is that it’s very easily parallelized, meaning the render engine makes great use of all of your resources, CPU cores, or GPU cores, to run through this phase.
The first phase though, the preparation phase, underutilizes your hardware, as it is very dependent on your CPU’s single-core performance and most of the calculations in this phase can only be run on a single core (or very few cores).
This means the rest of your PC’s performance just sits and waits idly until that phase is done and it can ramp up and use the full potential of its resources.
Here’s a screenshot of what the CPU utilization looks like when rendering a moderately complex 3D-Scene on the V-Ray CPU Renderer:
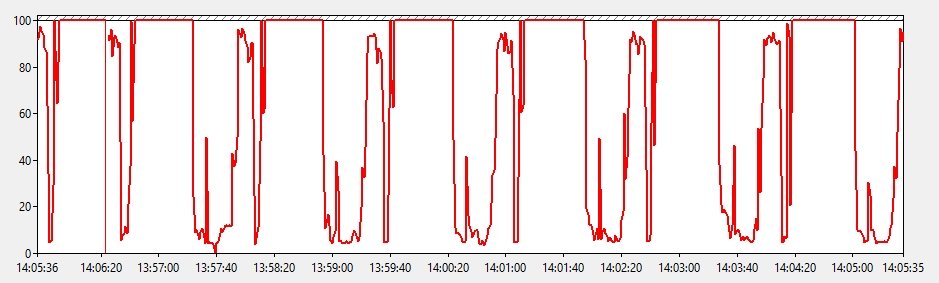
As you can see, the CPU is not utilized very well. A lot of time, it is idling at around 10% utilization. This is where Scene preparation happens. It mostly consists of building Ray-Tracing hierarchies and preparing textures.
When the utilization jumps to 100% and stays there for a while, that’s where the actual rendering-phase begins, which you can usually see through progressing buckets or progressive rendering.
In a best-case scenario, your PC’s resources would be utilized 100% all the time during rendering, but since this is not how render engines work, we can use a Render Manager to improve it.
Now, do note, that this preparation time is a fixed amount of time per frame that you are rendering – It does not get longer if your overall rendering-time is longer. So if you render frames that take hours and hours to render, a minute of preparation time is not much.
If, however, your frames take just a couple of minutes to finish rendering, then a minute of preparation time wastes a lot of resources.
A worst-case scenario is when you have a powerful PC with a lot of GPUs. Say you have a Render node with 8 GPUs. All 8 of those GPUs will sit there idly, waiting until preparation is completed.
If you had 8 PCs with 1 GPU each, preparation time would be divided by 8, wasting much fewer resources – because preparation can be done simultaneously on 8 PCs.
Simultaneously is the key-word here, because we can use a Rendermanager to render multiple jobs on one PC at the same time, assigning resources to each render-job we are running.
So if we had 1 PC with 8 GPUs, we could use a render manager to run 8 jobs at a time, each of these jobs rendering a frame of our image-sequence, and each of these jobs having been assigned one of the GPUs so they don’t interfere.
This is standard practice with render managers and easy to set up.
Of course, running multiple render jobs at once on a single PC needs a lot of resources, but with a strong CPU and a lot of RAM, you can potentially save a lot of time.
Of course, this 8-GPU example is quite extreme, but even with a regular 1CPU, 1GPU machine, you can fill in those areas where the CPU or GPU is fairly idle with a second simultaneous render-job.
Use a different Render Engine
Now, using a different Render Engine surely isn’t something you can do easily and if you are used to a workflow or are bound to specific tools in a pipeline of your company, this will not work.
If you do however have power over what tools you use and are eager to see if another render engine might make sense for a future job, do some experimenting on the side.
You might have been doing e.g. CPU Rendering for years and years, and it might be time to hop onto a modern GPU Render Engine like Redshift or Octane.
There will always be tools that suit your type of projects and work methods more than others, so keep testing new stuff that pops up on the market.
Check for Software Updates
There can always be bugs in your Version that have been fixed in an Update or there might have been a feature update that improves render performance, so check if the Software and tools you use have any such updates.
If you encounter some weird behavior in a Tool, always report this to the developers so it can be fixed. Most Software packages have Forums where you can easily file a bug report.
Upgrade your PC, buy more & better Hardware
This is kind of a no-brainer.
You can skip any kind of optimization of your 3D Project scenes and still see considerably faster rendering speeds if you just get better hardware.
This might not be a viable option to some, but for those of you who have the money to spend, this is something to consider.
It’s all about Return on Investment. If it costs you 1000$ now, but you’ll be able to complete all of your future renderings in half the time, better hardware pays for itself quickly.
Especially when you make money through doing 3D-Work and Rendering. If you don’t, you might not get money, but you do get more time. Which might be worth even more.
We have a multitude of Articles on buying, upgrading, and choosing the best PC-Hardware for your needs (3D Modeling, Animation, Rendering), so I’ll just give you a quick step-by-step overview and let you do some reading of other articles for more in-depth info:
How to improve your PC’s performance through Hardware Upgrades:
- Decide on the workloads you want to improve the performance for (e.g. Rendering in Redshift or Rendering in V-Ray)
- Find out what Hardware Component is crucial to the performance of your workload (GPU for GPU Rendering, CPU for CPU Rendering, RAM)
- Check performance metrics of your current hardware (Through Benchmarks like Cinebench or VRAY-Bench for CPU, or Octanebench and Redshift Bench for GPU)
- Decide on a budget and find benchmark scores for potential newer hardware components that fit your budget (As most scores are linear, you’ll then already know how much faster the newer parts are compared to your current PC’s performance)
- Buy them
- Render Faster! 🙂
If this process seems to be confusing, feel free to ask us in the forum. We’ve been able to help thousands already, and love to help you too!
For GPU Render Engines adding more GPUs usually scales the performance almost linearly. You’ll have to make sure to have a Platform, Motherboard, CPU, and Chipset that supports multi-GPU setups though.
For CPU Rendering, the more cores and the higher the clocks, usually the better.
The higher the performance per component, the more of a premium you usually pay for added performance. Sometimes it makes sense to get multiple lower-tier components (e.g. GPUs) instead of one high-end component.
Overclock the Hardware you currently have
I don’t like to recommend overclocking but it is a viable option to temporarily get some higher performance out of your hardware.
The downsides to overclocking are these:
- It introduces increased instability, risking to lose your render process if something goes wrong or worse
- You generate an unproportionate amount of heat compared to the performance gain
- You draw an unproportionate amount of power compared to the performance gain
- Your components are exposed to an increased amount of strain, risking damage to the overclocked components (CPU, GPU, Motherboard, RAM) or your entire PC
After those disclaimers, overclocking is still an option for those that know what they are doing. Tweaking your OC settings can take a lot of time, though, so be sure to experiment with this before you run into time constraints for your final renders.
Both CPU and GPU overclocking is possible.
In my opinion, in most cases, Overclocking is not worth it, and the GPUs and CPUs already do a good job with their automated boosting features that stay within safer limits.
Utilize a Renderfarm
If all else fails and you are still seeing bad render performance, and planning ahead you notice that you’ll just need more performance in general, a Renderfarm is the answer.
There are two types of Renderfarms:
I have written an extensive Guide on how to build your own Renderfarm – the gist of it is this:
A Renderfarm is basically just a bunch of PCs hooked up through a network and managed through a render manager.
Everyone can set up their own Renderfarm and how easy this is you can learn in the guide linked above.
The great thing with Rendernodes (individual PCs in a Renderfarm), is that you can specialize them to the extreme so they tackle your exact workloads much better than an all-rounder workstation.
Your own Renderfarm is an investment that pays for itself very quickly. If you earn money through your 3D Jobs and have regular work, a Renderfarm, or just a couple of extra PCs, will save you a lot of money in the long run and speed up your rendering a lot.
In case you don’t have the time or money to set up your own personal Renderfarm, you can also use an online Renderfarm to render your jobs.
There are a lot of different Renderfarm service providers such as RanchComputing or Rebus Renderfarm, that offer either Plugins that directly plug into your Software or online Interfaces that make the process fairly easy.
The benefit of an online Renderfarm is that they have a crazy amount of processing power (hundreds, thousands of Render-Servers), meaning you can usually render a large number of complex scenes in a matter of minutes or hours.
Of course, this comes at a cost, and it’s not cheap.
Any time you render something, an online Renderfarm will ask for money. With your own Renderfarm, once it paid for itself, you can basically render on it for free (apart from some electricity cost).
Conclusion: How to render faster
That’s about it for this article. Of course, there are a gazillion more ways to render faster and I am curious to hear your methods in the comments.
A lot of the methods discussed in this Article will work nicely for your future projects, some others might help you render faster right now.
Try building a habit of optimizing your scenes while creating them and utilize compositing / post-production to its fullest to save render- and valuable work-time.
What did I miss? What are some of your methods to speed up rendering? Let me know in the comments! 🙂


 for Blender in 2023")
")

10 Comments
29 September, 2023
Which references did you use to write this article or is it all your personal experience?
29 September, 2023
Hey Paradeisa,
I’ve been a 3D-Generalist for the last 15 years or so, and this is personal experience! Feel free to let me know of any other questions you might have 🙂
Cheers,
Alex
22 October, 2021
It’s a very complete article, thanks… …I had noticed that (in Blender), when you save your file just before rendering, close Blender and re-open it, the render is much faster… …I think this have to do with the memory occupation (or else, I’m not a technician!)… …my two cents…
23 October, 2021
Thanks Xavier,
Yes this can be the case if your RAM or VRAM are overly full from working on the scene and aren’t sufficiently emptied before the rendering process.
This’ll most likely go away with more RAM or VRAM.
Cheers,
Alex
13 February, 2021
Your article really helped me a lot in understanding how to speed up Cg renders. But there’s something that I still can’t figure out. I did v-ray render with exactly the same project file with exactly the same settings on one pc tower and one Mac Pro bootcamp PC, but the result on the bootcamp PC has a lot of noise in each frame. Can you explain what could be the possible reasons?
Thanks!
15 February, 2021
I’d have to see the rendering to be able to tell you where the noise is coming from. But in general I’d say that a bootcamp win running on a mac has a high chance of producing unexpected results.
Are you doing cpu or gpu rendering in vray?
Cheers,
Alex
21 December, 2020
I don’t think I’ve ever seen such an in-depth Article on rendering before, good work. I do have a question for you, though:
You described the waste of resources when using a GPU Rendernode that has a bunch of GPUs during preparation time that is dependent on CPU performance (mostly single-core) and I understand that.
What’s the deal with CPU cores, though, when I use a CPU render engine? Does the same apply?
Thanks!
21 December, 2020
Hey Boris,
Thanks! Yes you can say the same about Rendering on high-core-count systems when using CPU rendering engines.
The amount of time wasted in the render preparation phase x the “number” of resources wasted.
So if you have a dual CPU system with 128 Cores, you are really wasting 127 cores that are waiting idly until the single-core preparation is completed.
Of course if I waste a bunch of resources with crazily powerful cpus and gpus, maybe I’ll just build 128 PCs with a single core each. You see the problem here, you’ll have to balance out and find the sweet spot between the cost of an entire pc vs how much performance you can pack into one, and the amount of resources you waste during preparation time.
Best to just use a rendermanager and be able to ignore this entirely.
Cheers,
Alex
15 December, 2020
Alex, wow this is a fantastic read, thanks for this. Here’s another one of the things I do that can bring some speed-ups: Merging Meshes, especially when you have a lot of objects, can speed things up. Not sure why, but it works at times 🙂
15 December, 2020
Hey John,
Thanks, you are absolutely right. Especially when your scene is in the 10k or 100k Objects area, you can see slowdowns in your viewport which usually translates to slowdowns in rendering too. The Render Engine probably has trouble iterating and checking all of the objects for different rays, and has a much easier time to do so if it just has to check ray collision with a few objects.
Thanks for the tip!
Cheers,
Alex