 by
by ![10 Ways to Stop a CPU From Overheating [Ranked]](https://www.cgdirector.com/wp-content/uploads/media/2023/01/10-Ways-to-stop-a-CPU-From-Overheating-Twitter-1200x675.jpg "10 Ways to Stop a CPU From Overheating [Ranked]")
TABLE OF CONTENTS
The Central Processing Unit (CPU) is known as the brain of your computer for a reason: It’s responsible for processing and executing the instructions that come from your operating system, software, and other hardware components.
When your CPU overheats, a whole range of problems can occur, from stuttering, crashes, random shutdowns, and the dreaded blue screen of death, to performance reduction caused by thermal-throttling.
If the heat isn’t dealt with, it can even shorten your CPU’s lifespan and lead to permanent damage.
Keeping your CPU cool will ensure it performs well for years to come.
Below, I’ve gathered 10 effective ways to stop your CPU from overheating. But first, let’s discuss what exactly causes a CPU to overheat.
Why is My CPU Overheating?
A CPU can overheat for several reasons. Here’s what those reasons look like when broken down into their most basic elements:
- The CPU is generating too much heat
- The CPU Cooler isn’t capable of reducing the CPU’s heat sufficiently
So far, so good. The above seems quite logical, right? It seems we have two main options to tackle an overheating CPU.
The first is to reduce the heat a CPU is generating itself. And the second is to increase the cooler’s capability to decrease temperature.
Before we can figure out how to tackle those two, let’s take a look at what causes the above two main reasons of CPU overheating to occur.
The main cause of why a CPU heats up is electric resistance inside its circuits due to utilization. It is normal for a CPU to be utilized; after all, that’s what it’s built for! But things can get out of hand if it is utilized too strongly and over long periods of time.
Here are some things that utilize a CPU strongly and heat it up fast:
- Tasks that you’re unaware of, e.g.: Malware, outdated drivers and background tasks that drive up CPU-utilization
- Tasks that you are aware of and actively initiate, e.g.: Sustained Multi-core workloads like Rendering or Gaming
That first one is something you should fix as fast as possible, but the second one is something you want to do, right? So instead of getting rid of the (2nd) task or workload (and lose your capability of work or fun), you want the CPU to be able to cope with the heat better.
This brings us to our second reason why a CPU heats up: insufficient cooling / dissipation of the CPU’s heat.
Here are the reasons for insufficient cooling of a CPU:
- Limited airflow into your PC case
- Insufficient airflow of the CPU Cooler
- Insufficient CPU cooler (the radiator and fans aren’t strong enough for your type of CPU)
- Poorly applied (or dried) thermal paste
- Overclocked CPU (this can multiply all of the above)
So, while you want to utilize your CPU (that’s what it’s made for!), you want to utilize it only with tasks you control, and you want to maximize the cooling capacity to keep the CPU as cool as possible.
Great! Let’s continue:
Signs Your CPU is Overheating
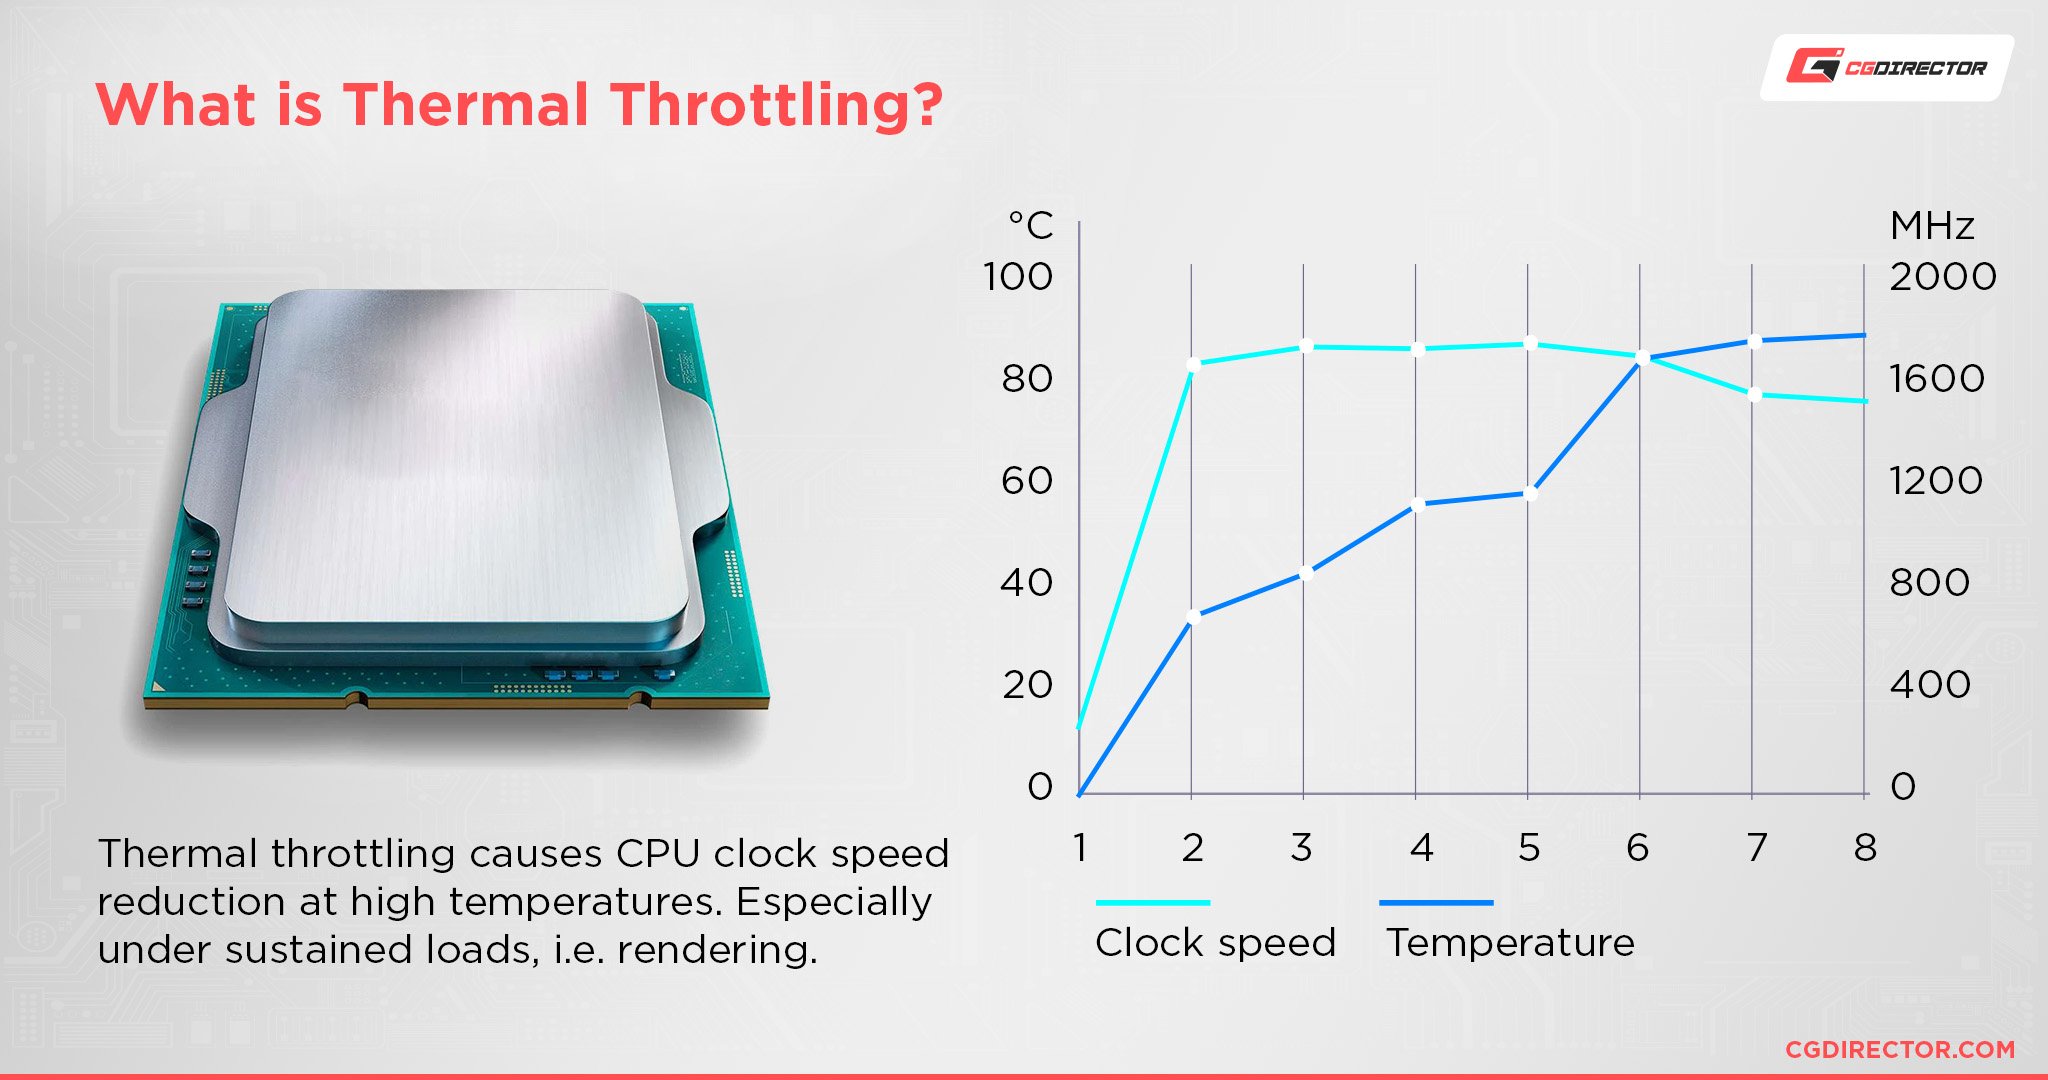
A CPU can run safely at temperatures between 104°F–158°F (40–70°C).
Some intensive tasks, such as gaming or 3D rendering, can push the temperature up to 176°F (80°C), though this is still safe as long as this isn’t kept up for a sustained period.
If your CPU’s temperature hits above 180°F (82°C), this is when throttling — significantly reduced clock speed — and serious damage (where your CPU stops working entirely) can occur.
Warning signs of an overheating CPU include:
- Sluggish, slow performance
- CPU clock-speed throttling
- Excessive fan noise that doesn’t lessen even over long periods of time
- Crashes
- System suddenly shuts down
You can also test the temperature of your CPU using third-party software, such as Core Temp or NZXT’s CAM. Both are easy to use.
Core Temp allows you to keep track of each CPU core’s temperature, while NZXT Cam provides additional information, like the clock speed and load.
It’s a good idea to first test the temperature with normal use, such as when performing daily tasks, then to check the temperature again while running a benchmark such as Cinebench R23. This will give you an in-depth insight into how your CPU is coping with the heat.
Be warned that a stress test or benchmark run does put your device under a heavy load. If your CPU is already struggling with heat when you’re carrying out daily tasks, you should avoid performing a stress test.
How to Stop a CPU From Overheating: 10 Common Fixes Ranked
So, what if you’ve noticed some of the telltale signs that your CPU might be overheating? Let’s take a look at the 10 most effective ways to mitigate overheating.
Most of these fixes are relatively easy to implement, though some, such as reapplying thermal paste, should only be carried out by experienced users.
If you’re not comfortable diving into your computer’s hardware, always seek out a professional for assistance.
You can also ask our Experts on the Forum or in the comments below the article, we’re happy to help out! 🙂
1. Close Programs with High CPU Usage
Having too many programs open simultaneously can drive up your CPU’s utilization. Even if you don’t think you have lots of programs open, there are plenty of background tasks that are automatically launched at startup.
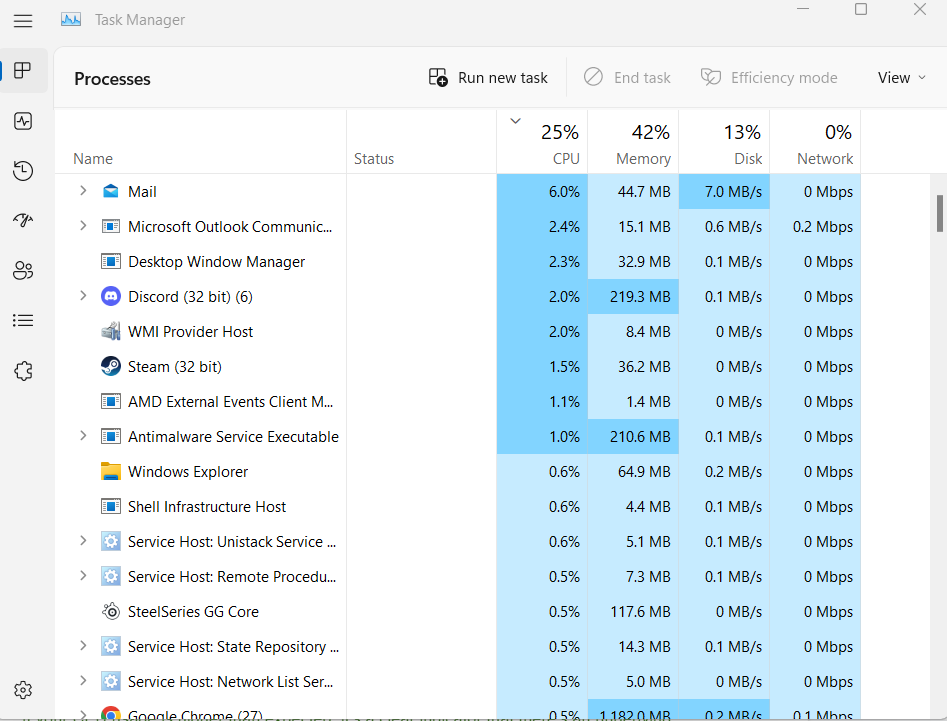
You can identify and close high CPU usage programs in the Windows “Task Manager,” under the processes tab. Here’s how:
- Press CTRL + Shift + ESC simultaneously to launch “Task Manager.”
- In the “Processes” tab, identify unnecessary programs and background tasks with high CPU usage (Sort by CPU Column).
- Click on the desired program or task, and select “End Task” to close it. Repeat for each one.
- Test your CPU’s temperature again to see if this has made a difference.
As a rough guideline, your total CPU usage should be around 2 to 5% when it’s idle and under 30% when you’re performing light tasks, such as surfing the web.
Intensive tasks can spike your CPU usage up to 60%, or sometimes even 100%. This is normal as long as the heat is being dealt with properly.
If your CPU usage is higher than expected (for example, if you’re not doing anything demanding on the computer but the utilization is still near 100%), it’s a clear indicator that there’s an underlying issue, so keep on trying our other fixes below.
2. Improve Airflow
Insufficient ventilation is one of the main reasons a CPU overheats, and it is no surprise why:
If the heat is trapped within your device and can’t escape (or no fresh air can make its way in), it’ll cause your CPU to become extra toasty.
There are several ways you can improve airflow, including:
- Ensure your PC is located in a well-ventilated area that has plenty of airflows. Don’t keep your device in a closed space, such as a desk cabinet.
- Keep your system’s case closed. Despite common misconception, opening the case won’t improve your airflow, and can actually have the opposite effect. This is because it exposes your system to dust and debris, both things that can clog up your vents, fans, and radiators.
- Remove any items stacked on top of the case.
- Ensure cables are tidy within the PC.
- Add more case fans.
- Invest in a new chassis tailored to improving airflow.
- Be sure not to place laptops on soft surfaces (like a bed), especially if air vents are at the bottom
- Clean your intake and exhaust paths from any obstructions like dust or cables
A major cause of poor airflow is blocked vents or faulty fans, which brings us to our next point:
3. Inspect the Fans and Vents
Your PC’s fans and air vents play a vital role in keeping internal temperatures low. If the air vents are blocked by debris, or the fans are faulty and not running properly, your CPU will overheat.
Turn your PC off, unplug everything, and then open the chassis.
Check if there’s any dust or debris built up in the fans or vents. If there is, use a microfiber cloth and compressed air to clear it away. Be careful not to cause any damage to the fan blades.
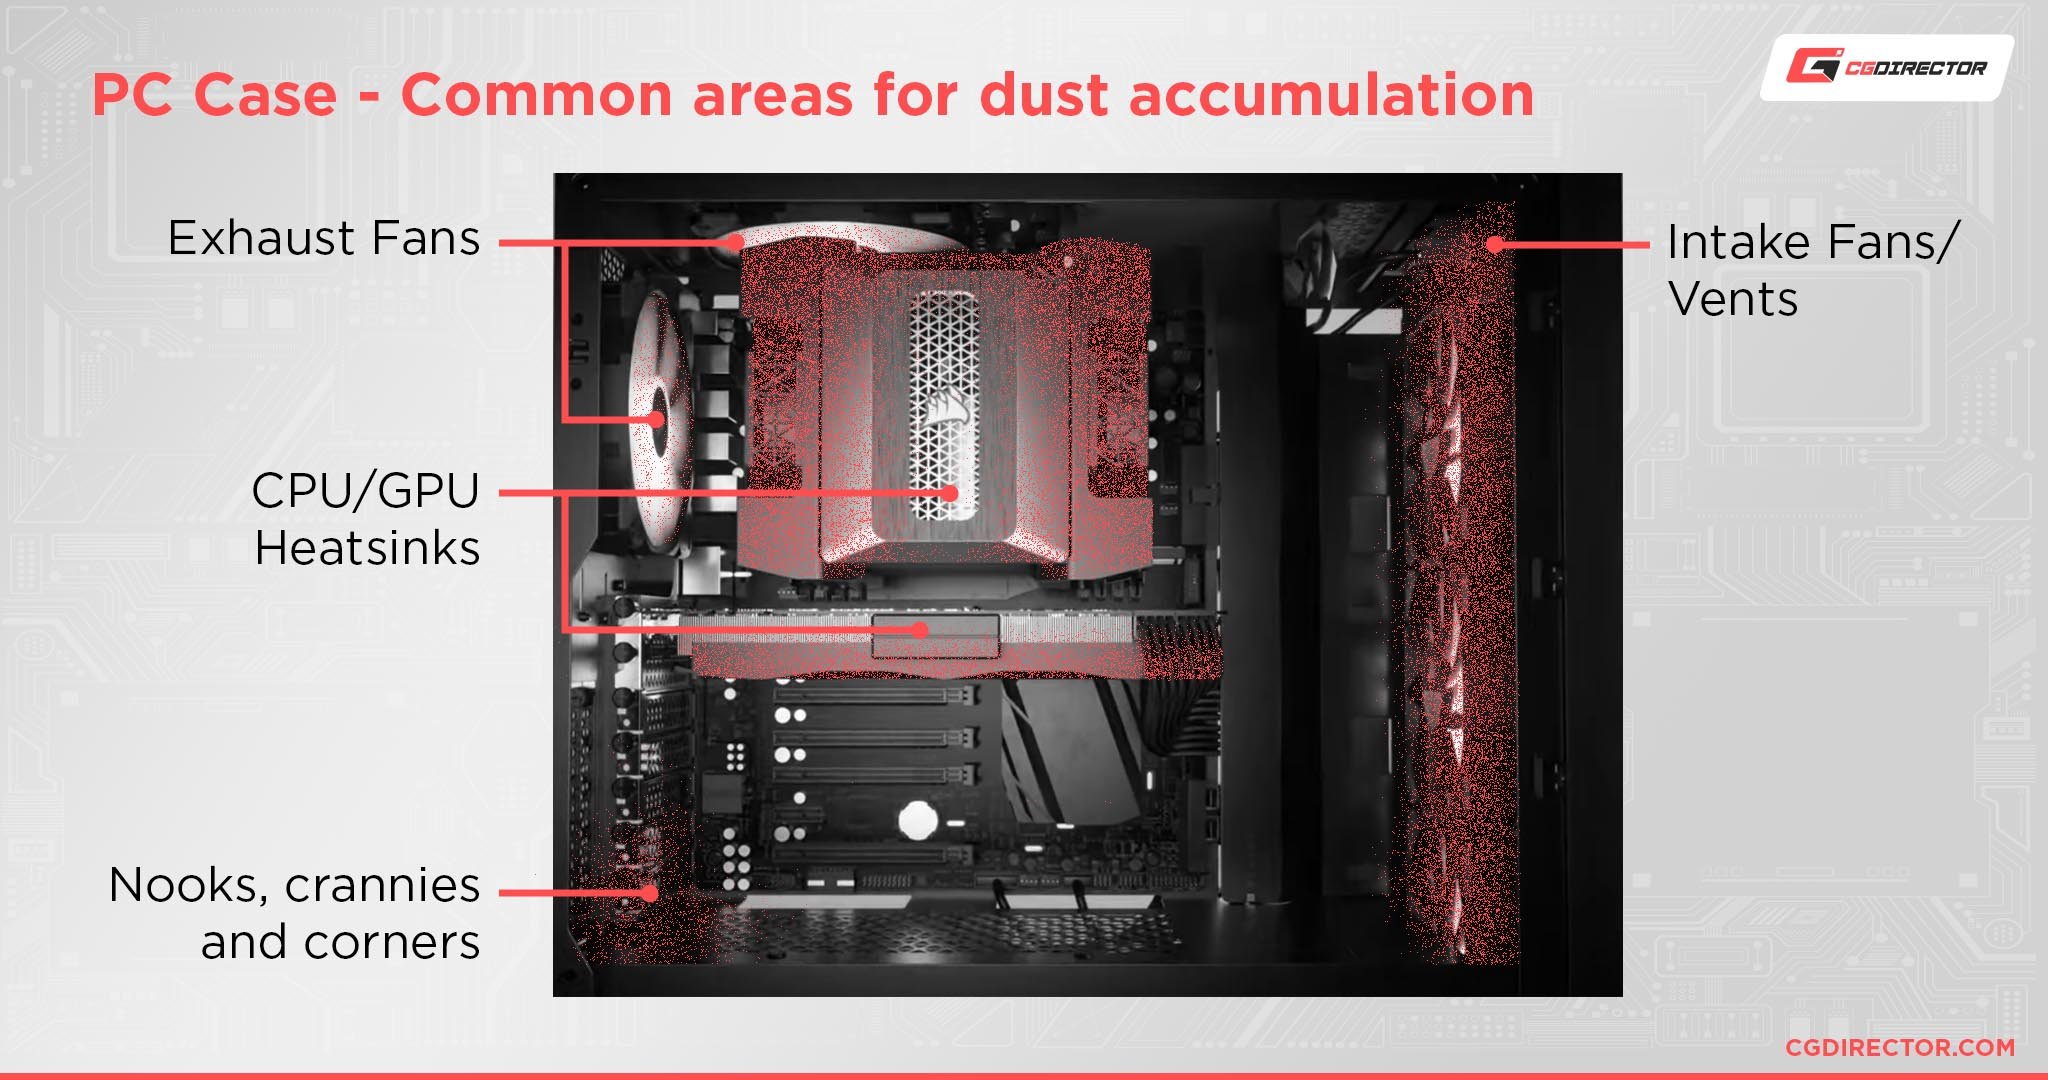
Dust tends to build up over time, so it’s good practice to clear your PC every 6 to 12 months. We have a great article on properly dusting your PC here if you’d like to follow along.
You should also ensure that the cables are all properly connected, and aren’t blocking the fans from moving. Sometimes the BIOS doesn’t properly recognize the fans, (especially ones that aren’t spinning), so it may be worth resetting the BIOS to see if it fixes the issue of non-functioning fans as well.
Unfortunately, if the fans aren’t spinning and none of the measures above have worked, it’s likely that there’s a fault with the fans, the motherboard, or your PSU.
Replace each component one by one, starting with the fans, to figure out the root cause. Or, send your device in for repairs if it’s covered under warranty. Also, make sure that the fans are receiving the appropriate voltage and are hooked up to the correct fan headers.
Of course: If your fans are set up in the BIOS to only spin up with increasing temperature, they might be waiting with ramping up until the CPU gets hot.
Do check the Hardware Monitor in your BIOS to make sure this is the case. Even if the fans are spinning, you should double-check that their speed syncs to the CPU’s load.
In other words, intensive tasks should cause an increase in fan speed, while light tasks should decrease the speed or stop the fans entirely.
If the fans and vents look good, you’ll next want to inspect your CPU, particularly its heatsink and thermal paste.
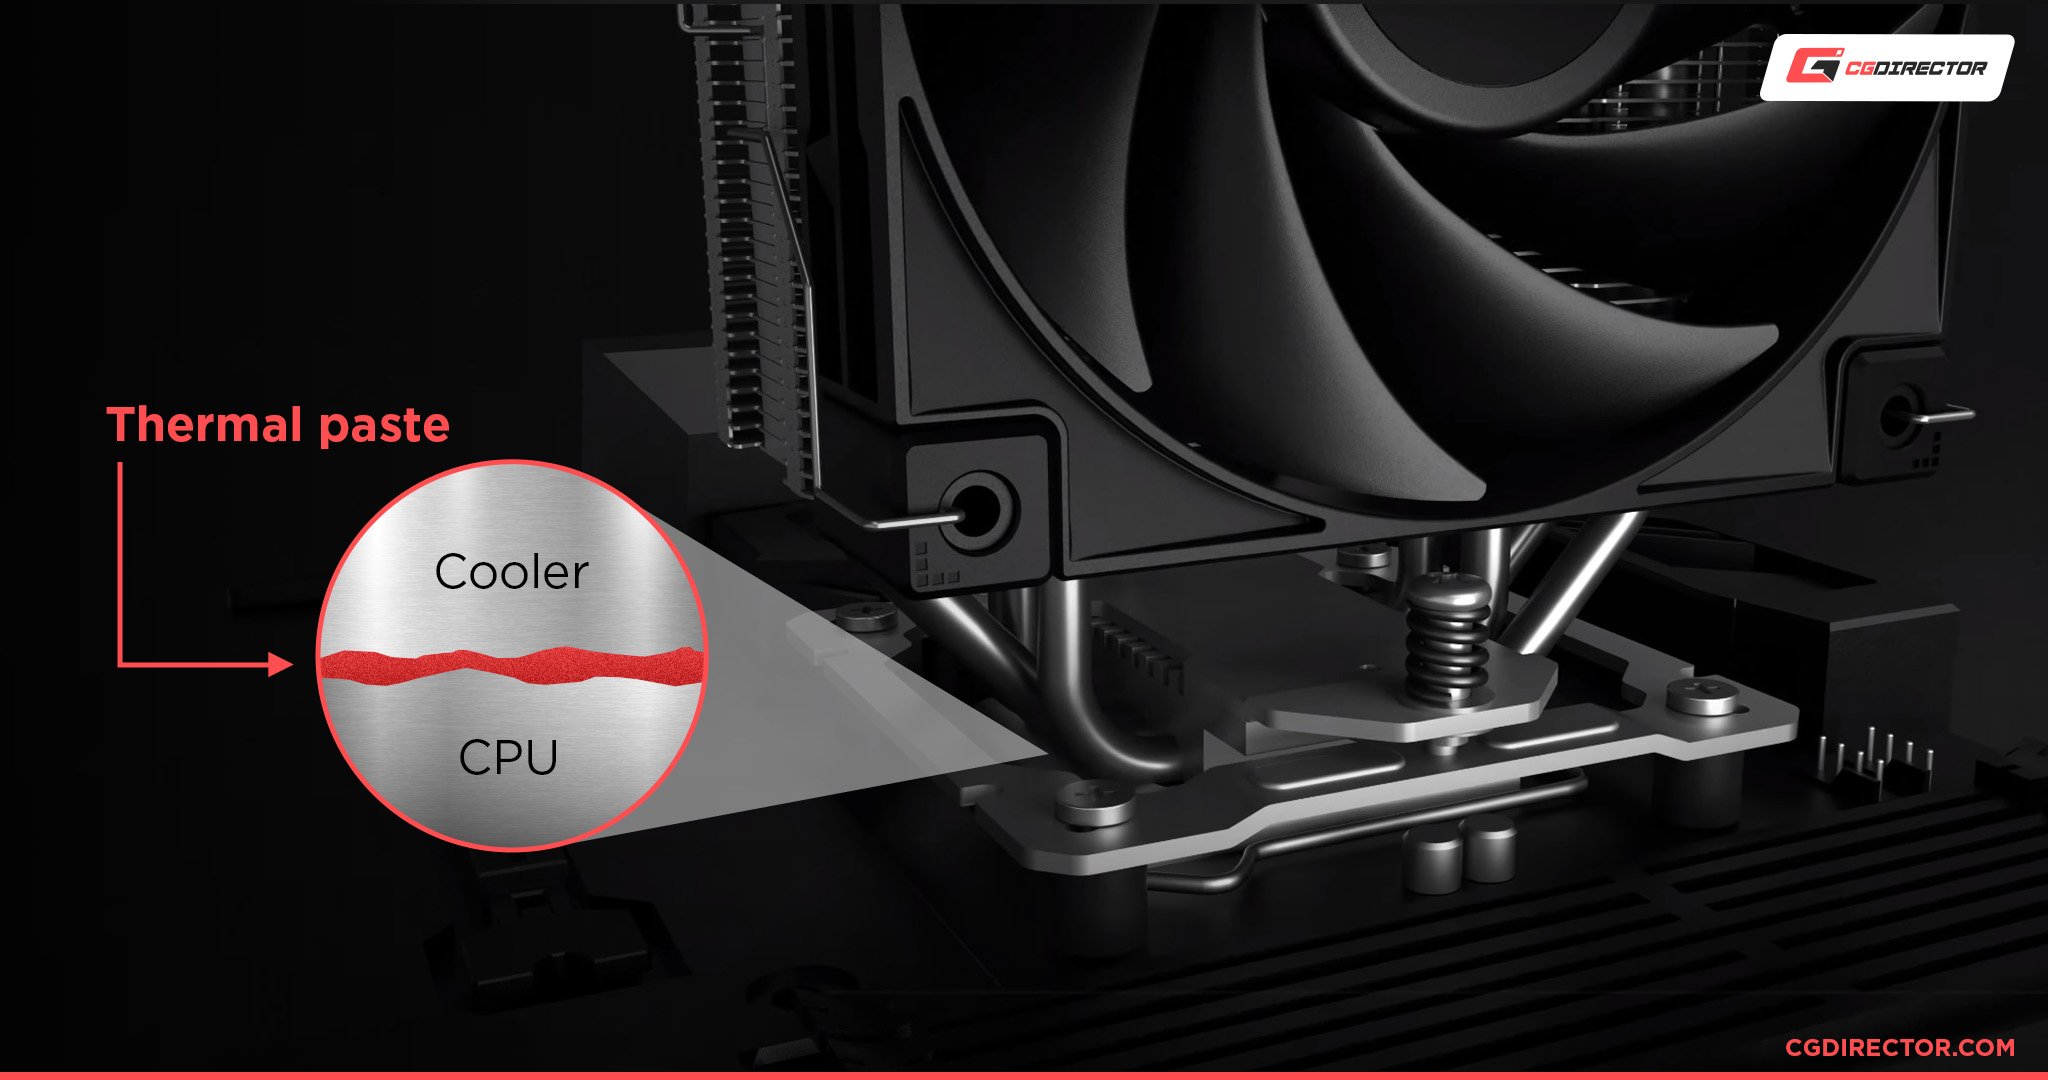
4. Check CPU’s Heatsink and Reapply Thermal Paste
The heatsink is a metallic component that helps to dissipate heat and keep a chip’s temperature low.
It’s typically considered a passive cooling measure which is often improved by fans moving hot air away from the heatsink.
Overheating issues are bound to occur if the CPU’s heatsink isn’t properly seated. It should be firm, secure, and not wiggle when you touch it.
Old, dried-up thermal paste can also cause a CPU to overheat. Thermal paste improves the heat transfer between the CPU’s integrated heat spreader (IHS) and the heatsink.
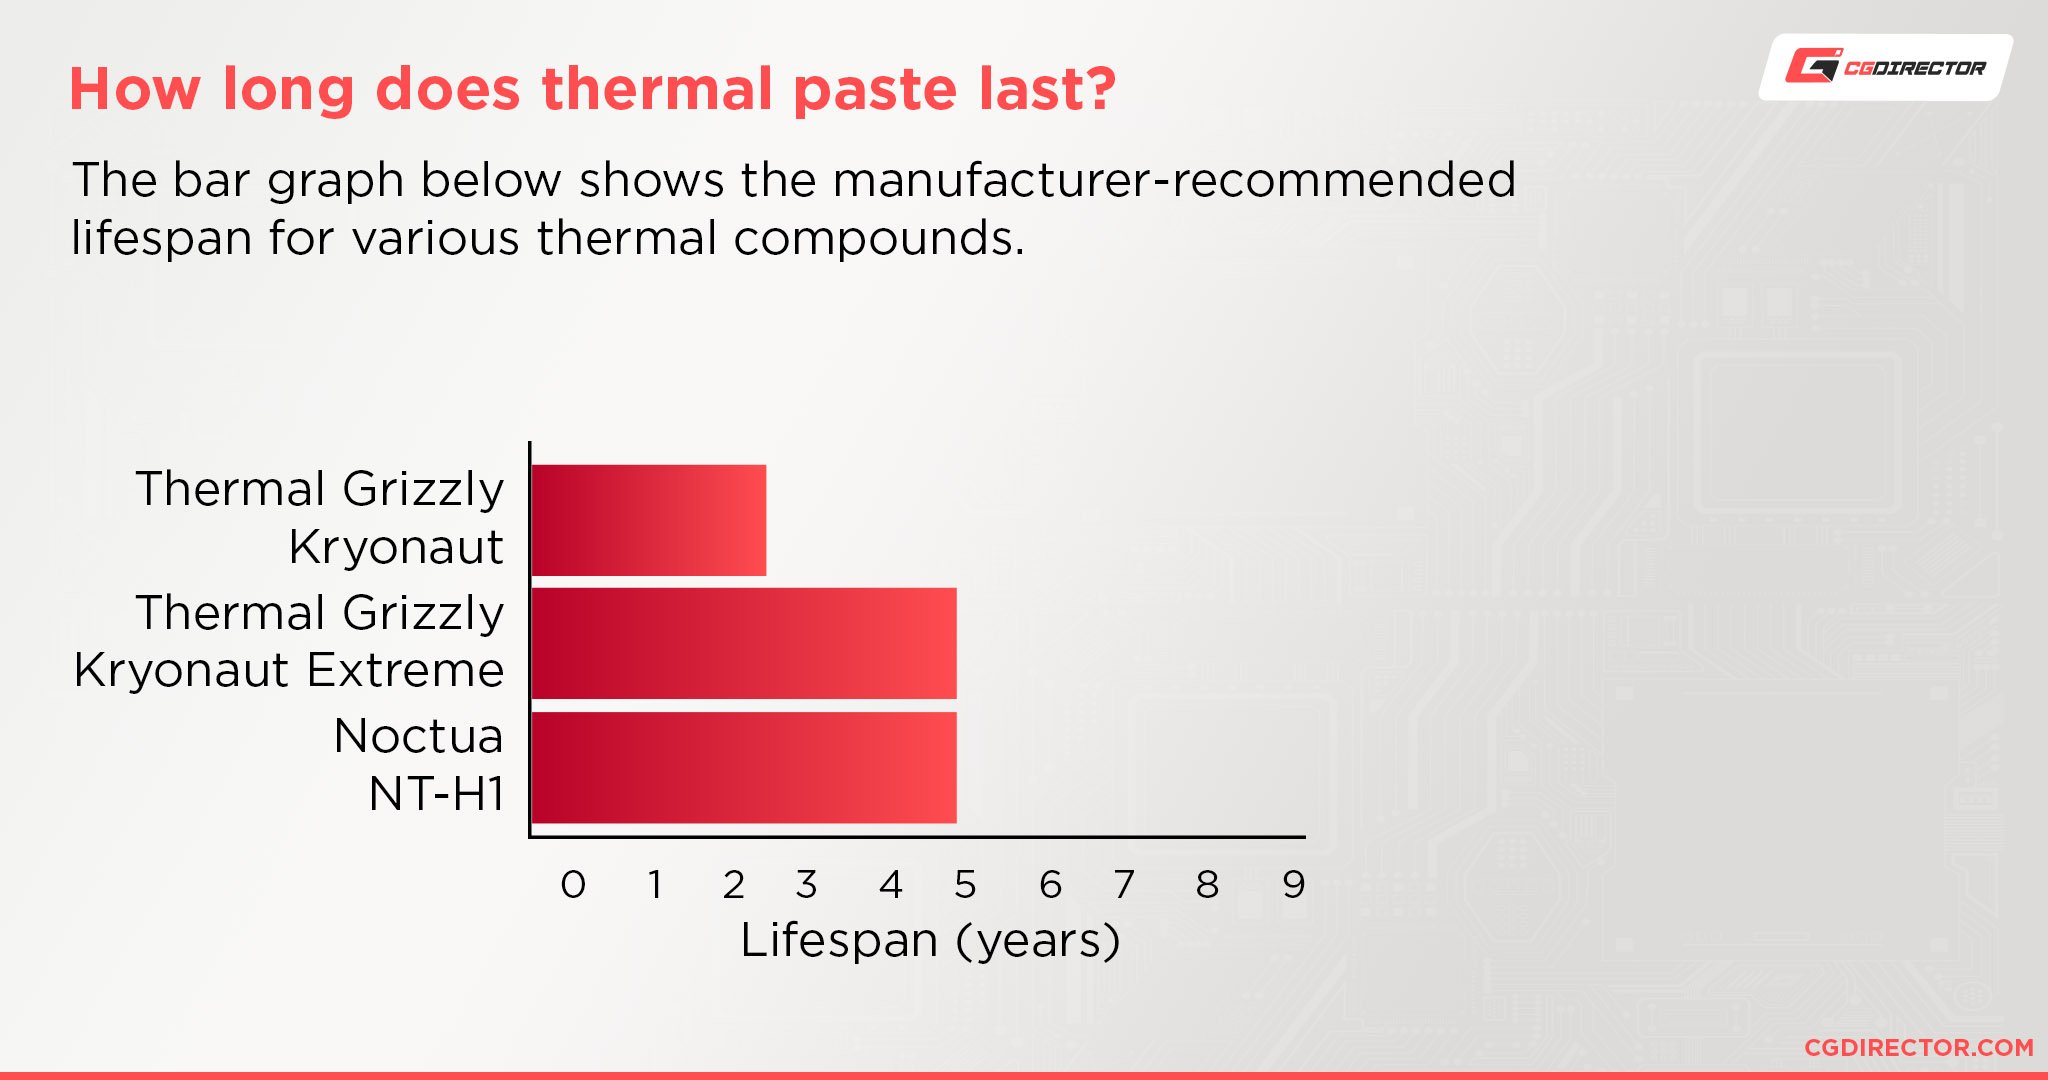
Most thermal pastes maintain their quality for around 3 to 5 years, though cheaper ones tend to dry up quickly and may have a shorter lifespan. If your thermal paste is over 5 years old, it likely needs to be replaced.
Even if your thermal paste is brand new, it can still cause problems if you didn’t apply it suboptimally, e.g. too much or too little. The paste should also be spread evenly so that no air pockets can form.
Here’s how to remove the CPU’s heatsink and reapply the thermal paste safely:
- Run your computer for half an hour. This will help warm up the thermal paste and make it easier to remove.
- Turn off the computer and ensure all cables are unplugged. Don’t forget to also unplug the CPU cooler’s power cable.
- It’s best to rotate your PC 90 degrees so it’s lying down flat on its side with the motherboard at the bottom before removing the side panel.
- Loosen your CPU cooler’s bolts or clips.
- Slowly twist the CPU cooler until it comes off. Only twist side to side, and never yank the cooler or pull it upwards. This can damage the CPU’s pins and lead to permanent damage.
- Make sure the CPU is properly secured to its socket.
- Get a microfiber cloth and a suitable cleaning solution (99% isopropyl alcohol). Wipe away the old thermal paste from the heatsink and CPU’s IHS.
- Using your new thermal paste, squeeze a pea-sized drop onto the center of the IHS. Don’t spread the paste.
- Carefully place the heatsink back on the CPU. Make sure you keep it flat.
Unfortunately, if the heatsink slips or moves during this process, you’ll have to redo the process.
There are three main types of thermal pastes available on the market: ceramic-based, carbon-based, and liquid metal. Each has its fair share of pros and cons, though we recommend sticking to ceramic or carbon-based if you’re a beginner.
Be aware that certain CPUs may require slightly more thermal paste, like Intel’s eight-core processors or AMD’s large Threadripper CPUs.
Here’s an interesting Video by GamersNexus analyzing different methods of applying thermal paste:
Changing thermal paste really gets the sweat going! If that still didn’t help, here’s the next step you should try:
5. Scan for Malware
Remember how we differentiated between healthy CPU utilization from tasks that you control and are aware of, and unhealthy utilization from tasks that utilize your CPU without you knowing or your control?
Malware is such an unhealthy task that can wreak havoc on your device and cause your CPU to overheat. This is especially the case if it’s running tasks that use up your CPU’s performance, like mining cryptocurrency.
Malware typically doesn’t appear in the Task Manager, or if it does, it’ll be disguised as another common task name. This can make it extremely hard to detect if malware has infected your device.
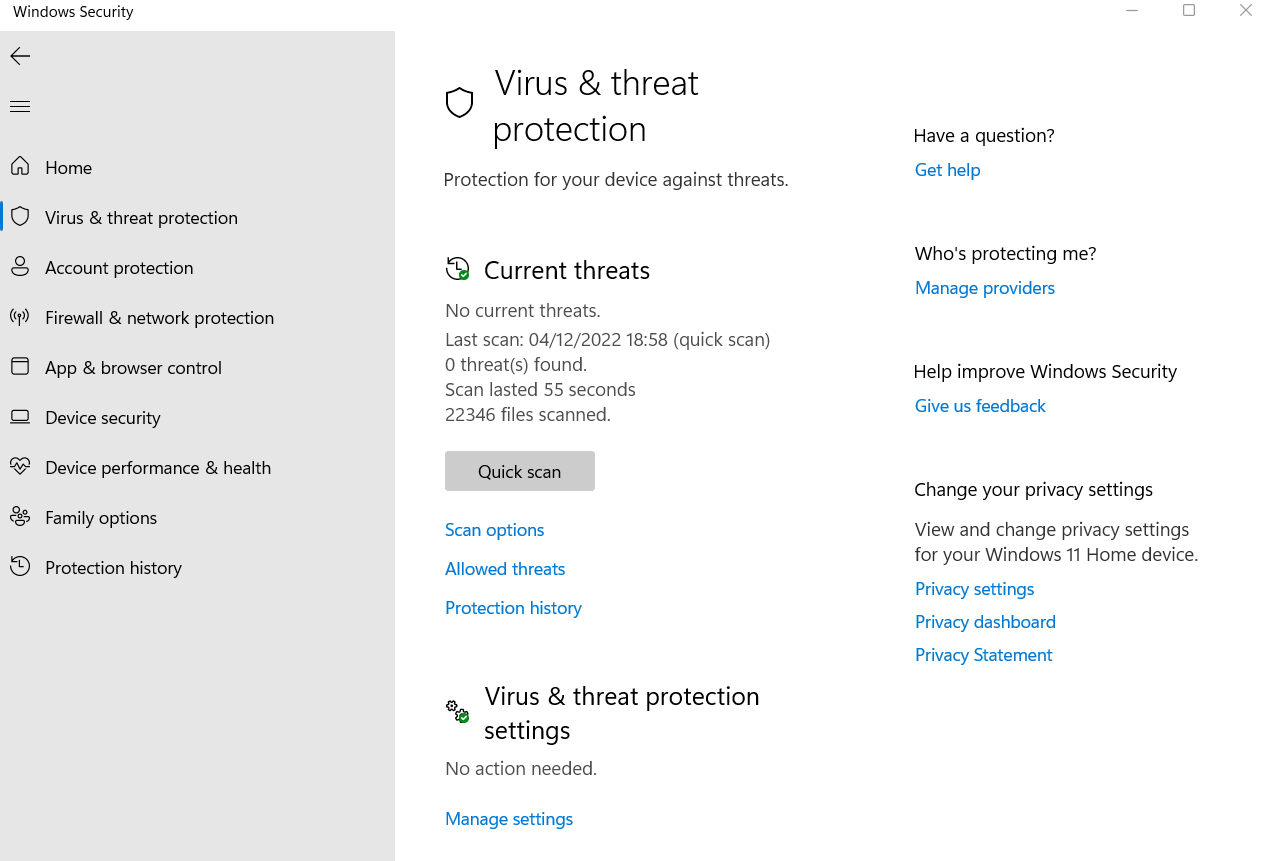
That’s why it’s important to run a full virus scan on your PC. Windows Security has an integrated security scan, but you can also use third-party antivirus scanners such as Malwarebytes that often catch more than the in-built Windows Security methods.
6. Adjust the Power Option
A power option that prioritizes performance over keeping temperatures low can cause your CPU to heat up unnecessarily and throttle.
Make sure that the Windows power option is set to the following configuration:
- Go to the Start menu and put “Control Panel” into the search bar.
- Click on the “Control Panel,” go to “Hardware & Sound,” and then select “Power options.”
- Set the power plan to “Balanced.” Then, click “Change Plan Settings,”
- Choose “Change Advanced Power Settings.”
- Click on “Processor Power Management” and reduce the maximum processor state to 80-90%.
- Apply the changes.
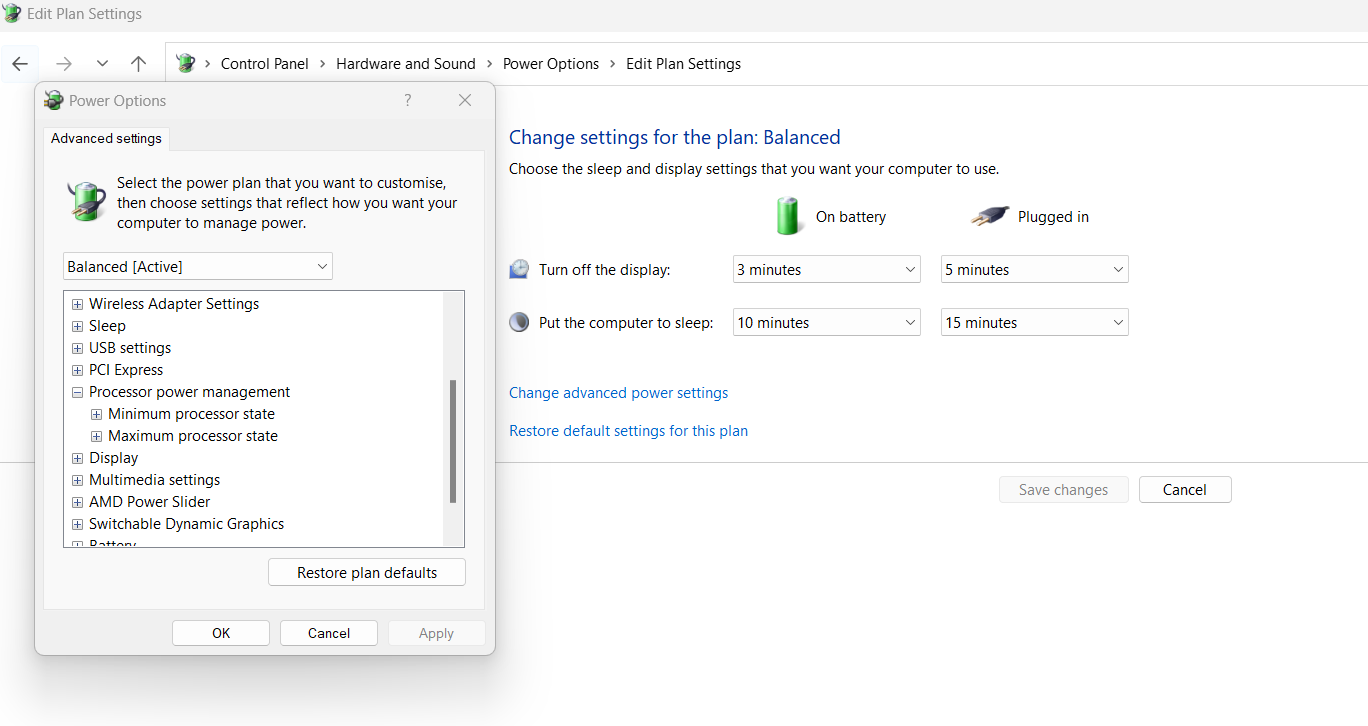
The Balanced Power Plan will ensure the CPU’s clock speed is reduced when the performance is not needed, keeping it cool when idle.
Of course, if you’ve overclocked your CPU, adjusting the power plan isn’t going to make much difference. So, make sure you…
7. Stop Overclocking the CPU
While overclocking boosts your CPU’s clock speeds, it also heats it up considerably. It’s best to refrain from manual overclocking unless you have extremely strong cooling and know what you’re doing.
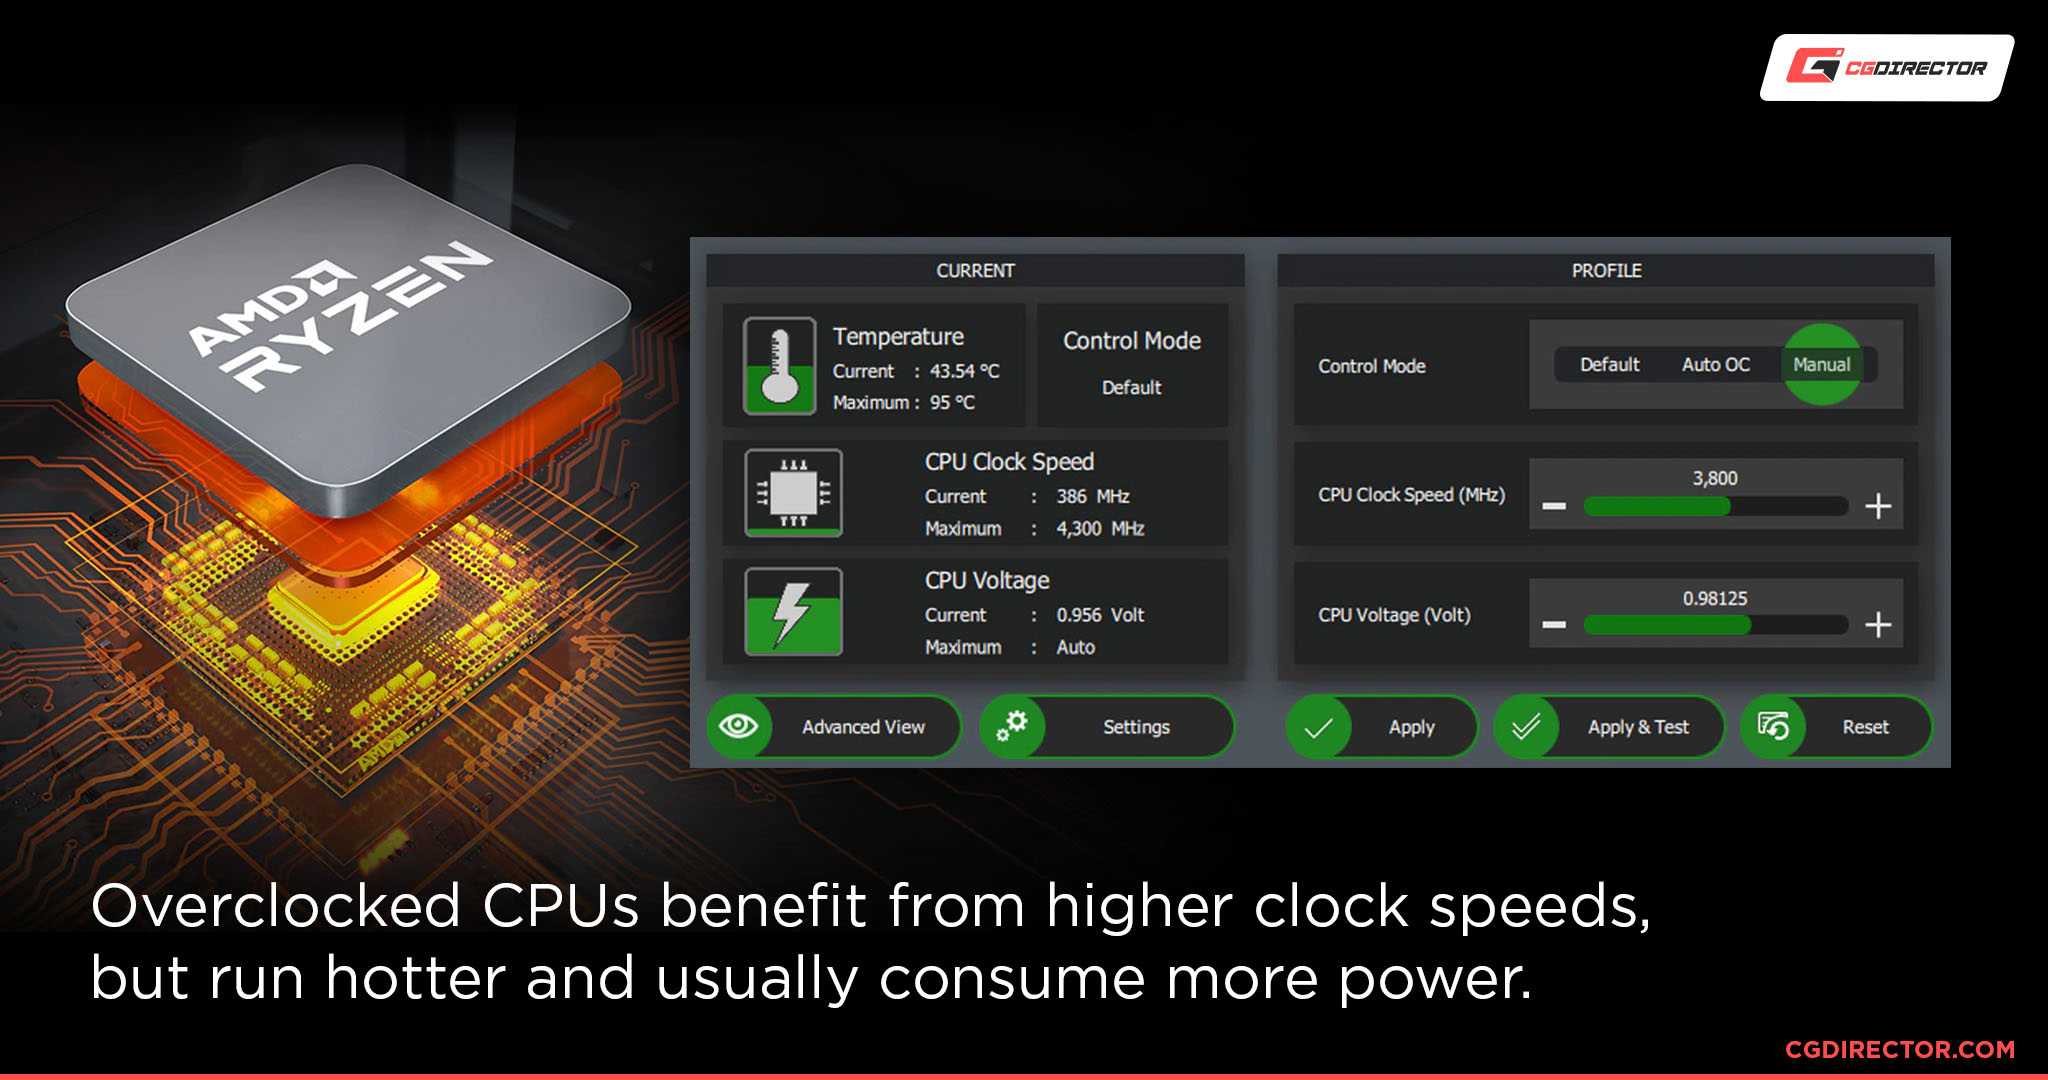
You can stop overclocking by resetting your BIOS to factory defaults.
You can also try undervolting your CPU to reduce its temperature, though this will impact your device’s performance, and the process can be difficult for beginners.
You can learn more about undervolting here.
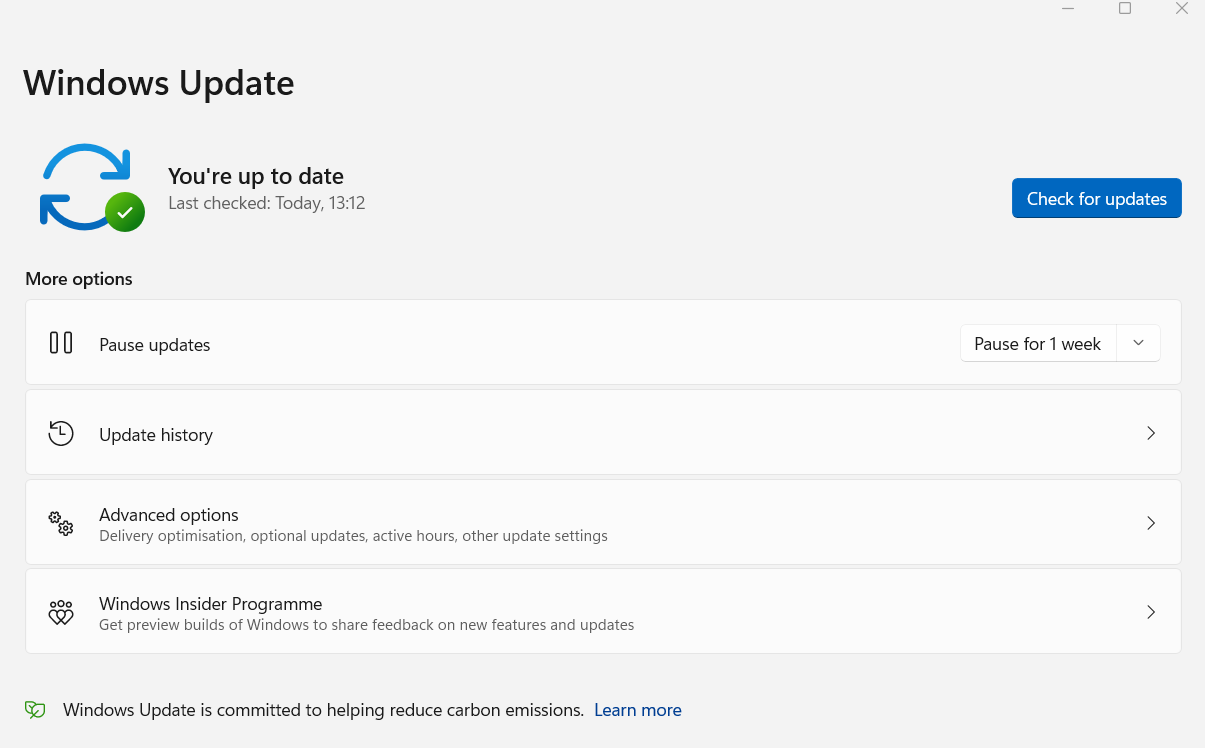
8. Check for Updates
Keeping your PC updated may potentially help to combat heat. This is because updates are often designed to fix bugs, patch vulnerabilities, and improve efficiency & performance.
Check your applications — like Chrome, your mail app, or typical daily used Software such as Adobe CC — and ensure each one is running the latest version. You can also check for Windows updates in the settings.
- Press “I” while holding down the Windows key to open up the settings.
- Go to “Windows Update,” then “Security & Update.”
- Select “Check for updates” and install the latest version if necessary.
- Restart your device.
Updated everything and still experiencing heat problems? Don’t give up hope, there are a couple more fixes you can try, like adjusting the CPU fan speed in BIOS.
9. Adjust CPU Fan Speed in BIOS
You can manually boost the CPU fan speed within your PC to help combat heat.
To do so, you’ll need to access the BIOS:
- Reboot your PC in BIOS mode. To do this, you need to restart while pressing the key specified by your manufacturer. It’s typically F2 or F12.
- Once in the BIOS menu, find the CPU fan option. Again, the exact name can vary depending on your manufacturer, but it’s often called “smart fan,” “fan options,” or “Hardware Monitor.”
- Set the CPU (and case) fan speeds to a mode that prioritizes cooling over keeping things quiet.
- Apply the changes and restart your device.
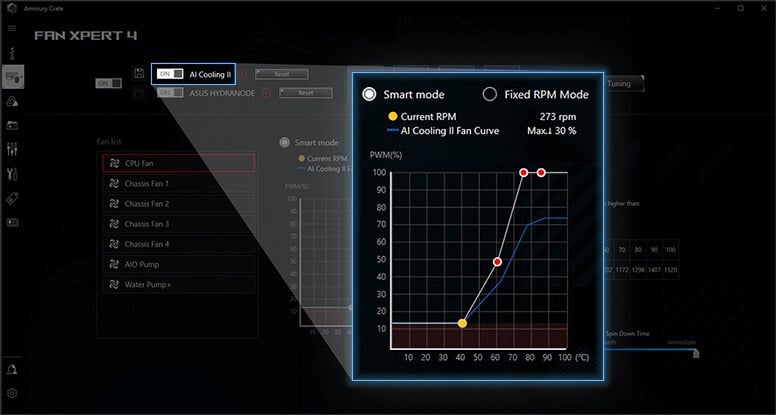
Be aware that not every device has the option to adjust fan speeds in the BIOS. If this is the case, you can instead use third-party software like SpeedFan.
10. Invest in a New CPU Cooler
It’s worth investing in a new CPU cooler, especially if your current one is old and none of the methods above have fixed your problem. Make sure your new cooler is powerful enough to cope with your everyday tasks.
There are two primary types of CPU coolers: Air coolers and liquid coolers.
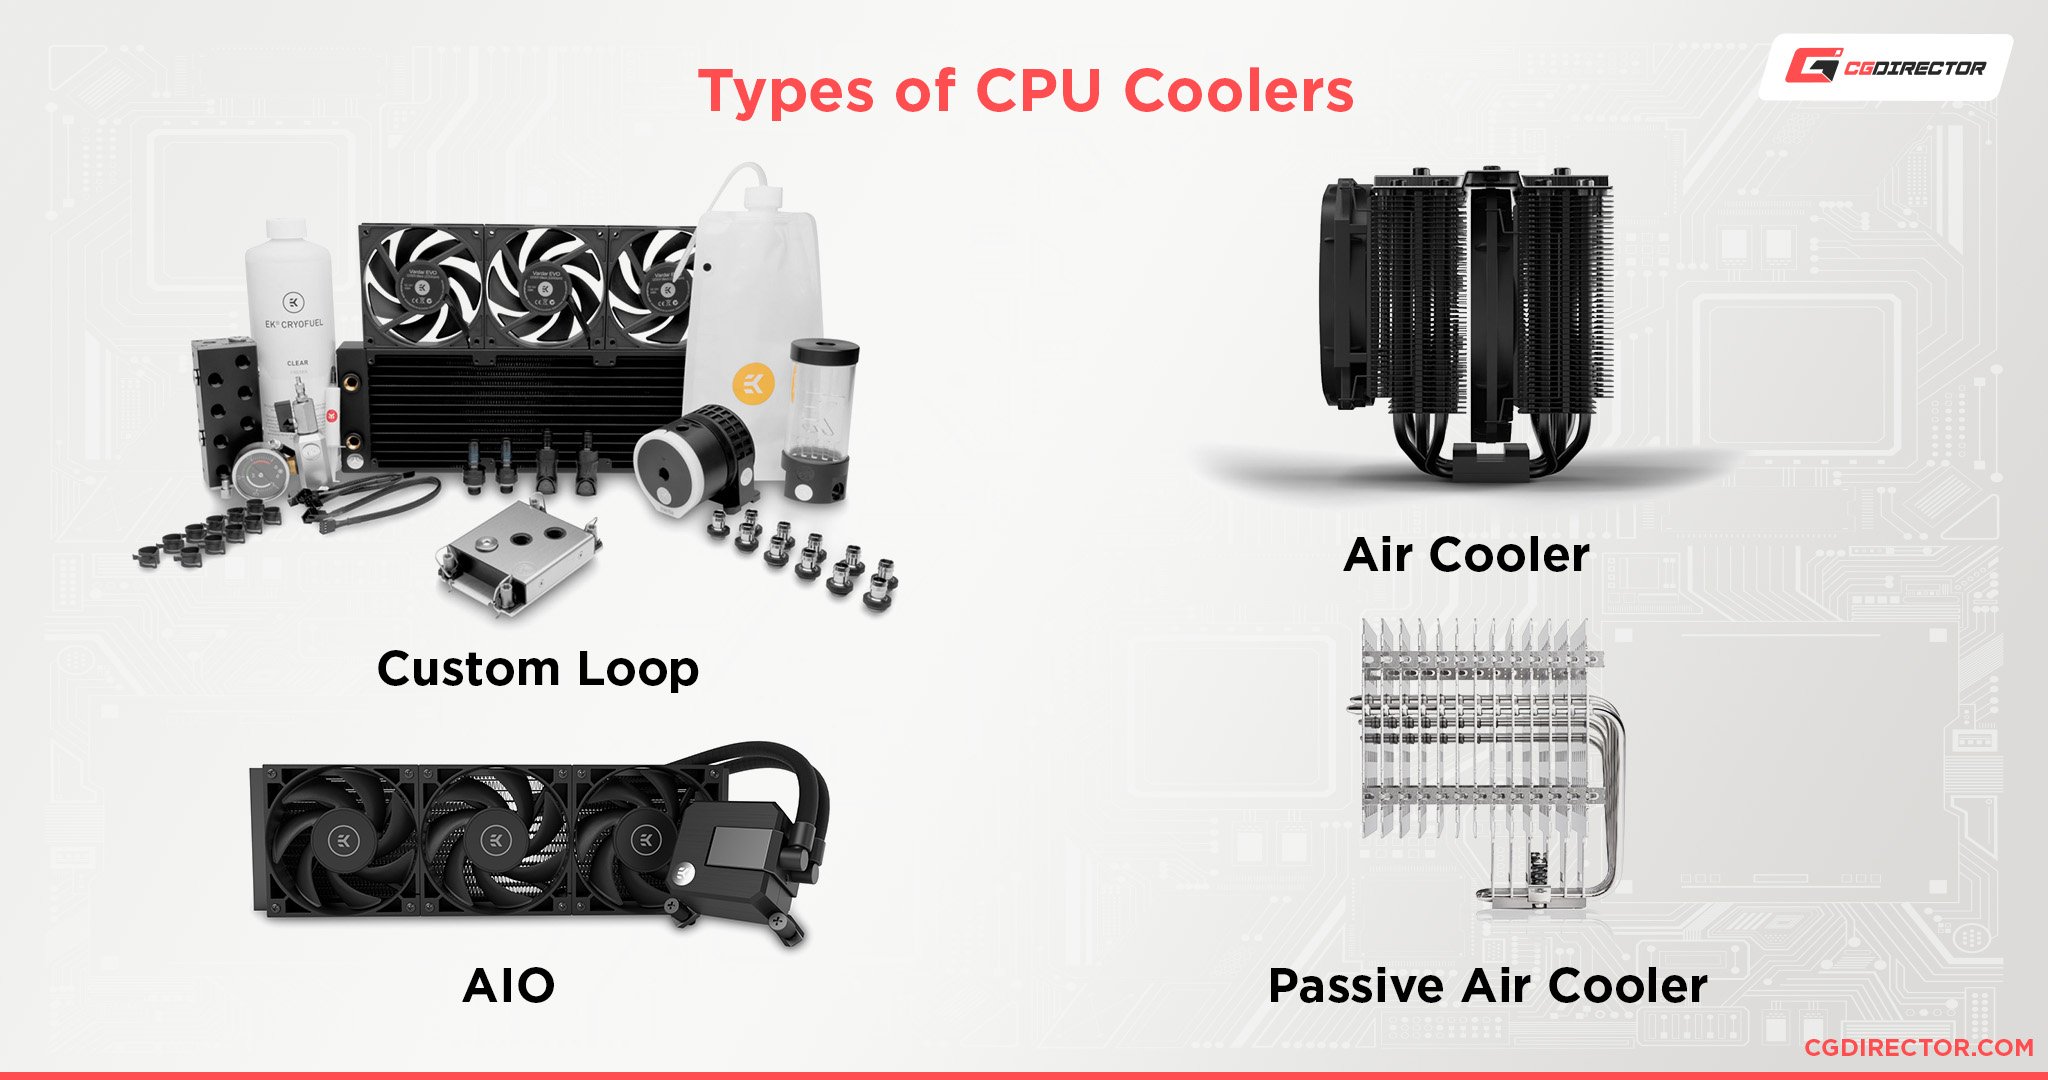
Our in-depth guide on the topic can help you determine which cooling type is better suited to your needs.
Additional Tips
Here, we’ve gathered a few more tips that may help stop your CPU from overheating.
- Use a laptop cooling fan: If you’re using a laptop, you can use a dedicated cooling fan to improve the airflow.
- Close browser tabs: Avoid having more than 5 browser tabs open simultaneously. Having dozens of browser tabs can overload your CPU and cause it to overheat.
- Change the environment: A cool, well-ventilated environment will make it easier for your PC to combat the heat. Keep your device out of direct sunlight, use air conditioning, and keep curtains and windows closed during the day.
- Remove the side panel of your case: Although we don’t usually recommend this as it introduces dust into the case more easily and exposes the insides, if you have too few case fans or the inside of your case is too convoluted and obstructing airflow, removing the side panel can reduce temperatures. A better long-term solution, though, would certainly be to increase airflow with the case closed.
FAQ
What happens if a CPU Overheats?
When your CPU overheats, it can cause performance issues, crashes, and sudden shutdowns. The CPU itself can also become damaged.
Is 150°F Too Hot for a CPU?
150°F is a safe temperature for a CPU and you’re unlikely to experience any performance issues.
However, if the CPU is running at 150°F when idle, it could be a sign of a potential problem. You should expect a CPU to be around 160°F under heavy load and 113°F under light load.
How to Prevent the CPU From Overheating?
Closing unnecessary background tasks, cleaning dust, and improving airflow are all ways you can prevent the CPU from overheating. You should also keep the software updated.
Is CPU Overheating Normal?
While it’s normal for the CPU to get hot under heavy load, it isn’t normal for it to overheat, especially if it’s a regular occurrence.
A CPU overheats when its temperature surpasses 180°F.
How Long Will an Overheating CPU Last?
A CPU that frequently overheats will have a significantly shorter lifespan than a CPU that hasn’t been exposed to unsafe temperatures.
Most overheating CPUs die within a year if the underlying issue isn’t fixed.
Over to You
We hope our methods above have helped you combat the heat for good. Your CPU is the most vital part of your PC, so you want it to stay in peak condition for as long as possible.
Let us know in the comments below which method worked for you. Or, if you discovered another solution not listed here, why not share it in the forum?
![How to Get a CPU Cooler off of a CPU [Un-stick Glued-On Cooler]](https://www.cgdirector.com/wp-content/uploads/media/2024/03/How-to-get-CPU-Cooler-off-CPU-Twitter-copy-594x335.jpg "How to Get a CPU Cooler off of a CPU [Un-stick Glued-On Cooler]")

![“Best” PC Bottleneck Calculators [CPU/GPU]: Do they even work?](https://www.cgdirector.com/wp-content/uploads/media/2024/01/Best-PC-Bottleneck-Calculators-CPUGPU-Explained-Twitter-594x335.jpg "“Best” PC Bottleneck Calculators [CPU/GPU]: Do they even work?")
![Best CPU for Video Encoding [2024 Update]](https://www.cgdirector.com/wp-content/uploads/media/2022/02/Best-CPU-For-Video-Encoding-Twitter-594x335.jpg "Best CPU for Video Encoding [2024 Update]")

2 Comments
17 August, 2023
can u please suggest me cooler/heatsink
17 August, 2023
Hi , i m also Compositor . I have i9 13900k ,i m facing overheating issue.