 by
by 
TABLE OF CONTENTS
BIOS, which stands for Basic Input Output System, is an integral part of your computer that keeps things running efficiently; it ensures your PC boots without problems, makes sure the various components work together properly and also manages settings for the CPU, hard drive, fans, and more.
Put simply: without a BIOS, your PC would function as an expensive (albeit aesthetic) brick.
Unlike most other software, the BIOS doesn’t update automatically.
So, if you’re experiencing system instabilities or booting errors, updating your MSI BIOS can solve many issues if nothing else has worked.
This process can seem incredibly daunting and complicated. But don’t sweat it — follow our steps below, and you’ll have it done in no time.
We’ll first explain exactly what a BIOS is and how to decide whether it’s worth updating it.
What Is A BIOS?
BIOS is firmware that’s embedded in a small memory chip within your computer’s motherboard.
It’s responsible for initializing and testing all components hooked up to your PC, booting up your system, and also helps manage the data flow between the computer’s operating system (OS) and any attached devices, like the hard drive, keyboard, and printer.
Most BIOS settings are configurable and can be tailored to your needs. For example, you can change the BIOS settings for things like the CPU clock speed and voltage to maximize your PC’s performance or reduce your fan speeds to decrease noise.
Should I Update My MSI BIOS?
You usually don’t need to update your BIOS regularly, if at all. Most BIOS updates, while offering some improvements, aren’t significant enough to be worth the hassle.
However, this isn’t always the case. Sometimes, these updates can come with critical security patches and bug fixes, which can solve a whole range of infuriating problems, from system errors, slow-downs, and crashes, to malfunctioning hardware components.
BIOS updates can also include support for new hardware.
So, if you’re plagued by any of the problems above — or intend to upgrade your PC’s specs in the near future — you’ll likely want to update your MSI BIOS to the latest version before adding any new components to your PC.
Avoid updating the MSI BIOS if your PC works fine (or you don’t need a hardware update). As they say: Never change a running system!
How to Update Your MSI BIOS Using M-Flash
When we say MSI BIOS, we mean the BIOS on an MSI motherboard specifically. It doesn’t matter if this motherboard is inside your PC (which is more common) or inside a Laptop made by MSI. The process is much the same.
Updating your BIOS can be nerve-wracking, and it’s no surprise why: one critical mistake and your computer can go from a robust powerhouse into an overpriced brick.
But it’s typically a safe process as long as you follow the manufacturer’s steps carefully and take the necessary precautions.
Prerequisites
Here’re the precautions and preliminary things to check off that we recommend you do before starting with the BIOS updating process:
- Check the BIOS changelog on the manufacturer’s website; it’ll let you know exactly what the update includes and whether or not it’ll benefit your situation (e.g. provides a specific fix for the bug you’re experiencing)
- Consider if the BIOS update you plan to flash (install) has been thoroughly tested; new versions may not have experienced the same rigorous testing process yet and be more prone to bugs
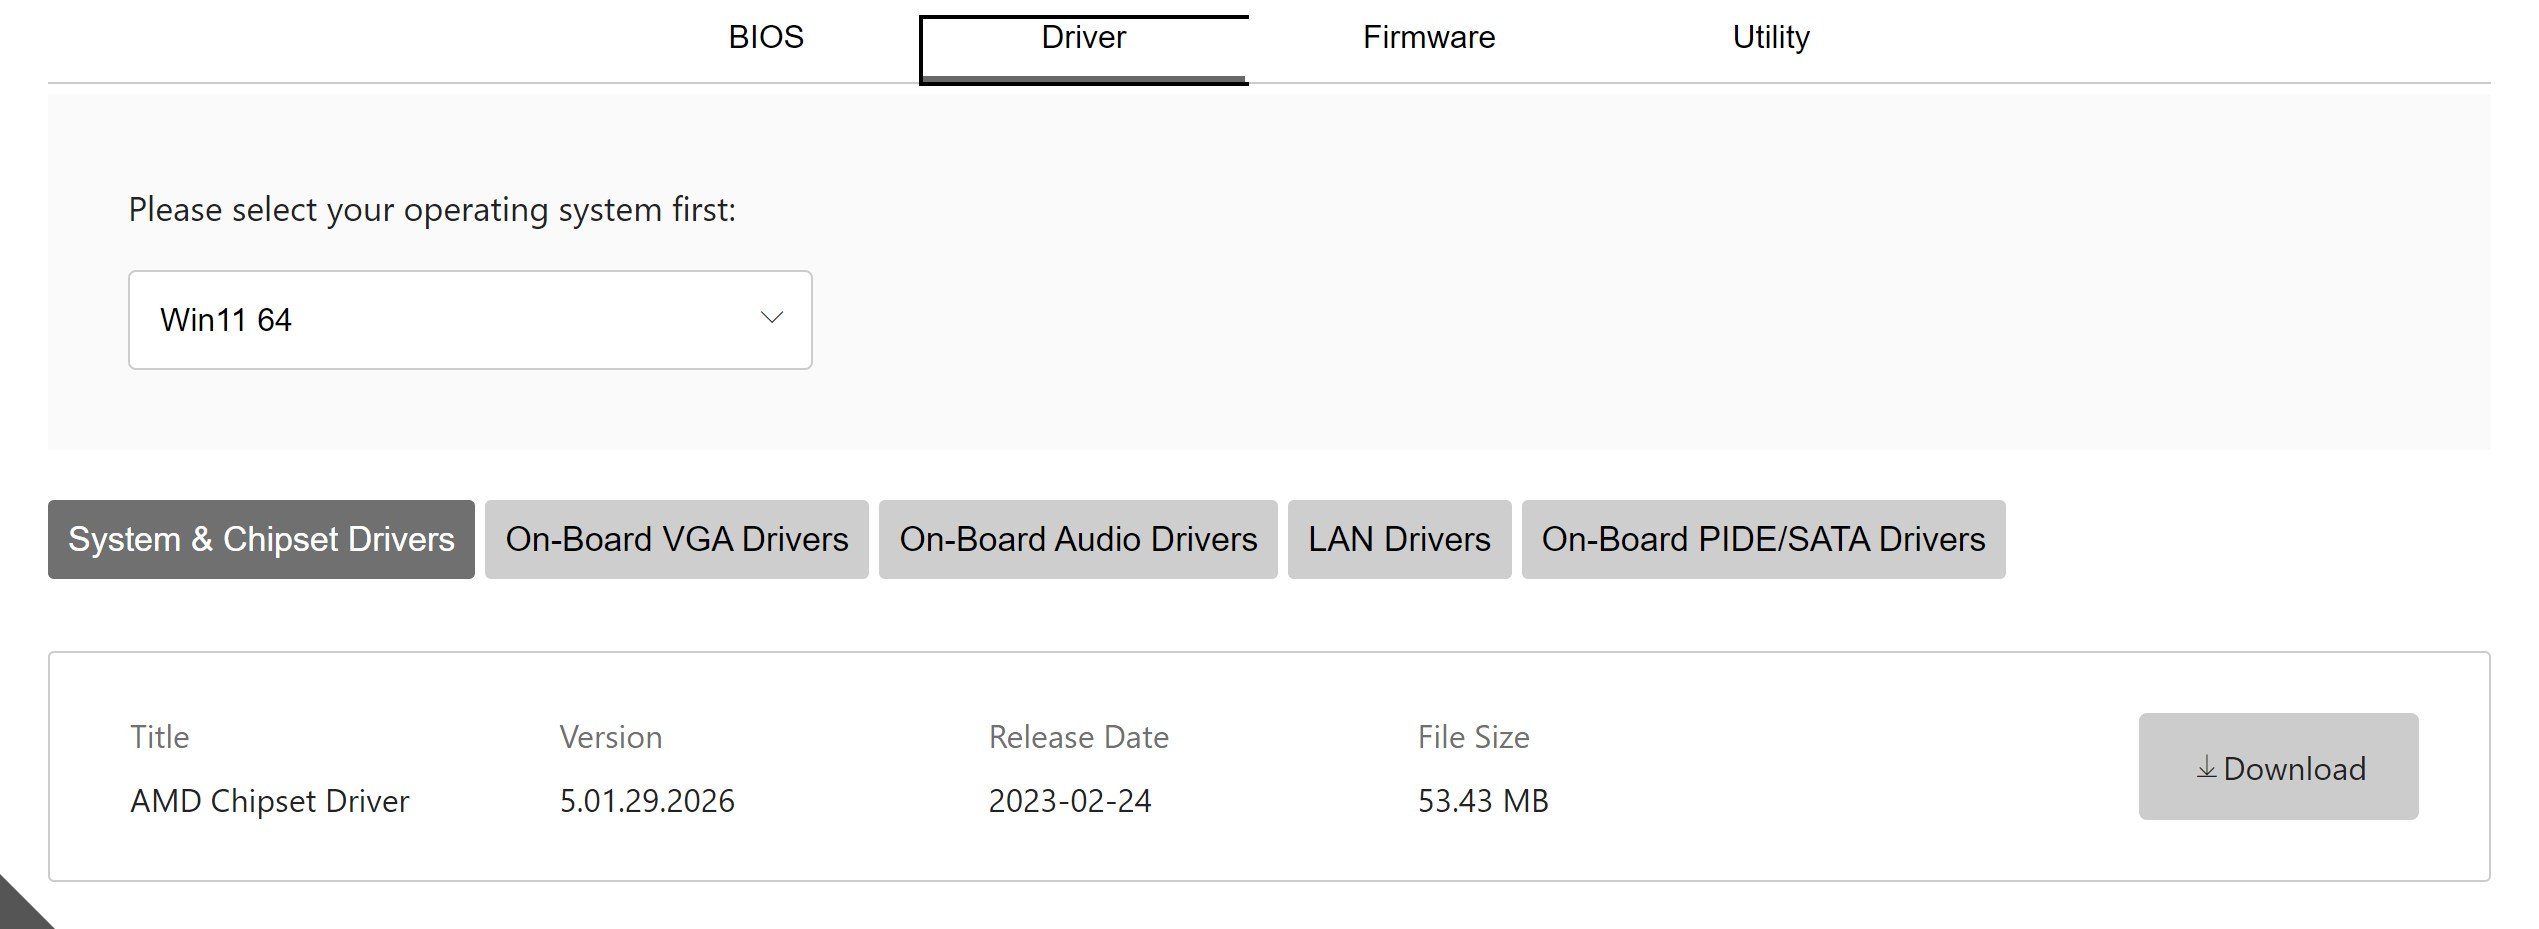
- Make sure that the latest motherboard drivers are installed to minimize the chance of incompatibility
- Back up everything to an external storage device before you proceed
- Ensure the power cable is reliable and plugged in properly
- Note down your BIOS settings or any overclocking values – your custom configurations will be wiped after the installation process, so you’ll need to reapply them
- Ensure the USB flash drive has a reliable, strong connection and isn’t corrupted. You should also check that the USB port is in working order
- Check that there aren’t any planned power outages occurring in your area
You should also check what MSI BIOS version your PC is currently running. You may actually already have the latest version, so an “update” could be unneccesary.
Here’s how to find your current BIOS version:
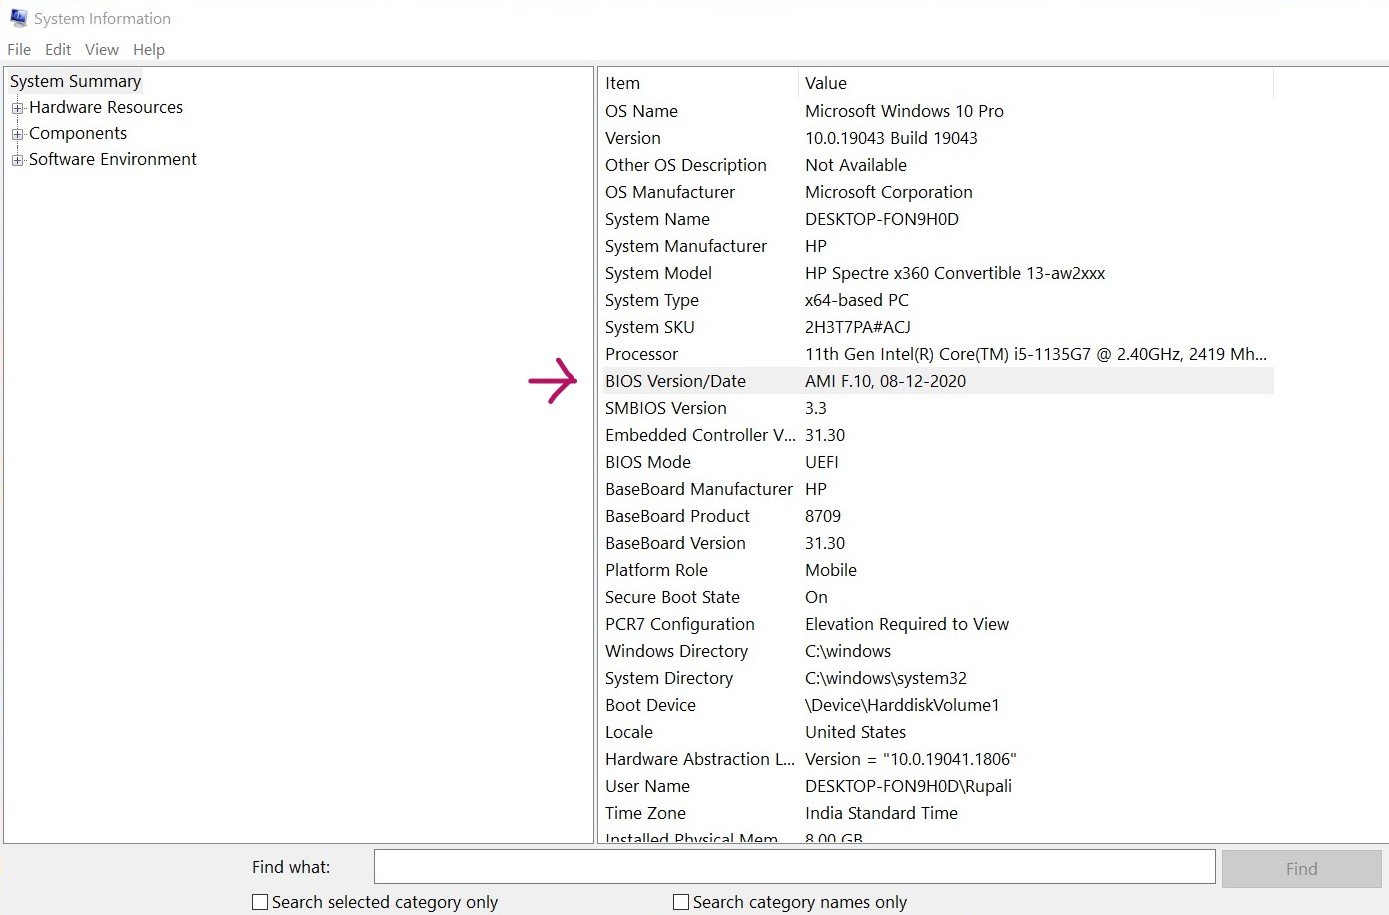
- Hold down the “Windows” and “R” keys simultaneously to open the Run Dialogue box
- Enter “msinfo32” and select “Ok” to access the System Information
- In System Summary, scroll down until you find the BIOS Version/Date
With those preliminary steps done, here’s how to update your BIOS:
Step 1. Identify Your Motherboard Version
You’ll first need to figure out exactly which motherboard version you have so that you can download the correct, compatible BIOS file from the manufacturer’s website.
Flashing an incompatible BIOS file can utterly wreck your computer, so it’s extremely important you get the right one.
You can easily find out your motherboard details in the command prompt:
- Type “CMD” in the Start Windows search bar, and select the Command Prompt app when it appears
- Type the following line into the command prompt: wmic baseboard get product,manufacturer,version,serialnumber
- Hit enter, and it’ll tell you your motherboard’s version and serial number
This method should work in both Windows 10 and Windows 11.
However, if for whatever reason you can’t access the Command Prompt, you can instead access Windows System Information to find the BIOS version.
In System Summary, look for the following: “BaseBoard Manufacturer, “BaseBoard Product,” and “BaseBoard Version.”
Step 2. Prepare a USB Flash Drive
Once you’ve identified your motherboard version, you’ll next want to prepare a fully formatted USB flash drive.
This sounds super complicated, but rest assured it’s an easy, stress-free process:
- Plug the USB flash drive into your PC
- Locate and right-click on the drive, then select the “Format” option
- In “File System Option” choose “FAT32”
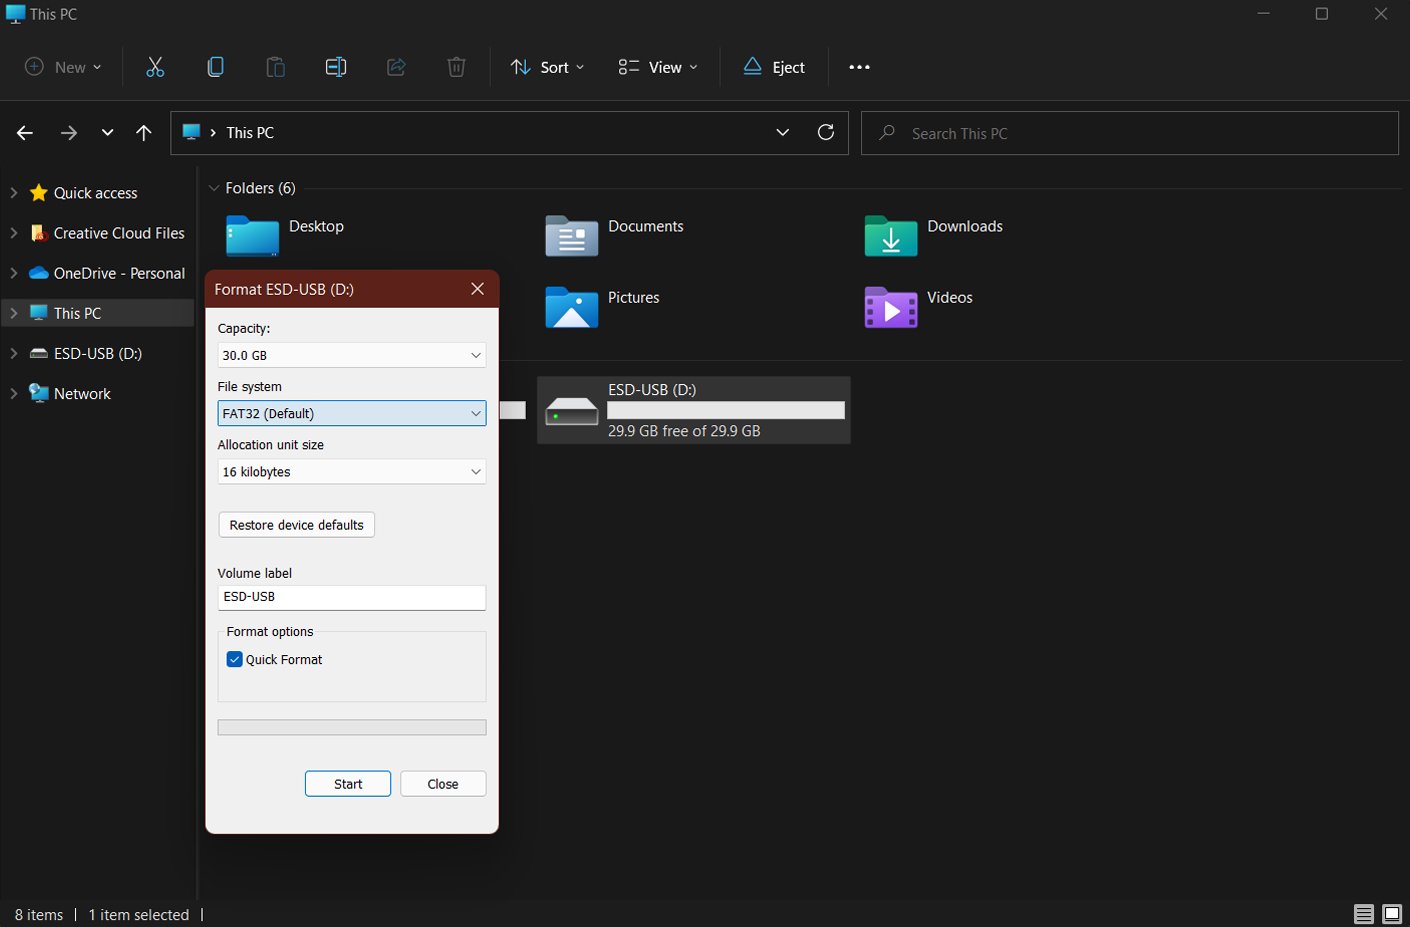

- Click “Start” to apply the changes
Make sure to use a USB flash drive that’s reliable, high-quality, and has a drive capacity that’s 32GB or less.
You should also check that the USB drive is empty and has no data stored on it.
Step 3. Download the Latest MSI BIOS Firmware
You’ll next want to download the latest MSI BIOS firmware and copy it onto your USB flash drive.
Fortunately, MSI has made it pretty easy to find the appropriate BIOS version for your motherboard model:
- Ensure your formatted USB flash drive is properly connected
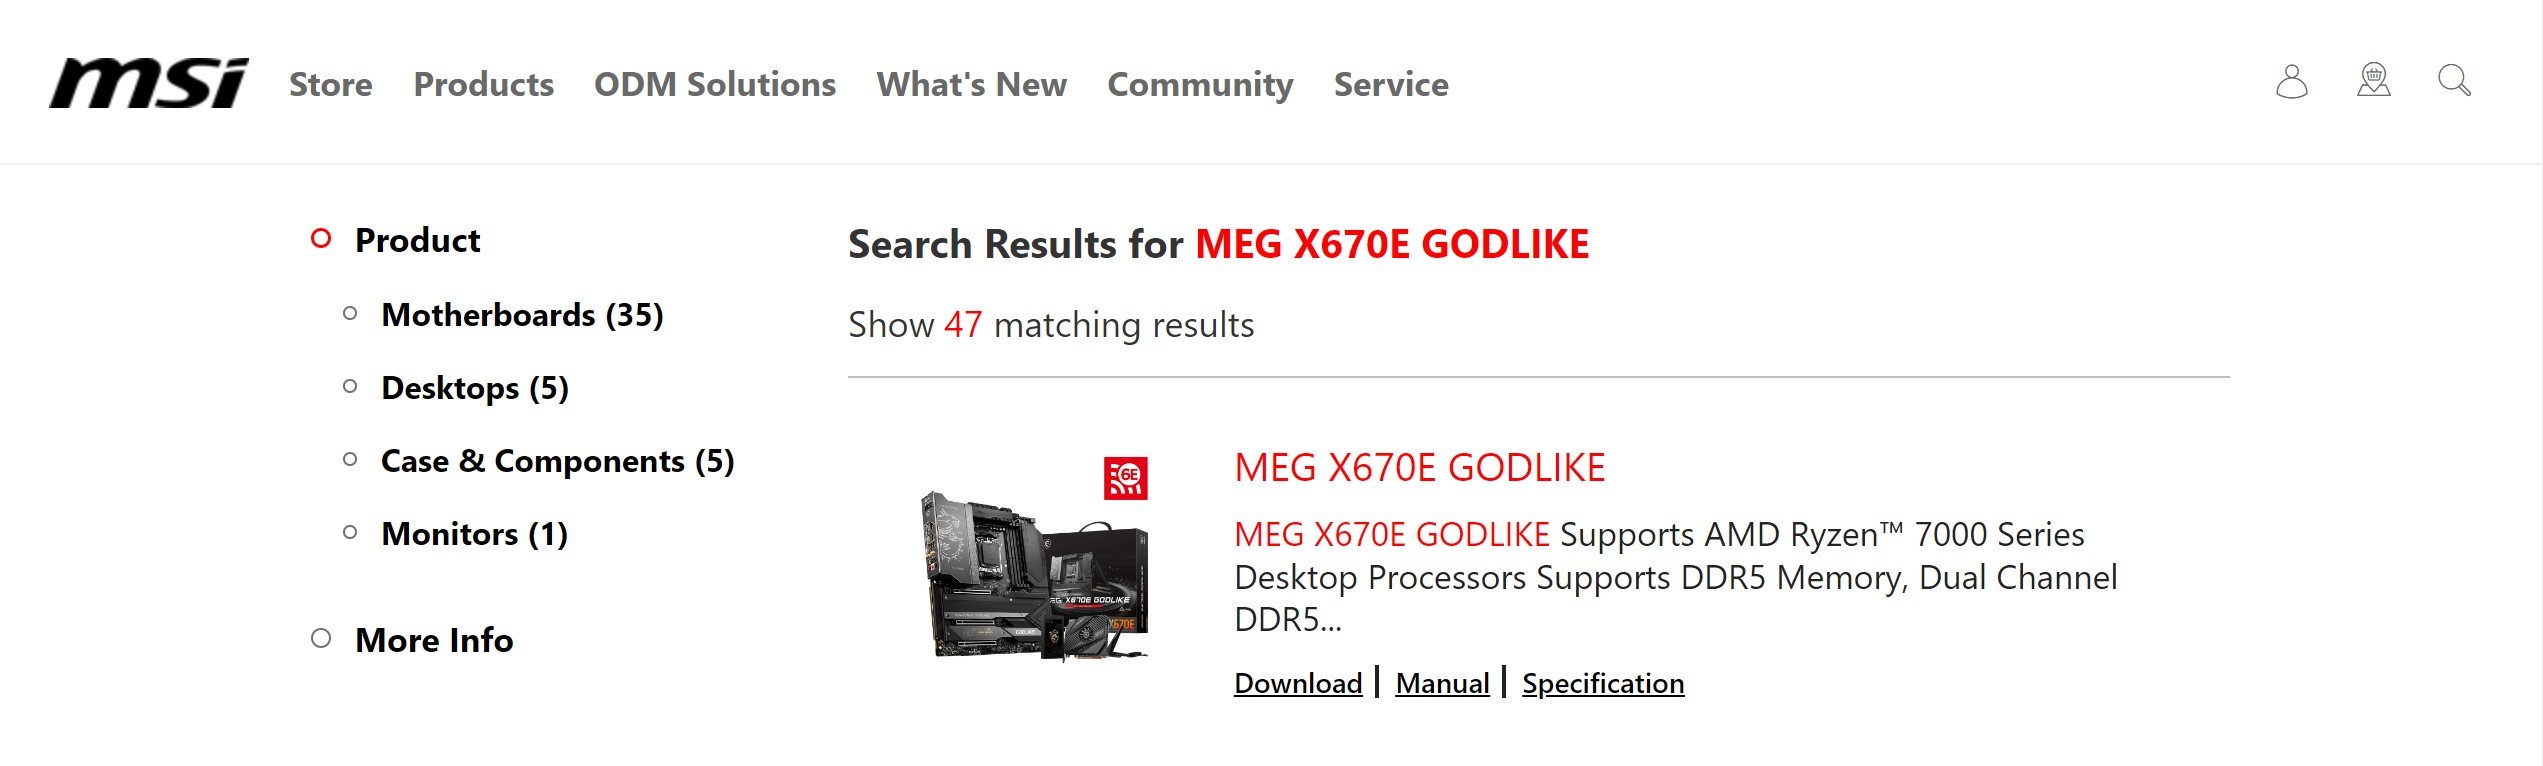
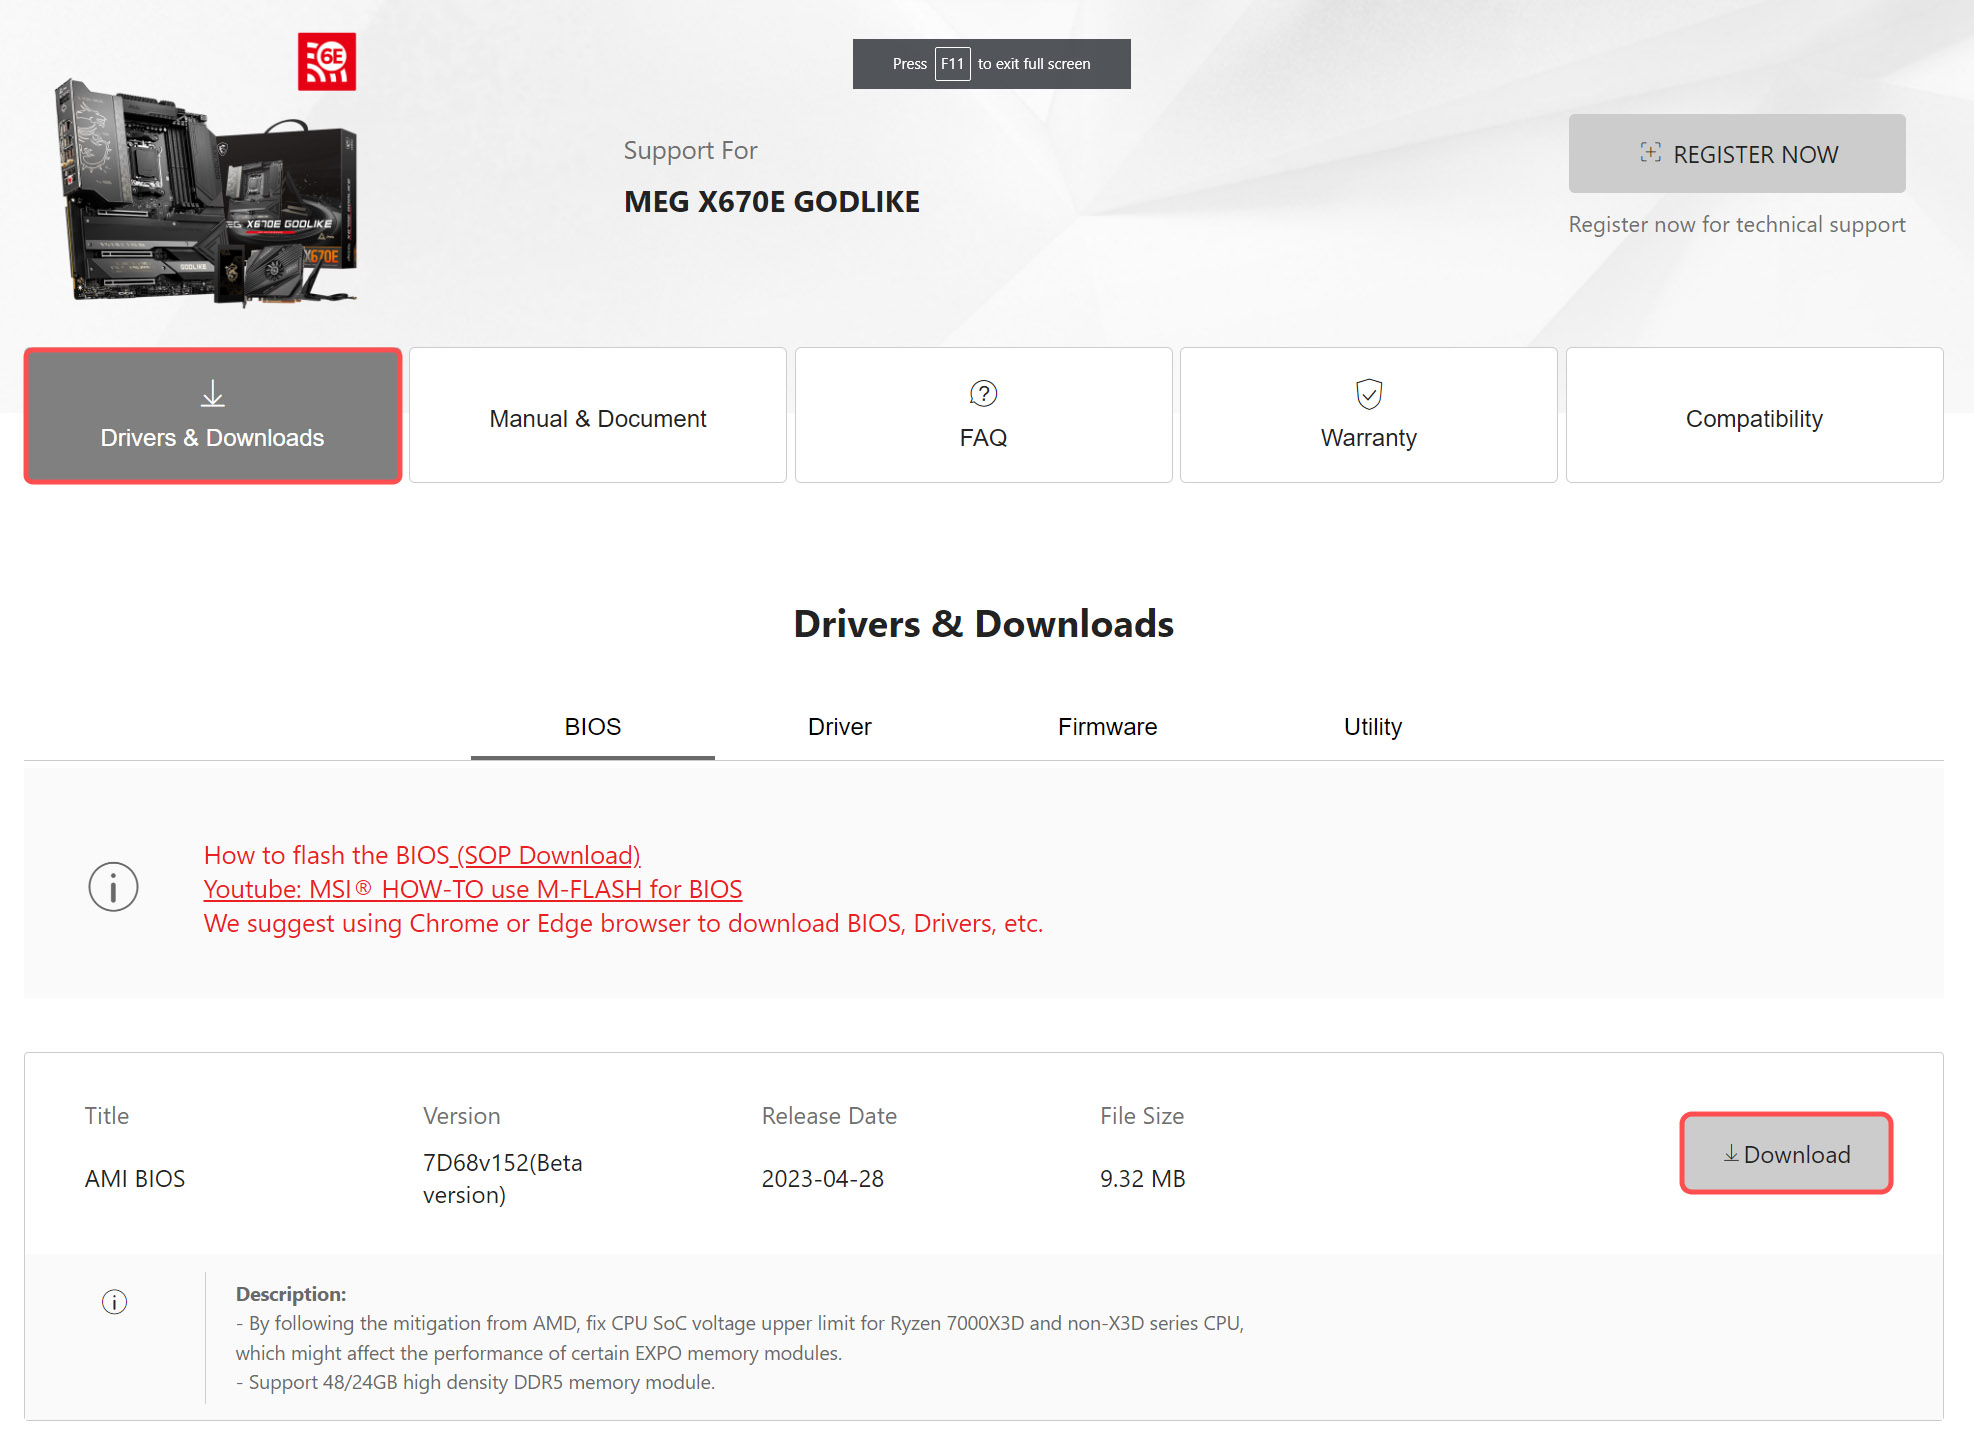
- Go to the official MSI website
- Enter your motherboard’s version into the search bar, then hit Enter
- If you entered the model name correctly, your motherboard should show up on the results page
- Select the motherboard’s “Download” tab
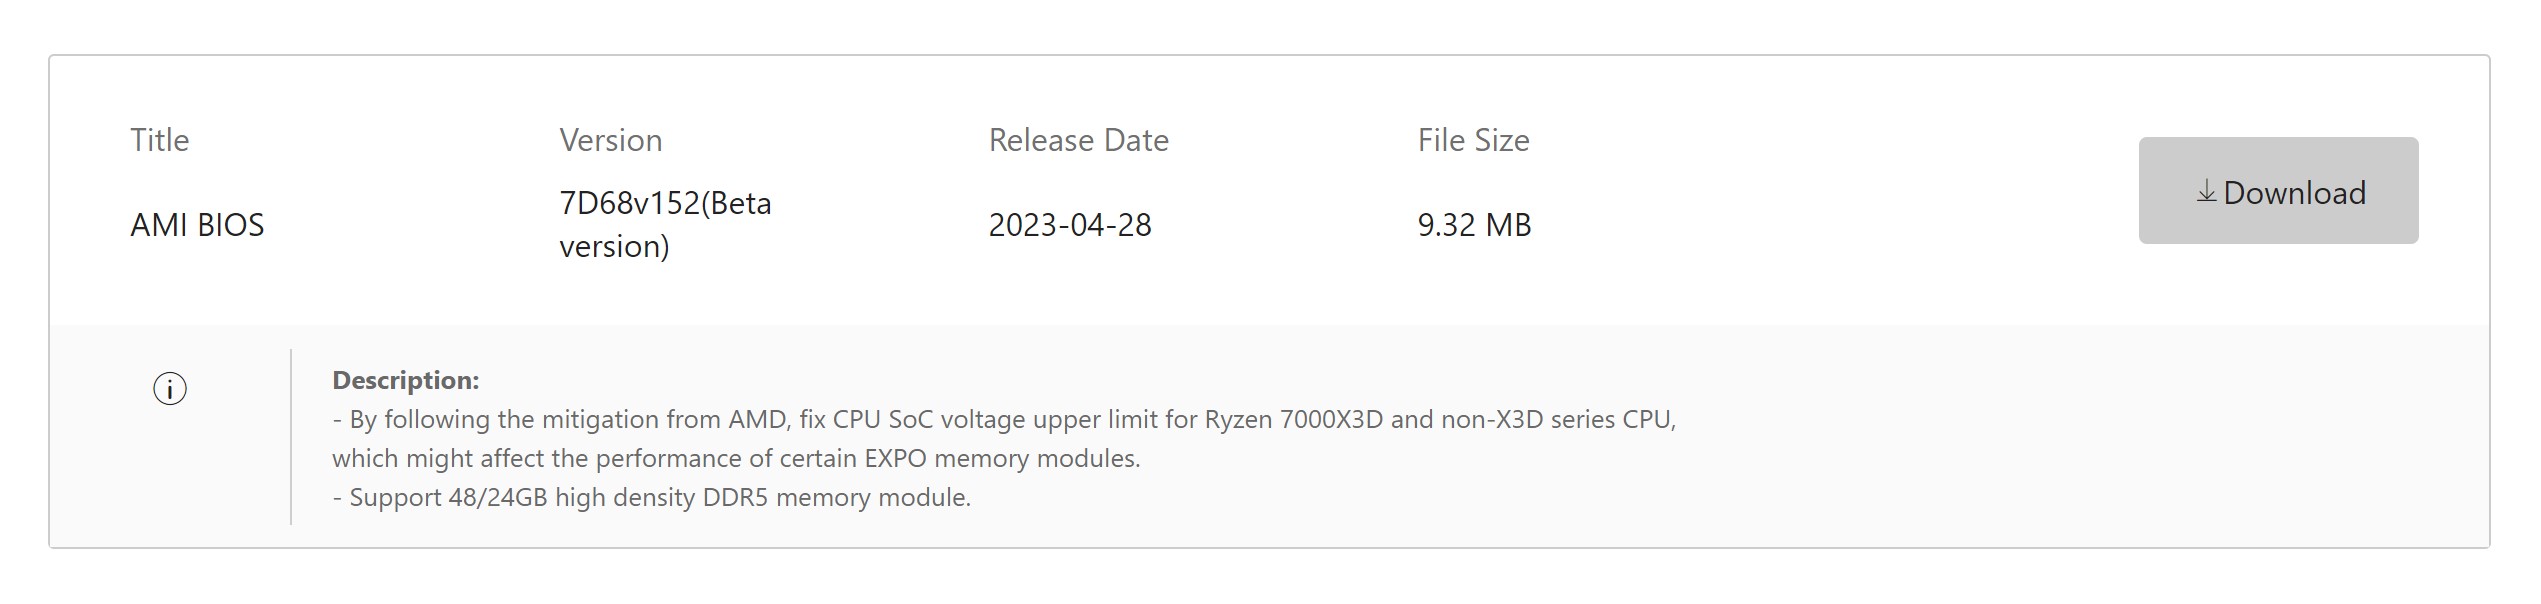
- Look for the latest BIOS file version, or whichever one best suits your needs
- Click on the download button (arrow pointing down) to start the process
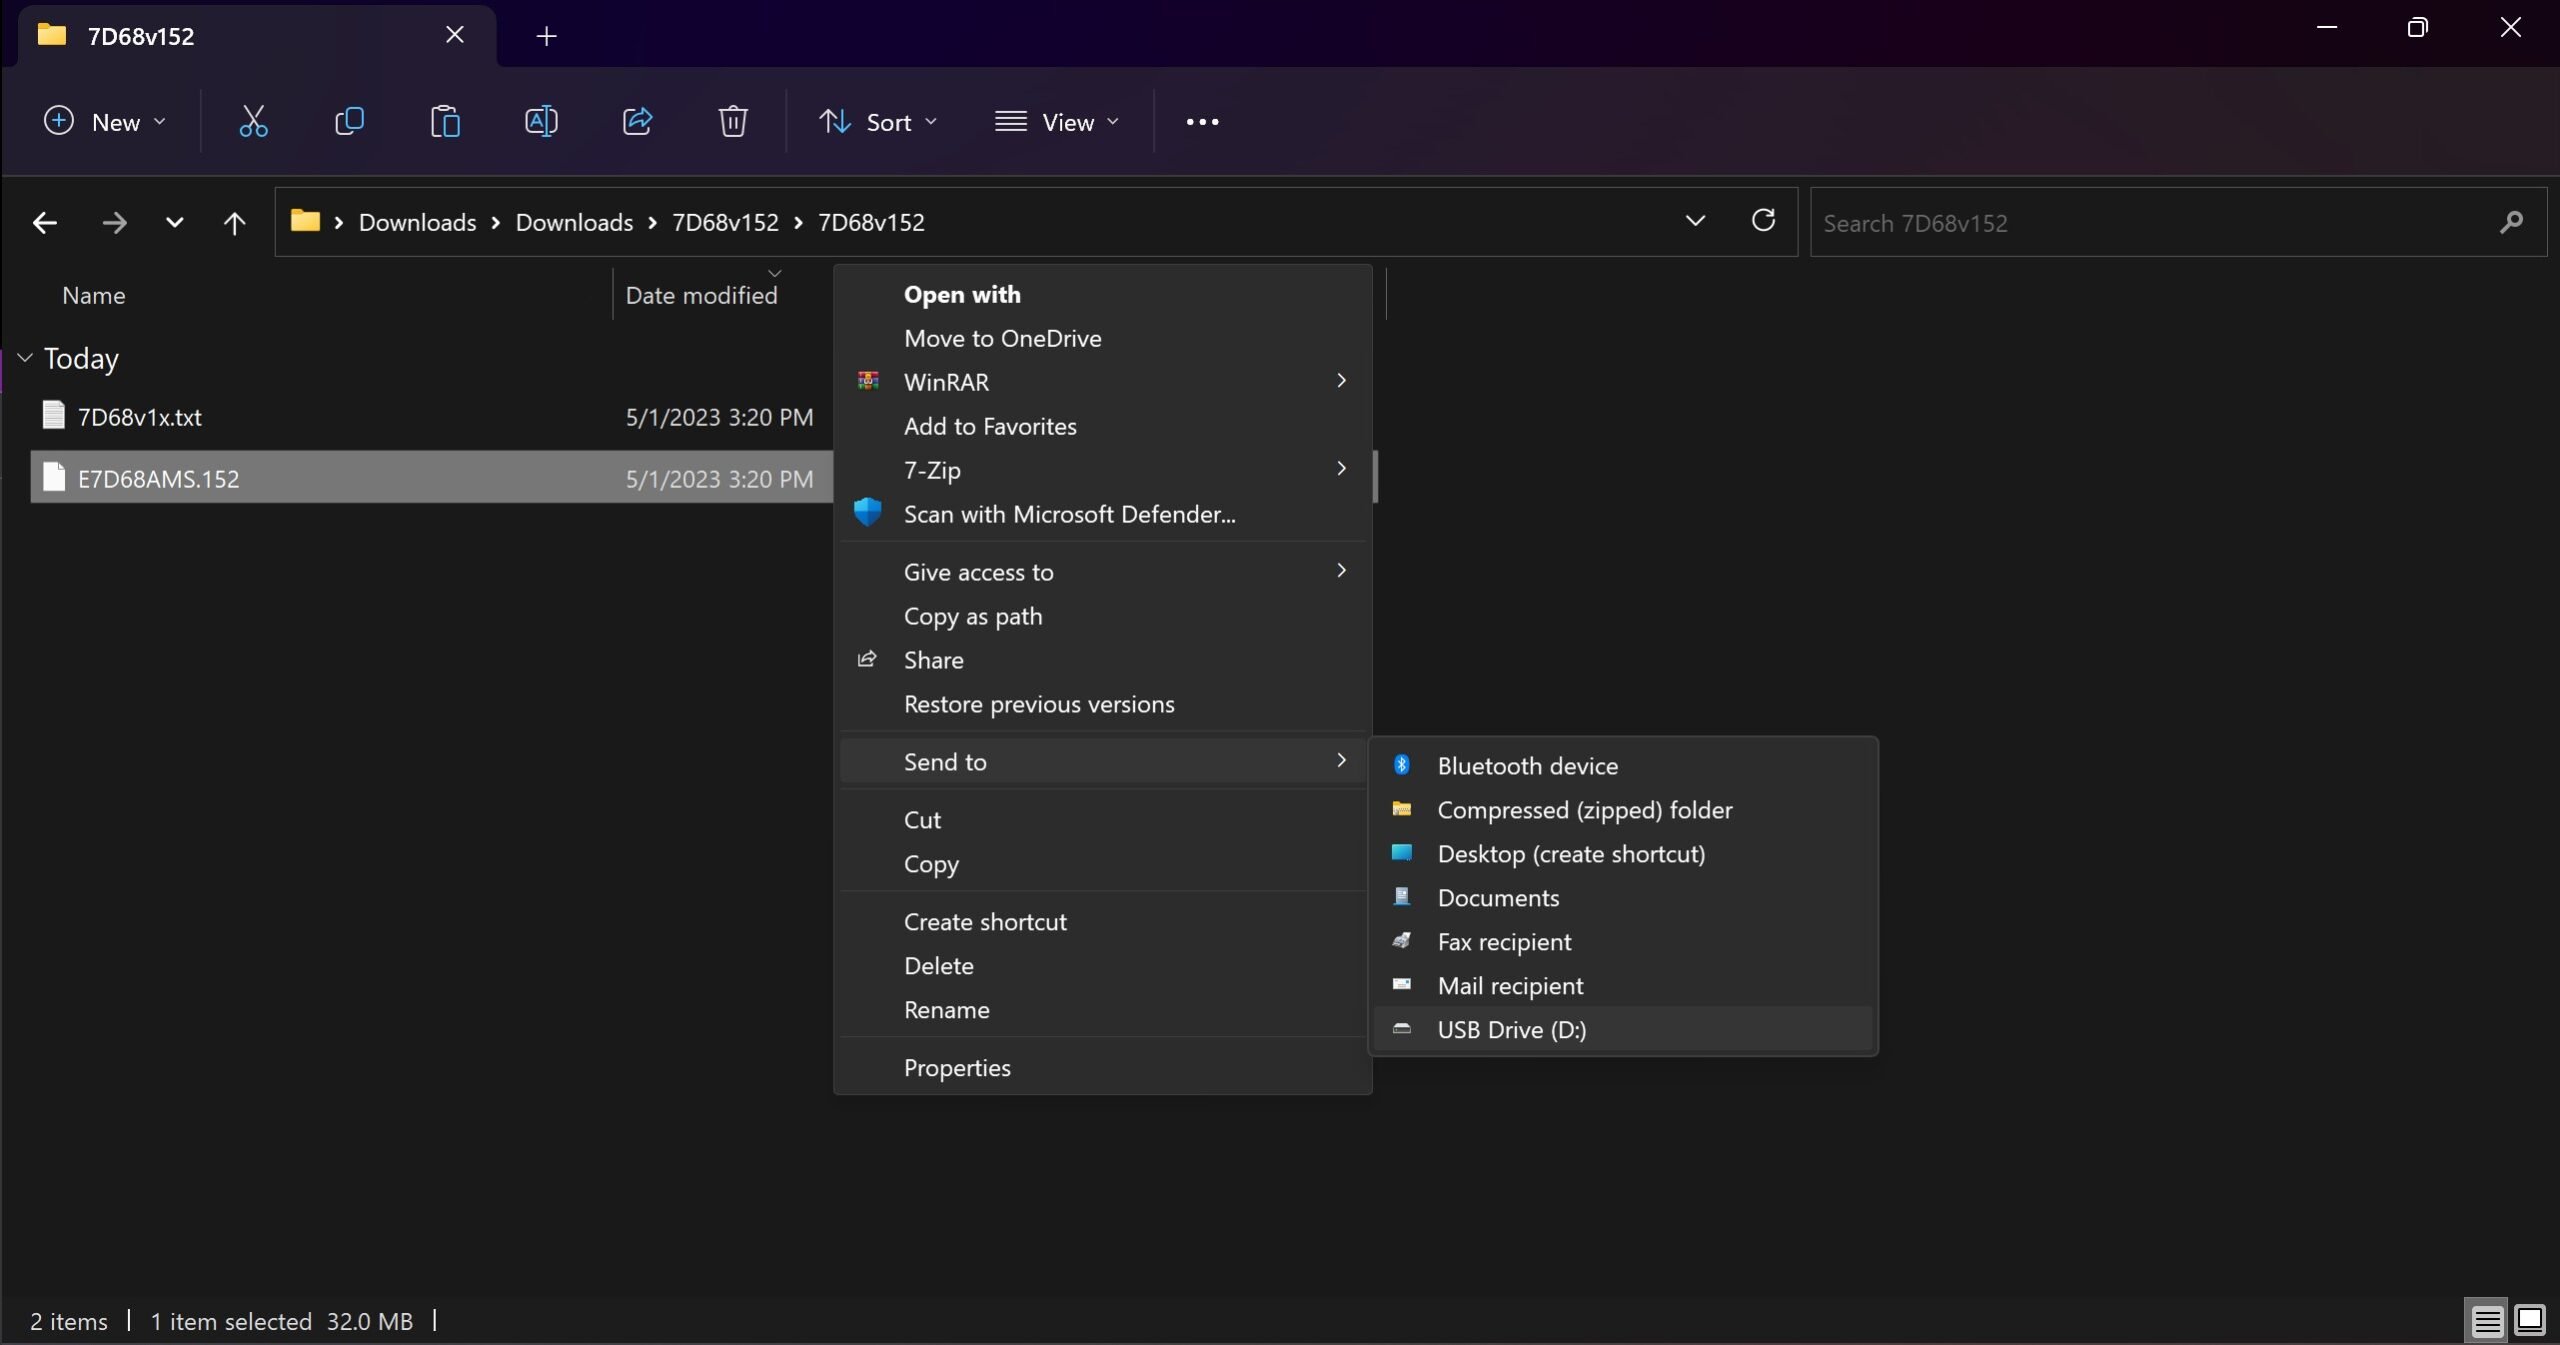
- Then, once the file has been downloaded, right-click on the file and select “Extract all”
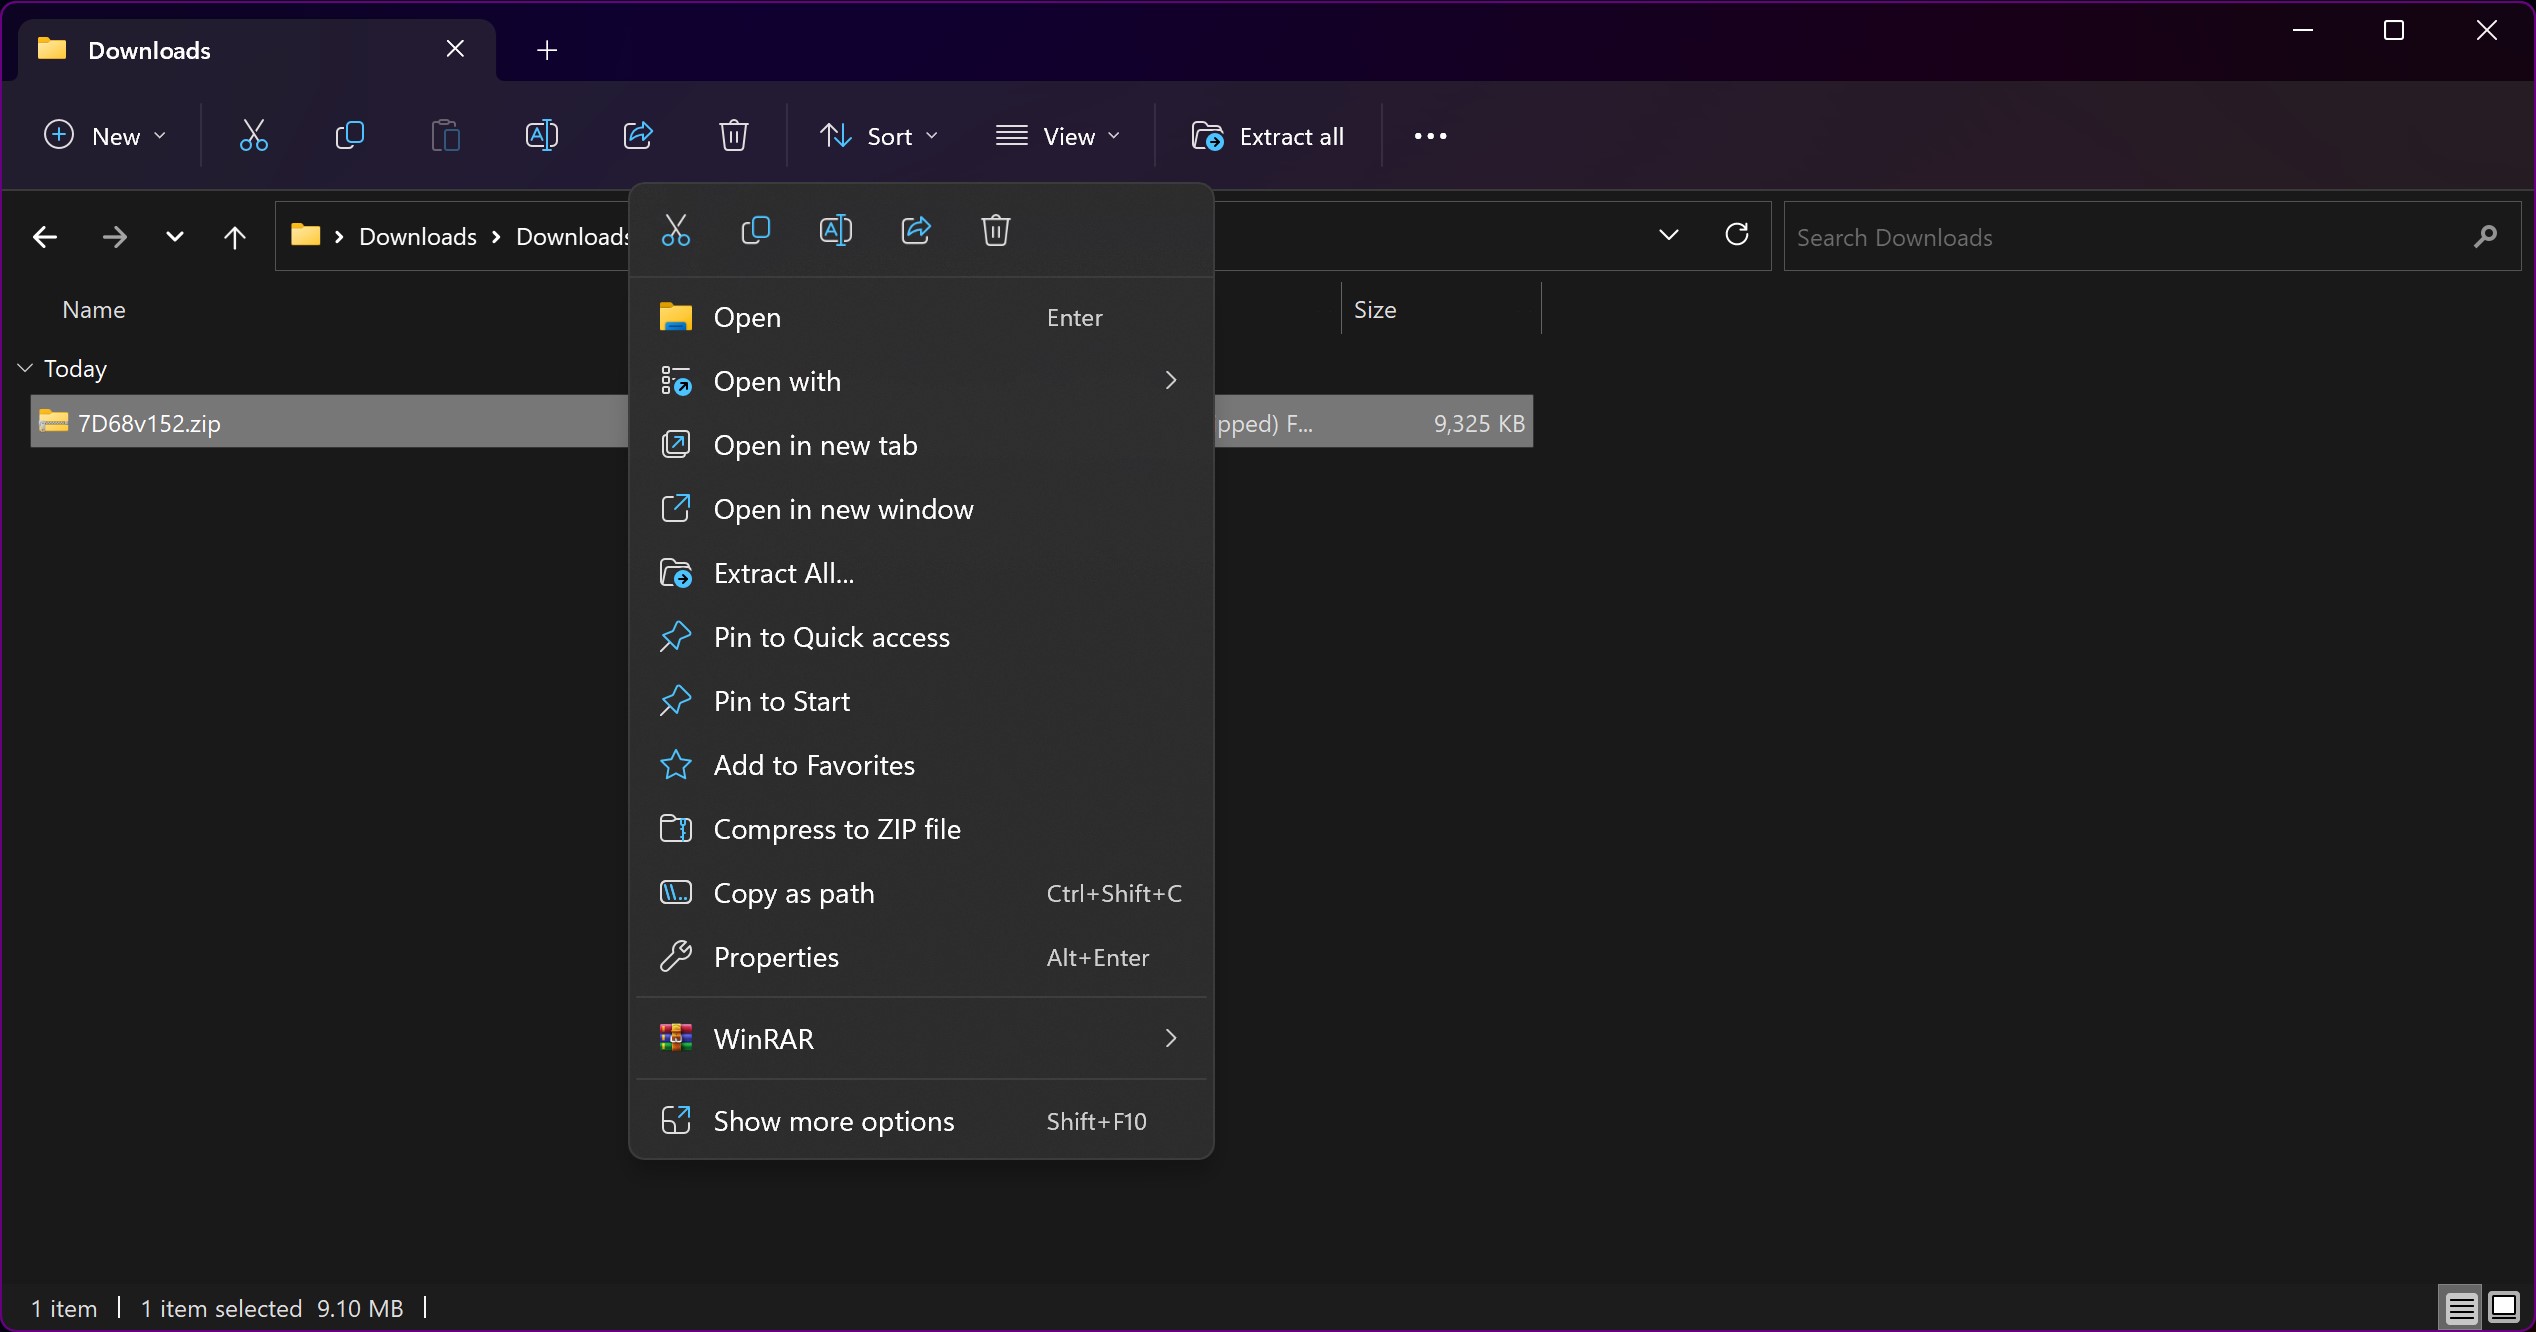

- Copy the file onto the USB flash drive

Before proceeding to the next step, it’s wise to double-check that the BIOS file has successfully been copied over to your USB flash drive.
Step 4. Updating the MSI BIOS
Now the tricky part begins — updating the actual MSI BIOS!
This is where you get into dangerous territory, so make sure to remind yourself of the safety precautions we’ve outlined above.
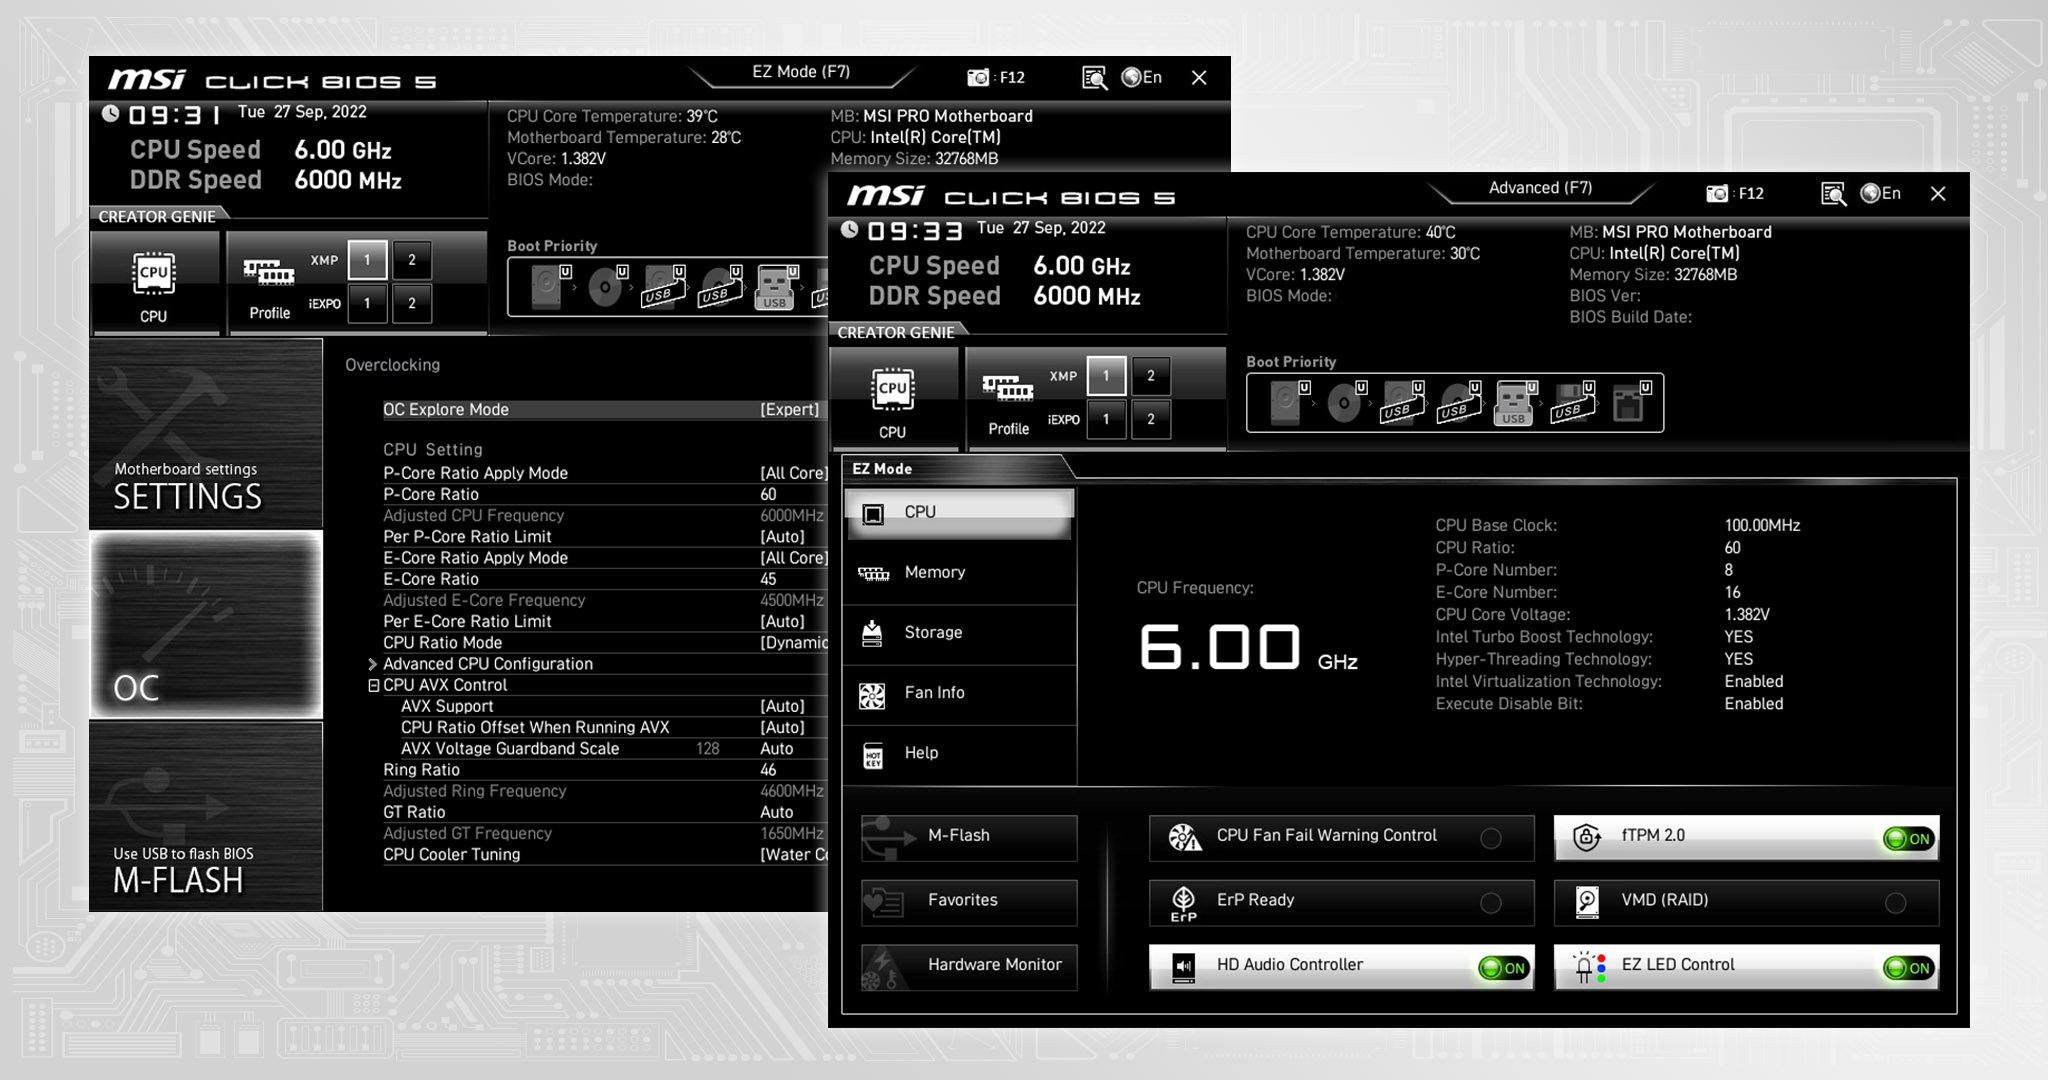
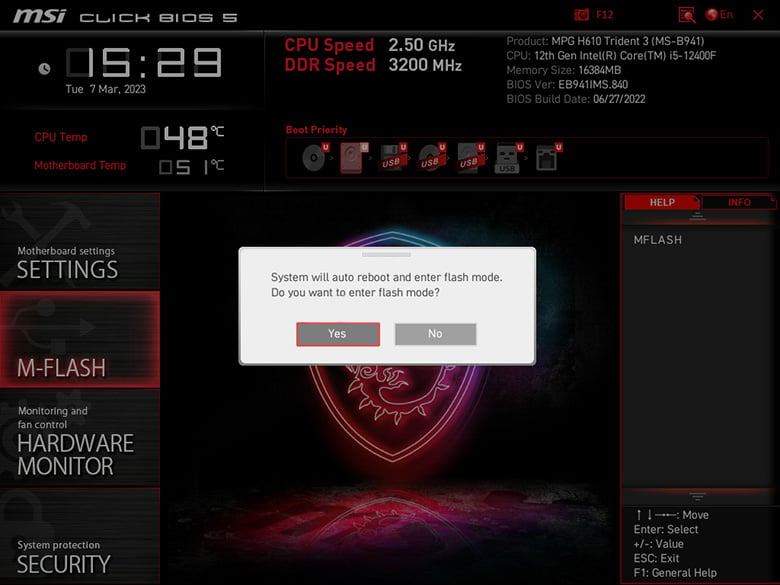
- Reboot your PC
- As soon as your PC begins loading up, hit the “Del” key repeatedly until it takes you to the BIOS menu
- Click on “M-FLASH” and select “Yes” to reboot the system in Flash mode

- After the restart into M-Flash mode completes, select the USB drive with the BIOS file
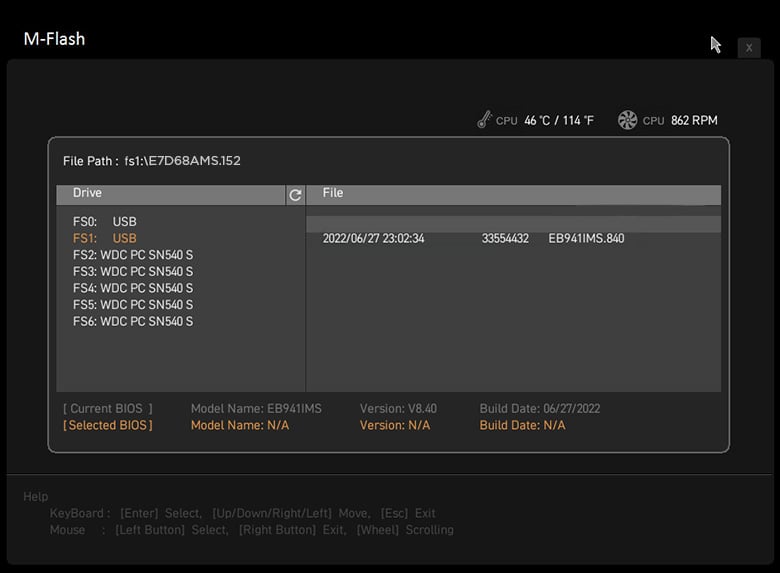

- Click on the BIOS file and hit the Enter key
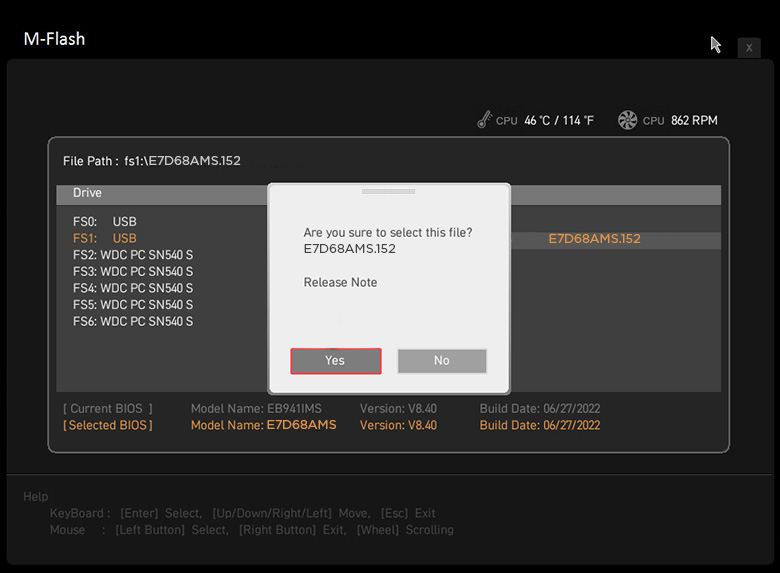
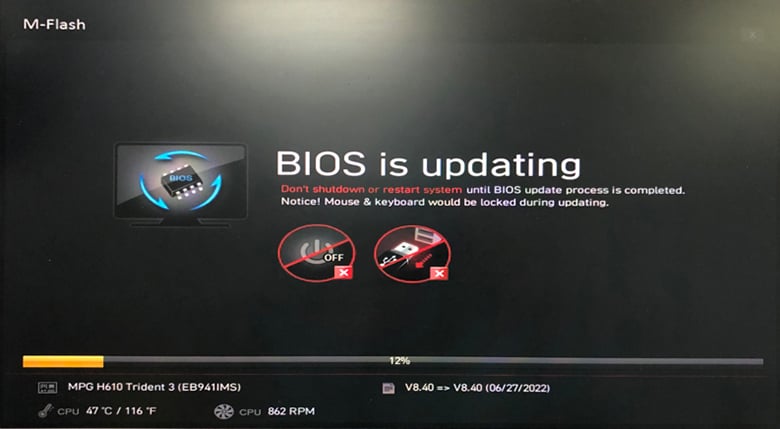
- Start the update — don’t turn off your computer or disconnect the USB flash drive during this process.
- Your PC will restart automatically once complete
- Enter the BIOS menu again to check if the latest version is now installed. You will also need to re-apply any setting changes in the BIOS menu
Hopefully, updating to the latest BIOS version has now solved whatever issue plagued your PC.
If it hasn’t, you’ll want to try out some other troubleshooting steps — you can reach out to an expert on our forum for help with your particular PC issue.
And if anything has gone wrong with the update, whether due to a sudden power cut or disconnect, don’t panic just yet! Contact your manufacturer immediately for guidance and support.
How to Update Your MSI BIOS Using Flash Button
The easiest and most convenient method to update the MSI BIOS is using M-Flash.
However, if you’re building a computer and need to update its current BIOS for hardware compatibility, then you’ll want to use the flash button within the motherboard; it allows you to update the BIOS without your PC having all its parts installed (e.g. the RAM, CPU, or video card).
- Download the necessary MSI BIOS file onto a formatted USB flash drive (refer to step 2)
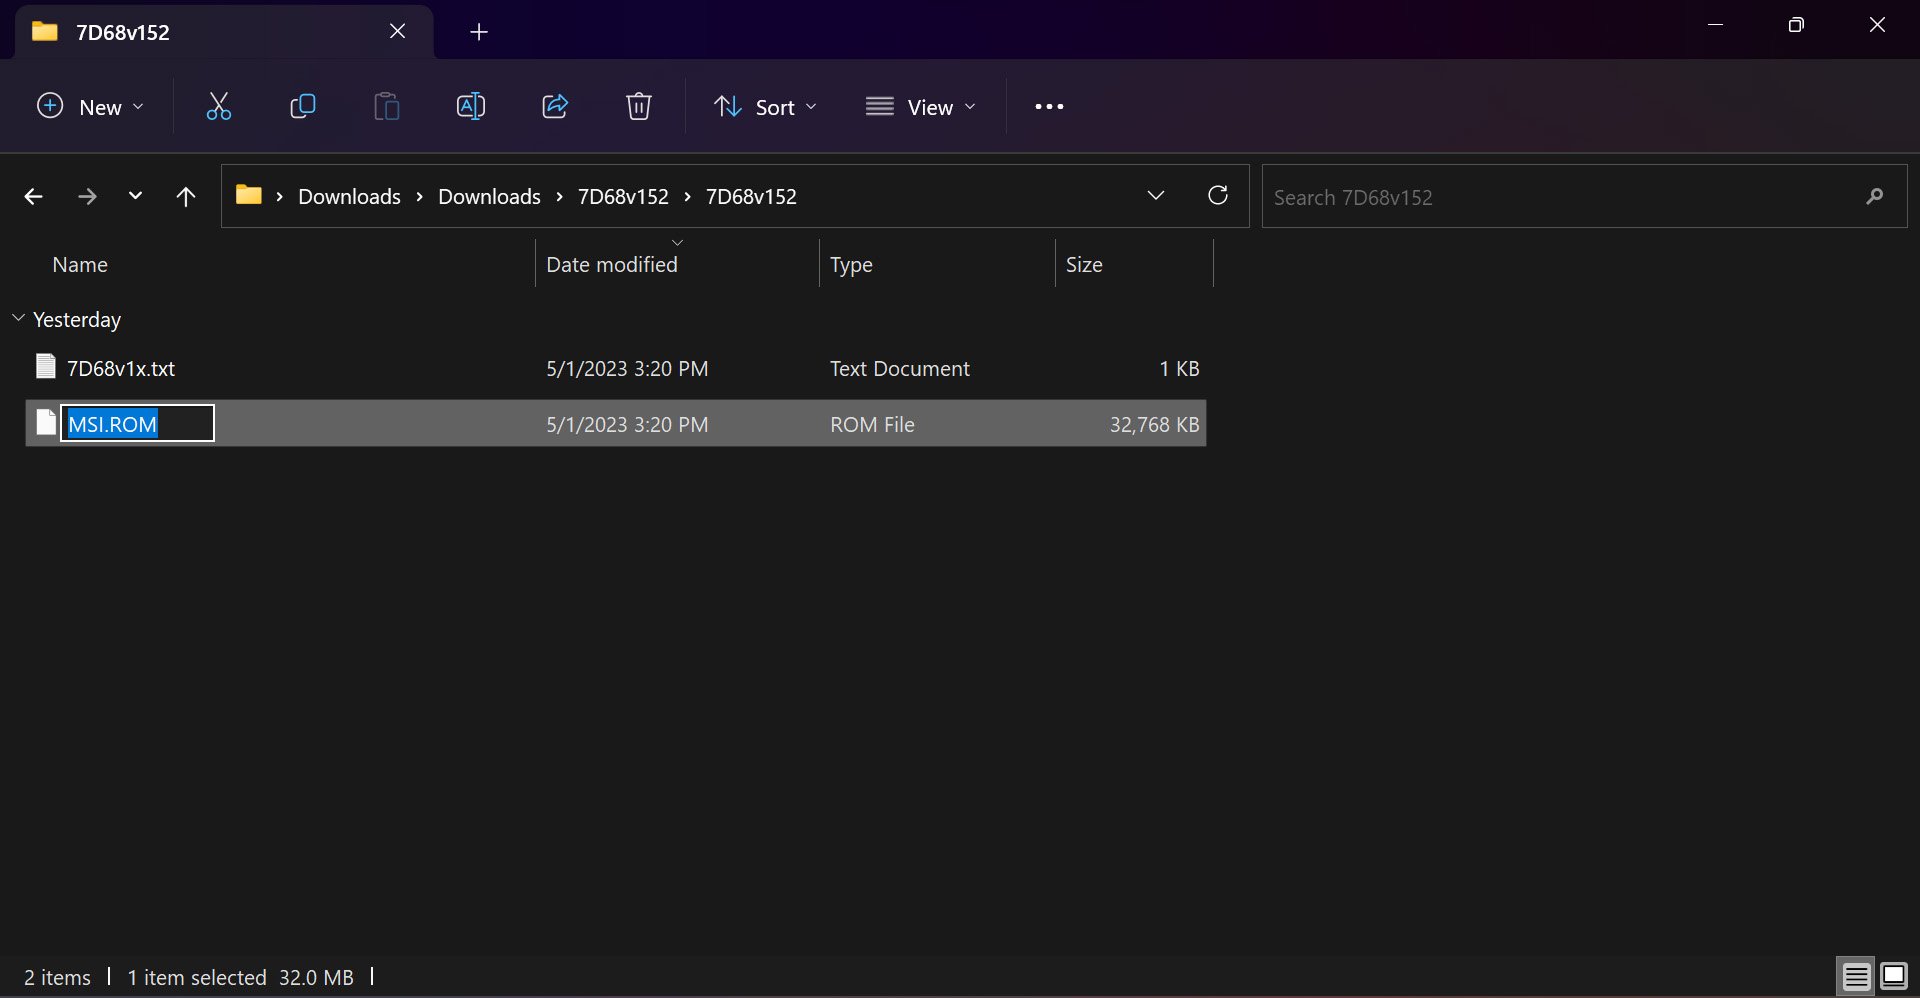
- Rename the BIOS file to “MSI.ROM” and hit “Enter” to apply the change

- Click “Yes” when the caution message appears
- Disconnect the USB flash drive
- Switch off your PC, but make sure it’s still connected to the power source
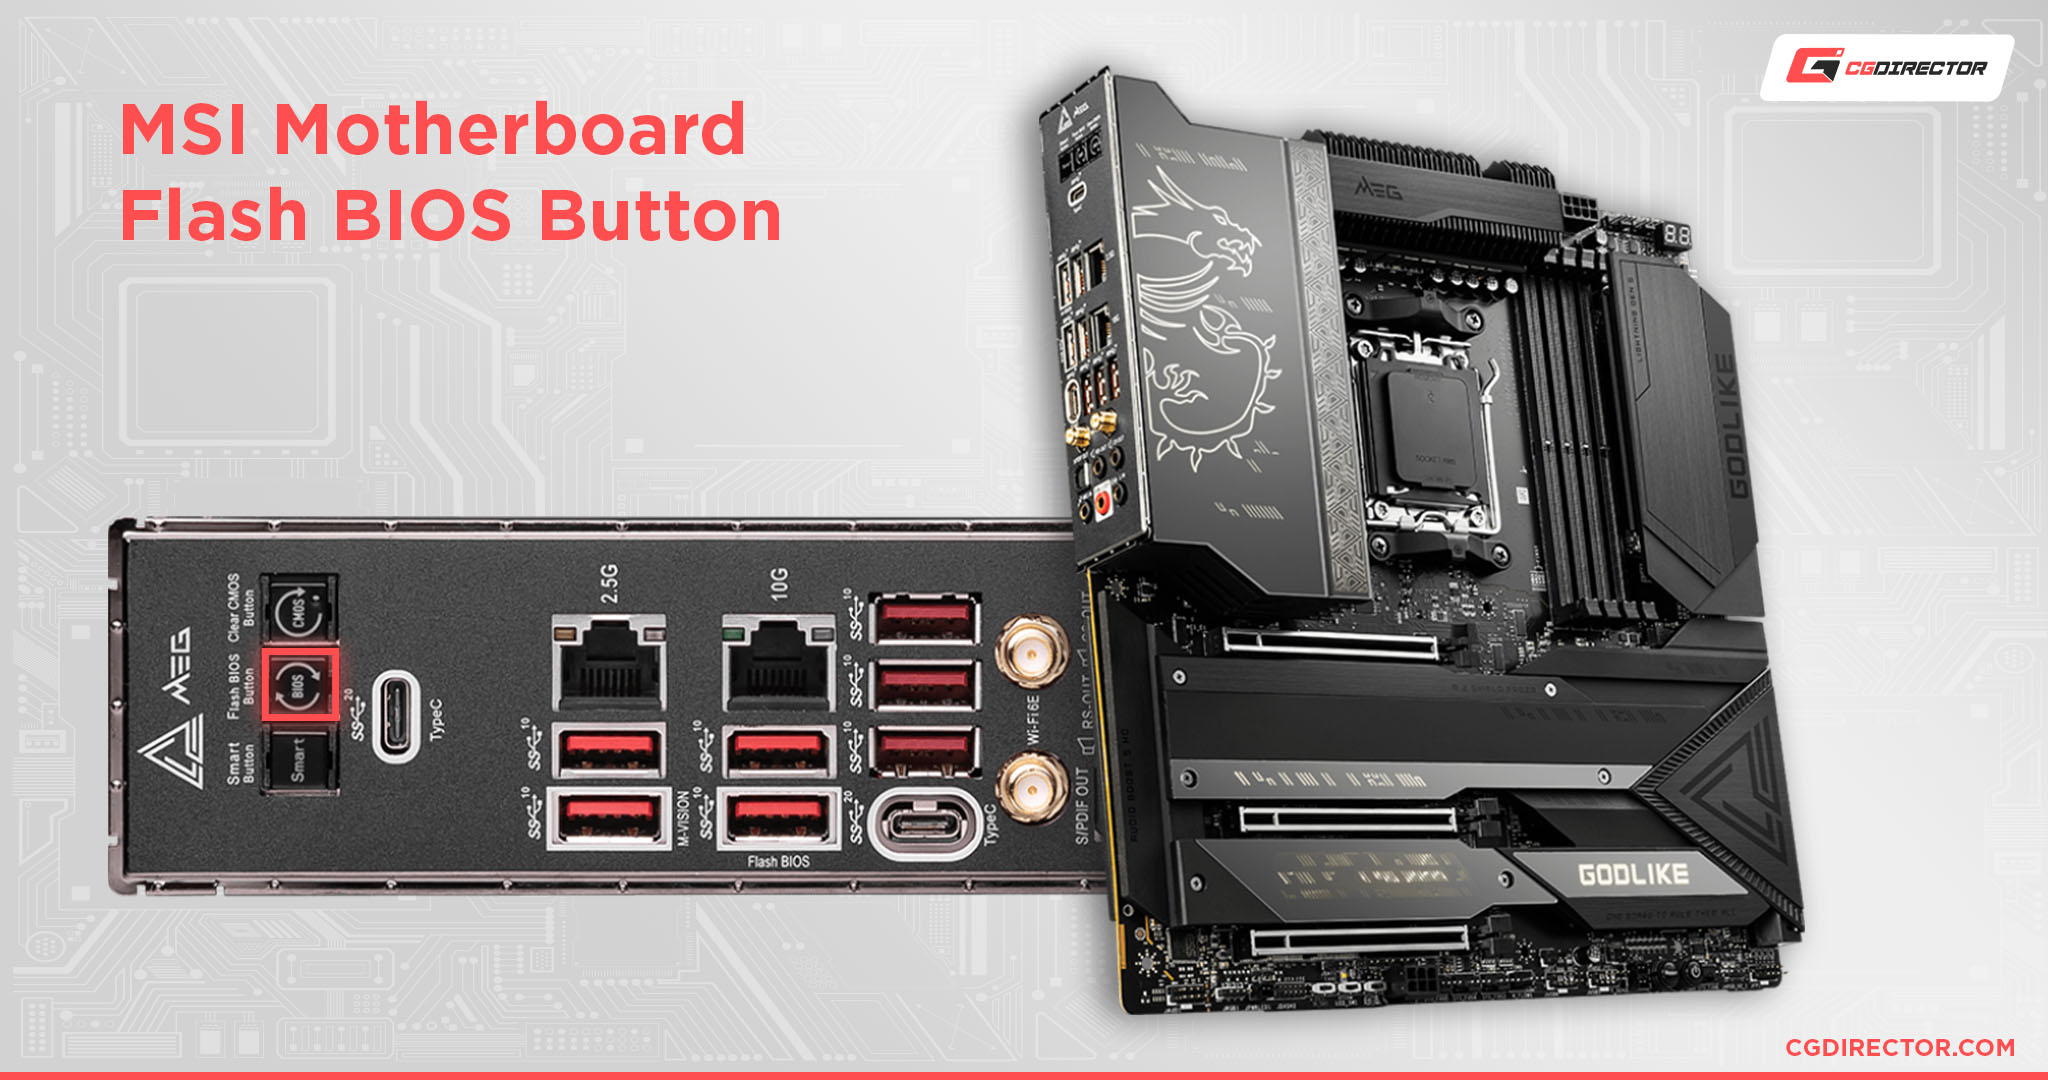
- On the motherboard look for the USB port labeled “FLASH BIOS button” (it’ll have a small button just above it). You should be able to notice it pretty easily, but you can refer to your motherboard’s manual if you can’t find it
- Connect your USB flash drive to the relevant port
- Press the flash BIOS button. If it’s working properly, it’ll start flashing and your computer will begin to boot up
- The flashing indicates that the BIOS update is in process, so make sure not to touch anything or remove the USB drive until the flashing has stopped. The process typically takes around five minutes
- Remove the USB flash drive and reboot the computer once the update is complete
- Check the BIOS version in the BIOS menu
Once the latest BIOS version is installed, you’ll finally be able to add in that swanky new CPU.
Again though, if you run into any issues while using this method, make sure to reach out to your manufacturer for assistance.
How to update Your MSI BIOS without a CPU?
Often times you’re upgrading your CPU or buying a motherboard that needs a BIOS update before it supports the new CPU you bought.
Thankfully, on most motherboards, you can update your BIOS even if you don’t have a CPU or only have an unsupported CPU.
We’ve covered how to do this in our guide right here.
FAQ
Should I Use the M-Flash Method or the Flash Button?
Generally, the easiest and most convenient method is using M-Flash, since it doesn’t require you to tinker around with your motherboard.
However, if you’re in the process of building a PC and don’t have it up and running just yet, you’ll need to use the flash button to update the MSI BIOS.
Can I Downgrade the MSI BIOS Version?
Yes — just download an older BIOS file version instead of the latest update.
MSI provides downloads for both new and old BIOS files on their official website, so you shouldn’t have a problem finding this.
Can I Update MSI BIOS Without A USB?
Yes, it’s possible to update the MSI BIOS without a USB flash drive.
You can do so using the MSI Center app (downloadable for free from the Windows store).
Open the app, go to “Support,” “Advanced” and then select “BIOS Update.” We do advise against this method though — it’s a lot more dangerous and unreliable.
Over to You
The BIOS can seem like a whole other world and one that’s brimming with dangers at every corner.
However, as long as you take the necessary precautions and follow our steps above, it should be smooth sailing. The BIOS might be scary, but updating it isn’t as complicated as most people assume!
If you have any more questions about the BIOS, or any other part of your PC for that matter, feel free to leave a comment down below. You can also share your questions on our dedicated forum.
![How To Reset An MSI BIOS? [All Possible Ways]](https://www.cgdirector.com/wp-content/uploads/media/2022/09/How-To-Reset-MSI-BIOS-All-Possible-Ways-Twitter-594x335.jpg "How To Reset An MSI BIOS? [All Possible Ways]")


2 Comments
6 October, 2023
Hi, I know this is probably a simple question, but I am fearful of having to do this process myself and am asking for clarity.
1. I am planning on using M-Flash to upgrade my bios
2. My MSI : Version: 1.10 Date: 22/7/2015 Current and last Version : 7977v1I Date : 2018-07-02
3. This article and others (and vids) keep speaking about the USB. Here is my point for clarification:
After I copy the file to the USB, do I eject it (as one vid said)?
The instruction says that I will have to “select the USB drive with the BIOS file”. When did I plug back in the USB?
What size USB am I using?
Thank you,
6 October, 2023
Hey Clare,
It doesnt really matter if you eject it or not after copying, as long as the stick is inserted into the right USB slot at the back (as indicated in the motherboard manual or sometimes printer on the io shield on the back) when you start the M-Flash / Load the BIOS Update procedure.
Hope this helps,
Alex