 by
by ![How to Use a Laptop as a Monitor [2024 Update]](https://www.cgdirector.com/wp-content/uploads/media/2023/06/How-to-Use-a-Laptop-as-a-Monitor-CGD-APR-1200x675.jpg "How to Use a Laptop as a Monitor [2024 Update]")
TABLE OF CONTENTS
An extra monitor can boost your productivity tenfold. After all, it doubles the amount of workspace, lets you effortlessly multi-task, and makes switching between tabs or documents a hassle-free experience.
Of course, an extra monitor isn’t exactly cheap — most retail at a price between $100 to $500, with some, specced-out monitors even reaching a retail price of over $1,000.
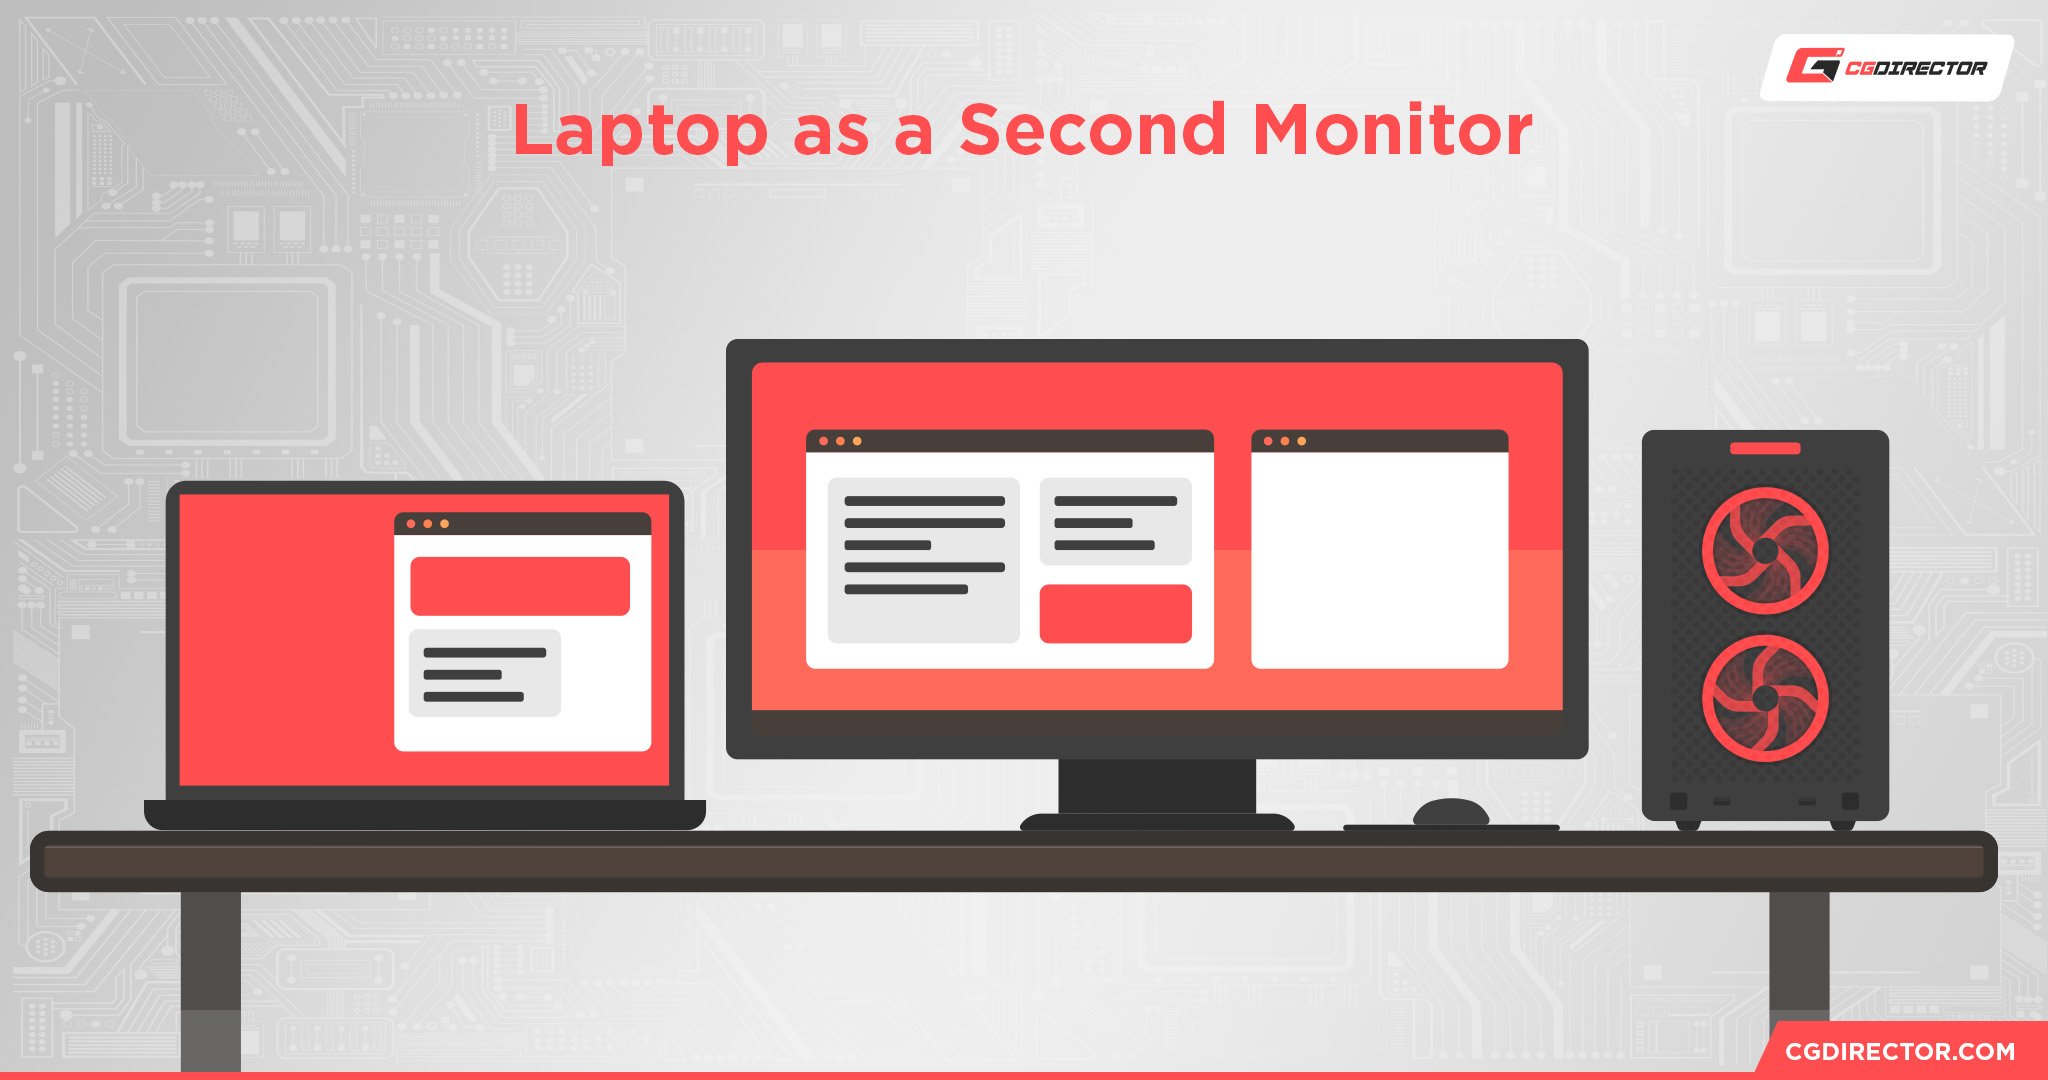
But you’ll be pleased to know that you don’t have to give up your dream for a dual-monitor experience. You can actually repurpose your old laptop into a monitor for your PC.
It’s super easy to do, even for someone that isn’t a tech wiz. We’ll cover the step-by-step process below, and also answer some common questions about dual-monitor setups.
Let’s dive in!
How Can I Benefit From a Second Monitor?
A second monitor can be a total game-changer. Chances are, once you experience a dual display setup, you won’t want to use a PC without it ever again!
Some of the benefits it offers include:
- Complex Applications can be spread across multiple monitors for more efficient work. E.g. Video Editing Footage Preview on one, your editing timeline on the secondary monitor
- Ability to watch a video, lecture, or meeting on one display while you work on the other
- Lessens the need to switch between various sites while researching
- Ability to easily view and compare multiple documents, tabs, or programs side-by-side
- Aesthetic value; can use one of the displays solely for wallpapers or videos
- Can extend the screen to provide a more immersive experience
- Makes collaborating with colleagues while using a video conferencing tool an effortless experience
- Easier to organize your workspace
Unsurprisingly, all of these factors can help increase your productivity — in fact, studies have even shown that the average productivity increases by 42% when people work with two monitors instead of one.
How to Use a Laptop as a Monitor — Easiest Methods for Windows and Mac
A laptop isn’t the first thing that comes to mind when you think about a second monitor. And this is pretty understandable. Unlike external monitors, you can’t just connect your PC to a laptop with an HDMI cable.
Most laptops only come with a video output port, not an input port. Meaning, you can output your laptop screen information to an external monitor, but you can’t then use it as a video input for other devices.
There are some laptops that have this feature, like the Alienware M17x R4, though this is incredibly rare.
So, if an HDMI or other directly connected display cable is out of the question, how exactly can a laptop be used as a second monitor?
It’s pretty simple: you cast the device’s screen to your laptop by using a wireless streaming protocol. We’ll first explain how to go about this process on a Windows device:
1. How to Use a Laptop as a Monitor on Windows Using Miracast
The easiest and simplest method is to use Windows’ built-in Miracast feature.
For those not familiar, Miracast is a wireless technology that can be used to cast your PC’s screen onto a compatible device.
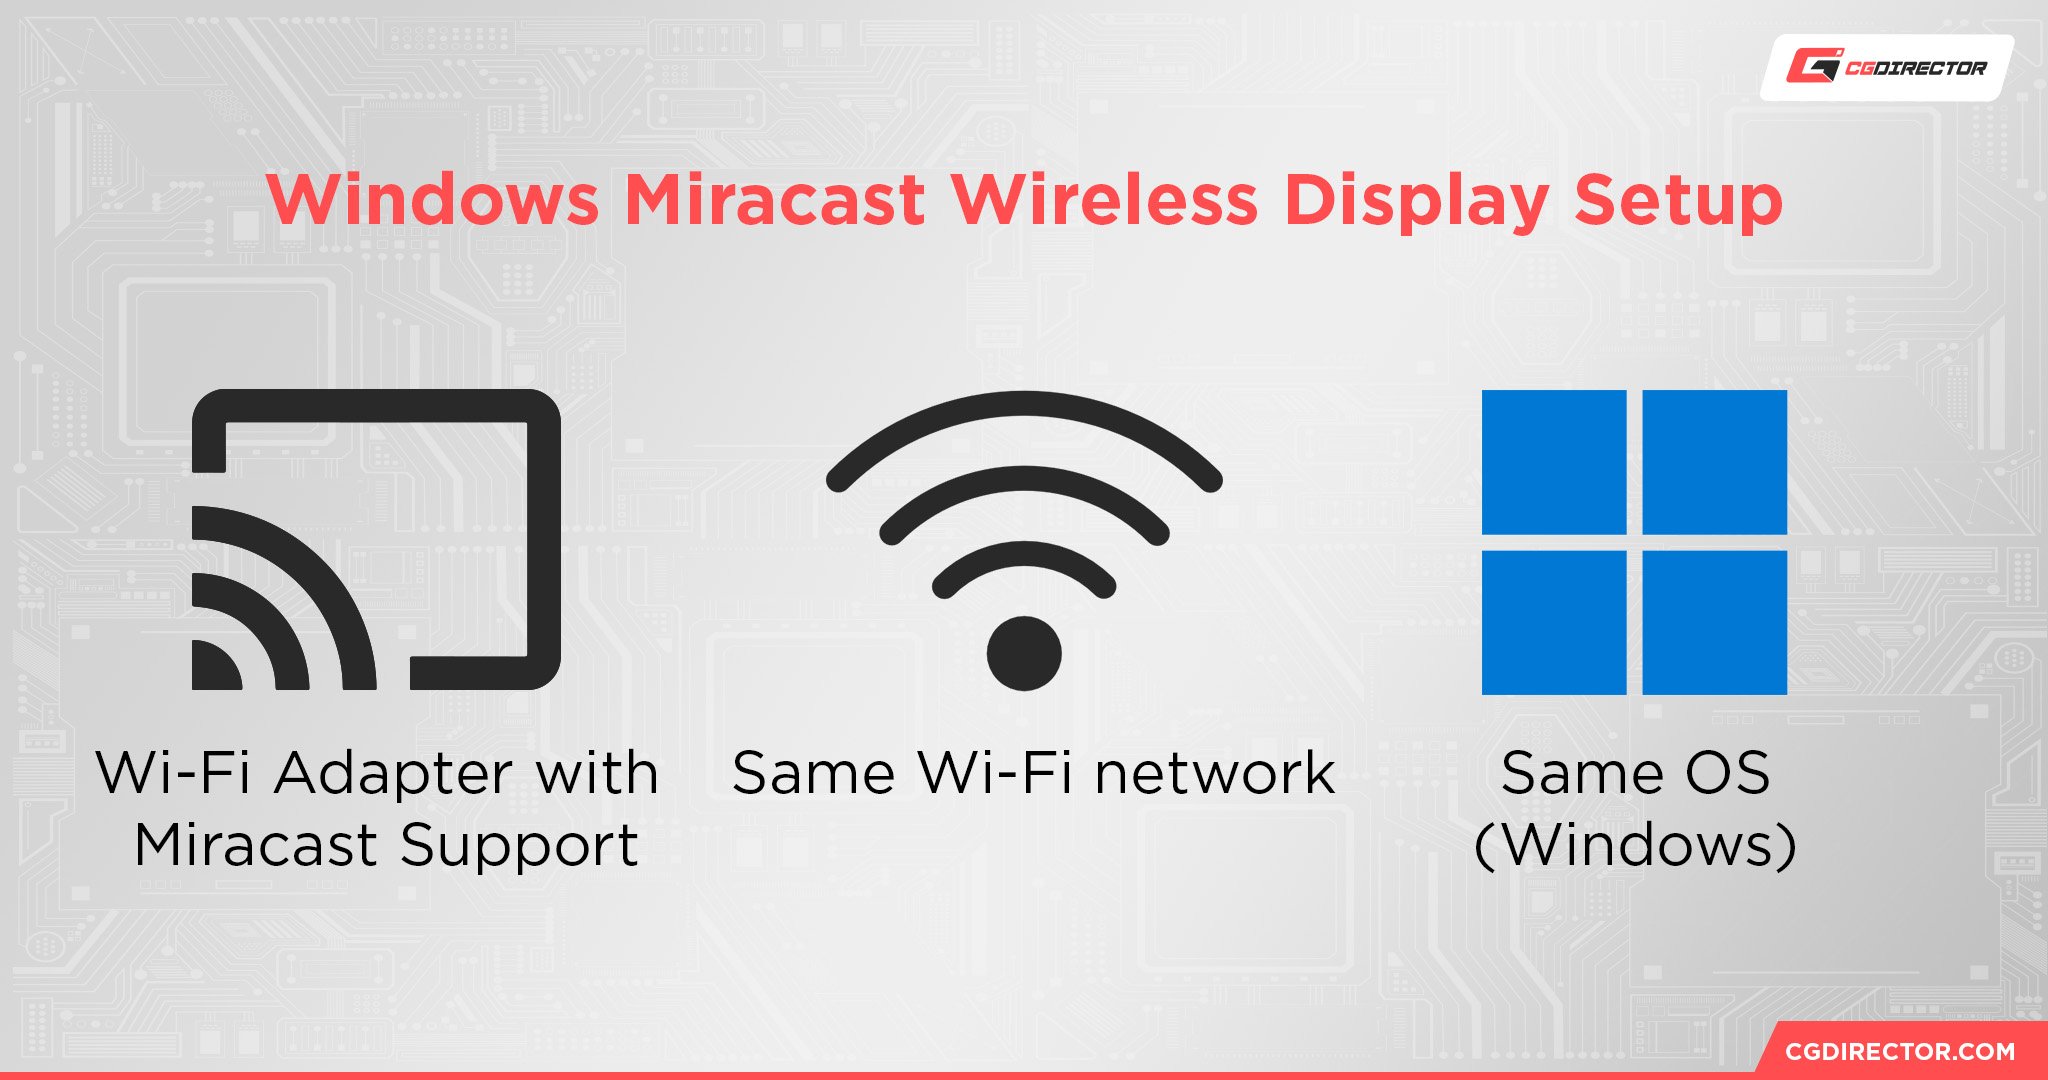
Most modern Windows devices running 8.1 or later support this technology, though there are a few requirements.
Your devices must:
- A WiFi adapter that supports Miracast
- Be connected to the same WiFi network
- Run the same operating system (Windows)
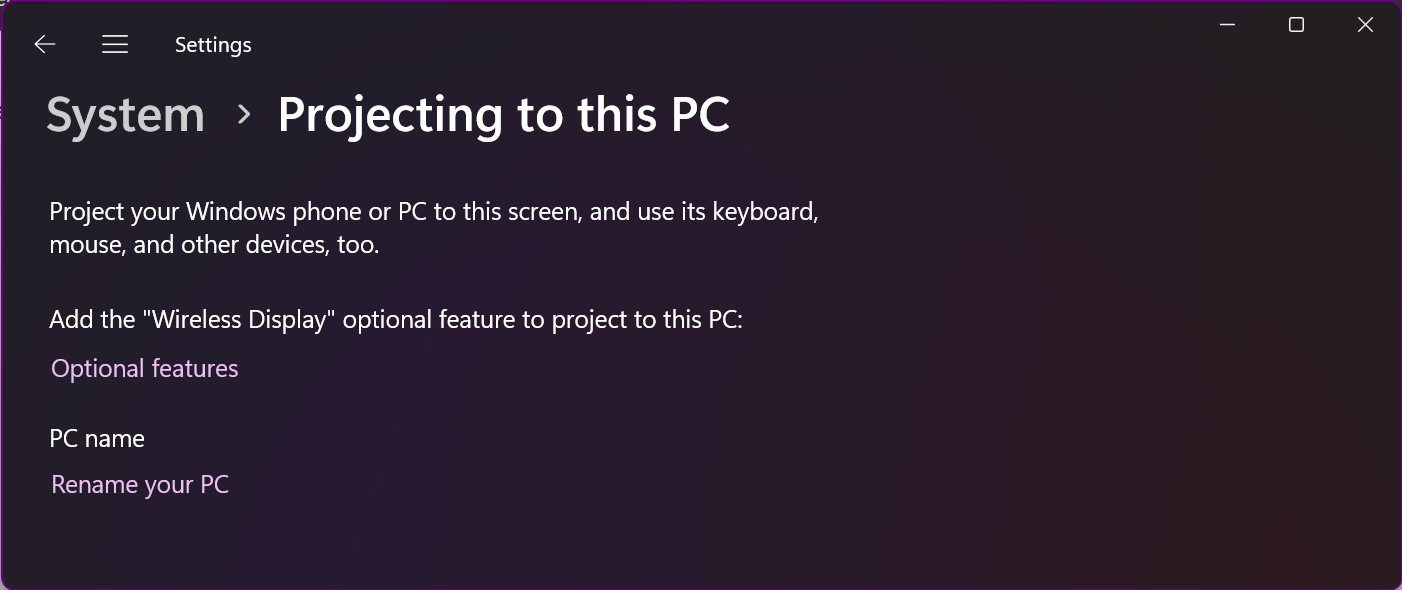
You can easily check if your laptop is compatible in the Windows “Settings Panel:”
- Hold down the “Win” and “I” keys simultaneously
- Navigate to the “System” tab and scroll down to the “Projecting to this PC” option
If your device is compatible with Miracast, it’ll show you the options to set up a wireless display.
If you get the “Add the Wireless Display” message, you’ll need to first manually install the Wireless Display feature to use Miracast.
The installation is a simple process and only takes a few minutes:
- Click on the “Optional Features” text

- Select the “View Features” button in the “Add an Optional Feature” box at the top
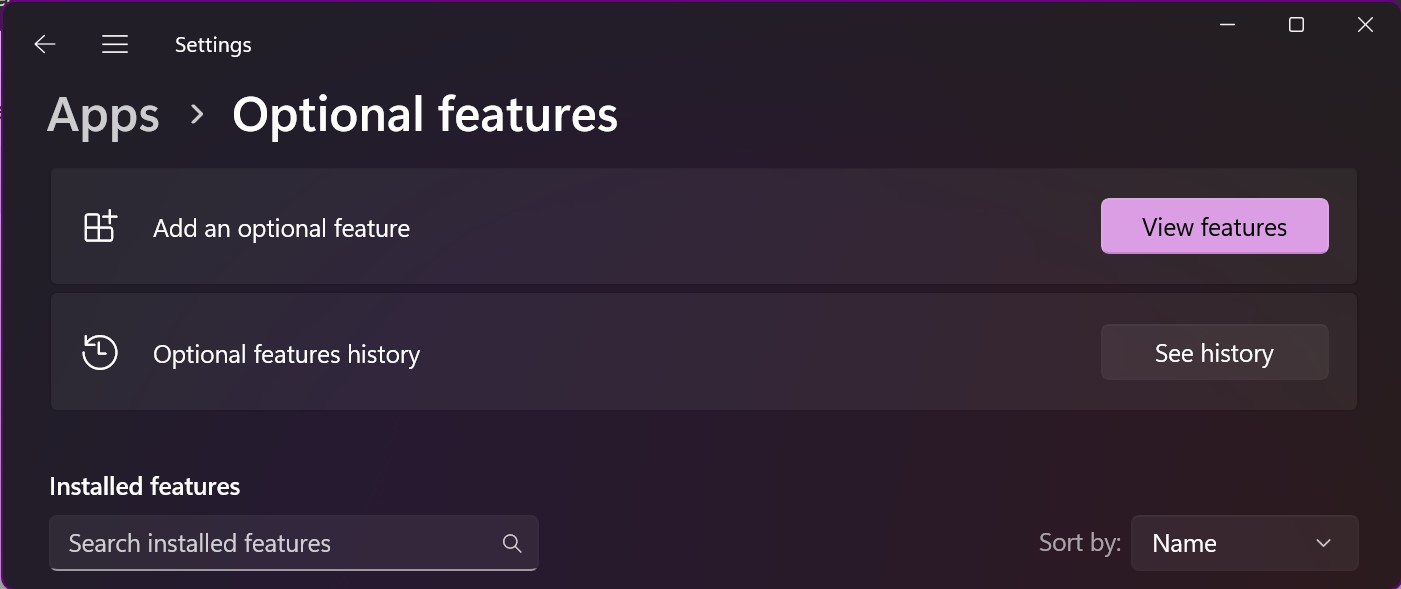

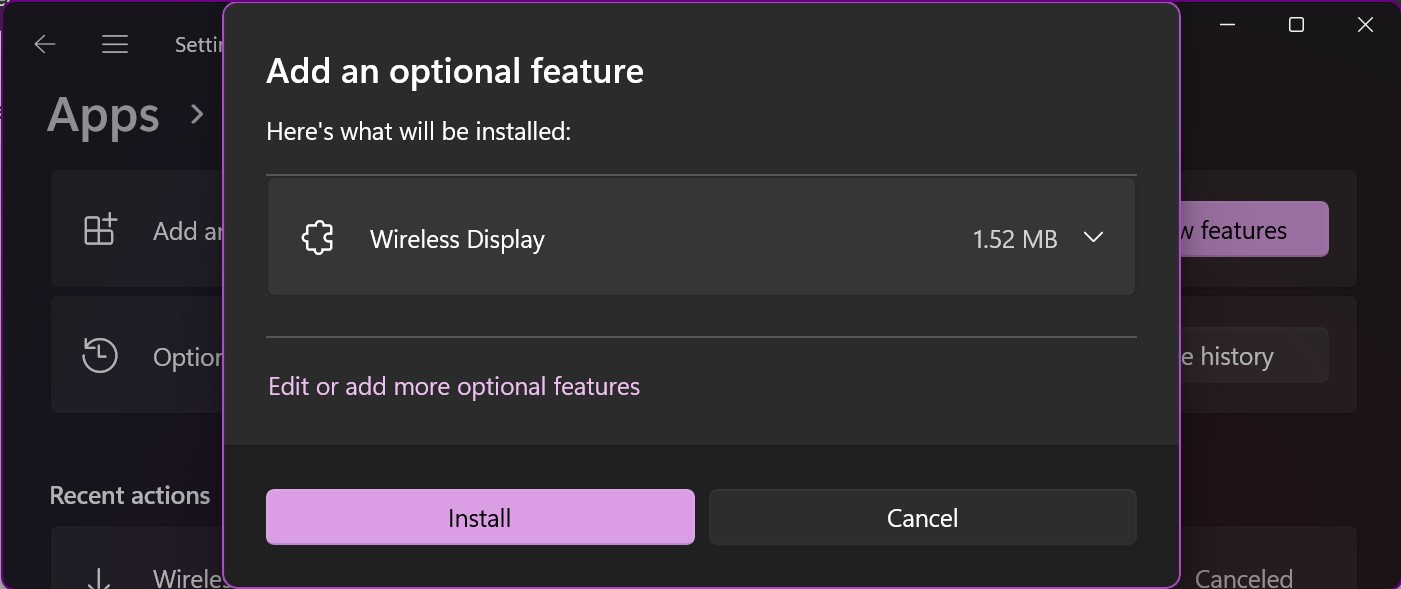
- Search for “Wireless Display,” then click on it and hit the “Next” button
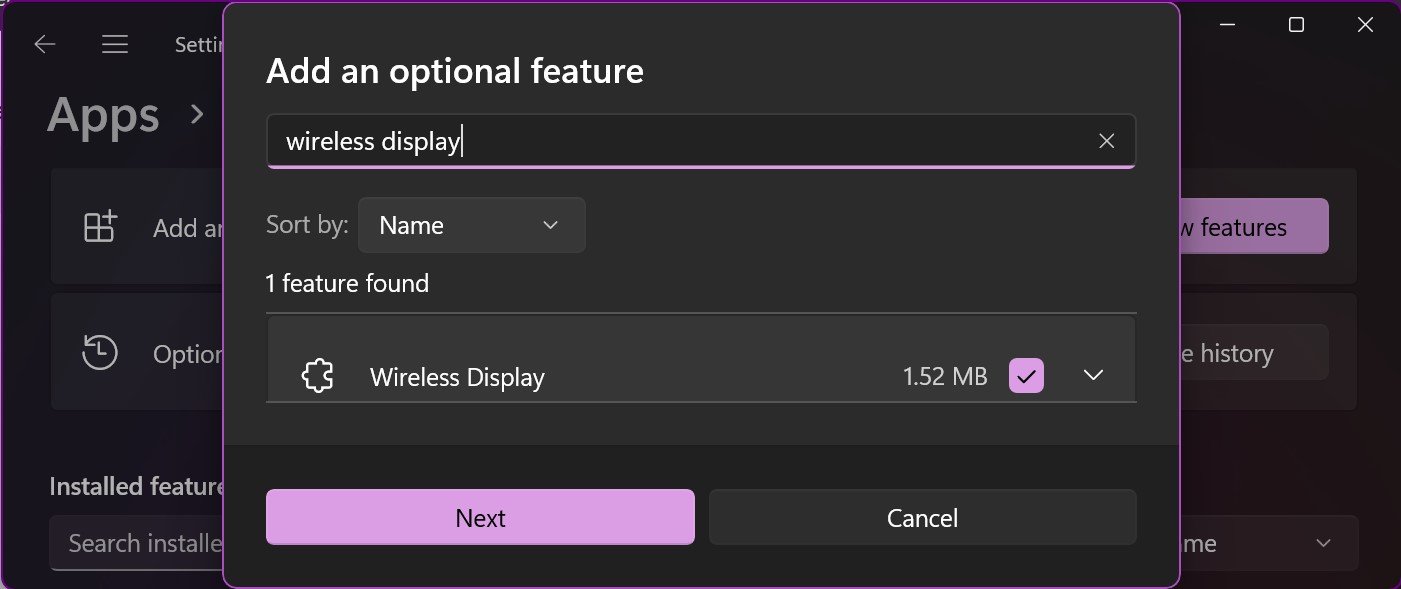
- Click “Install”
If your device isn’t compatible with Miracast, it won’t show you these options and will instead show a message saying: “This device doesn’t support receiving Miracast, so you can’t project to it wirelessly.”
If you experience this issue, your best bet is to try using a third-party program, which we discuss later on in this article.
Setting up and Configuring Miracast
Great! You’ve determined that your devices support Miracast.
Now it’s time to set it up and configure your laptop as a second monitor. This process will only take a few minutes, and while some of the options may seem confusing, don’t worry as we’ll explain everything below.
Here are the steps to follow:
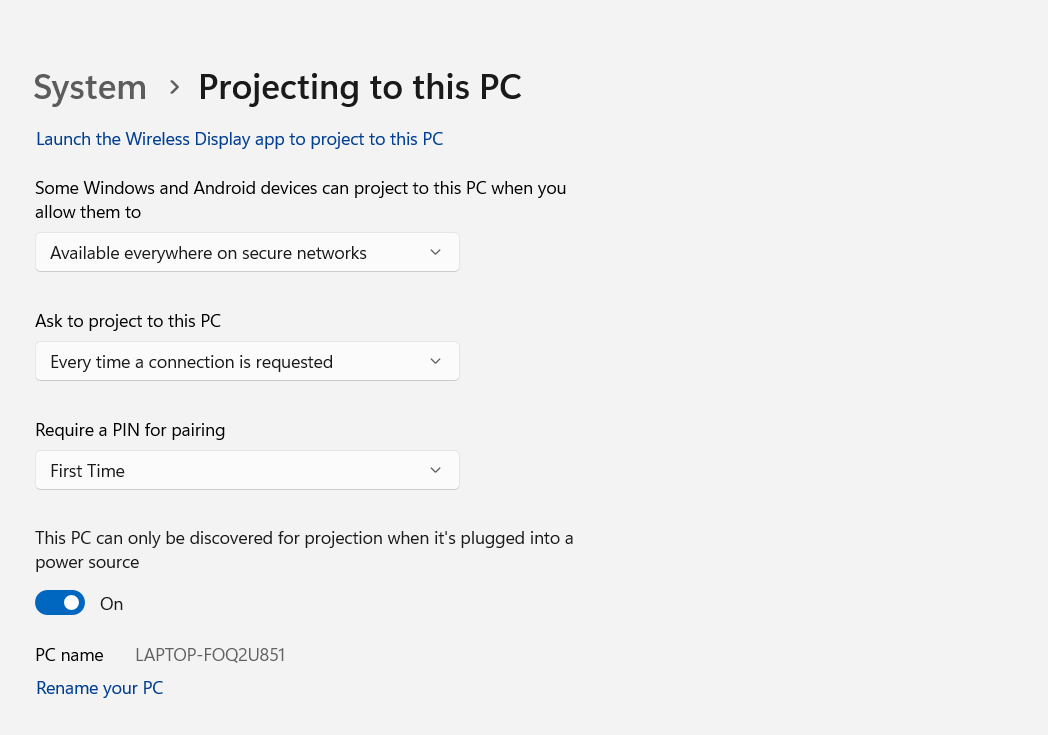
- On the laptop you want to use as your second display, go to the “Projecting to this PC” option (check the steps above to locate this feature)
- In the “Windows and Android devices can project to this PC when you allow them to,” section, toggle the “Always Off” to “Available Everywhere” or “Available Everywhere on Secured Networks.” We personally recommend sticking to “Secured Networks,” though you can opt for “Available Everywhere” if it better suits your needs (e.g. if you travel a lot).
You can then configure the following display settings to your liking and preferred security level:
- “Ask to project to this PC:” “First time only” means it’ll connect automatically without notification after the initial setup, while “Every time a connection is requested” means it’ll notify you every time you want to use it
- “Require Pin for pairing:” You can enable this feature for additional security. It essentially prevents other, unknown devices from using your laptop as a monitor. Just like the option above, you can opt for the pin to be required every single time, or just for the initial setup.
- “This PC can only be discovered for projection when it’s plugged in:” This just means that you’ll only be able to use the device as a monitor if it’s plugged into a power source. It’s a good feature to enable if your laptop suffers from battery performance issues.
- Rename your PC: Make sure to give your laptop a memorable and easily recognizable name, especially if you have multiple devices connected to the same WiFi network
Using Your Windows Laptop as a Monitor
Once you’ve configured the display options to your preferences, your laptop should now be ready to use as a monitor:
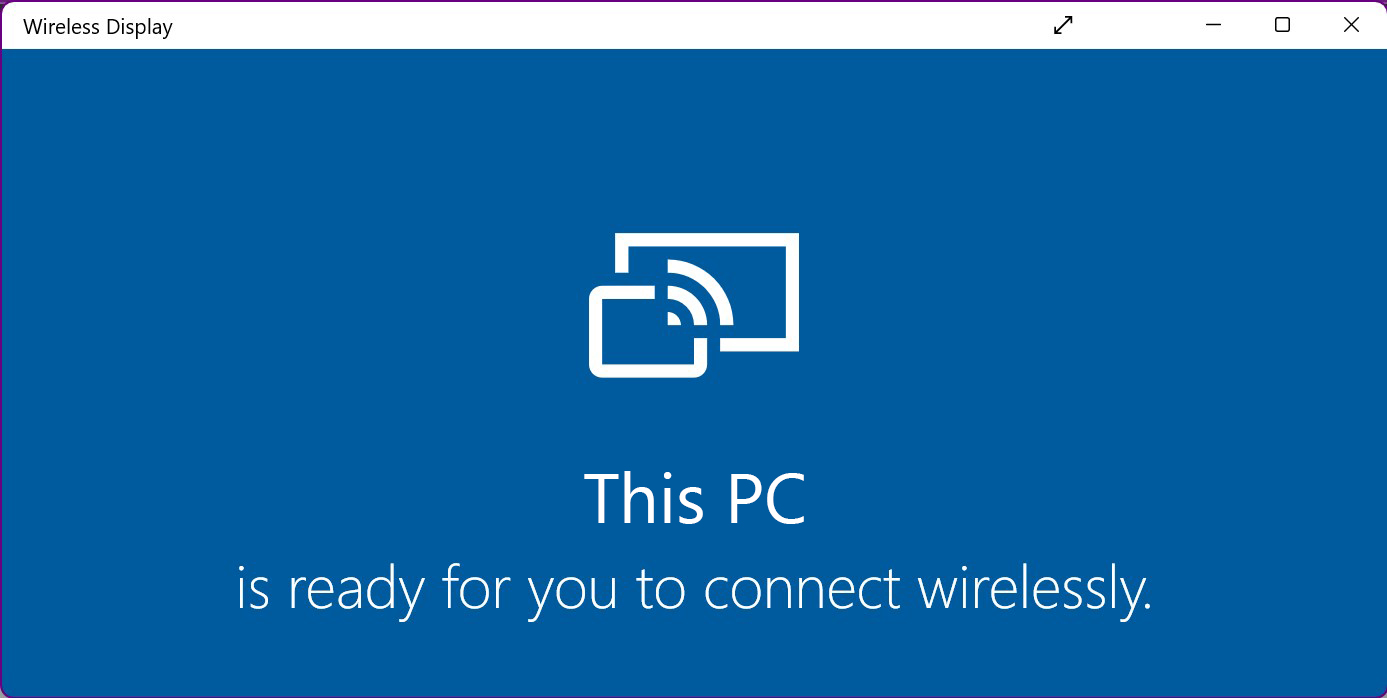
- Launch the “Wireless Display” app on the laptop (enter “Wireless Display” in the Windows search bar to find it)
- On the primary device, hold down the “Win” and “K” keys simultaneously
- Select your laptop once it shows up and connect to it
- On your laptop, accept the connection request. It should appear in your notification bar
- Now, go back to your main device and press the “Win” and “P” keys to choose your preferred display style:
- Duplicate: Your device’s display will be mirrored on the laptop’s monitor
- Extend: Your device’s display will be extended onto the laptop’s monitor, giving you additional screen space
- Second Screen Only: Your device’s display will only show on the laptop’s monitor


We hope you enjoy the dual-monitor experience!
If, for whatever reason, this method doesn’t work for you, proceed to step 3.
Also keep in mind that if you’re using a Mac, you’ll need to use Airplay instead since Miracast is only compatible with Android and Windows devices.
2. How to Use a MacBook as a Monitor Using AirPlay
A great aspect of the Apple ecosystem is how connected everything is — you can easily transfer files, data, and photos between devices at a click of a button. Unsurprisingly, Apple has also made it incredibly easy to turn a MacBook into a secondary monitor.
The process requires both devices to be compatible with AirPlay (running MacOS Monterey or later). Both devices also need to be signed into the same Apple ID account.
You’ll next want to ensure that the devices are connected to the same WiFi network, or are connected together through a lightning cable.
If you’re not bothered by cables, we recommend sticking with a cable connection — it’s more reliable and offers a lower-latency experience.
- On your main device, click on the “Control Center” icon in the menu bar
- Choose the “Screen Mirroring” option
- Wait for your MacBook to appear and then connect to it
- Once connected, go to “System Settings,” and click on the “Displays” option
- Here, you can customize your monitor experience — in the “Use as” option, you can choose to use your laptop as a “Main display,” “Extended display,” or “Mirror display”
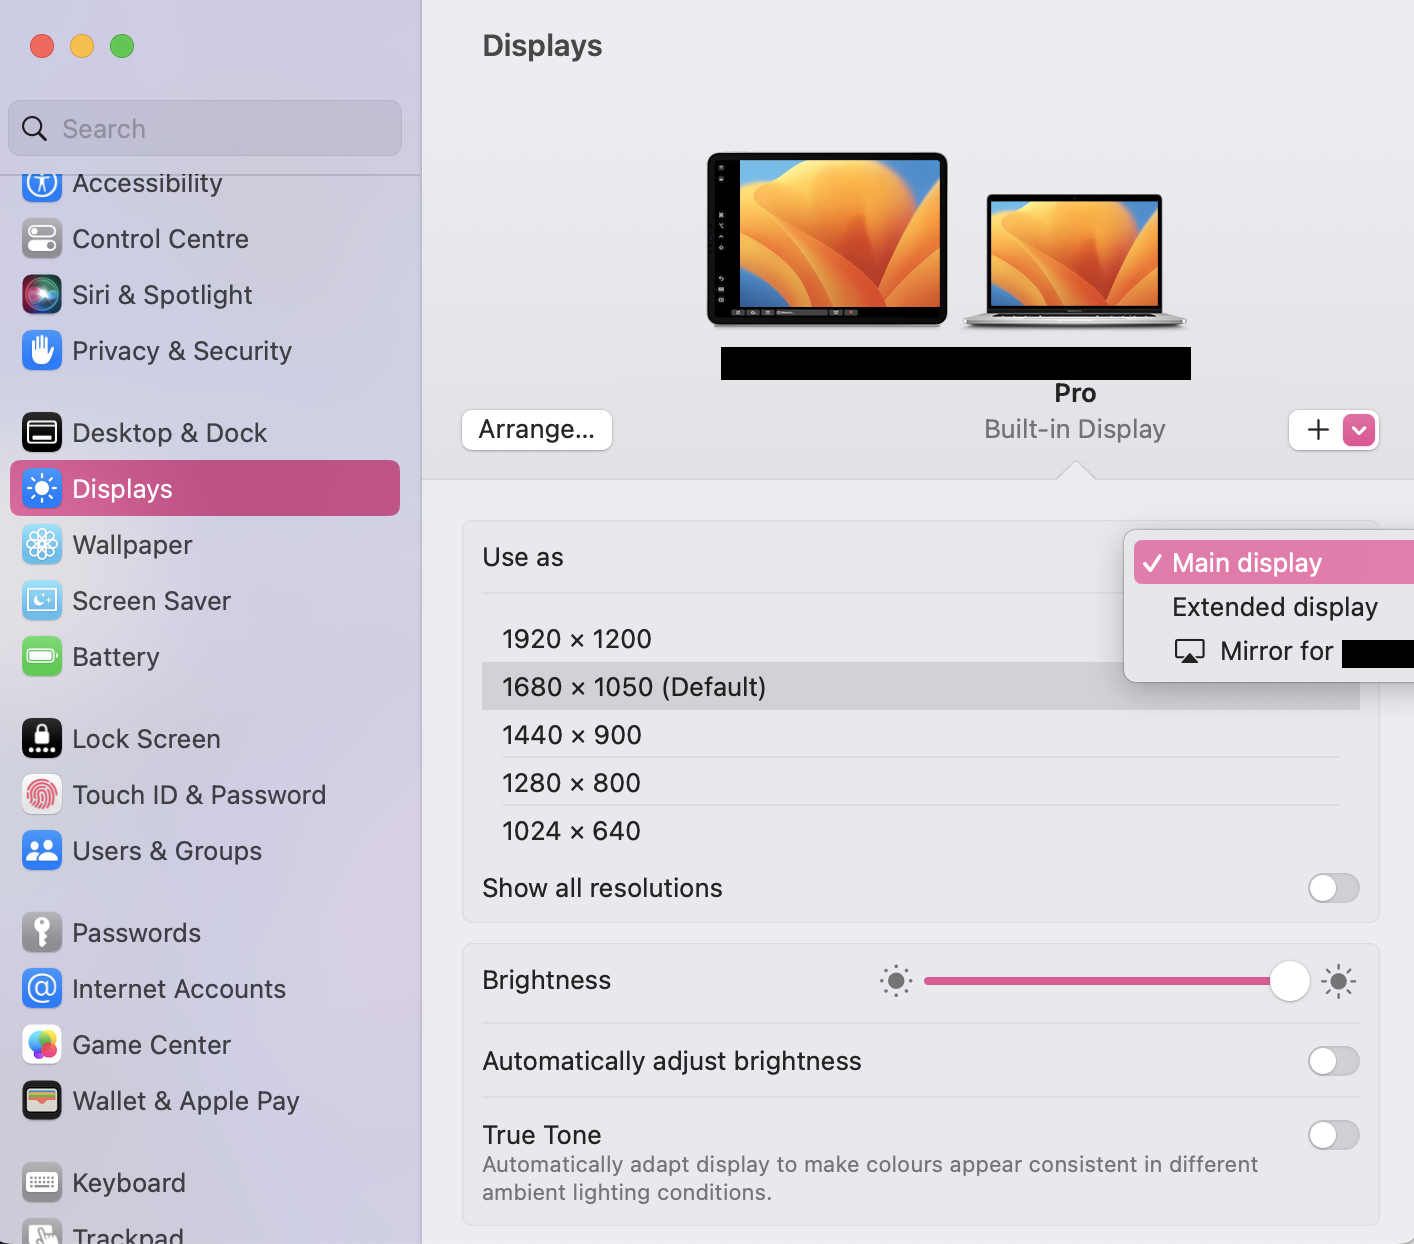
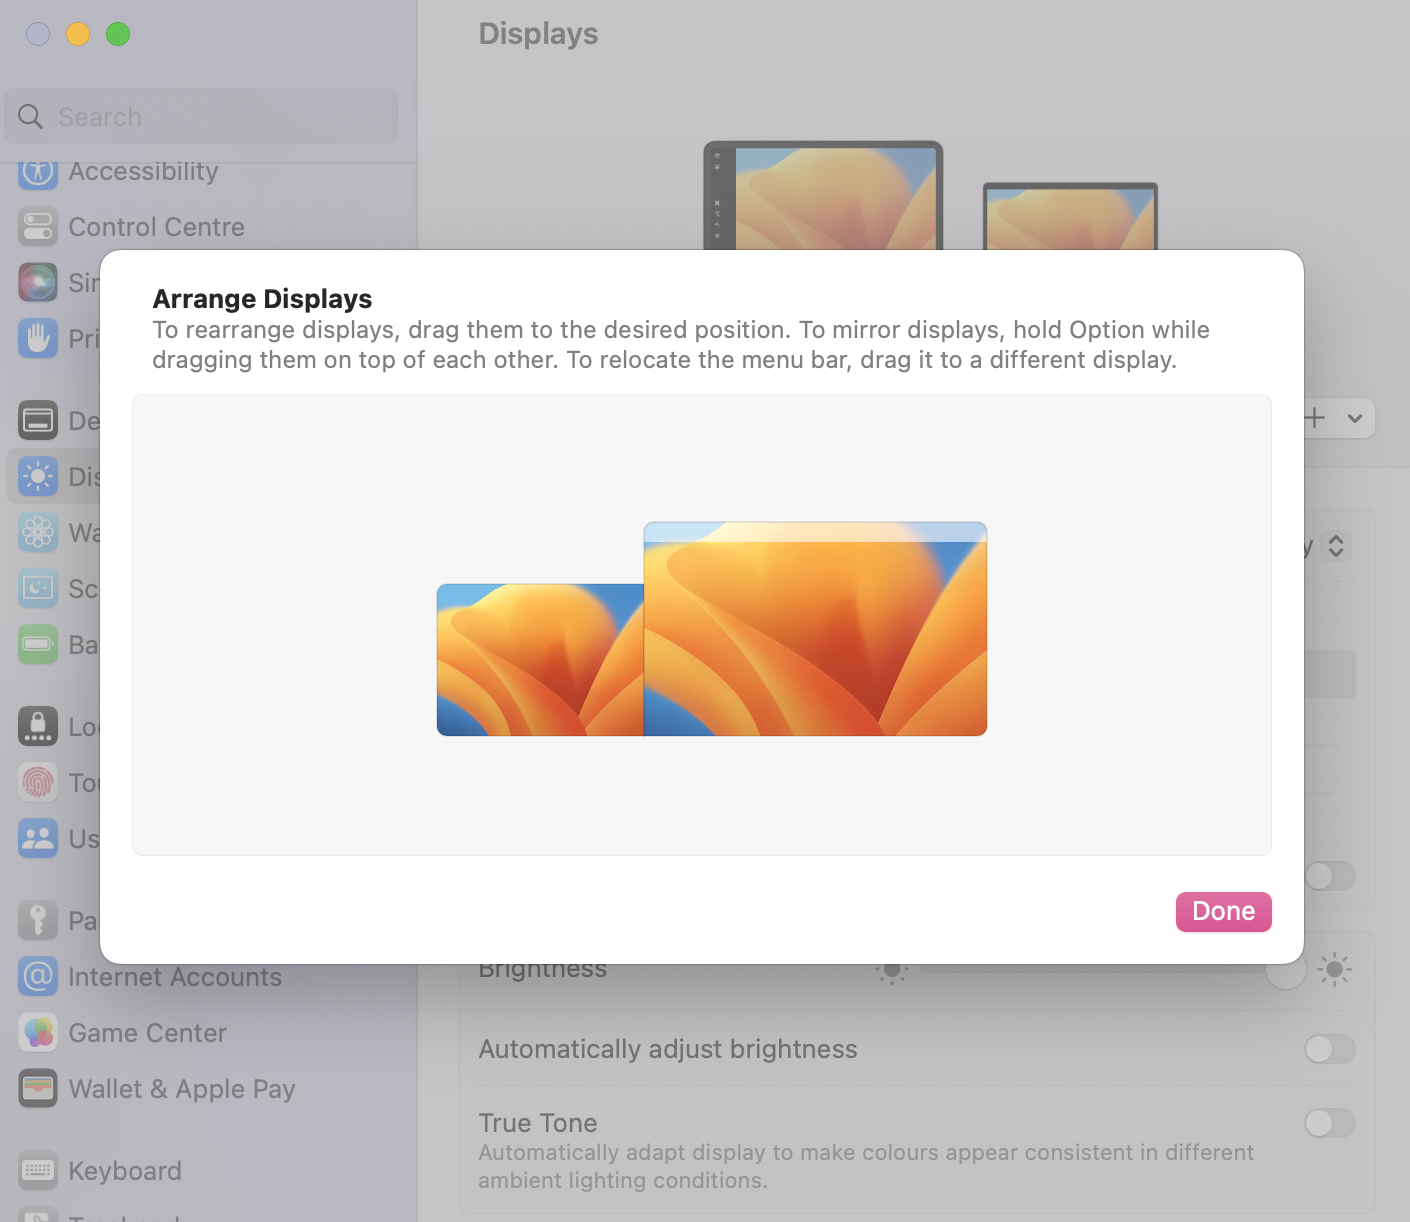
Next, click on the “Arrange” button to rearrange the displays to your preferred position. This setting will also allow you to relocate the menu bar.
Personally, we recommend positioning the displays side by side for a seamless experience, like this:
Press the “disconnect” icon in the sidebar to end the screen mirroring
If your MacBook isn’t showing up in the “Screen Mirroring” option, don’t panic. Double-check that your devices are both connected to the same WiFi network and then restart them.
If this doesn’t fix the issue, try connecting your devices together via a lightning cable if you haven’t done so already. In most cases, your primary device will recognize your laptop after this and it should appear in “Screen Mirroring.”
Unfortunately, if none of the above works, it’s likely one of your devices isn’t compatible. Upgrading to a later MacOS version may help if your MacBook is able to do this. You can also try using a Mac-compatible third-party program.
3. Use a Third-Party Program Like Spacedesk
There are plenty of third-party programs that can make it easy to use your laptop as a monitor for another device, many of which are free to download. One of the best third-party programs is Spacedesk.
This software is compatible with Windows devices running 8.1 or later and also supports iOS and Android devices too. Spacedesk is super easy to install and set up.
You just need to go to Spacedesk’s official website and download the compatible driver software on your primary device.
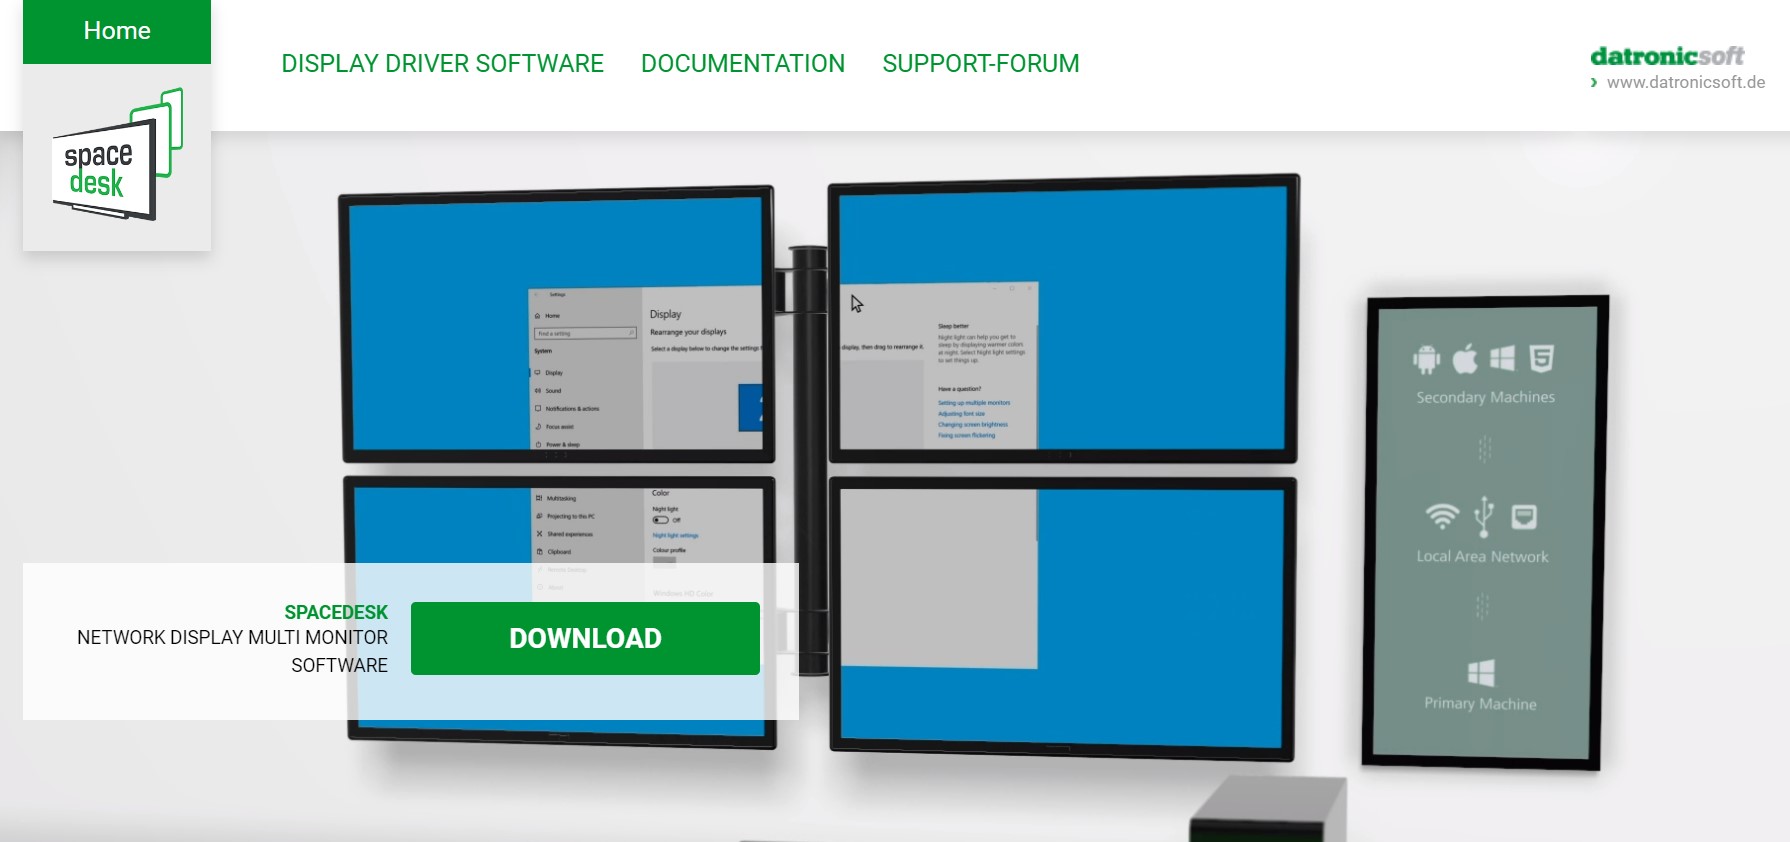
Then, on your secondary device, download the compatible viewer software. Keep in mind that you do need to make a firewall exception for the software to run.
After that, you just need to launch the software on each device to establish the connection. You should also ensure that they’re using the same WiFi connection.
Other noteworthy third-party programs you can try include Duet Display (subscription-based), Splashtop XDisplay, and Deskreen. Mac owners can also use Luna display if they’re willing to invest in the dongle.
FAQ
Can you use a laptop as a monitor with HDMI?
Generally, no. Most laptops only have an HDMI input source, not an output source.
In layman’s terms, you can share your laptop screen with another device, but your laptop itself can’t be used as a monitor for another device — it has no means to accept video/audio information from an external source.
Should I invest in an external display?
Investing in an external display is definitely worth it if you can afford to do so.
While the measures above are convenient for repurposing an old laptop, nothing can quite replace an actual monitor experience — it provides more screen space and ensures a strong, lag-free connection.
Does connecting a second monitor affect battery life?
Yes, in most cases connecting a second monitor does drain your device’s battery quicker, though the exact impact can vary depending on how you’re using the monitor and the external monitor’s resolution.
You might even save battery life if you solely use the external monitor and switch off your device’s own display.
What is an HDR monitor and do I need one?
An HDR (High Dynamic Range) monitor is a monitor that supports the latest-gen display HDR technologies.

We cover this in more detail and discuss whether or not you need one, in our in-depth HDR monitor guide.
Over to You
That’s a wrap! We hope the methods above have helped you repurpose your laptop as a handy external monitor for your main device.
If you need any more help, whether with this issue or another PC-related issue, make sure to reach out to an expert on our forum. You can also leave a comment below.
")

![Laptop Displays — Panel Types compared [IPS/OLED/TN]](https://www.cgdirector.com/wp-content/uploads/media/2024/03/Laptop-Displays-—-Which-Panel-Technology-Should-You-Go-With-Twitter-594x335.jpg "Laptop Displays — Panel Types compared [IPS/OLED/TN]")
![How To Enable/Set Your Monitor To 144 Hz [Updated]](https://www.cgdirector.com/wp-content/uploads/media/2023/12/How-To-EnableSet-Monitor-To-144-Hz-Twitter-copy-594x335.jpg "How To Enable/Set Your Monitor To 144 Hz [Updated]")

0 Comments