 by
by ![IOR / Index of Refraction List For Common Materials [For Use In 3D Materials / Rendering]](https://www.cgdirector.com/wp-content/uploads/media/2022/06/IORIndex-of-Refraction-List-for-Common-Materials-Twitter-1200x675.jpg "IOR / Index of Refraction List For Common Materials [For Use In 3D Materials / Rendering]")
TABLE OF CONTENTS
IOR, or “Index of Refraction.” You might’ve heard these words being thrown around if you’ve ever looked at a metal or glass shader tutorial.
But what is it really?
It’s hard to find a simple answer to explain what it’s all about, so I’ll be changing that in this article and explaining what exactly IOR is, why it’s important, how you use it, and layout some common IOR values for materials so that you can use them in your 3D Application and Renderer of choice.

What Is IOR (Index of Refraction)?
IOR, in short, is a number that tells you how much and what direction light bends when going through a medium (E.g. glass).
For most rendering application needs: lower IOR values equal more refraction, and higher IOR values equal more reflection.
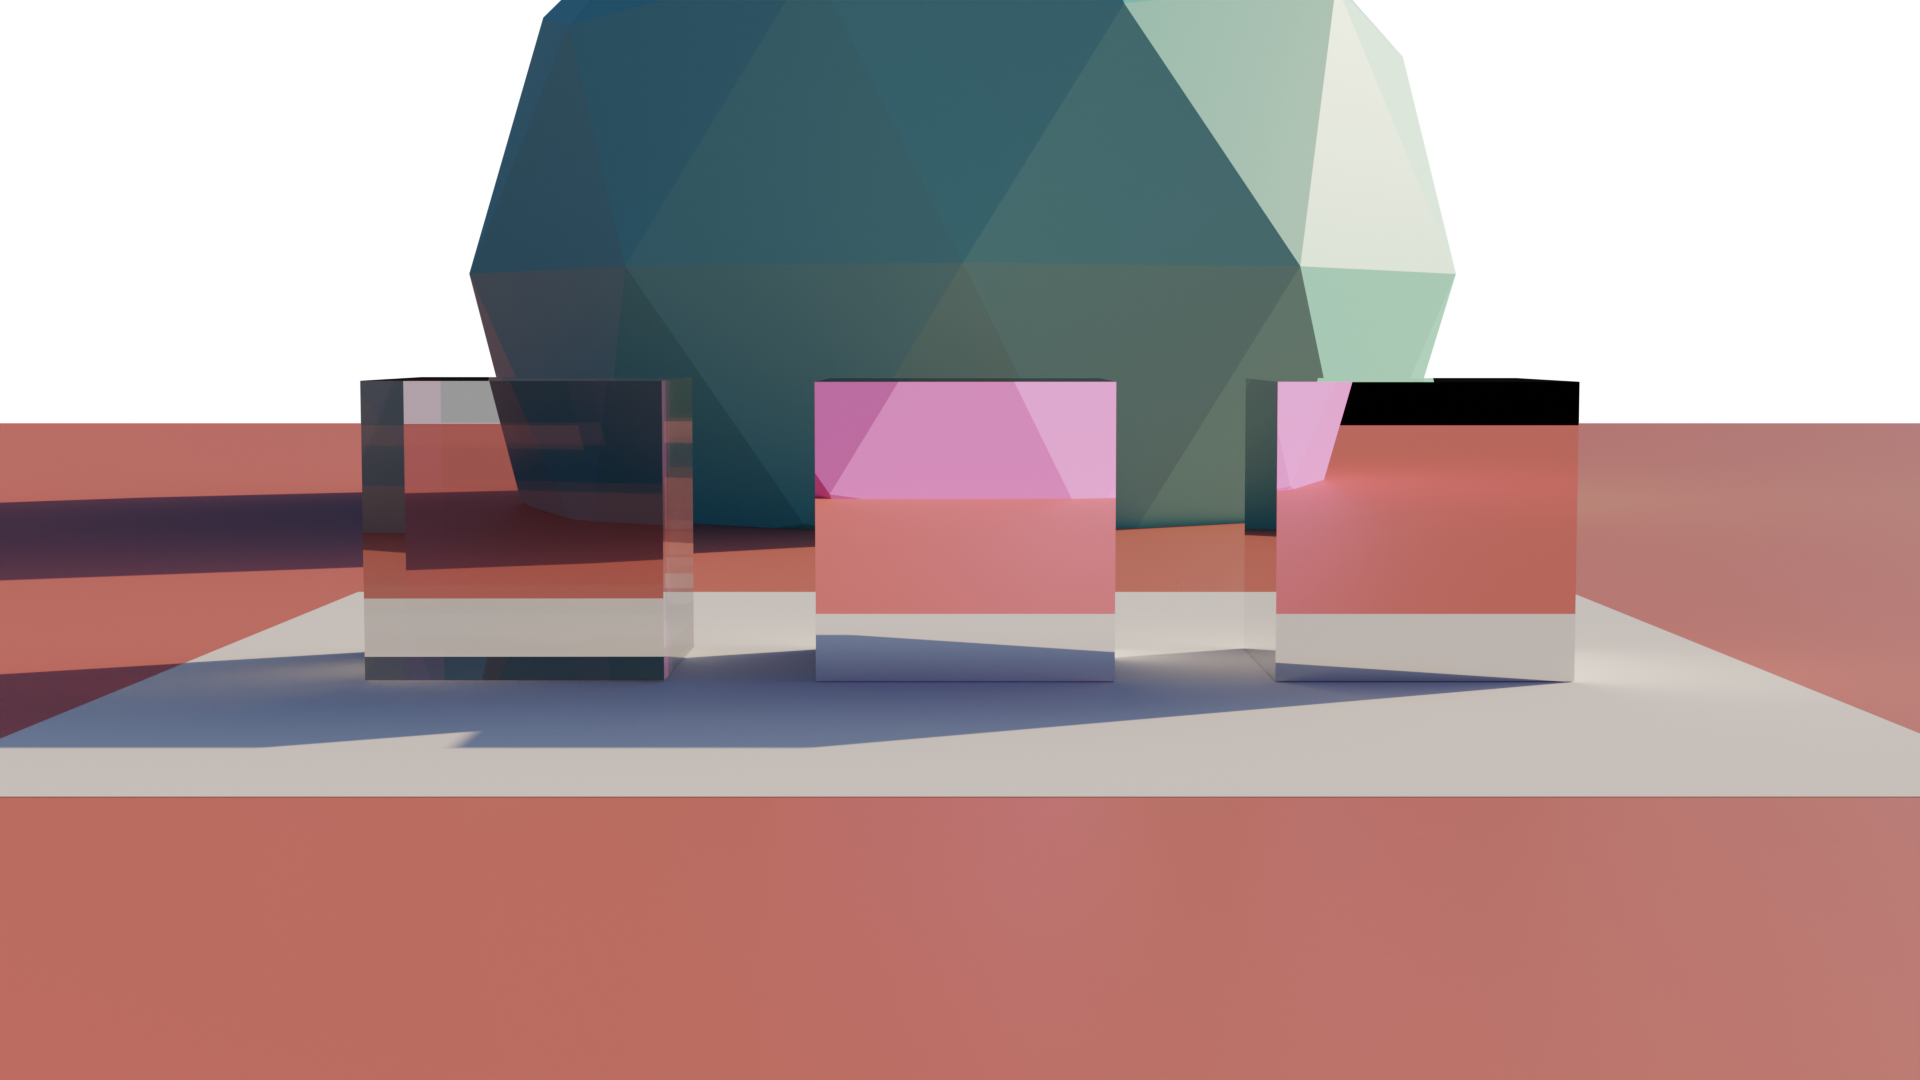
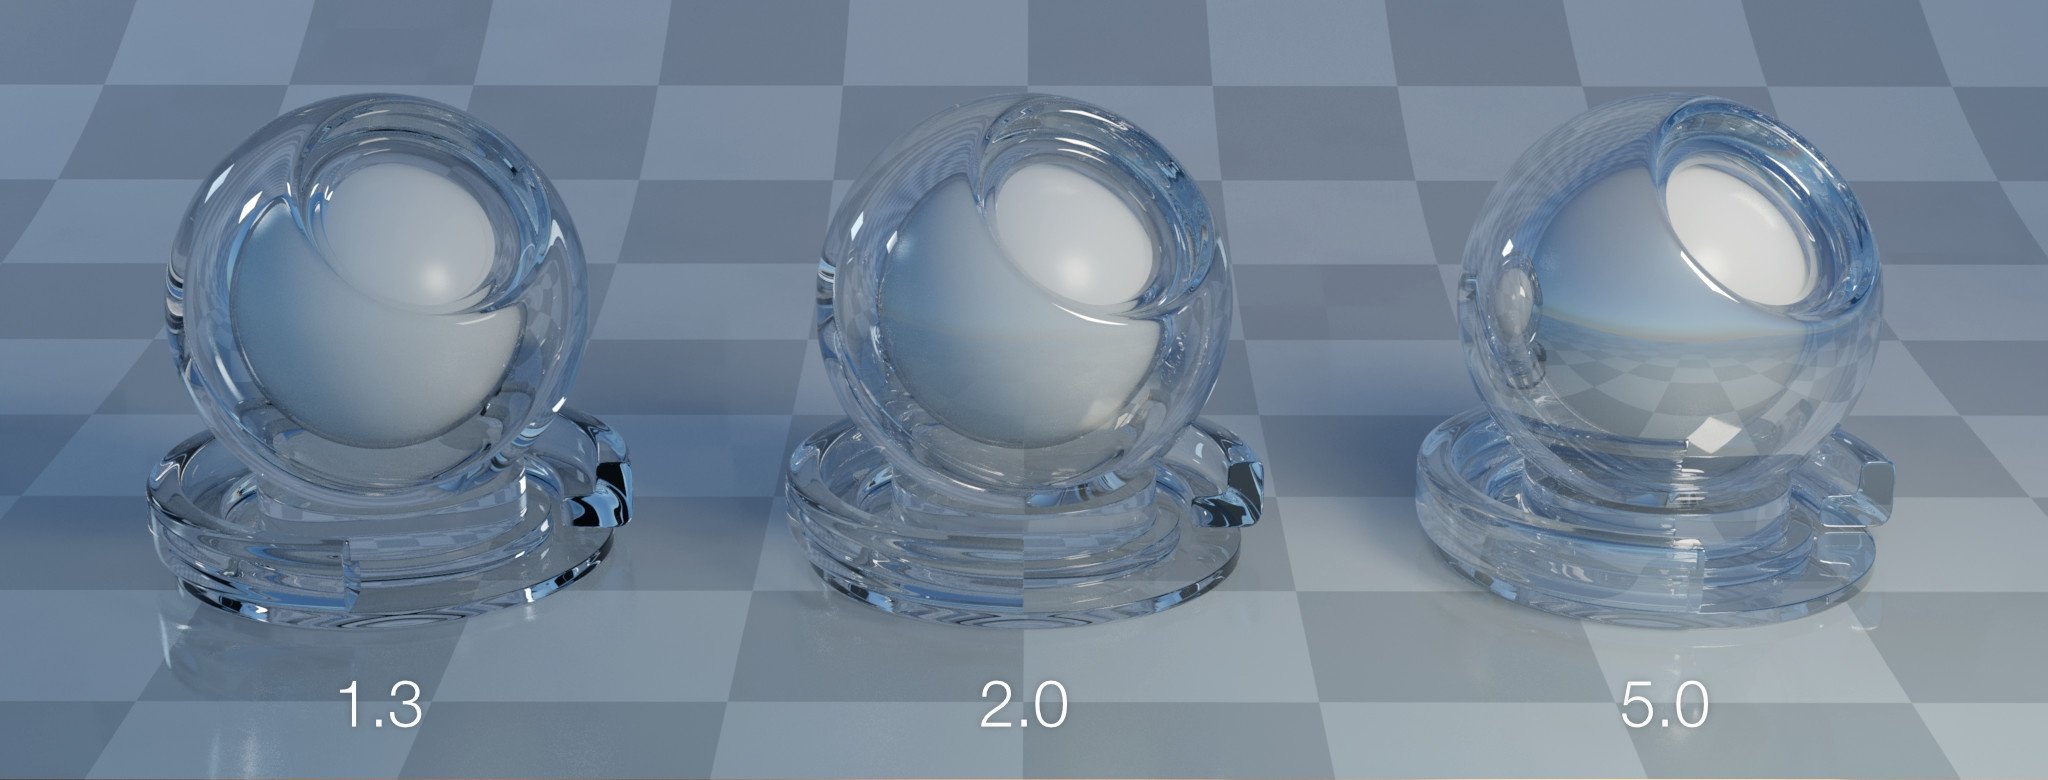
Example made in Blender to illustrate the difference between—going from the left—a glass cube with an IOR of 1.45, a glass cube with an IOR of 100, and a metallic cube with no roughness. Notice the mirror-esque appearance of the glass cube in the middle with an IOR of 100.
Now, you might be asking why does light bend when going through a medium?
To explain this, I’ll shamelessly steal the example that Khan from Khan Academy provided in his great introductory video to refraction.
Imagine a car cruising along an asphalt road. A little ways away, the road changes to mud. If the car is coming in at an angle, however slight, one of the front tires of the car—let’s use the right tire for this example—will hit the mud before the rest of the tires.
Now, at that moment, the right front tire of the car will slow down on the mud while the other three tires keep going at the same speed they were originally going.
Because of this, the car will turn towards the right tire, bending its original trajectory.
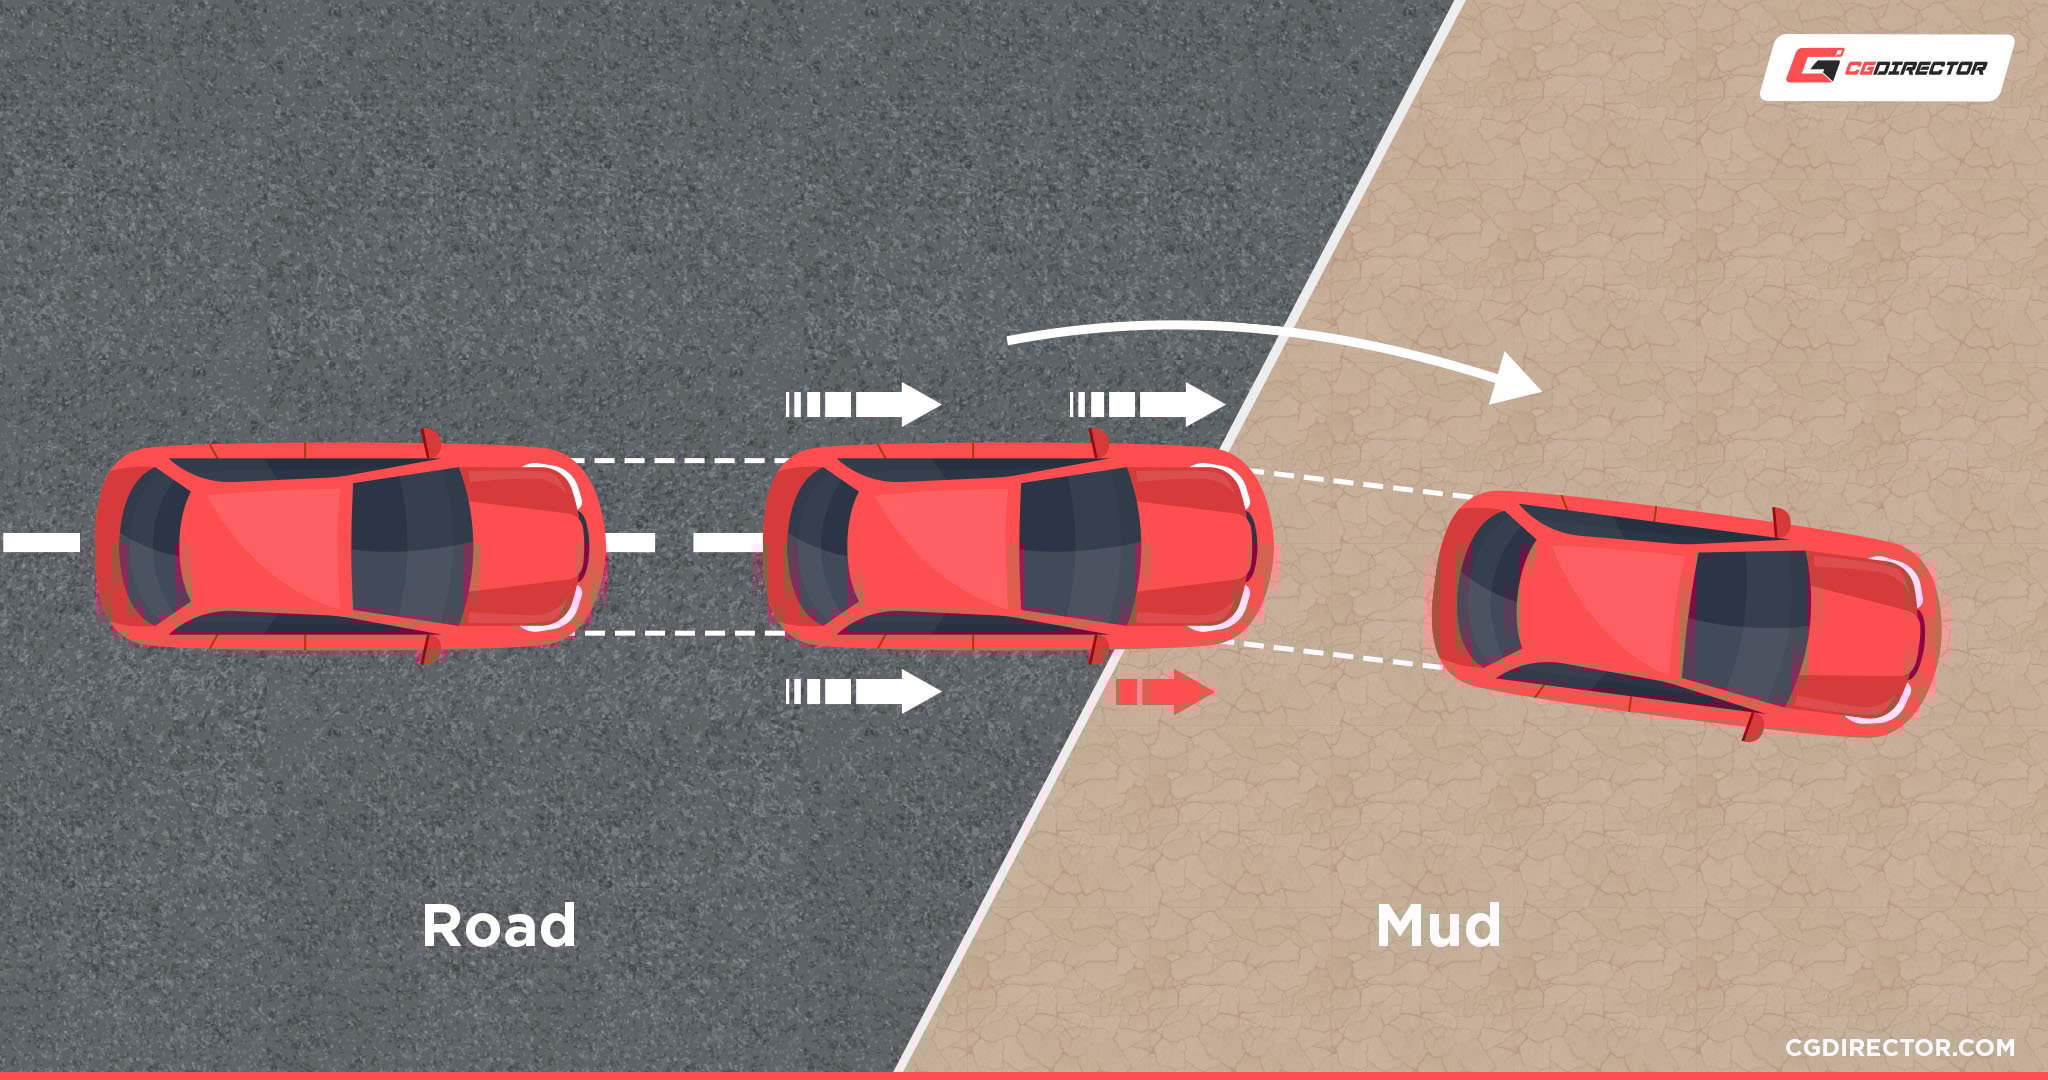
This is the same principle at play when it comes to light. You just change the car to be billions of light rays, the road to be medium one, and mud to be medium two. This is called the law of refraction or Snell’s Law.
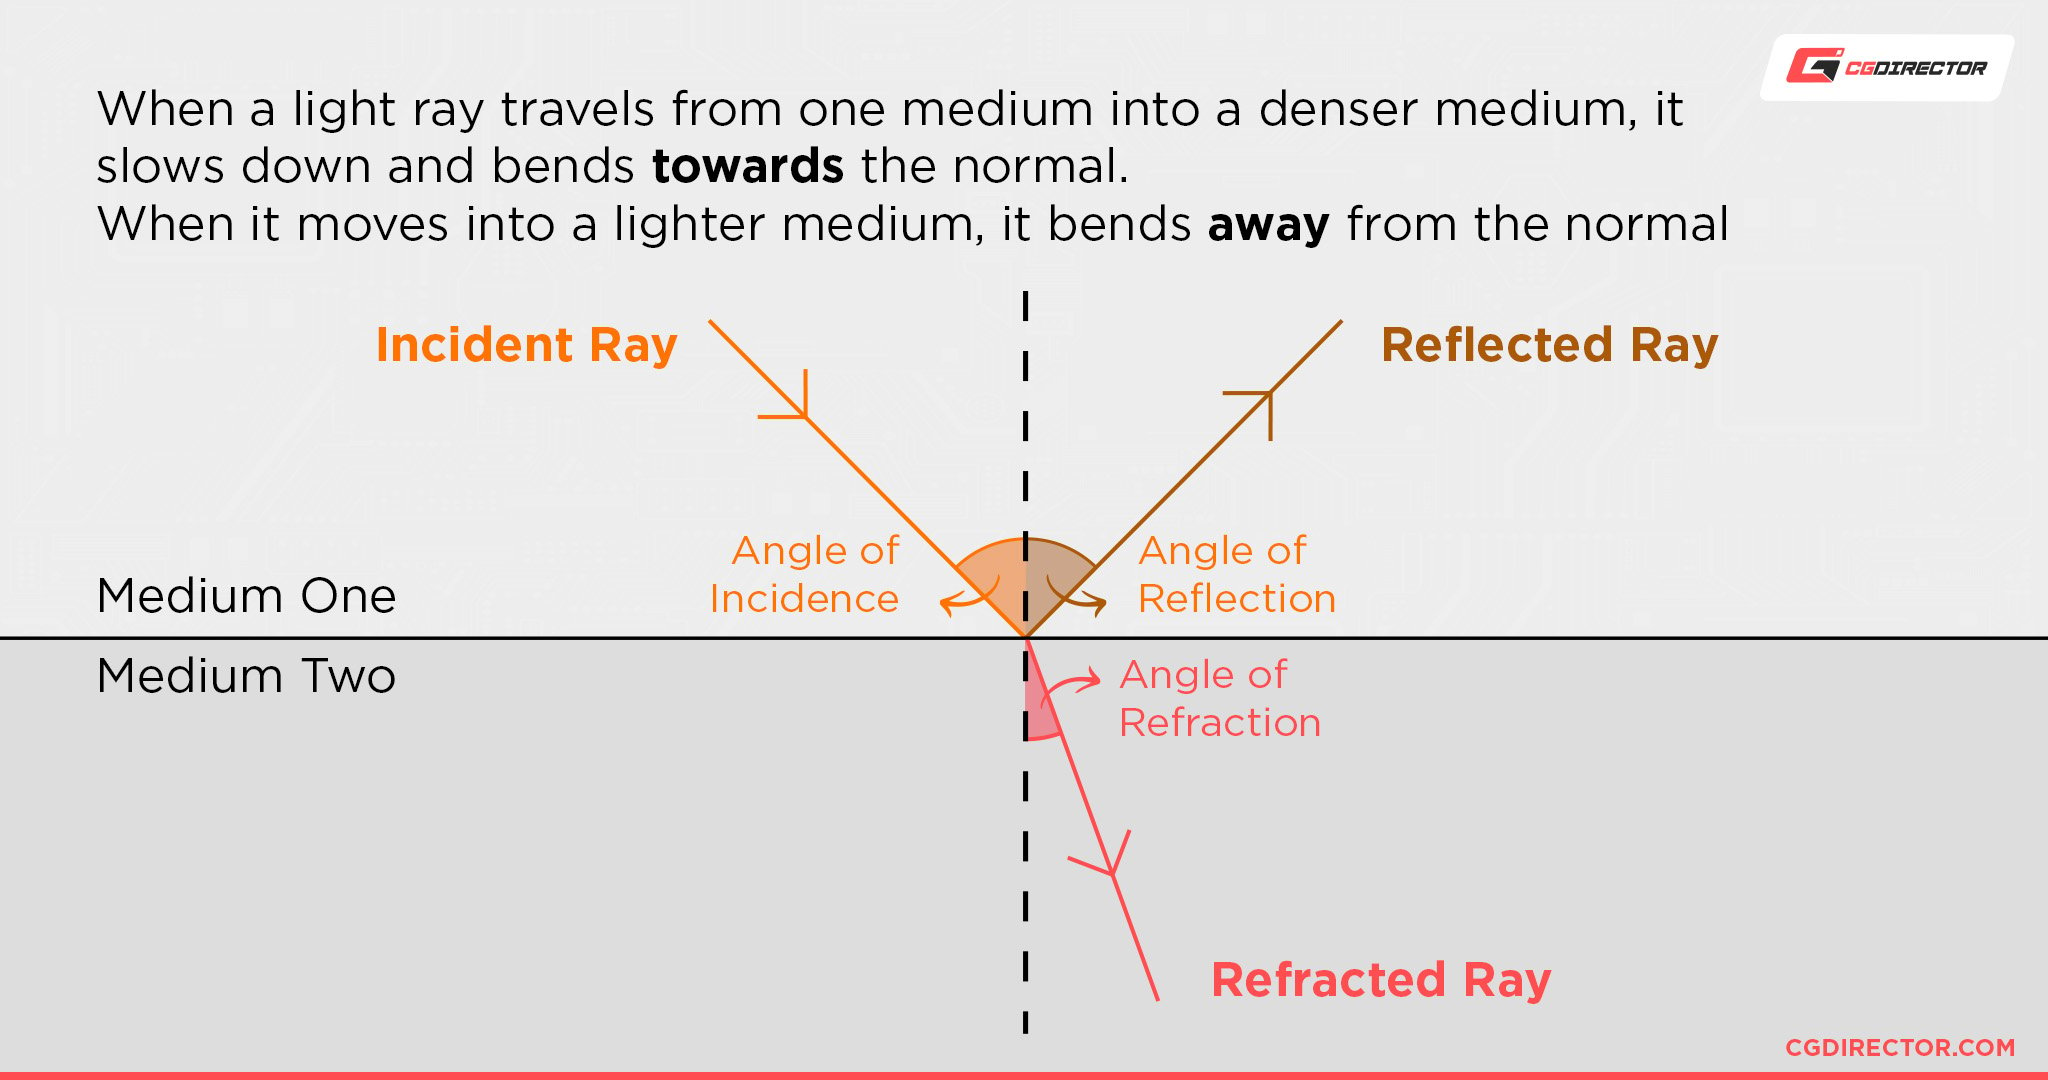
A demonstration of the law of refraction
Why Is IOR Important?
IOR is important because it allows us to configure the refraction of any given material in a much more realistic way as opposed to just turning up or down a “reflectivity” slider or something.
This is because we can figure out the IOR of materials in real life and then pretty much directly input those numbers into our shaders when we want to get extremely accurate materials.
How Do You Use IOR?
IOR can be implemented in a variety of ways across different render engines, so there’s no easy way to say that “this is how you should use IOR.”
Some render engines only expose one simple “IOR” variable where you can input the IOR that you desire, and that’s it.

The singular IOR option in Blender’s Principled BSDF node.
And then there are other render engines where both reflection and refraction options ask for IOR values.
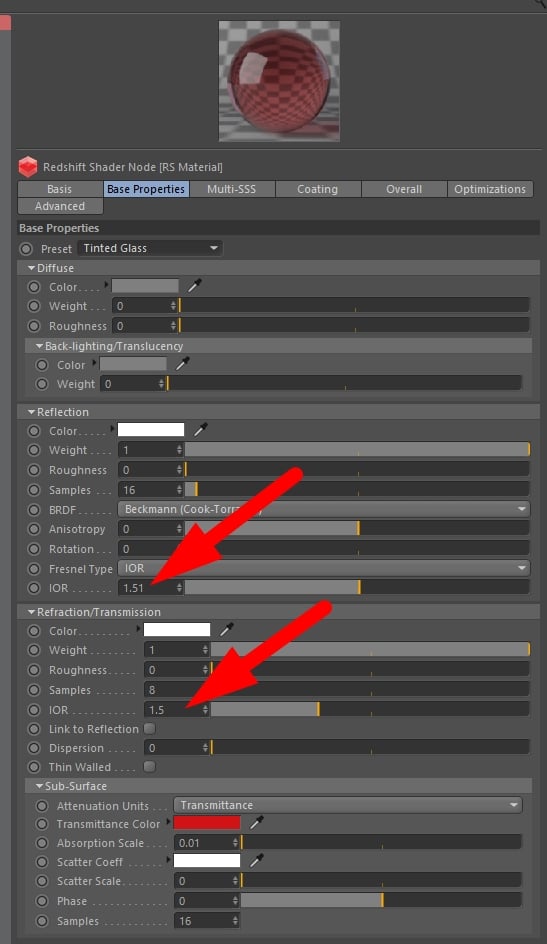
IOR Values in Redshift Render Engine
That’s because, by taking the IOR value of the material and the direction at which the light ray hits the surface, you can calculate the reflectivity of the material along with its refraction.
By default, in Redshift, the Refraction Value is linked to the Reflection IOR value. But you can uncouple them for more control in specific situations like rendering e.g. soap bubbles. A soap bubble would have a Refraction IOR of almost 1, while the Reflection would want to be increased.
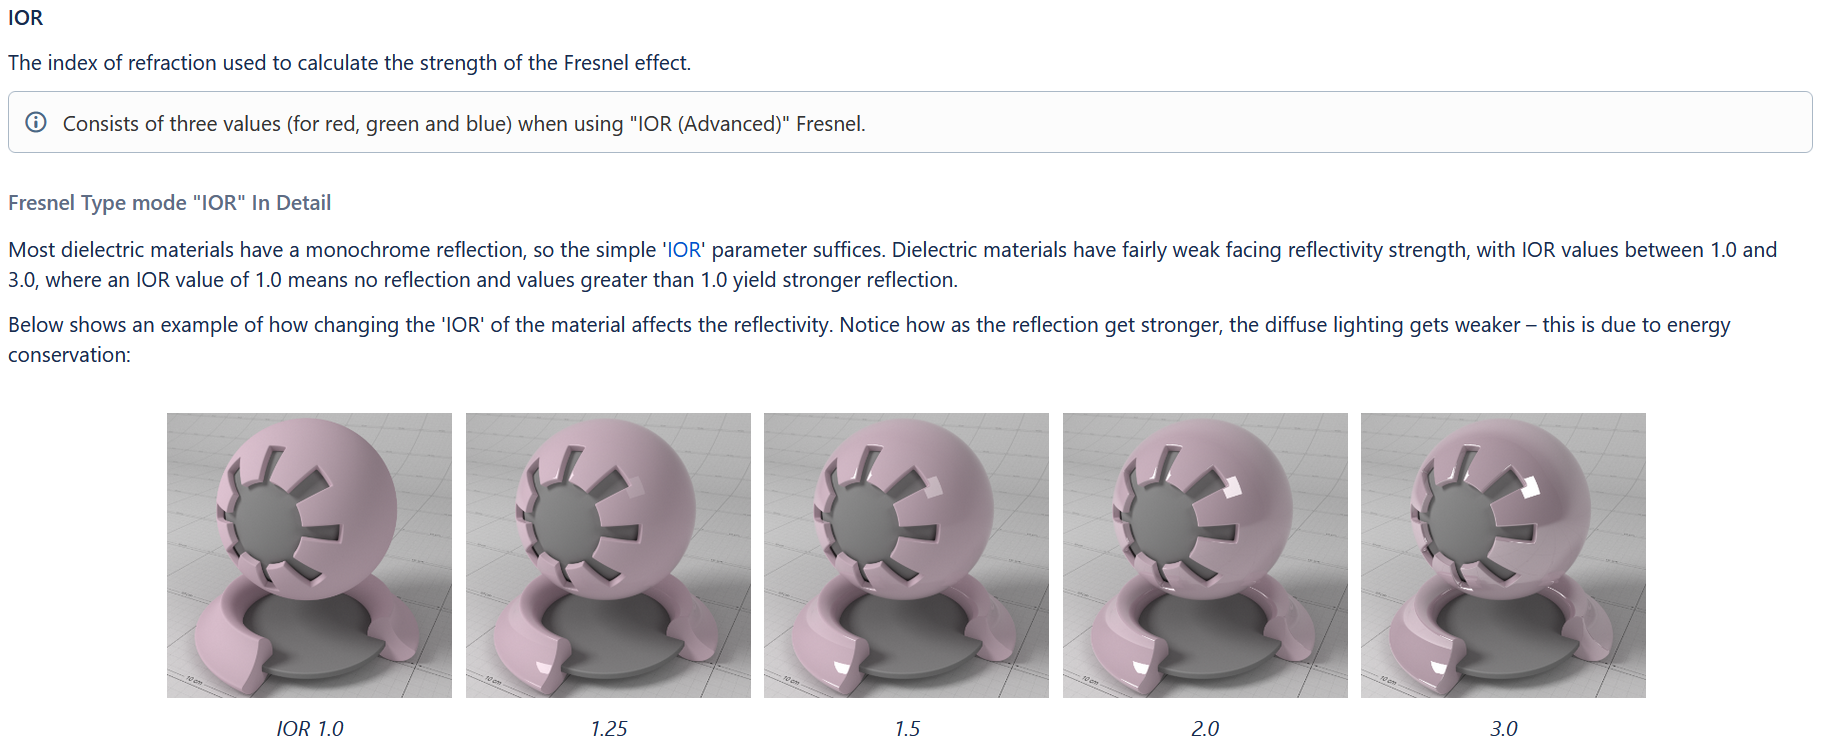
Image Credit: Maxon – An example given by the Redshift documentation on IOR and how it affects reflectivity within Redshift.
This gives you more control to really fine-tune the look of your materials.
Some other render engines even give you extremely detailed control through RGB values.
They allow you to specify exactly how individual red, green, and blue light refract and reflect off of a material. Unless you’re making extremely realistic materials or working with caustics, you don’t need this much control, but you can do some cool NPR (Non-Photorealistic) materials with it, so it’s nice to have.
IOR Refraction vs Reflection
There’s a lot of confusion around IOR, especially because each 3D Render Engine has their own special way of configuration and inputting values.
In Blender’s Cycles you have a separate Refractive Shader for something like Glass, in Redshift you can use the Standard Shader that lets you set both Reflection and Refraction, and don’t get me started on V-Ray that again has its own little quirks.
Anyway, you take a look at IOR lists, see glass and diamond on there, and probably water and milk among other fluids and solid refractive materials.
But then you see asphalt and aluminium and start to wonder if you have a grasp on what IOR is because last I checked, you can’t see through asphalt or aluminum foil, and there really shouldn’t be an IOR (Refraction) value to be set, right?
Well here’s the thing:
The Redshift Material already hints at it. The default material setting couples the IOR of Refraction and Reflection. If you set an IOR of 1.5 in Reflection, this is copied into Refraction as well.
So even though you can’t see through asphalt, it still has an IOR value.
IOR only indicates how much a ray is bent when entering a different medium, not how transparent an object is!
IOR List for Common materials
| Material | IOR |
|---|---|
| Acrylic glass | 1.490 |
| Air | 1.000 |
| Alcohol, Ethyl (grain) | 1.360 |
| Aluminum | 1.390 |
| Asphalt | 1.635 |
| Beer | 1.345 |
| Bronze | 1.180 |
| Copper | 1.100 |
| Crystal | 2.000 |
| Diamond | 2.418 |
| Emerald | 1.560 |
| Eye, Lens | 1.410 |
| Glass | 1.500 |
| Glass, Pyrex | 1.474 |
| Gold | 0.470 |
| Ice | 1.309 |
| Iron | 2.950 |
| Ivory | 1.540 |
| Lead | 2.010 |
| Lucite | 1.495 |
| Mercury (liquid) | 1.620 |
| Milk | 1.350 |
| Nickel | 1.080 |
| Nylon | 1.530 |
| Pearl | 1.530 |
| Plastic | 1.460 |
| Teflon | 1.350 |
| Titanium | 2.160 |
| Water | 1.325 |
FAQ
How Do You Calculate the Index of Refraction of a Given Material?
There are many ways to find the IOR of a material on your own, depending on what kind of information you have about the material.
Can the Index of Refraction Ever Be Less Than 1?
Because nothing can go faster than the speed of light in a vacuum, it isn’t odd to assume that there couldn’t be an IOR less than 1.
Remember, a higher IOR means that the light rays slow down more, meaning that an IOR of less than 1 will have the light rays going faster than in a vacuum.
But there actually can be certain instances where the index of refraction is less than 1 in the real world. You can learn more about that here.
The important point here for 3D artists is that IOR can be set to a value lower than 1, but it’s not recommended and there isn’t much point in it.
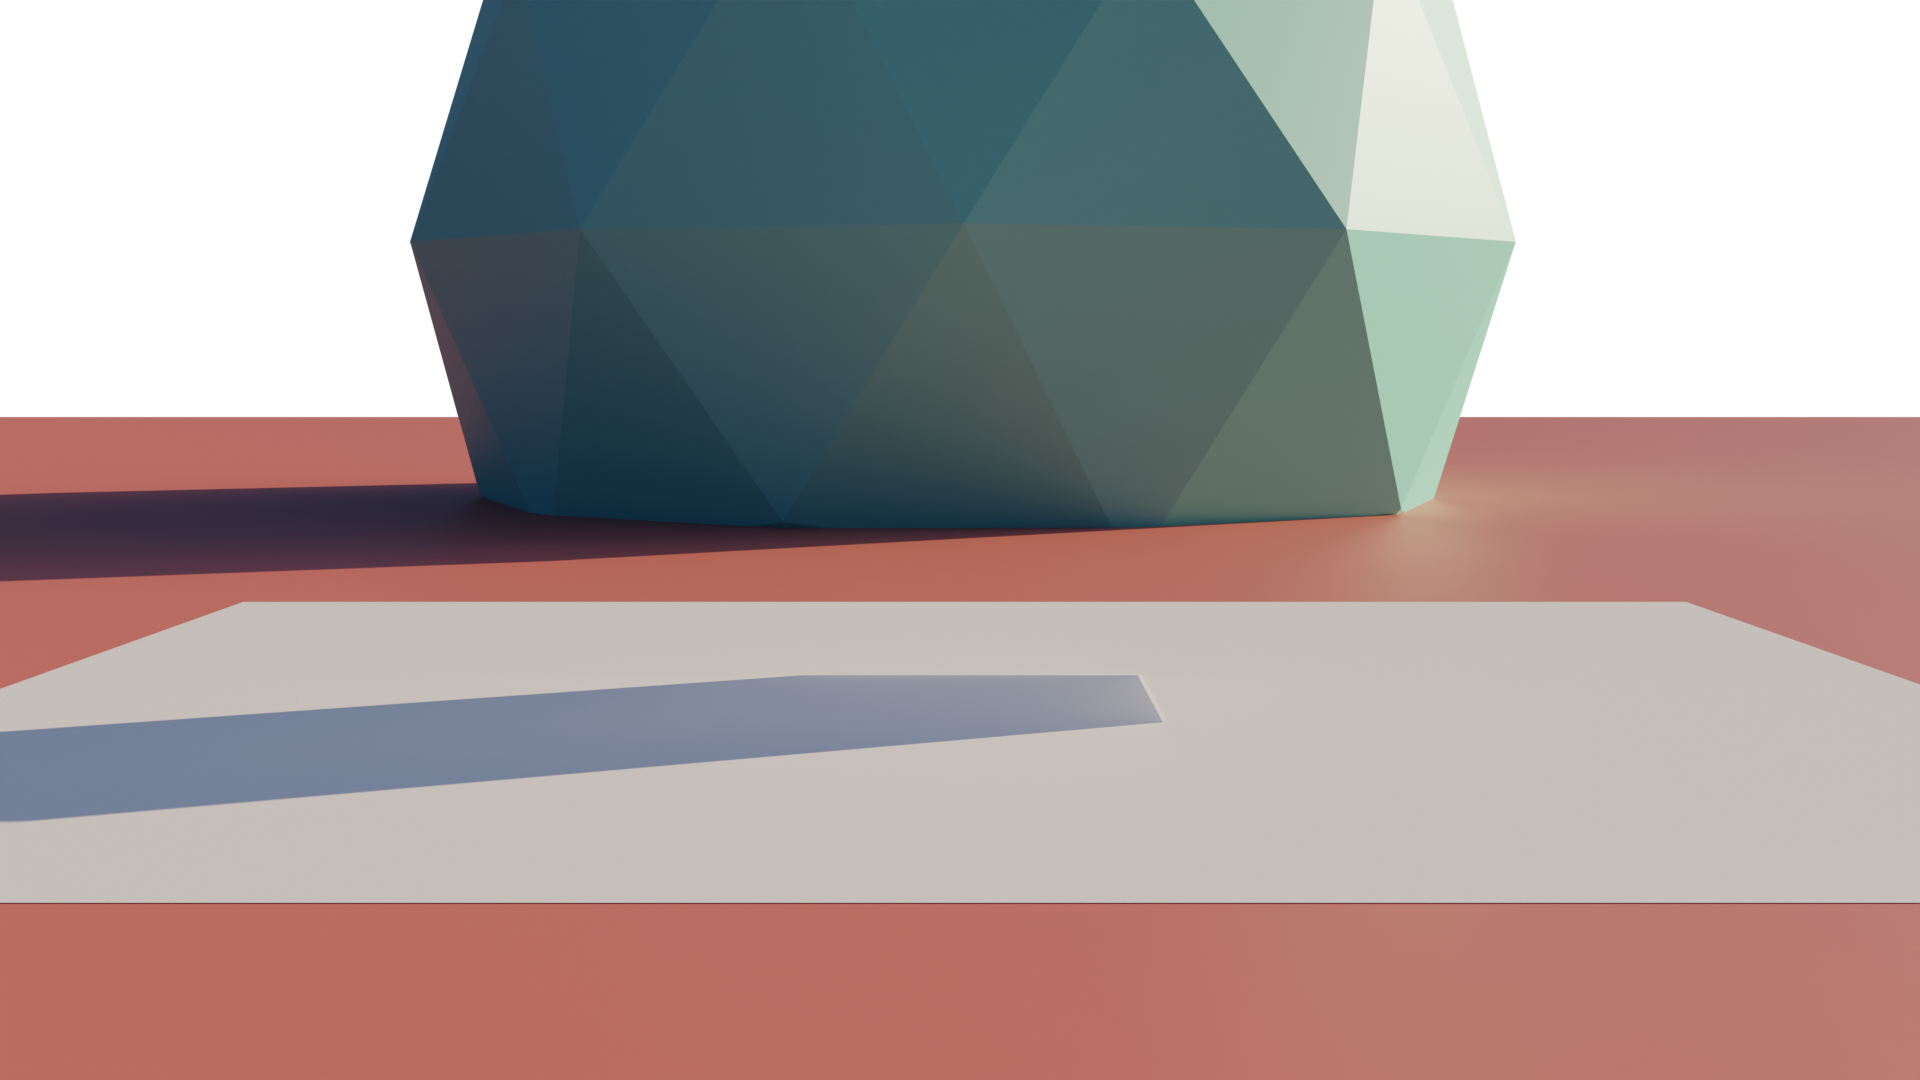
It basically flips the light rays into going the opposite direction which gives a weird sort of gem-esque light scattering effect.

A glass cube with an IOR of 0.25
What Is the Difference Between a Higher or Lower Index of Refraction?
When a light ray goes from one medium into another medium with a lower IOR, it bends towards the direction of the normal.
If it goes into a medium with a higher IOR, it bends away from the normal.
For practical CG purposes, this means that if you have a low IOR value, your material will be more translucent—up to a point,
If you go below an IOR of 1 it rolls back on itself and becomes similar to if you had a higher IOR value. And if it has a higher IOR value, it’ll be more reflective.
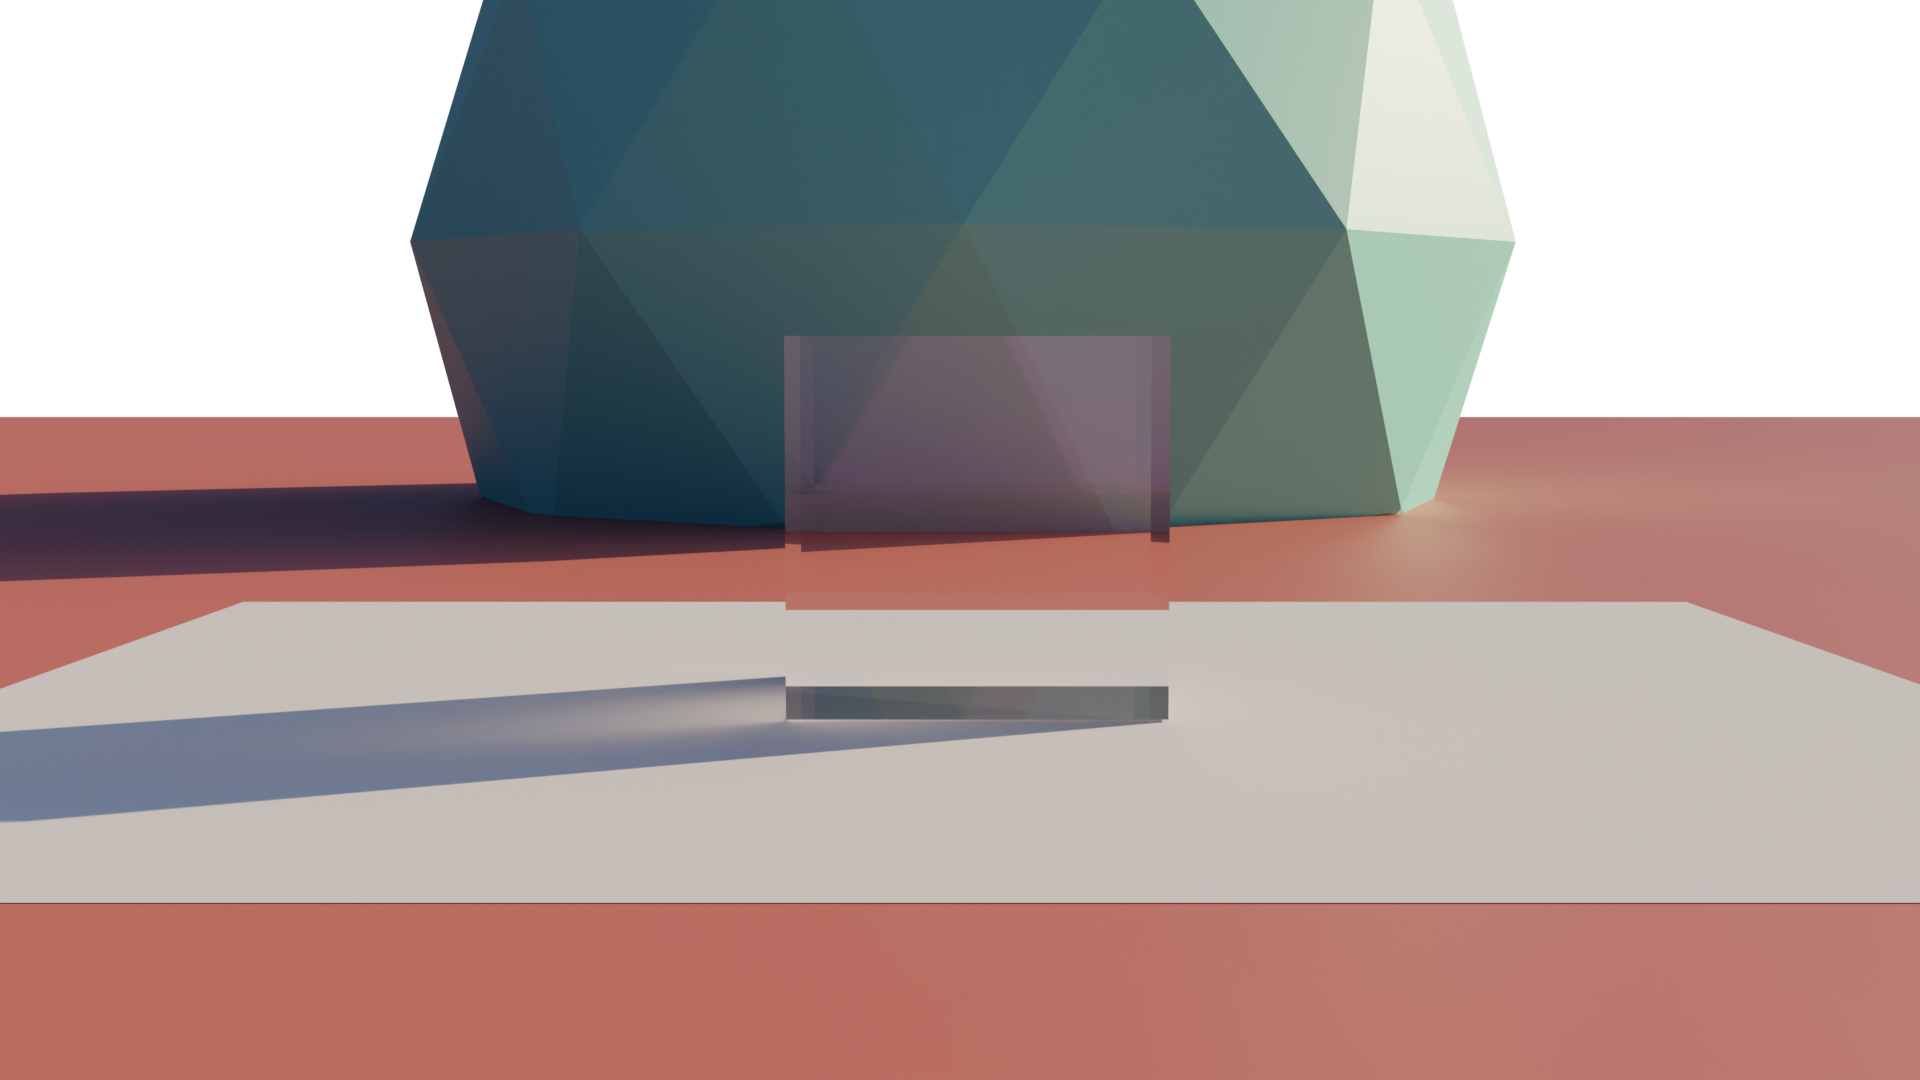
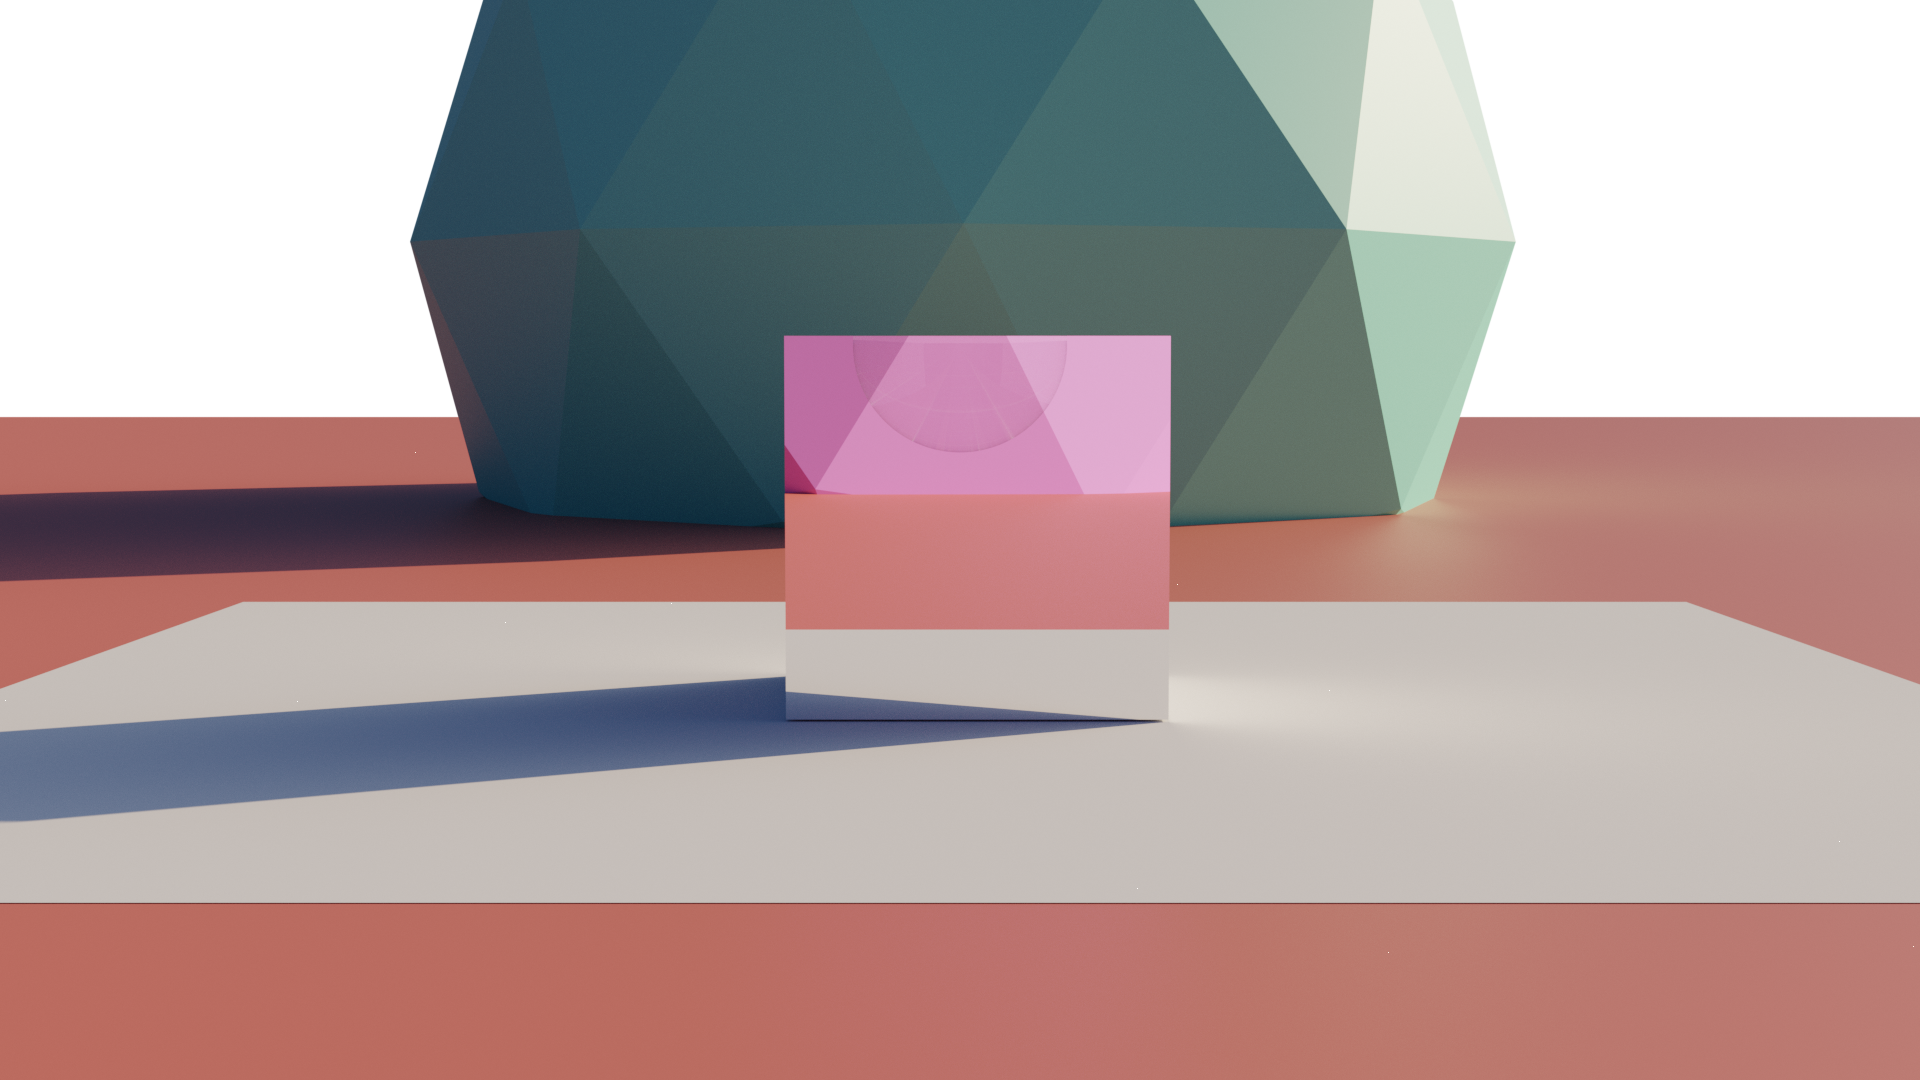 |  |
| IOR 0.04 - Notice how the cube reflects the pink Ico Sphere behind it. This is because the light rays have been bent so far back that it now reflects completely instead of going through the object. | IOR 1.00 - Notice how the cube is completely invisible. This is because, with an IOR of 1, all light simply goes through the cube without being redirected anywhere. |
 | 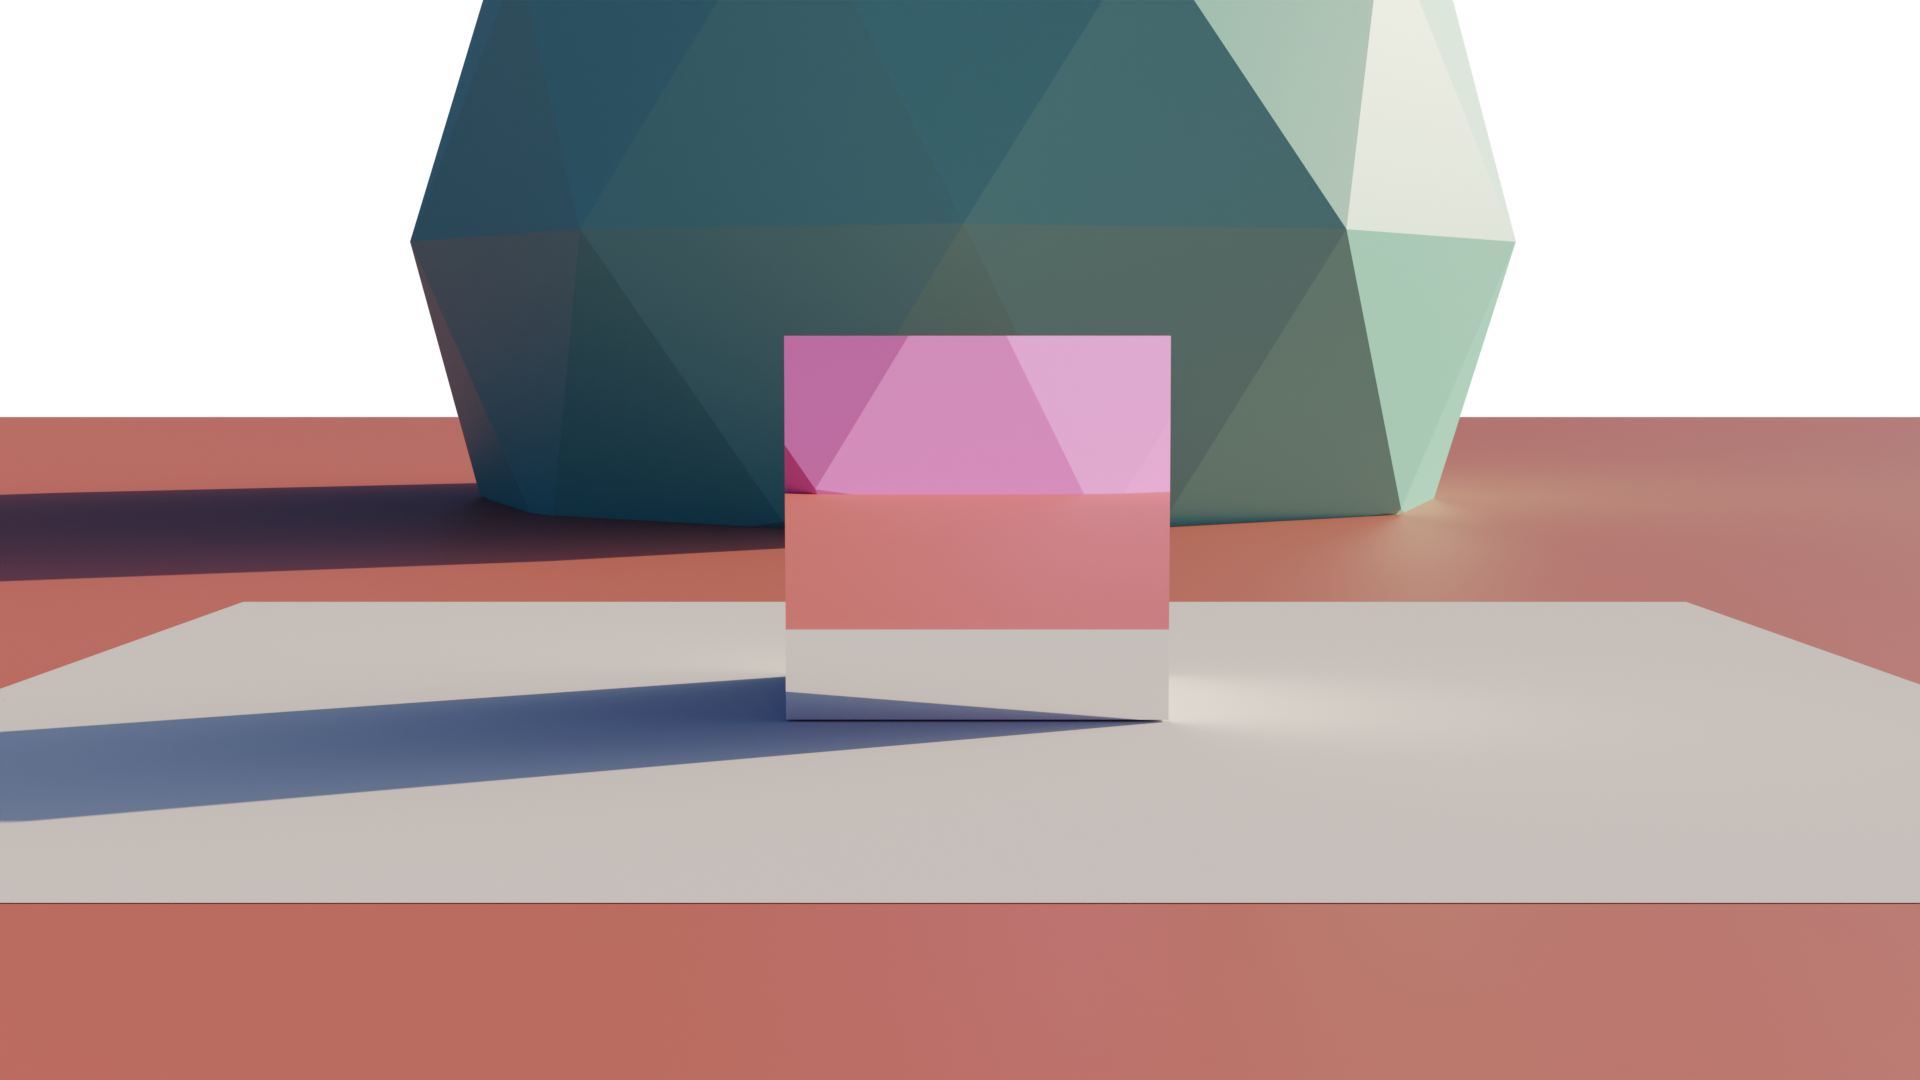 |
| IOR 1.45 - Notice how you can both see the turquoise Ico Sphere through the cube and see a slight reflection of the pink Ico Sphere behind the cube as well. | IOR 100 - Notice how the cube is completely reflective. This is because, with an IOR above 10~, all light simply reflects off of the cube without being refracted through it. |
Why Do Some Render Engines Have Many Different IOR Fields Whereas Some Have Only One?
It’s a matter of how much control you need.
For most purposes, a single IOR value is more than enough to get as realistic a material as you might want.
But, if you really need that fine-tune control, some render engines offer RGB values that you input to really dial in your materials. This can be especially important for certain metallic materials.
Over to You
Hopefully, that helped you figure out what IOR is about!
It can be a bit tricky to understand at first, but you don’t have to worry about the physics of it all. All you have to understand is that using the real-world IOR values will give you a more photorealistic material if that’s the style that you’re going for.
Have any other questions about shader creation? Feel free to ask us in the comments or our forum!
![What Is “Rendering” in Digital Art? [2D/3D]](https://www.cgdirector.com/wp-content/uploads/media/2022/09/What-Is-Rendering-in-Digital-Art-Twitter-594x335.jpg "What Is “Rendering” in Digital Art? [2D/3D]")
 for your Needs?")
![Best Laptops for 3D Modeling and Rendering [Updated Guide]](https://www.cgdirector.com/wp-content/uploads/media/2021/07/Best-Laptop-for-3D-Modeling-and-Rendering-Twitter-594x335.jpg "Best Laptops for 3D Modeling and Rendering [Updated Guide]")


0 Comments