 by
by 
TABLE OF CONTENTS
If you’re here, you’re ready to learn how to lower your GPU’s temperature.
I’ll walk you through several methods of doing exactly that, but first I want to go over what raises GPU temperatures, to begin with, how to monitor them, and when to be concerned.
You can use the Table of Contents to skip ahead to the temperature-reducing tips if you like, but otherwise, I’m diving headfirst into this GPU Temperature Guide.
What Raises Your GPU Temperature?
First, let’s talk about what actually raises your GPU temperature:
Most of the things you do on your PC- even things that might be tied to your graphics card, like watching high-resolution video- most likely isn’t going to get your GPU to heat up.
In order to get your GPU hot, you need to get its GPU utilization raised by a GPU-intensive application.
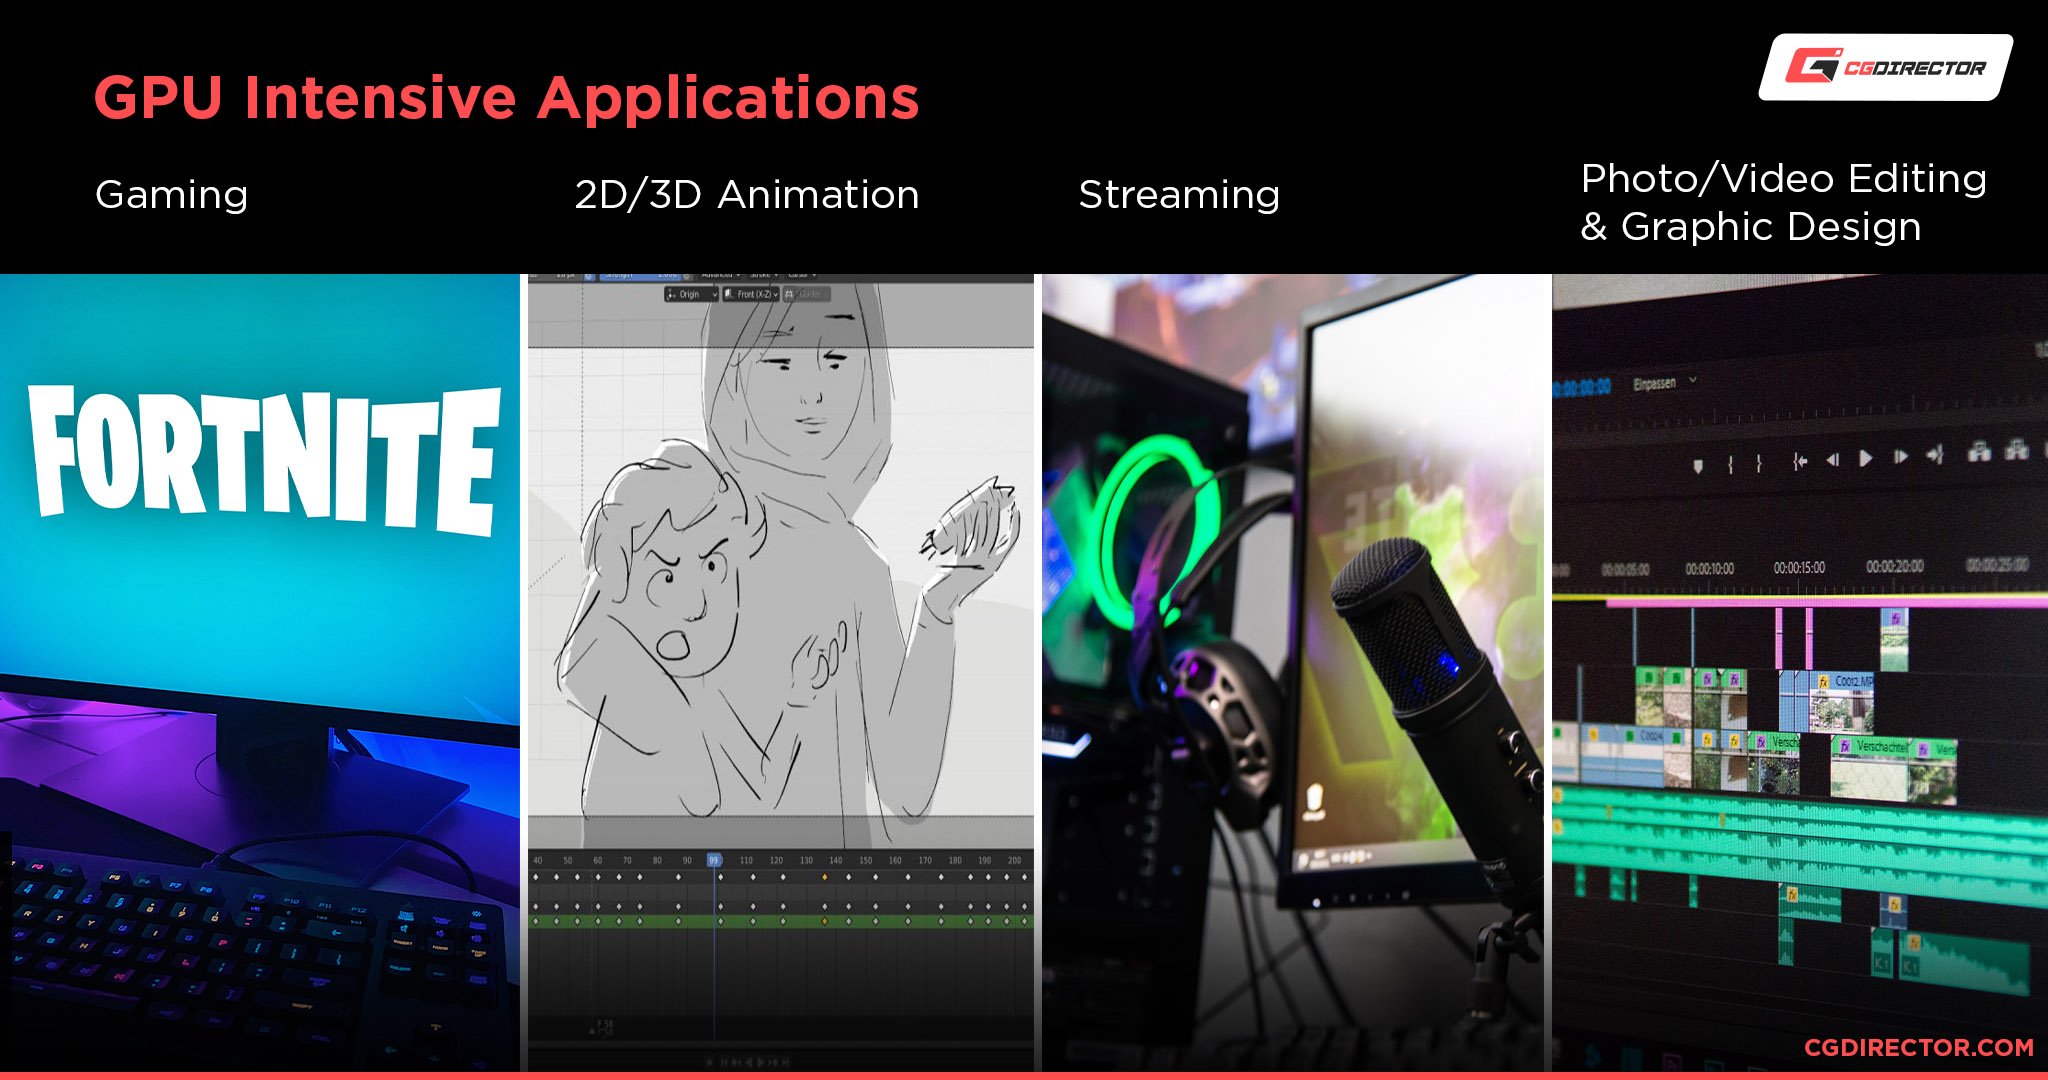
Examples of GPU-intensive applications include the majority of PC games, as well as many video editing, photo editing, and 3D rendering software tools.
If you have a particularly powerful graphics card, you’ll need to throw cutting-edge modern games at high settings or heavy productivity loads to see your temperatures rise significantly.
Even in these cases, your temperatures will most likely fall off pretty quickly once the intensive task in question is no longer being run.
Where issues are more likely to arise is when a GPU is forced to run a sustained, heavy workload over a much longer period of time than a few hours. This can be for particularly long renders, crypto mining, and so on.
In these cases, your GPU temperature will only rise until it begins to thermal throttle.
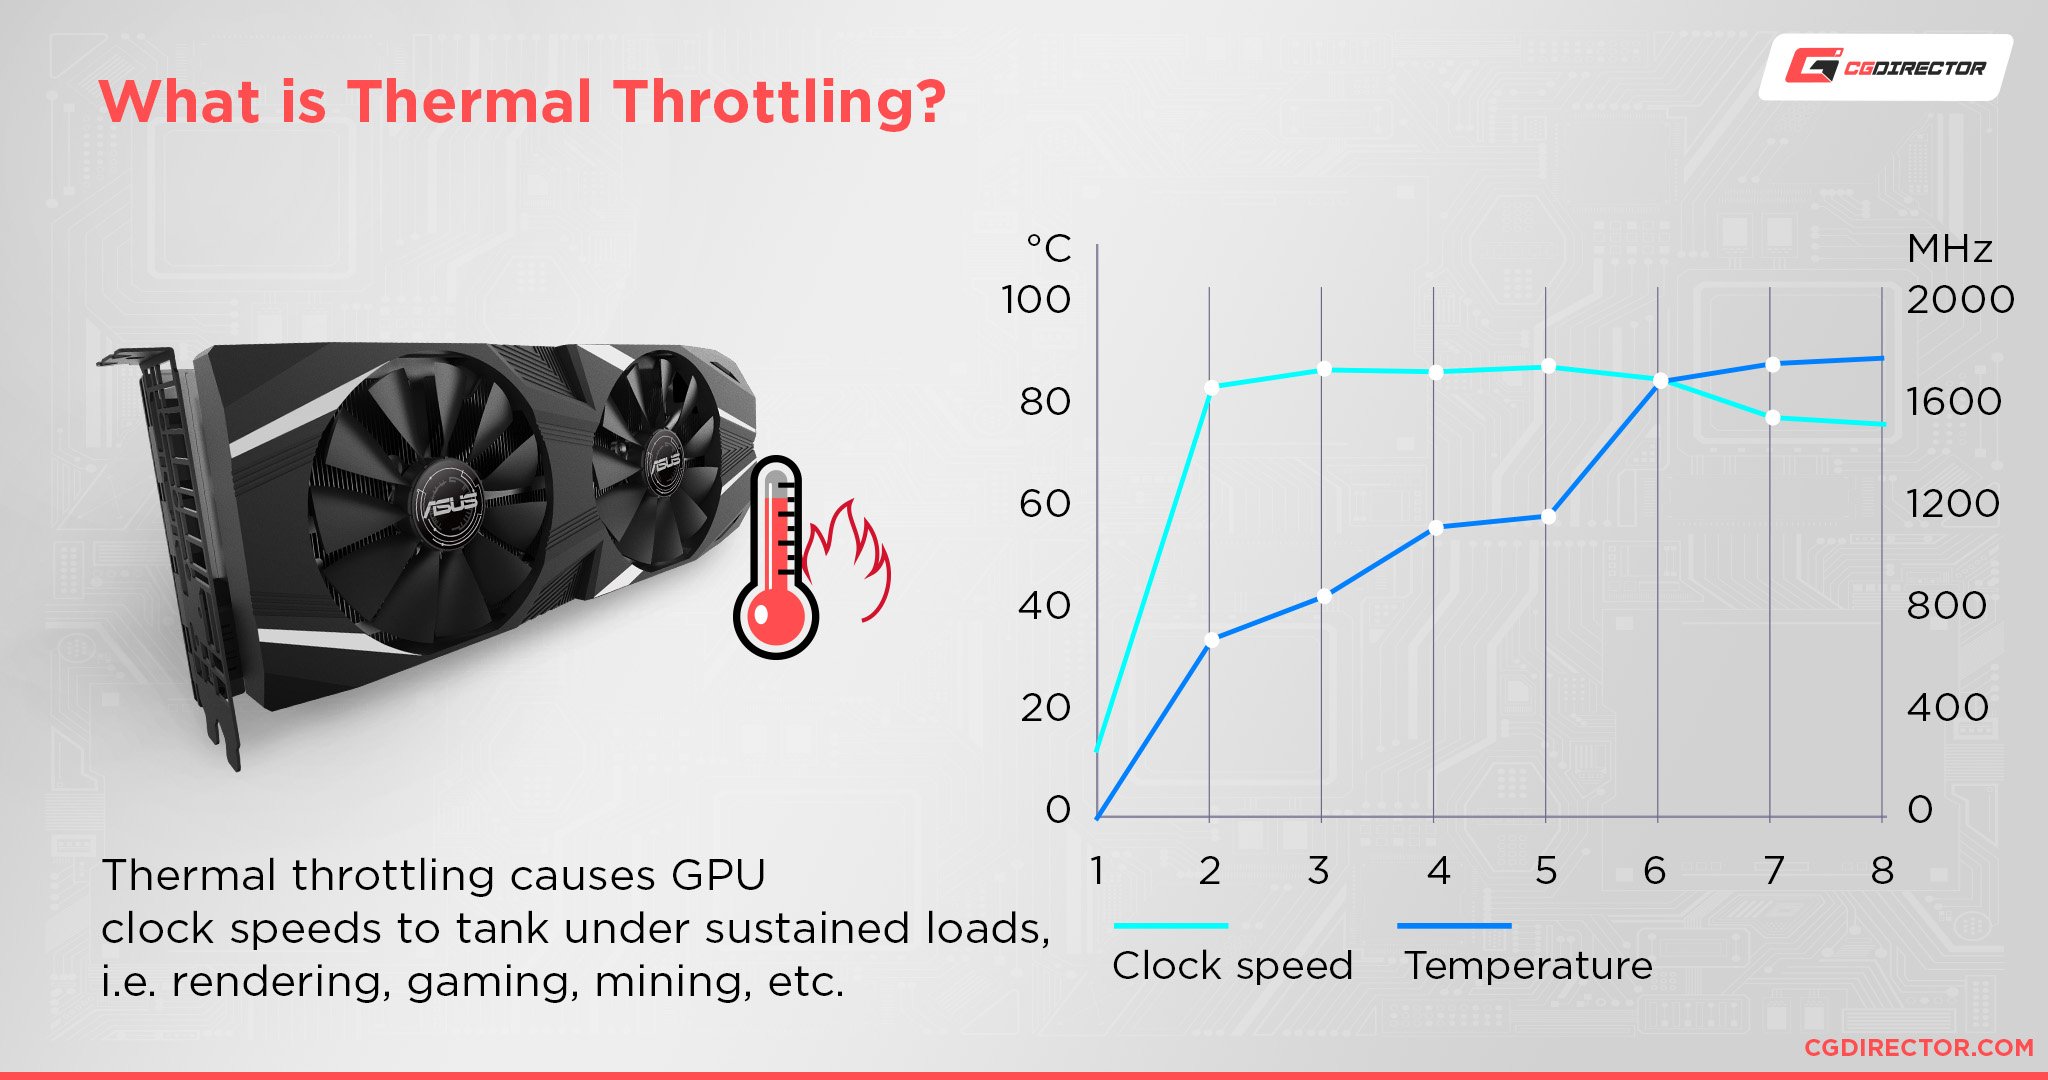
Once thermal throttling starts, crashing becomes a higher possibility, and performance across the board will be reduced until temperatures are under control.
So, how do you monitor this and know when too high is too high?
How To Monitor GPU Temperatures & How High Is Too High
Fortunately, Windows 10 and newer Windows OSes have a GPU utilization and temperature monitor built right into the Task Manager’s Performance Tab (CTRL + SHIFT + ESC).
The temperature will be displayed in degrees Celsius, like with other hardware monitoring applications.
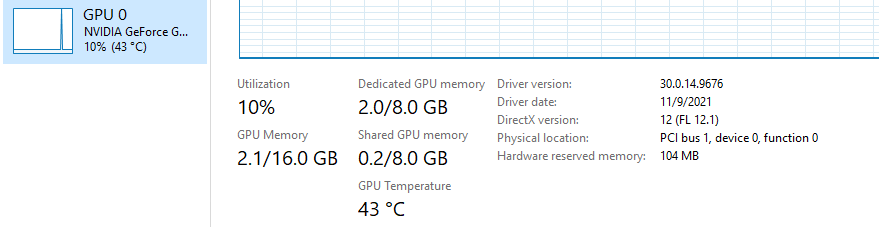
Task Manager’s Performance Tab showing GPU’s temperature
This is an easy way to check the temperature and utilization of your graphics hardware at any given time.
In the screenshot above, my card is more-or-less idle, with my CPU doing most of the heavy lifting for my productivity and writing workloads.
However, if I boot up Devil May Cry 5 and start running around for a bit, those temperatures will quickly rise:
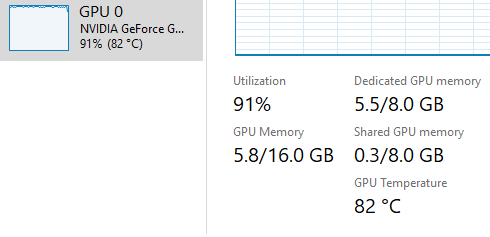
GPU’s temperature quickly rising when playing a high-end PC Game
So with that being said and demonstrated, what level of GPU temperatures should be considered too high?
Fortunately for me, 82 degrees Celsius is a perfectly safe range for a GPU under heavy utilization to be running at.
A dangerously high GPU temperature starts at about 95 degrees Celsius. This temperature zone is dangerously hot for most GPUs and an actual problem that will force thermal throttling for any GPU being pushed past this temperature.
If the overheating is severe enough and the thermal throttling isn’t enough by itself, you may even experience a crash.
Below 90 degrees Celsius is generally considered an ideal zone for a GPU under heavy load. If you can get below 80 degrees Celsius at load, you may even have some extra overclocking headroom.
How To Lower Your GPU Temperature
Disable Any Overclocking You May Be Using
If you’re overclocking, you’re definitely running your GPU with more power and, as a result, more heat.
If your overclock is stable despite running hotter, then that’s okay, but you should still make sure that a GPU overclock isn’t pushing you into that danger zone of 90-95 degrees Celsius!
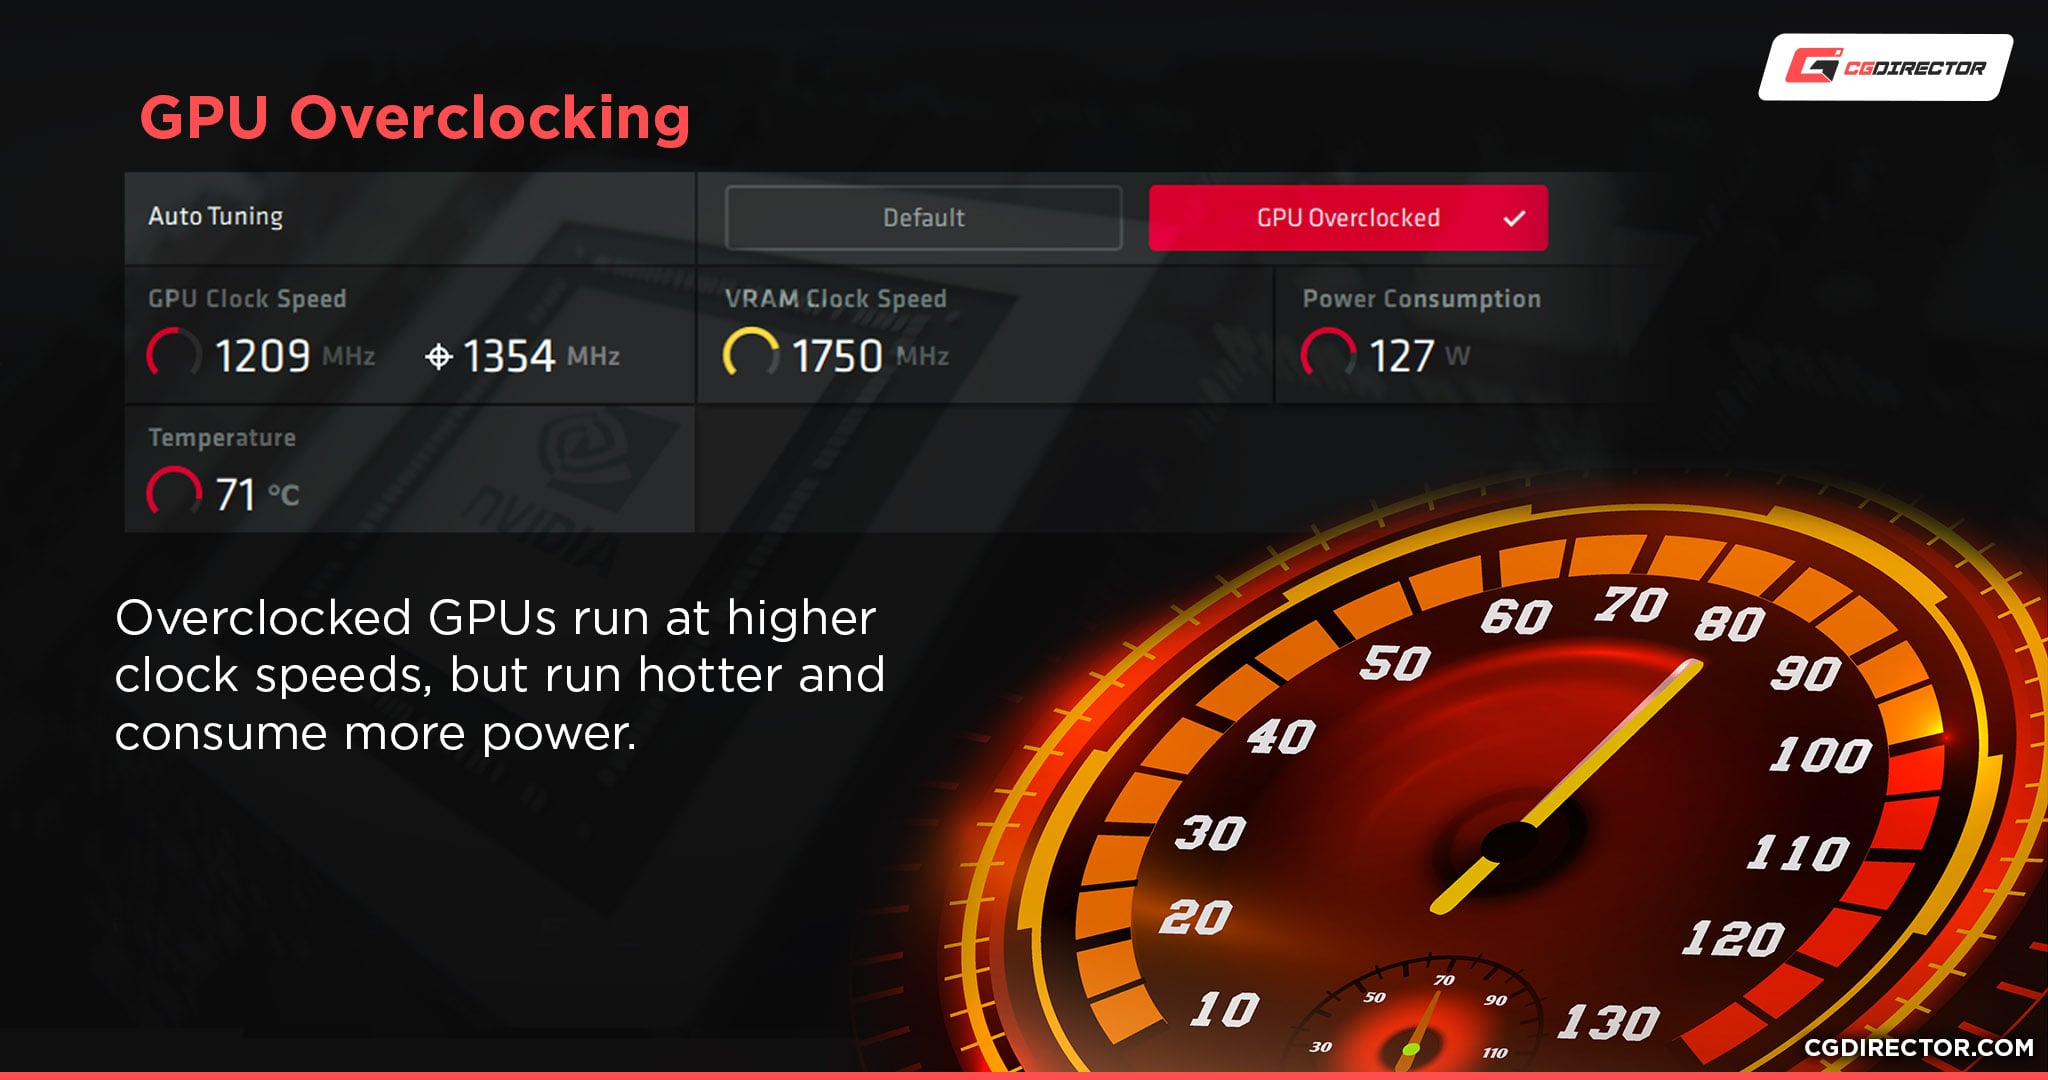
Even if it somehow isn’t causing your card to crash, it’s definitely raising your temperatures and can even have a long-term impact on your hardware if it’s constantly in the danger zone.
Moving past this point, I’m going to assume you’re running your GPU at stock clocks.
You can still consider these other options, but your overclock is most likely to be the culprit in this scenario.
Set A Higher GPU Fan Curve
With modern GPU monitoring software, setting and controlling fan speeds has become extremely accessible.
With my Gigabyte GTX 1070 and Gigabyte’s “XTREME Gaming Engine”, I have a few buttons that let me set my Fan Speeds easily.
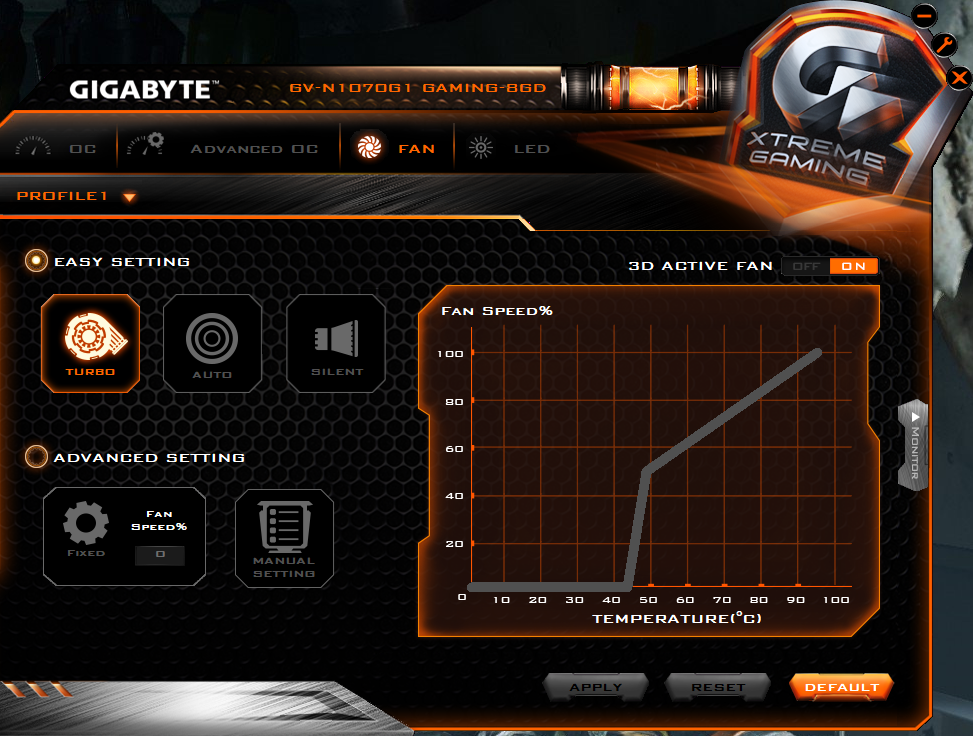
If you want the most seamless experience, find your GPU manufacturer’s support page for your specific graphics card and download the compatible utility.
If that sounds like too much work or you aren’t sure you have access to the information, try to download and install MSI Afterburner instead.
Within MSI Afterburner, you should be able to set your own Fan Speed curve with any graphics card, even for GPUs from other Graphics Card brands than MSI.
Setting your Fan Speed to kick into high speeds around the 50 degrees Celsius mark is a good way to keep your temperatures down, should you opt for this route.
Undervolt Your Graphics Card or Set A Low-Power Mode
Using a GPU tweaking utility like MSI Afterburner (linked in the above section), you don’t just have to overclock your GPU.
You can also do something called undervolting.
Undervolting is similar to setting a low-power mode, except with the goal of maintaining all stock clock and memory frequencies.
If you can do this with your graphics card, you can effectively stabilize its performance and lower its heat exhaust by having it do mostly the same thing, but without actually stressing its components.
This is an especially valuable option for laptop users, who don’t have as many options for achieving higher performance via raw cooling.
If you want an easy option to reduce coil whine and don’t care about possible performance reduction, set your Windows Power Plan to Balanced or even Power Saver.
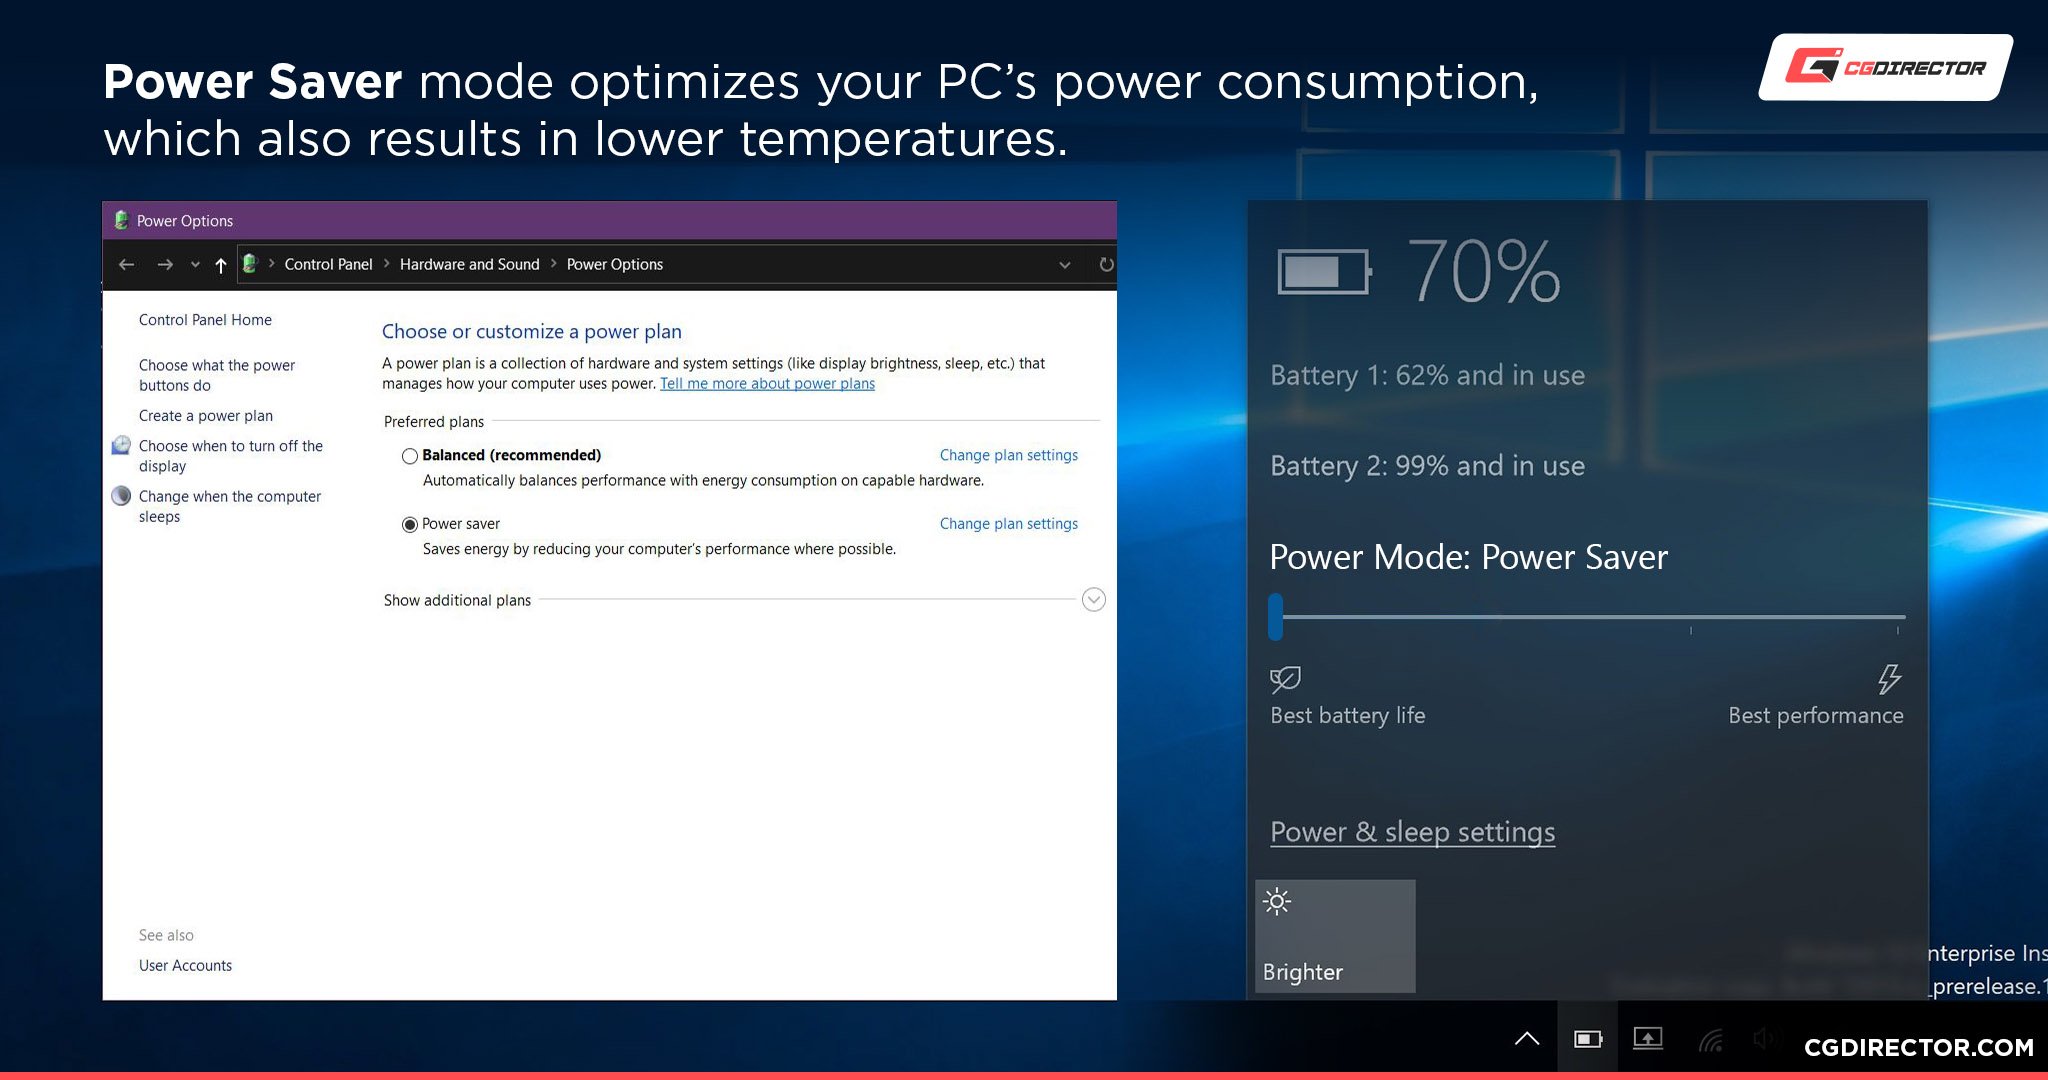
This should reduce power consumption across the board, but especially prevent your GPU from reaching its maximum limits. This will help prevent coil whine, but you will lose performance as a direct result.
Set An FPS Cap
Did you know that uncapped FPS increases the likelihood of coil whine?
It’s true- especially if you’re running a game at hundreds or even over a thousand FPS. This can happen surprisingly frequently with older 3D games being run on cutting-edge modern hardware, as well as a lot of eSports titles.
Setting an FPS Cap of 60 should prevent this from happening in nearly anything unless there are titles you already don’t reach 60 FPS in. (In which case maximum GPU utilization may still result in coil whine, and you’ll want to lower settings or your cap.)
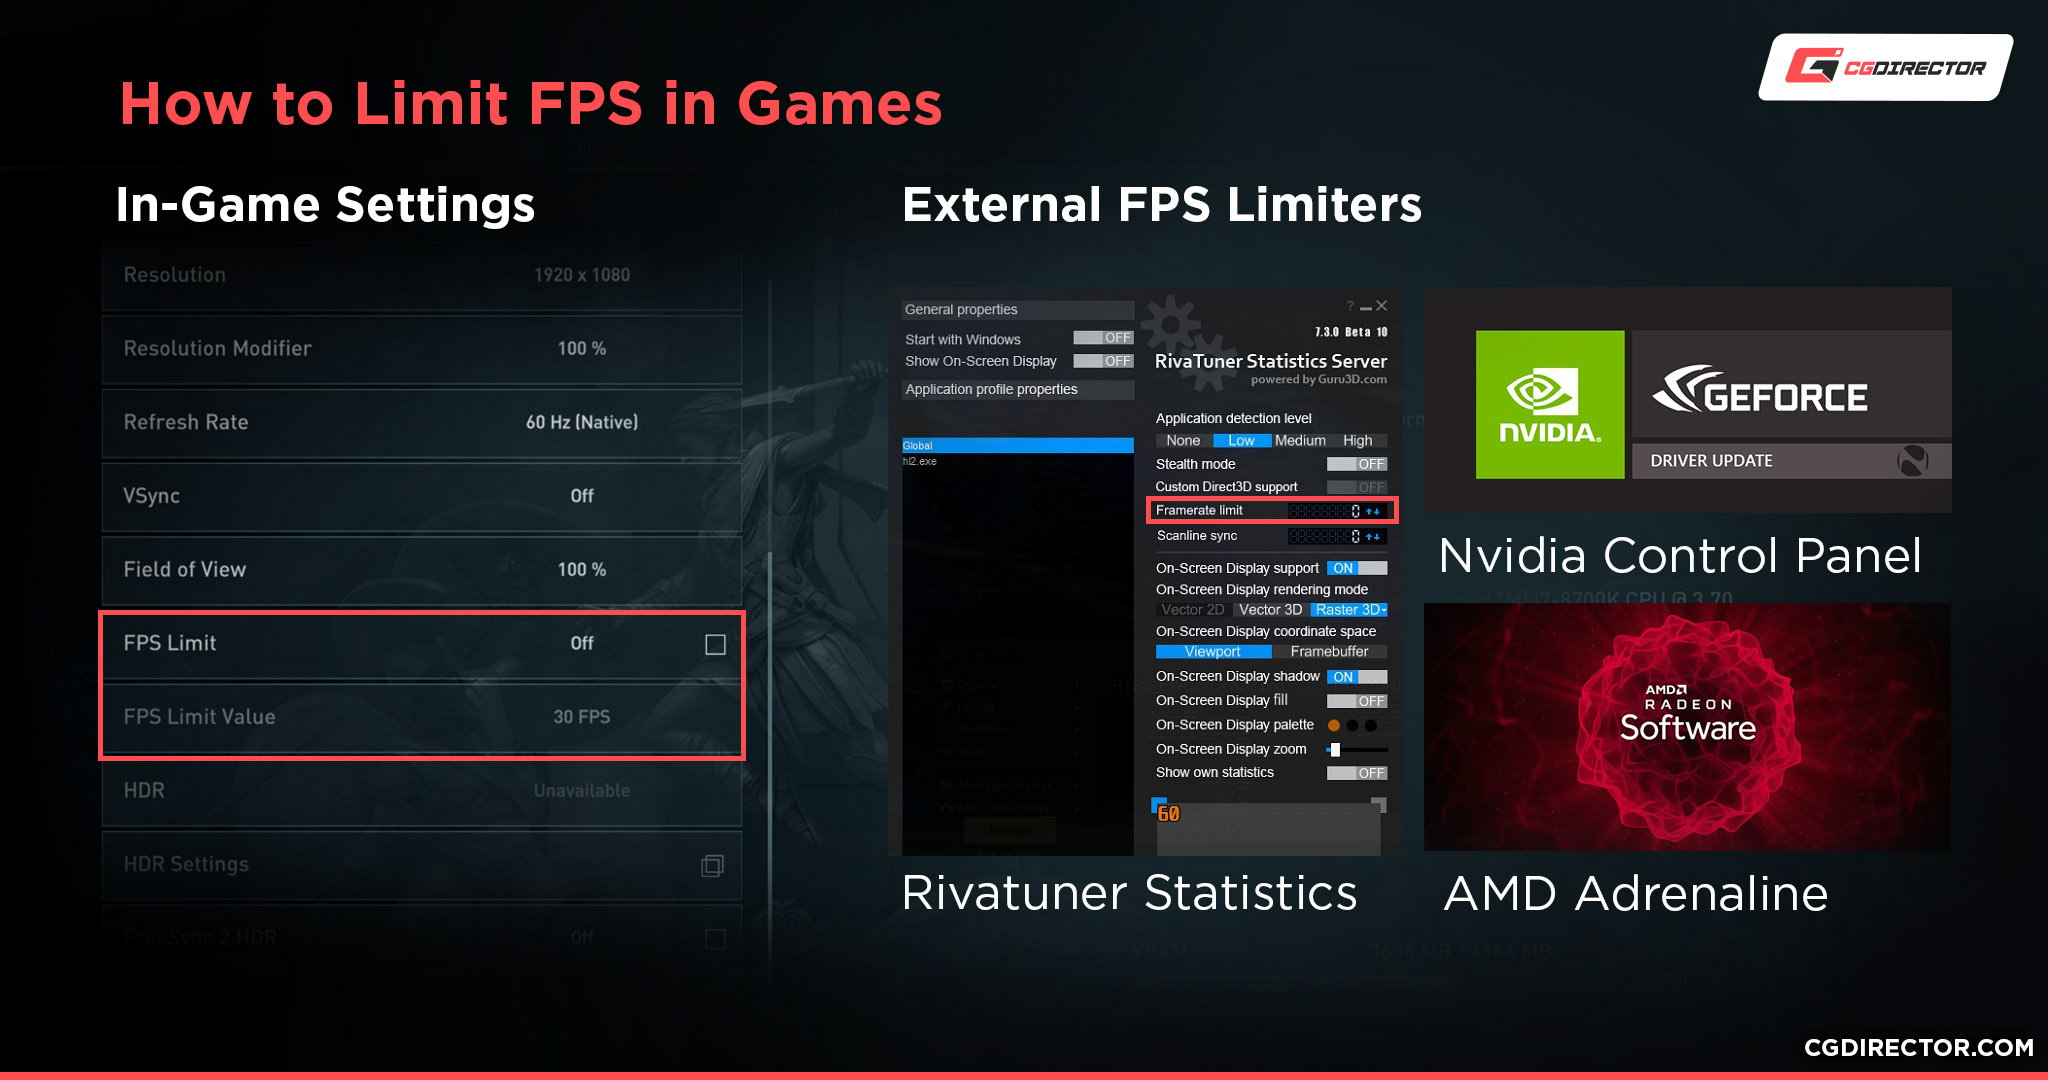
Even if you use a high-refresh rate monitor, setting an FPS cap to somewhere that is consistently reachable should result in a smoother overall gaming experience, even if you have to opt for something like 100 or 144 FPS instead of 100+-but-jumping-around-constantly FPS.
There are a few different ways to go about capping FPS. The best way by far is to do so within the engine of the game you’re playing, usually by finding an in-game setting or console command.
If the game you’re playing doesn’t support this feature, the next-best option is to use RivaTuner Statistics Server to set an FPS cap on that specific game.
You can even choose to make Global or Game-Specifics profiles in RivaTuner to streamline or customize this process as you choose.
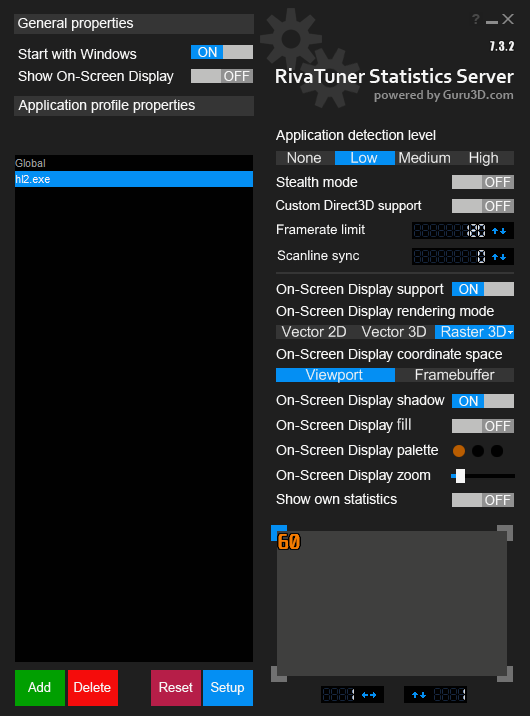
A 120 FPS limit set for hl2.exe- Team Fortress 2’s version, specifically. My Global cap is a 144 FPS fallback for games where I can’t set an in-game limiter. – Image-Credit: RivaTuner
You can also use V-Sync in your games to cap your FPS and reduce screen tearing, but doing so will come at the cost of increased input latency and more drastic decreases to FPS when they do occur, most noticeable with double-buffered V-Sync.
Triple-buffered V-Sync alleviates this since its frame drops are usually two-thirds of full FPS rather than one-half of full FPS like with double-buffered V-Sync.
In general, I would recommend using an in-game limiter or RTSS to cap your frame rate and use a FreeSync or G-Sync Monitor from there to eliminate screen tearing.
The added input latency from V-Sync and its more direct impact on FPS drops when they occur leans me against recommending its usage outside of games where it’s explicitly recommended.
Use Compressed Air To Clean Your Graphics Card
Owned your graphics card for a few years, bought it used, or just think it could use a good dusting? You can use a can of compressed air to accomplish this with safety and precision.
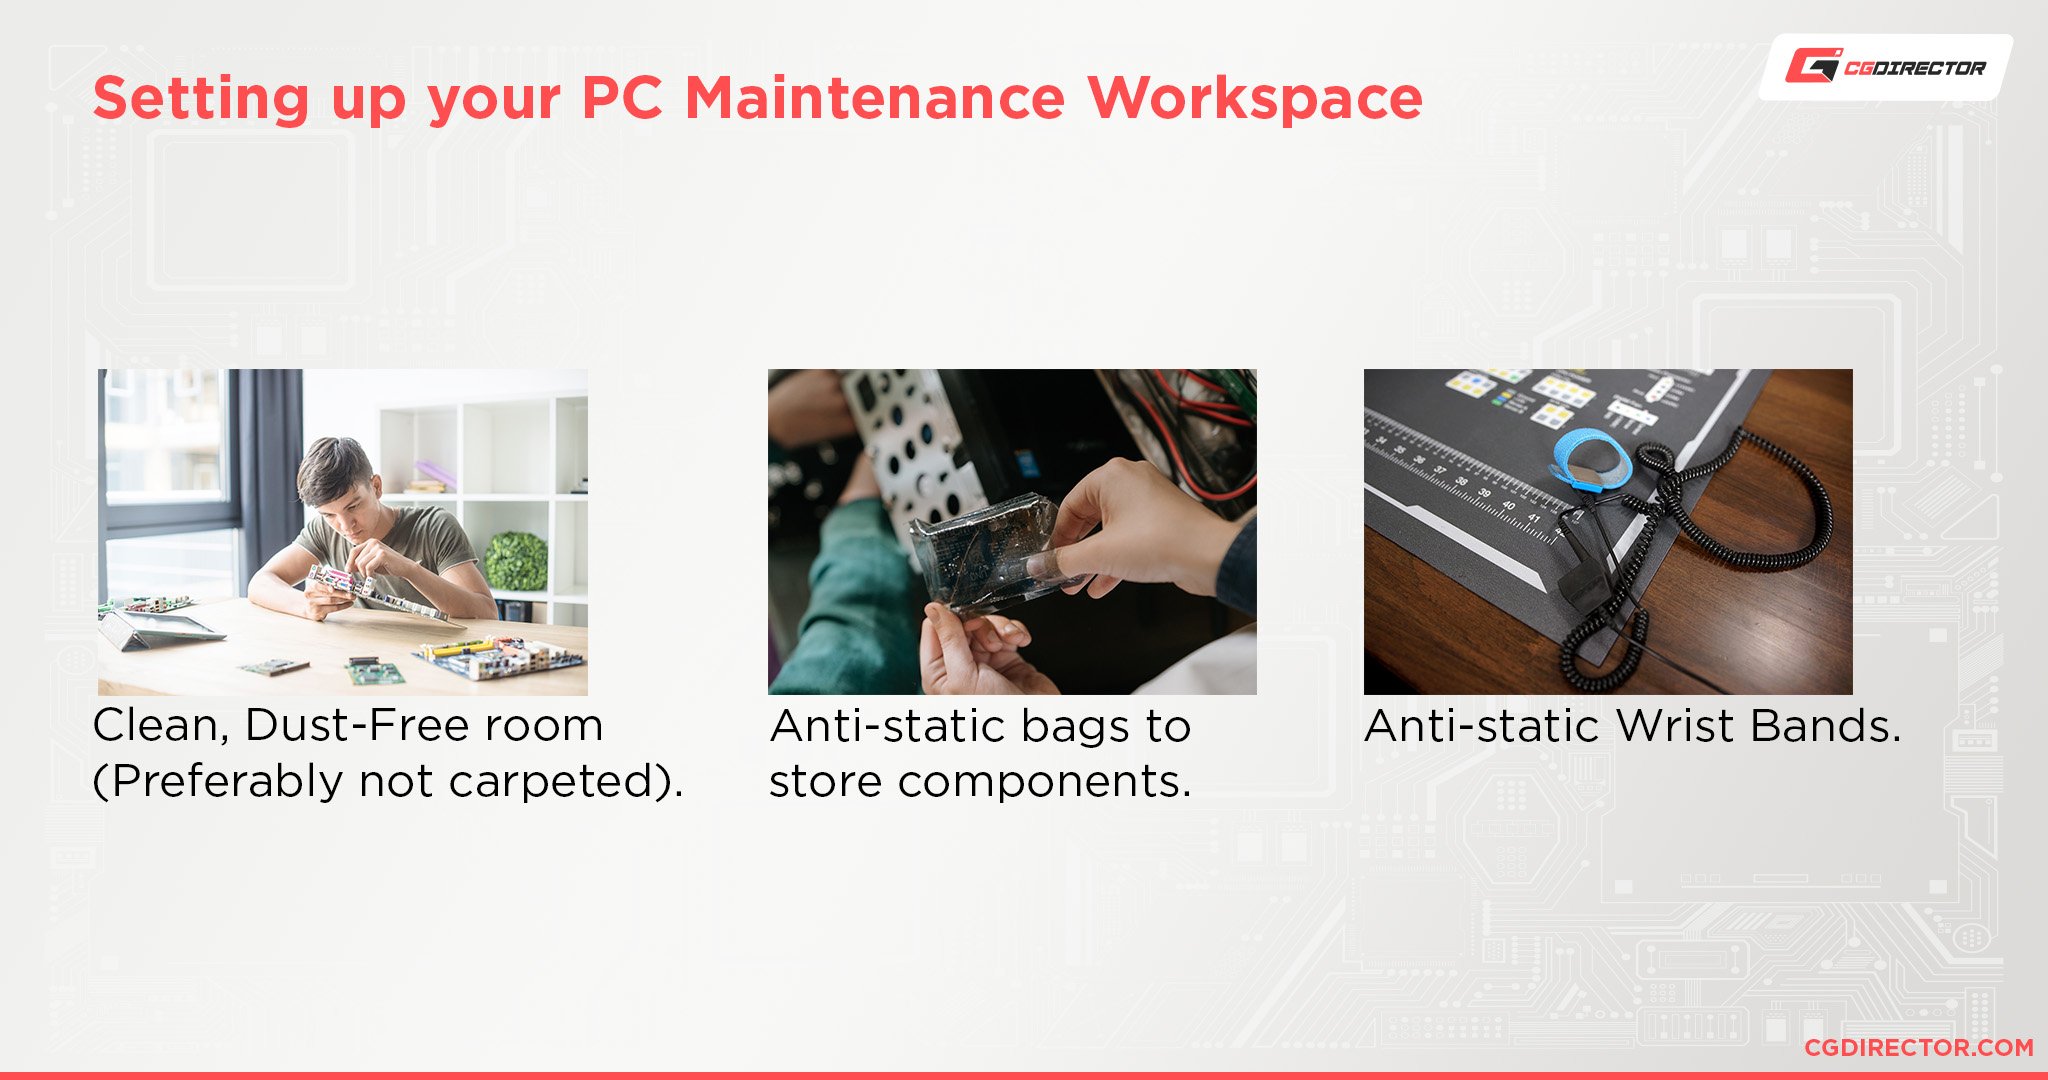
First, completely shut down your PC. Then, switch off the power supply and unplug the system. Press the power button a few times to clear any excess power that might be lingering in your system, then ground yourself. (Use an anti-static wristband if you’re worried about static discharge!)
Once grounded, safely remove your graphics card from your PC and take it somewhere, preferably outdoors, for dusting.
It’s a fairly straightforward process to dust something with compressed air, you’ll just want to hold your fans still when you’re cleaning around them to prevent them from being propelled by the compressed air. Skipping this step can break the bearings on your GPU fans, so don’t skip it!
If you feel your PC, in general, has a lot of dust buildup, it can be helpful to dust the entire thing, not just your graphics card.
In this case, my advice is largely the same, but to keep the fan point in mind for your various case and cooling fans, not just your GPU fans.
Plus, if you’ll be dusting your entire PC, the can will freeze up fairly easily- if this happens, just take a short break before returning to dust again.
Add Case Fans To Improve Case Airflow (Benefits All Components, Especially Open-Air GPU)
If you’re using a large Mini ITX or most Micro ATX and ATX cases, chances are you have room for a few extra case fans.
Improving the airflow in your entire case will also improve the performance of any coolers and heatsinks present inside, thanks to the presence of cooler air and proper airflow helping encourage intake and exhaust.
This especially applies to graphics cards with open-air style cooler designs, which just kind of exhaust heat in every direction without strong case airflow.
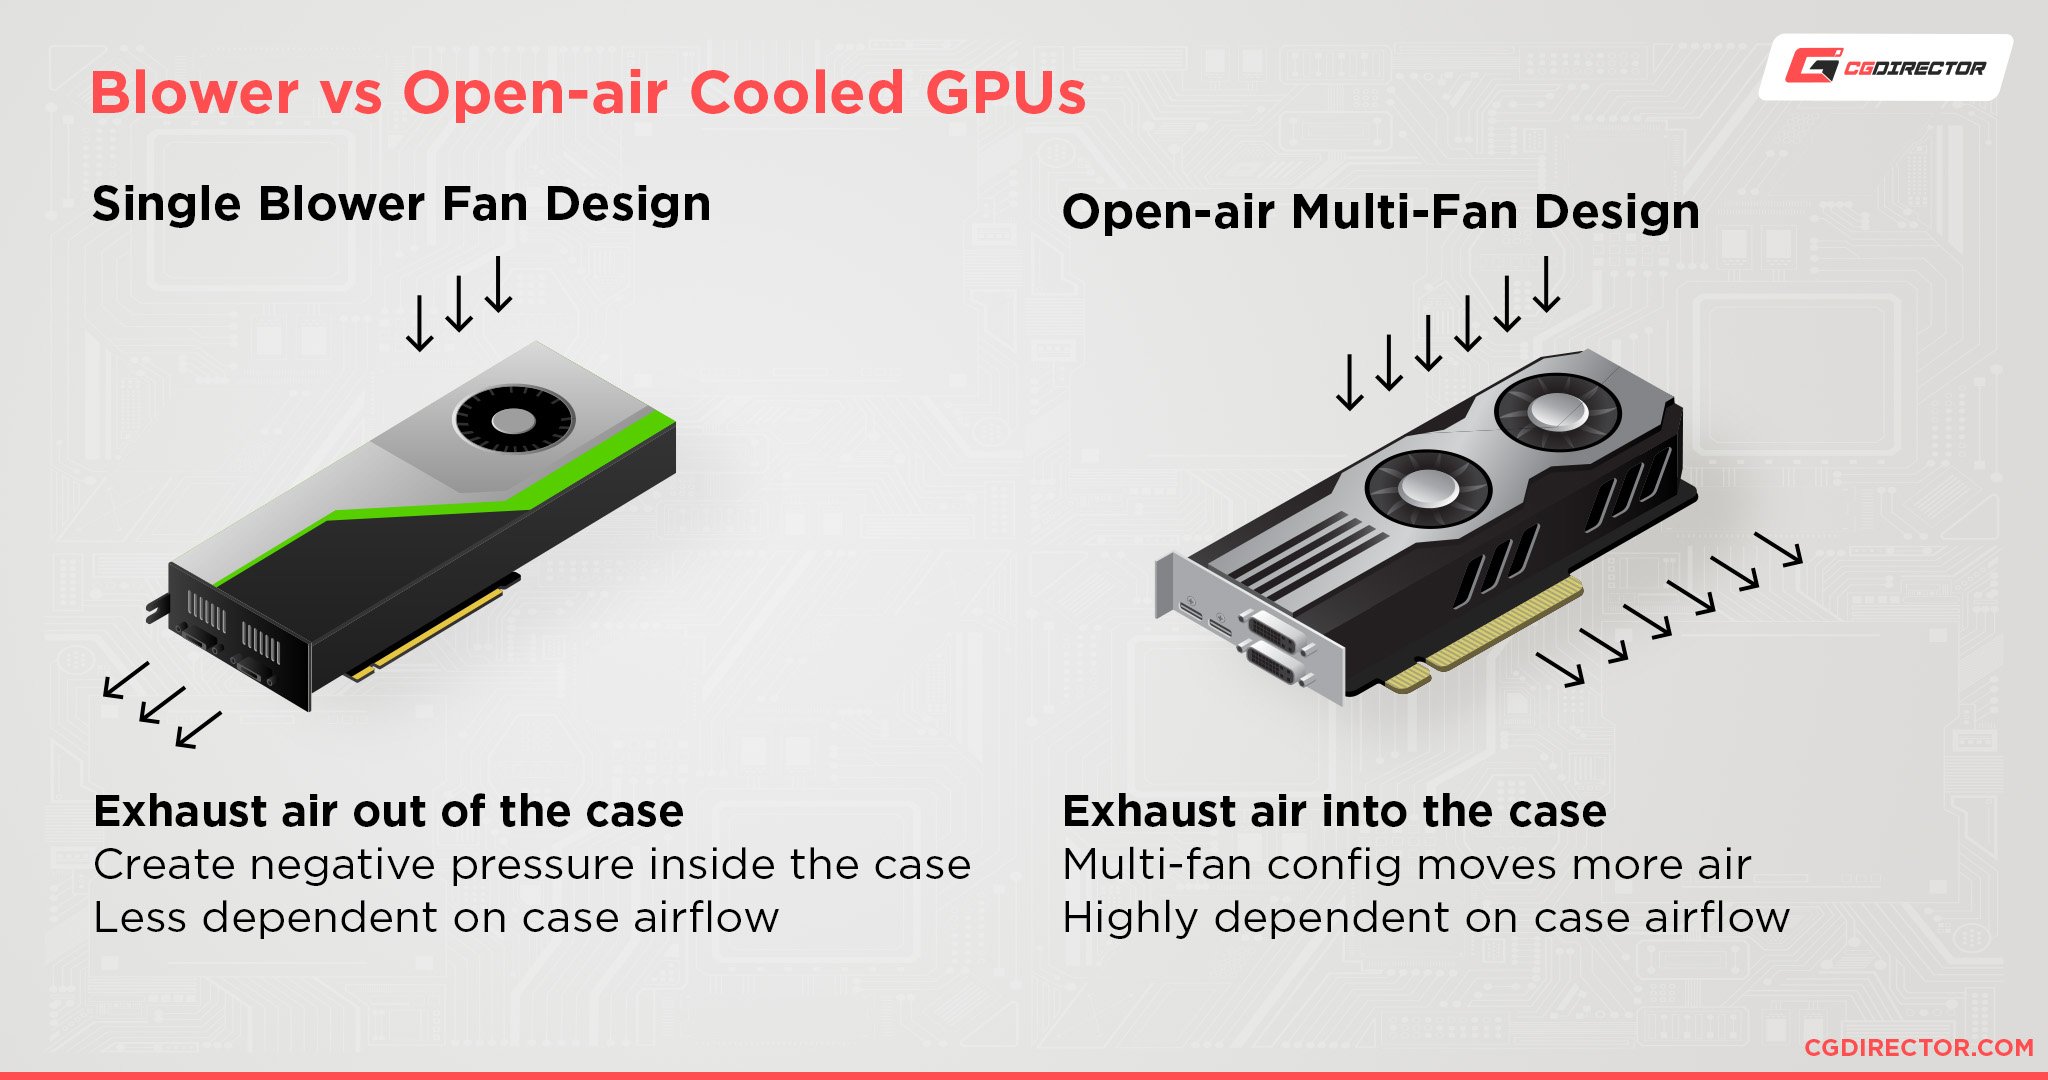
Comparatively, a blower-style GPU devotes its fans to the job of rapidly sucking air in and exhausting it outside of the case.
This can be done with a more low-profile design than with open-air cards, and actually makes the blower-style cards ideal for use in an HTPC or Mini ITX PC build.
Want to learn more about the difference between Blower-Style and Open-Air Graphics Cards? Check out Alex’s detailed guide on the topic.
Replace The GPU’s Thermal Paste
I’ve put this option at the end of the list because it’s the most severe option, but it’s also the one that’s most guaranteed to help, especially if you’re using an older graphics card.
It turns out that most thermal paste is destined to start degrading after about two or three years.
The compound used in hardware that’s never meant to be opened up by the end-user (like laptops or GPUs) is commonly estimated to last about five years, but your mileage may vary when it comes to PC hardware.
When thermal paste degrades, its ability to transfer heat from the GPU chip to the attached cooler is reduced. This results in abnormally high temperatures, even when fans are being run at full throttle, and as a consequence will decrease performance when the card begins to throttle.
Replacing your GPU thermal paste will require it to be professionally taken apart and the original paste cleaned off safely.
If you aren’t comfortable doing this or don’t know-how, definitely let a professional do it for you!
If you want somewhere to start looking for a good Thermal Paste, check here for our top recommendations.
FAQ
Does Undervolting Decrease Performance?
No. Undervolting can’t be done alongside overclocking (which requires more power to drive higher clocks), but in most scenarios should be easy to get working with a GPU running at stock clock speeds.
By intelligently lowering the voltage, you can effectively stabilize GPU performance at stock while generating less heat and consuming less power.
As a bonus, it should also reduce coil whine.
While undervolting poses no permanent risk of any kind to your hardware, you may still experience crashing if you try to push your voltages too low.
If you’re interested in undervolting your graphics card and aren’t sure where to start, this YouTube guide from Optimum Tech can help you out.
Over to You
Have any other questions about GPU Temperature? Feel free to ask us in the comments or our forum!
![Guide to Undervolting your GPU [Step by Step]](https://www.cgdirector.com/wp-content/uploads/media/2024/04/Guide-to-Undervolting-your-GPU-Twitter-594x335.jpg "Guide to Undervolting your GPU [Step by Step]")

![Are Intel ARC GPUs Any Good? [2024 Update]](https://www.cgdirector.com/wp-content/uploads/media/2024/02/Are-Intel-ARC-GPUs-Any-Good-Twitter-594x335.jpg "Are Intel ARC GPUs Any Good? [2024 Update]")
![Graphics Card (GPU) Not Detected [How to Fix]](https://www.cgdirector.com/wp-content/uploads/media/2024/01/Graphics-Card-GPU-Not-Detected-CGDIRECTOR-Twitter-594x335.jpg "Graphics Card (GPU) Not Detected [How to Fix]")

0 Comments