 by
by 
TABLE OF CONTENTS
First-time PC builders often shy away from tinkering in the BIOS (understandably). But, unfortunately, to set your memory to its rated speed, there’s no way around getting your hands dirty with so-called XMP Profiles.
You can quickly check whether your RAM is working at its rated speed. Open up your Windows Task Manager, navigate to the Performance tab, and select Memory.
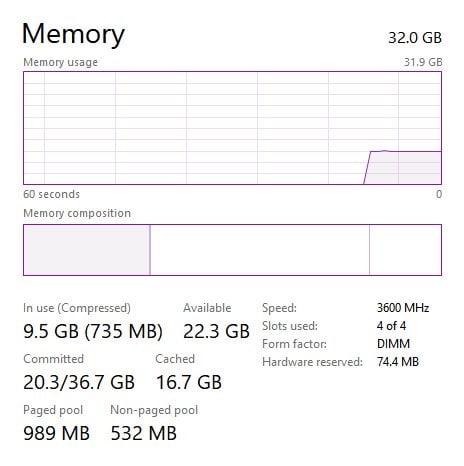
Windows Task Manager > Performance > Memory
As you can see, the memory on this system is running at the rated 3600MHz speed.
If you see a number lower than the RAM you purchased had advertised, you have to dive into your BIOS and mess around with a couple of settings to get it working. Motherboard manufacturers have thankfully simplified this process to such a degree that you’ll only need to enable a profile to get your memory working at its rated speed.
Note – For workstation machines, it’s always best to avoid pushing memory clocks too high or tightening memory timings too much as our primary objective is stability.
Why Doesn’t Memory Just Run at Its Rated Speed?
People might wonder why you need to put in all this extra work to get your 3600MHz memory kit working at that 3600MHz speed. So why does it decide to drop down to a paltry 2133MHz? A processor that boosts up to 4GHz doesn’t require you to go into BIOS and mess around with settings to get it to 4GHz. It just works.
RAM is a bit more finicky in that regard. Although a memory manufacturer would like to guarantee all speeds they advertise, so much depends on external factors like power delivery, motherboard, and even the CPU’s memory controller, it’s almost impossible to promise a speed that works on every hardware combination.
That’s where the JEDEC (Joint Electron Device Engineering Council) standard comes into the picture. This standard sets the lowest bar that a memory module needs to meet, and that’s usually where your RAM sits when you plug it into your system.
Why? Because it’s a safe speed that will work with EVERY RAM, CPU, and motherboard combination out there. If your PC doesn’t boot when you plug in your memory kit, you won’t be able to tinker around in your BIOS and fix things. That’s why the standard exists – to guarantee a working machine.
If you want speeds higher than the JEDEC DDR4 standard, there’s no option but to overclock your memory kit. This sounds scarier than it is, honestly. It’s easy!
A 3600 MHz RAM kit, for example, is an overclock tested by the memory manufacturer and indicates its rated speed. However, it does NOT guarantee that speed to everyone. As I said, there are far too many variables involved for a manufacturer to definitively promise higher speeds or lower latencies.
What is an ‘XMP’ Profile?
XMP, or Extreme Memory Profile, was originally an Intel standard used exclusively on Intel platforms. Today, it’s become an informal way to address memory profiles for any platform. Some manufacturers use the terms A-XMP or DOCP on AMD motherboards to limit the ‘XMP’ terminology only to Intel.
Memory manufacturers now include these memory profiles, so you don’t need to go in and tinker with memory timings or voltages manually. Just enable it, and you’re ready to go. It’s a preset sequence of memory timings that will most likely work with that particular memory kit.
Note – Setting a memory profile does NOT guarantee stability. If your PC refuses to boot or constantly crashes after you set a profile, don’t panic. Just reset BIOS to its defaults and disable the XMP profile. If you can’t access the BIOS because your system won’t get a display, power cycle a few times until BIOS prompts you to reset settings to default/sets to default automatically and disable the profile.
Let’s go over the steps to set XMP/A-XMP using the ASUS, MSI, Gigabyte, and ASRock BIOS. The process remains similar for Intel and AMD systems.
How to Set XMP in ASUS BIOS
ASUS is a motherboard brand known to house several brands within its brand, so its interface varies depending on the product you buy (Prime, ROG STRIX, TUF, etc.). Here’s what a typical ROG STRIX BIOS looks like (in May 2021):
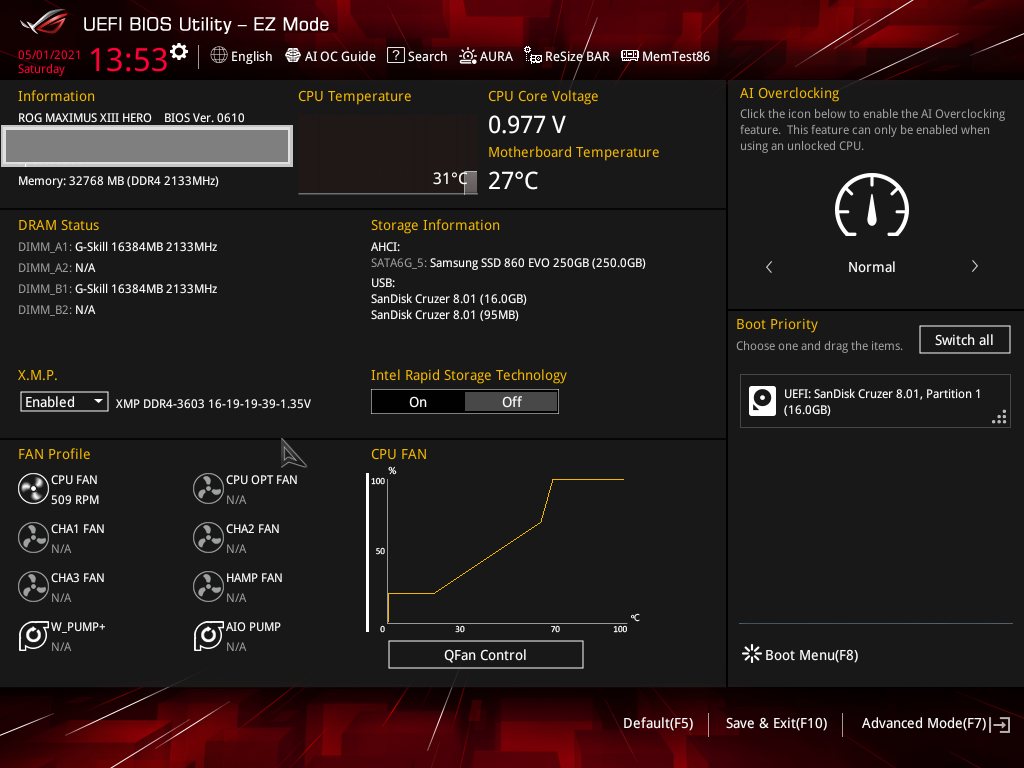
While you can set your memory profile using the ‘EZ’ mode, I recommend familiarizing yourself with the Advanced Mode (by pressing F7).
Setting an XMP profile in ‘EZ’ mode is, well, easy. Under the heading ‘X.M.P.,’ you’ll find your memory profile.
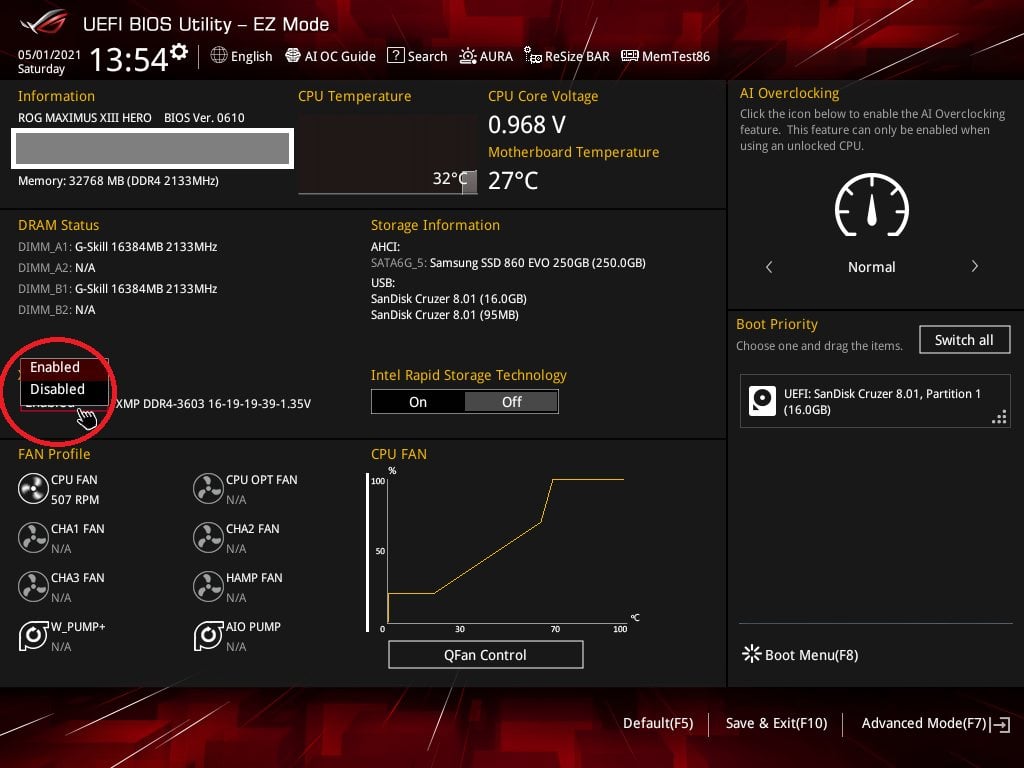
See the circled part of your BIOS page above. Navigate to it using your mouse/keyboard, and you’ll get a drop-down that has just two options. Select ‘Enabled,’ and you’re done! Next, press F10 and confirm to save settings and reboot.
However, I recommend using the ‘Advanced Mode’ to set your memory profile to familiarize yourself with the options there.
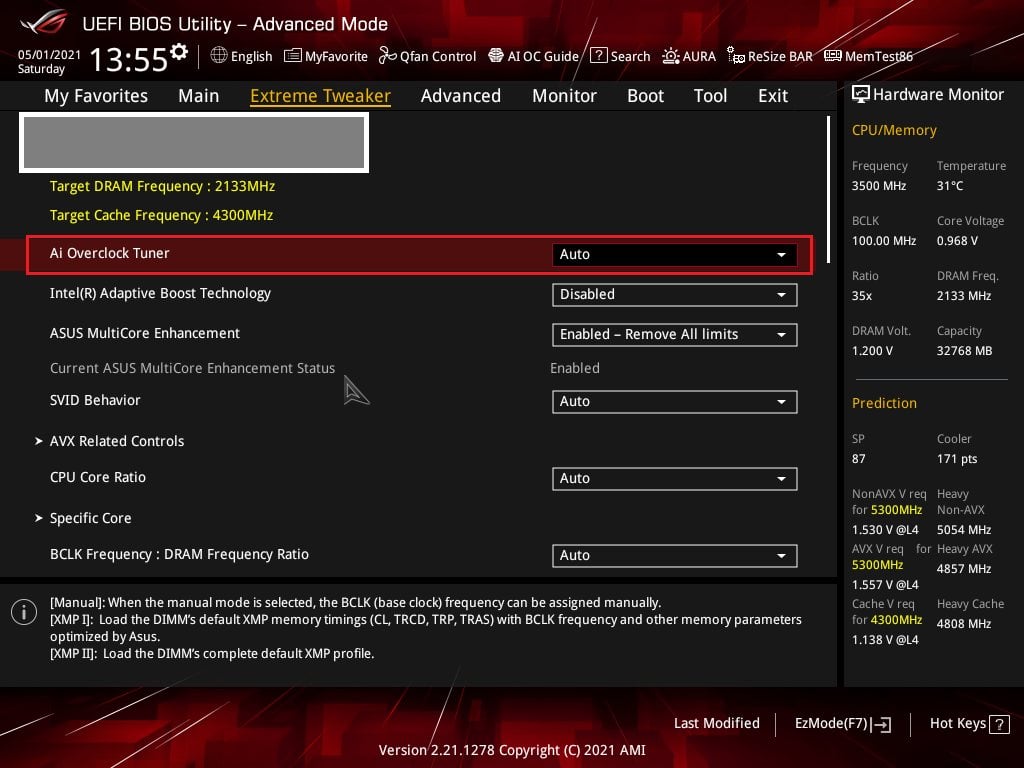
When you hit F7, you should see a page like the one above.
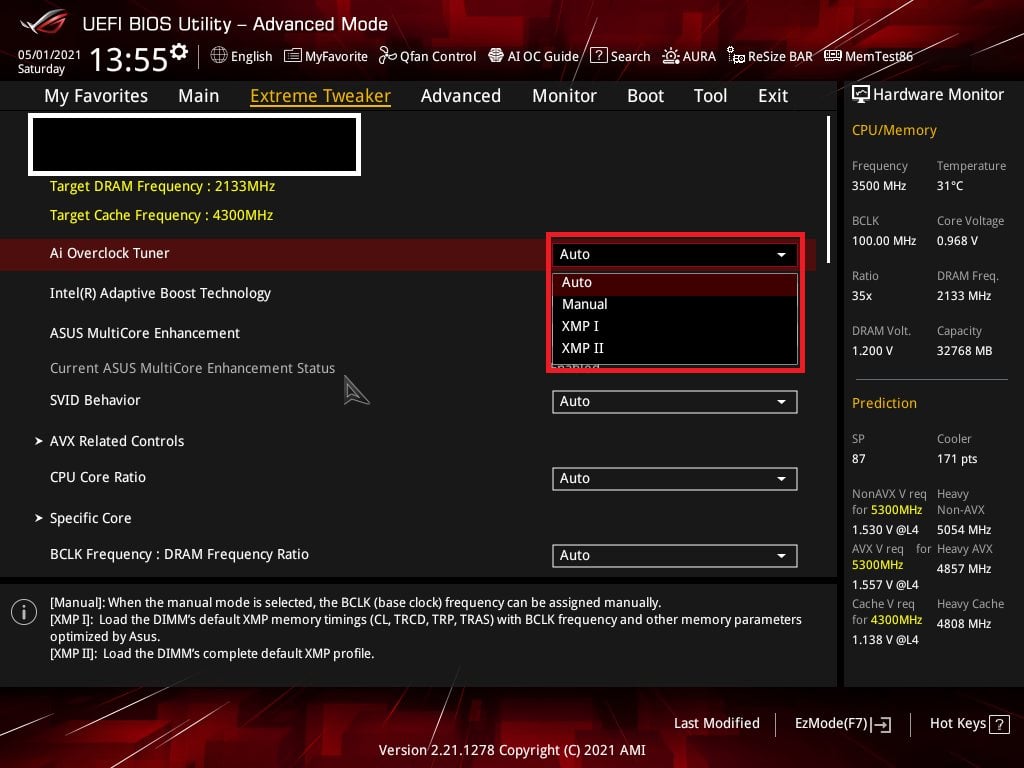
Here, head to ‘AI Overclock Tuner,’ and you should see a drop-down like the one shown above. Select XMP 1.
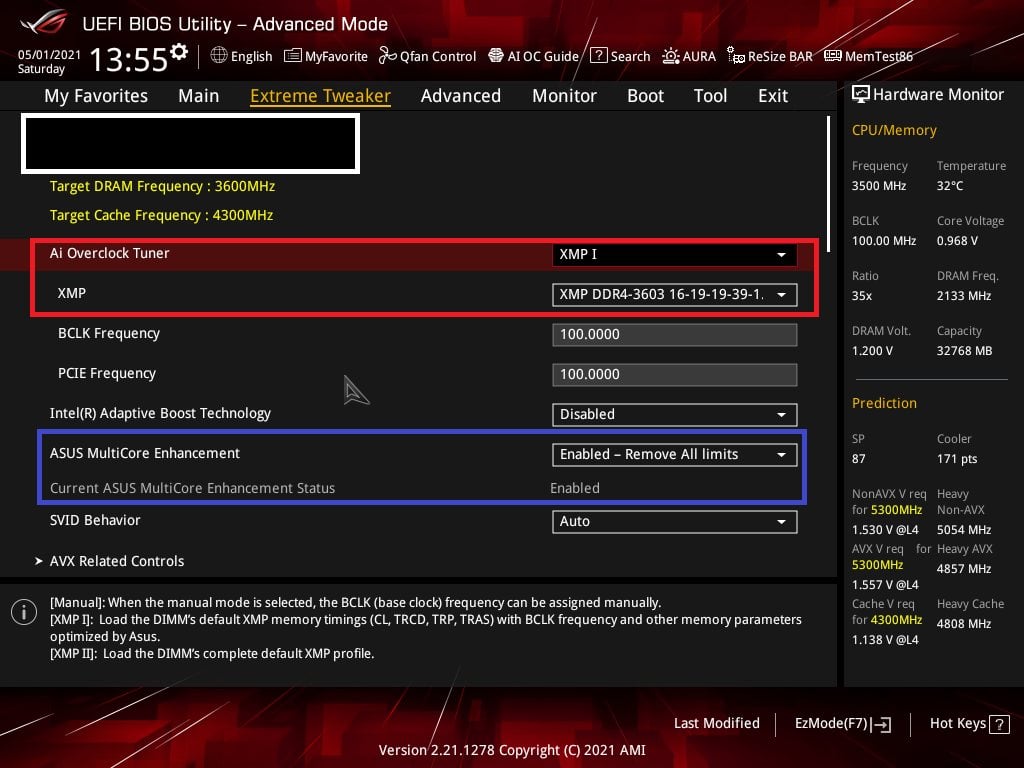
Once you’ve selected a profile, you should see a speed and its timings appear right under it. In our case, we know that Profile 1 or XMP 1 will set our memory to its rated DDR4 3600 CL16 speed.
Another thing you might want to look at is ‘ASUS MultiCore Enhancement.’ When enabled, it removes the power limits to keep processor power draw in check to ensure that it can boost as high as it can. The downside? A lot more power draw for a 5-10% bump in performance.
If you’re running CPU-intensive workloads like fluid simulations, I’d recommend disabling this option. However, if your work primarily involves working in the viewport, you can leave it on without worrying about excessive power draw.
How to Set XMP in MSI BIOS
MSI’s Click BIOS 5 is a mainstay across almost their entire lineup of mainstream motherboards. As a result, you won’t encounter too much variation in the interface across their product stack. Even if the interface is different (MSI PRO series motherboards, for example), it’s usually only a color variation; the options and navigation don’t change.
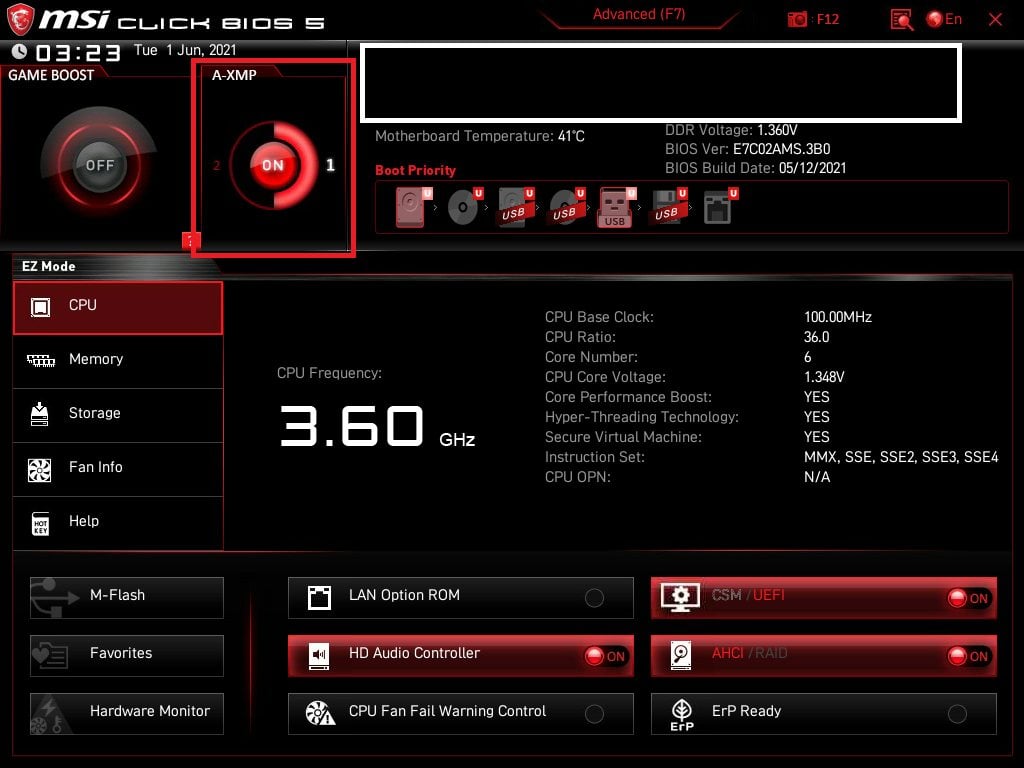
Like most other motherboard manufacturers, you’ll see an ‘EZ Mode’ BIOS interface when entering the MSI BIOS for the first time. Setting a memory profile here only requires you to navigate to the top where it says ‘XMP’ or ‘A-XMP’ and setting it Profile 1 or 2.
Although you can set your memory profile here, I still recommend venturing into the ‘Advanced’ interface.
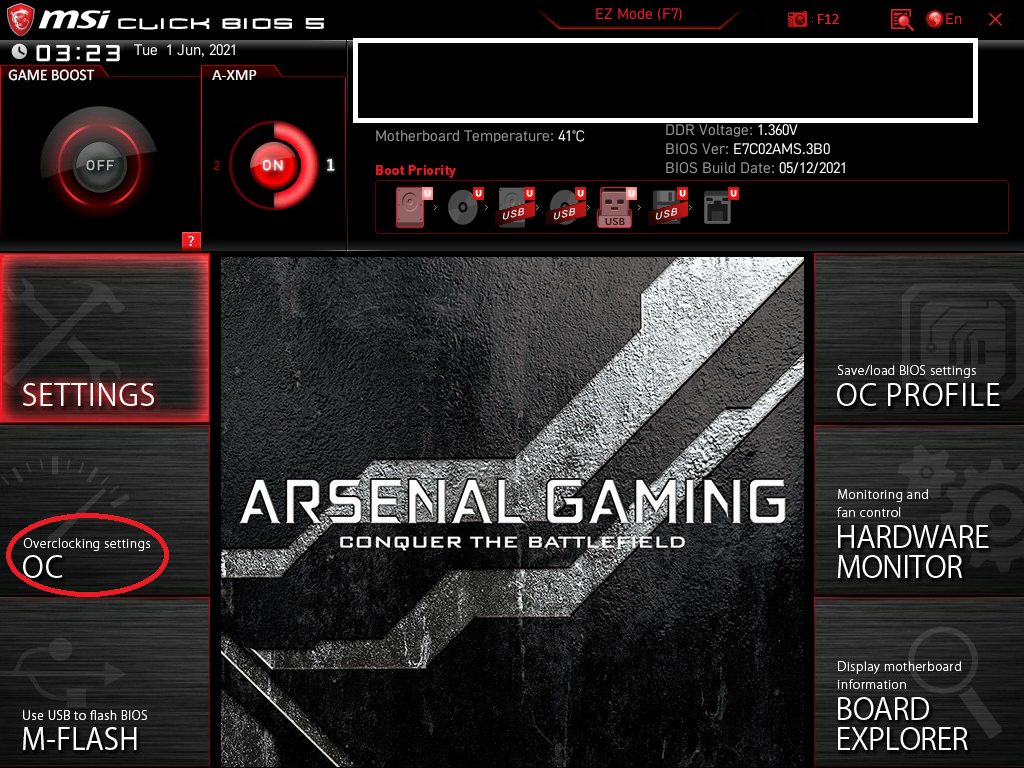
Once you hit ‘F7’ to enter the Advanced mode, you should see an interface like the one above. Next, navigate to Overclocking settings, and you should be greeted by a page like the one shown below.
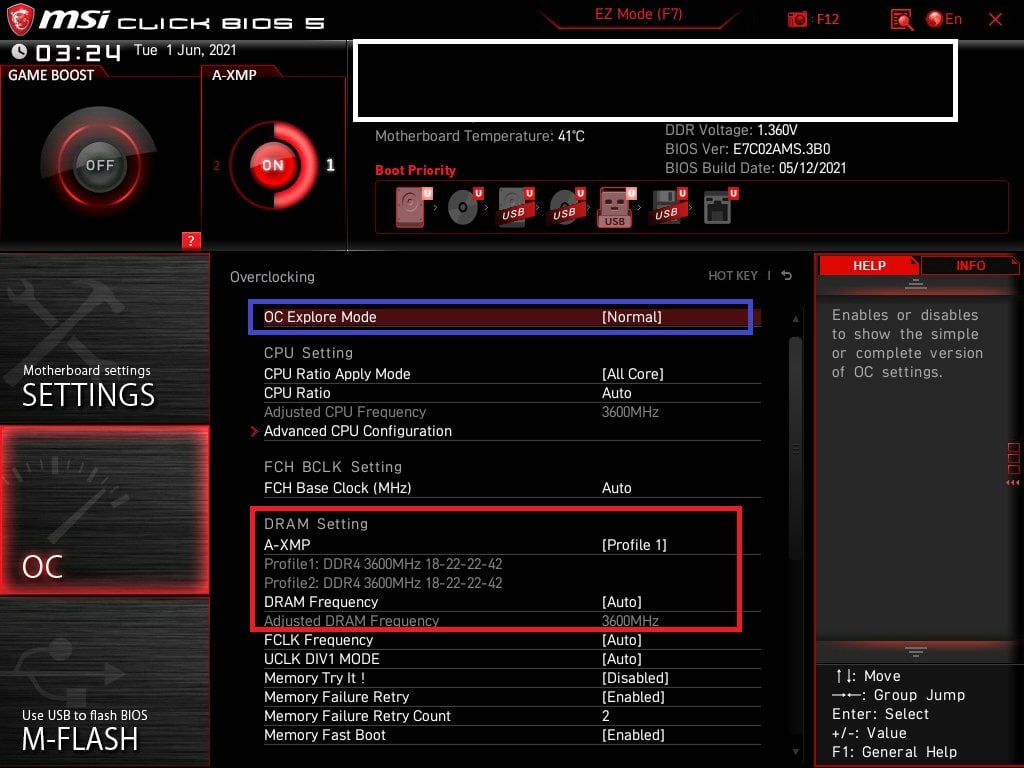
Ensure that ‘OC Explore Mode’ is set to ‘Normal.’ Find the DRAM settings in the list. Navigate to ‘XMP’ or ‘A-XMP’ and hit the Enter key.
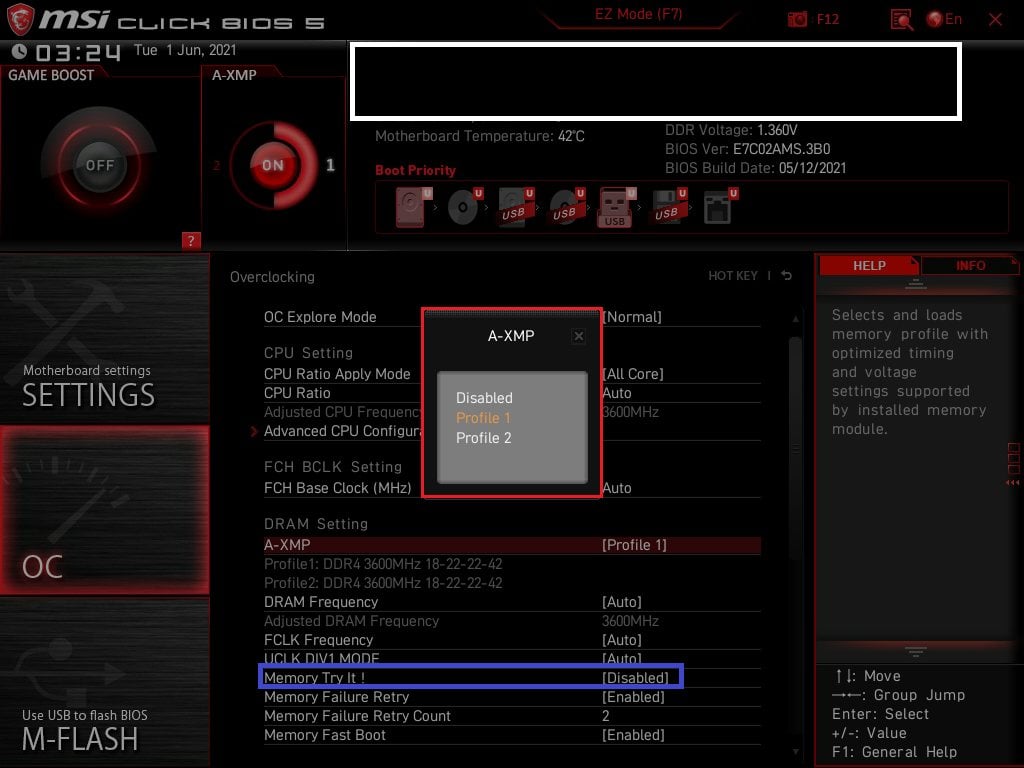
You should see a popup menu that looks like the one shown above. Select Profile 1 and hit Enter again. Both profiles’ memory timings are listed below the A-XMP option. That’s it! Hit F10 and confirm to save settings and reboot. Your XMP profile is set.
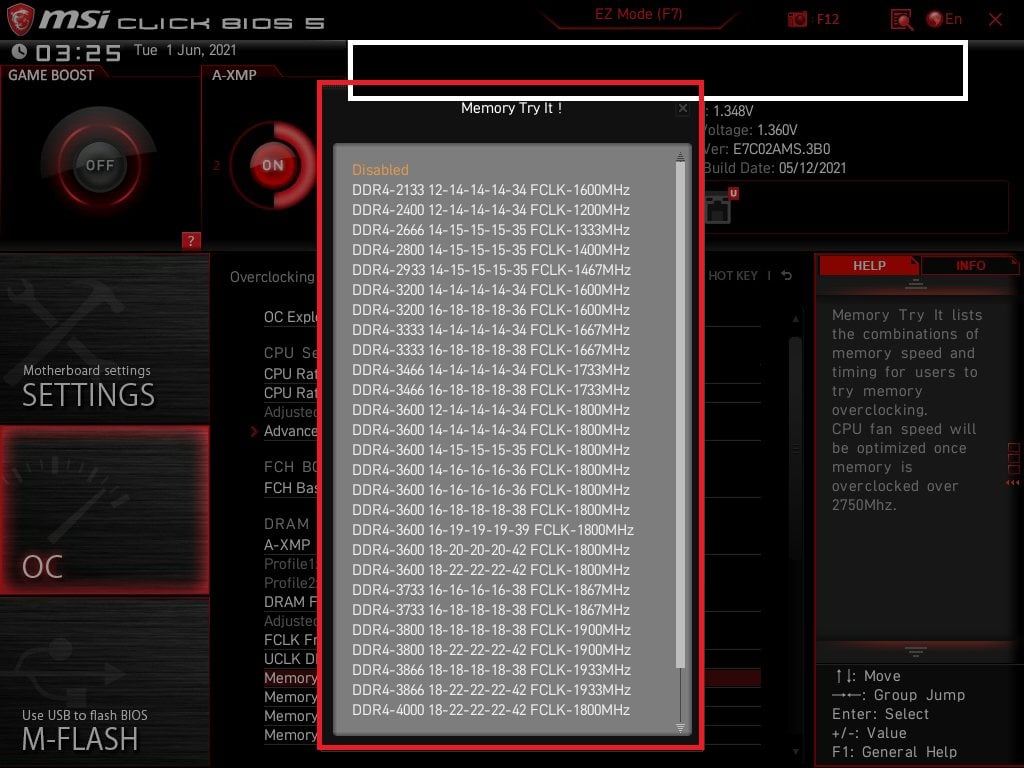
MSI also offers a neat ‘Memory Try It!’ feature that I quite like. If setting an XMP profile is not allowing you to boot, head on to Memory Try it. You’ll see it highlighted in Blue in the MSI_4 image. This will give you access to a list of commonly used memory timings and frequencies. Try setting one that sits below your memory’s rated speed until you find one that is stable.
If even Memory Try It! doesn’t work for you (extremely unlikely), you have no option but to dial in timings manually.
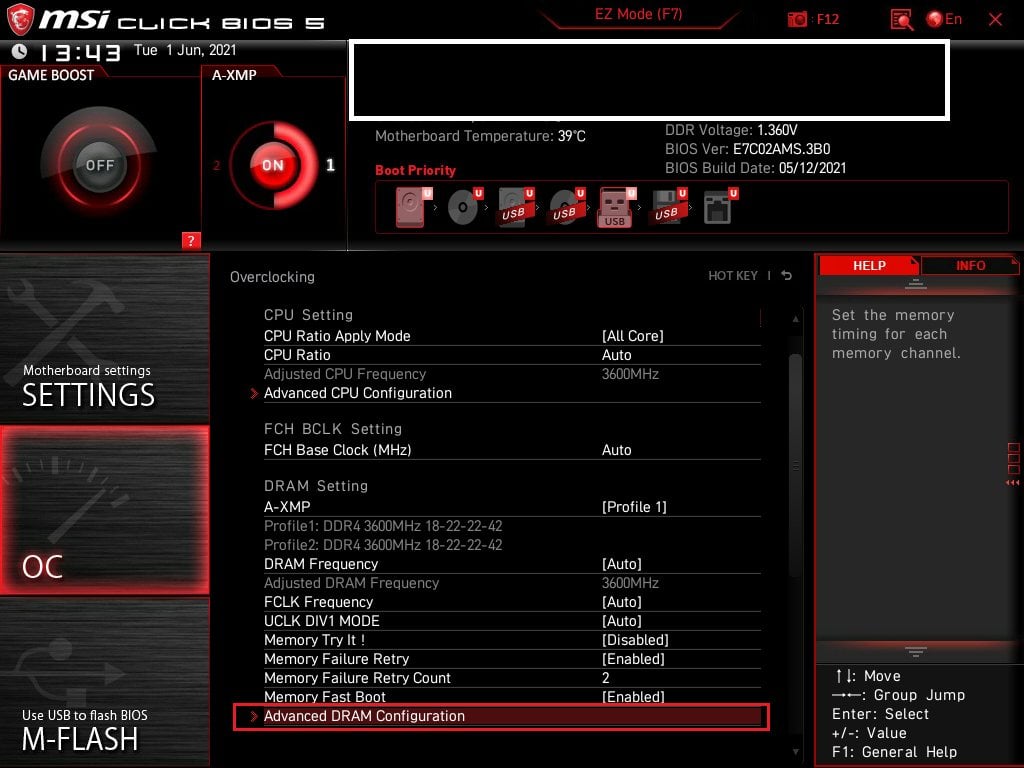
For setting memory frequencies and timings, head into ‘Advanced DRAM Configuration’ to bring up a page that looks like image MSI_7.
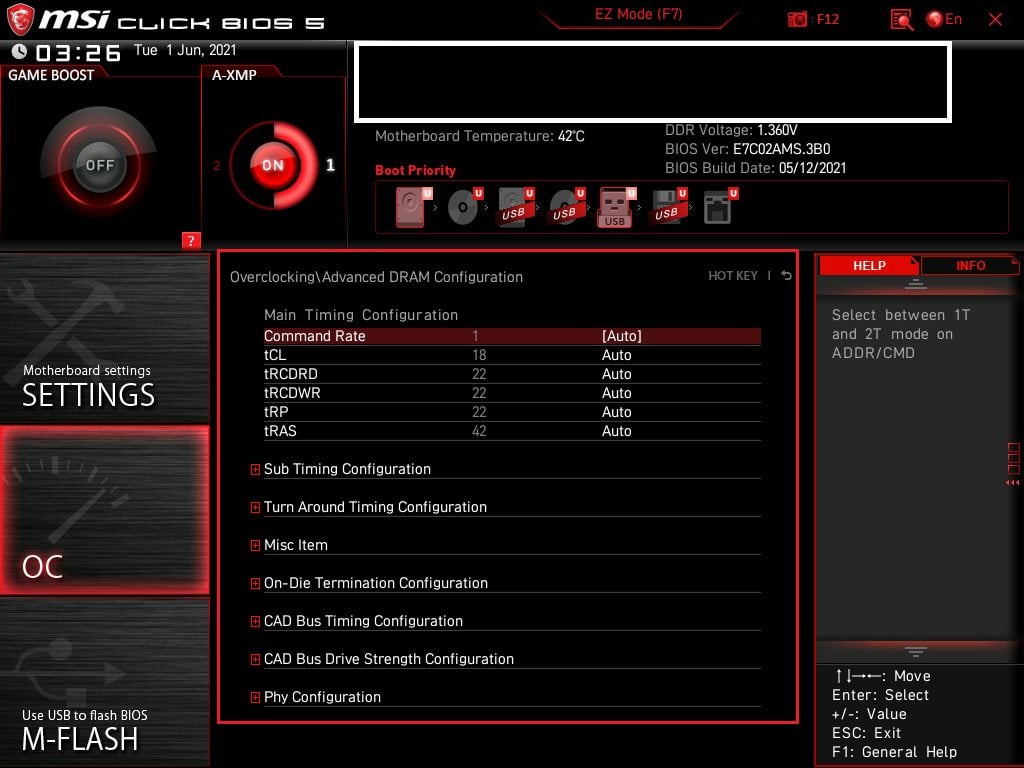
I won’t go into too much detail about dialing in memory timings here. You can find more information about memory frequencies and timings in my Best Memory for AMD Ryzen article.
How to Set XMP in Gigabyte BIOS
Gigabyte takes a different approach to its BIOS interface, choosing to avoid the EZ and Advanced Modes confusion entirely. Of course, this might change in a future update. When you enter the Gigabyte BIOS, you’re greeted by a pretty minimal screen like the one below.
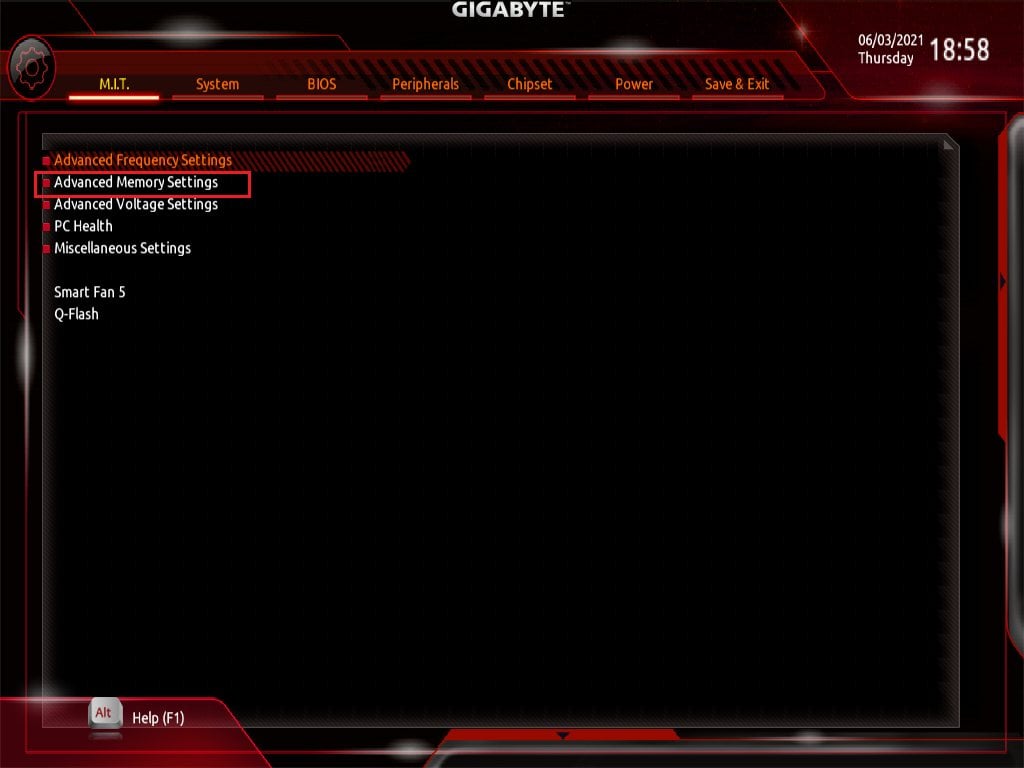
Here, head down to ‘Advanced Memory Settings’ to access settings related to your RAM. You should see a page like the one shown below.
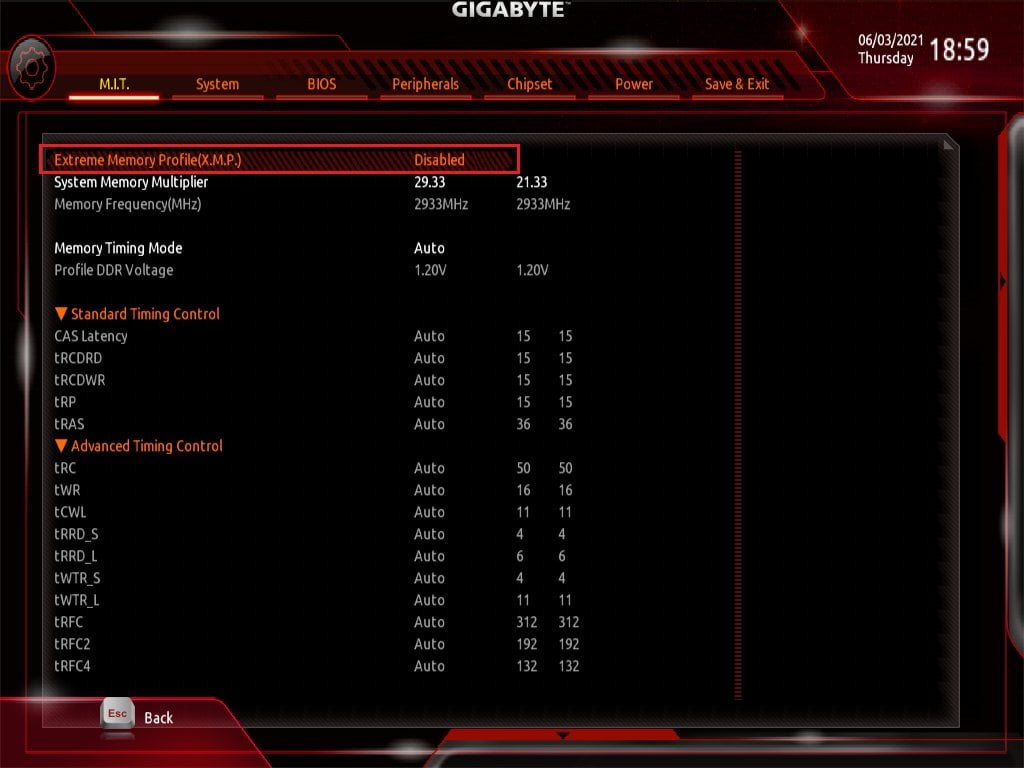
Now select the top-most option, Extreme Memory Profile, and you’ll get a popup with a couple of options.
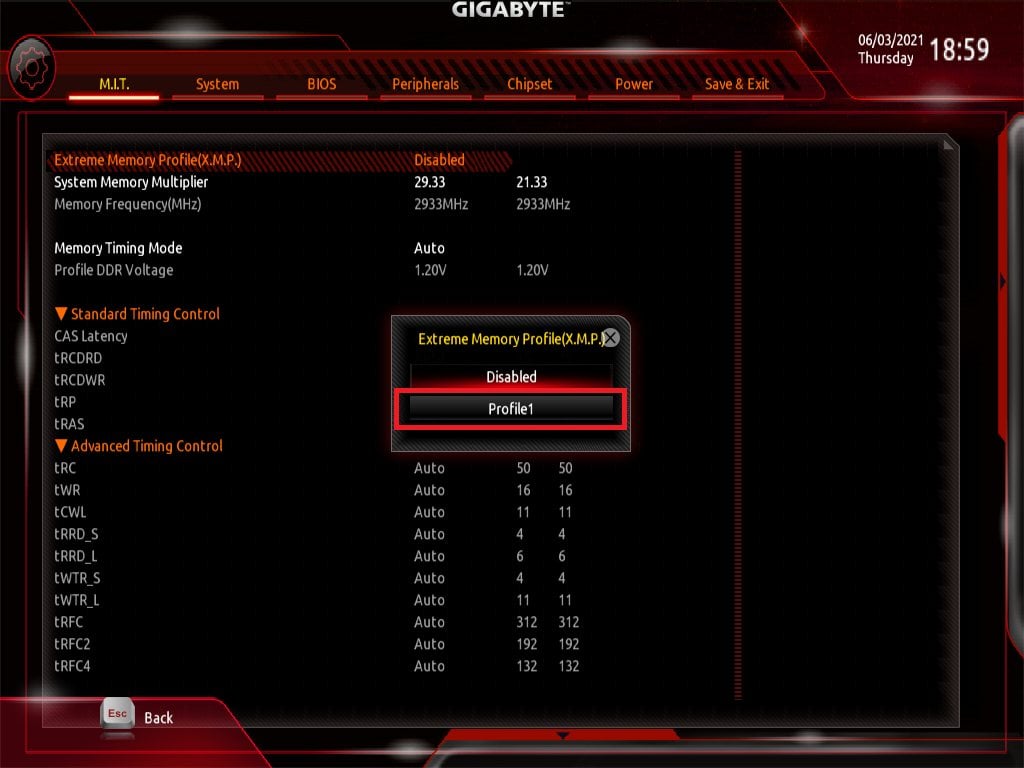
Select Profile 1 here, and you should see your choice reflected there. Hit F10 to save your settings and reboot. That’s it! Your memory profile is set.
If memory profiles don’t work for you (again, very unlikely), you will have to manually set the Memory Multiplier, Voltage, and Memory Timings on this page (shown in the image Gigabyte_3). Change the ‘Memory Timing Mode’ to ‘Manual’ to dial in your memory timings and set the ‘System Memory Multiplier’ value until you see the Memory Frequency (MHz) you want to set.
32.00 Memory Multiplier = 3200 MHz Memory Frequency
How to Set XMP in ASRock BIOS
ASRock’s BIOS usually remains consistent across its product lines. A color change here and there, but most of the navigation options stay the same.
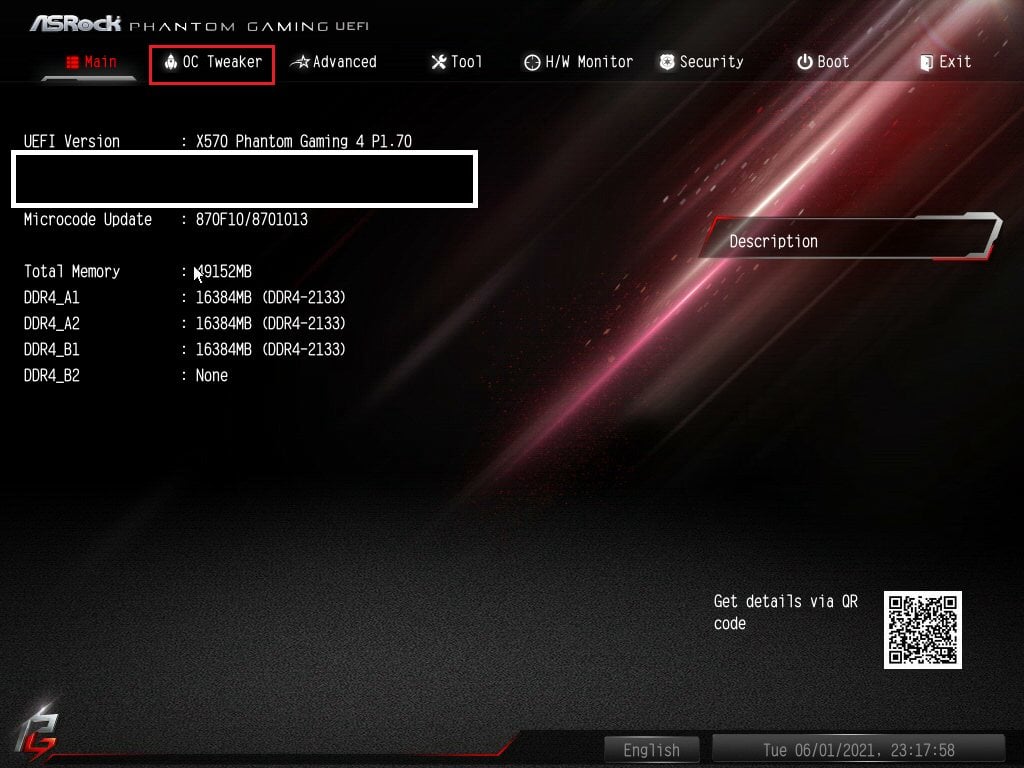
When you enter the ASRock BIOS, you should see a page that looks somewhat like the one above. Here, you’re looking for the tab called ‘OC Tweaker.’
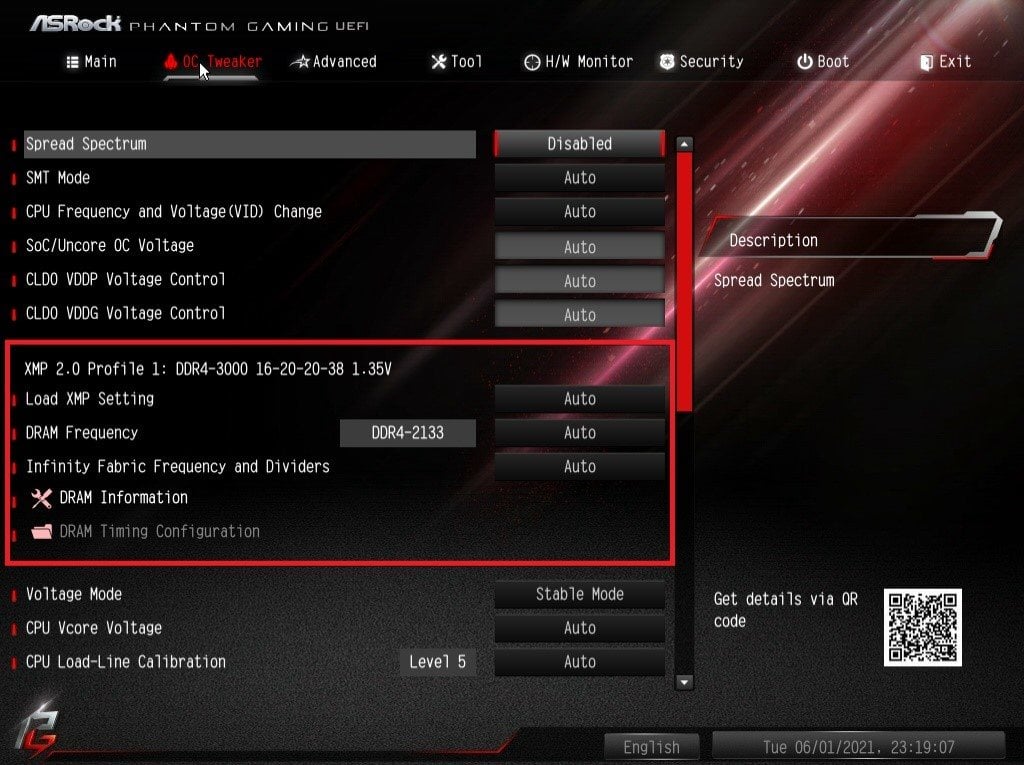
On the ‘OC Tweaker’ page, you’re looking for a section dedicated to memory (highlighted in the image above). Here, navigate to the label called ‘Load XMP Setting.’ You should see the XMP profiles for your memory kit in a popup once you hit Enter.
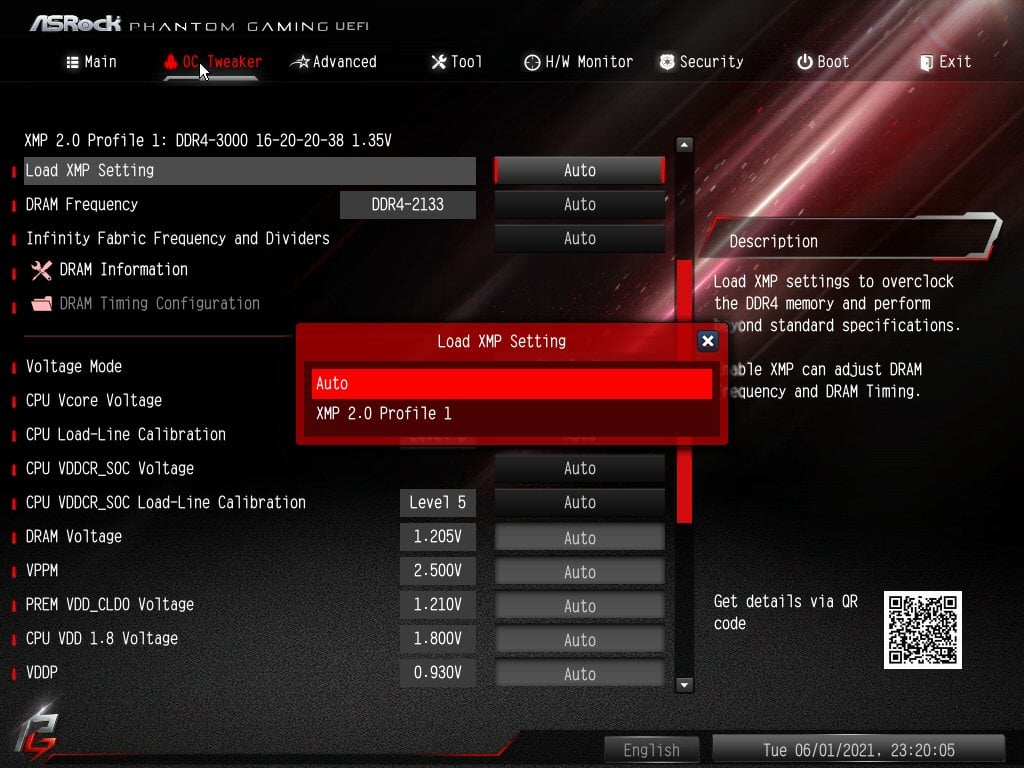
Select Profile 1. That’s it! You can now hit F10 to save and reboot into Windows. However, in the unlikely event that that profile doesn’t work for your system, you’ll have to resort to setting the timings, voltage, and frequency manually.
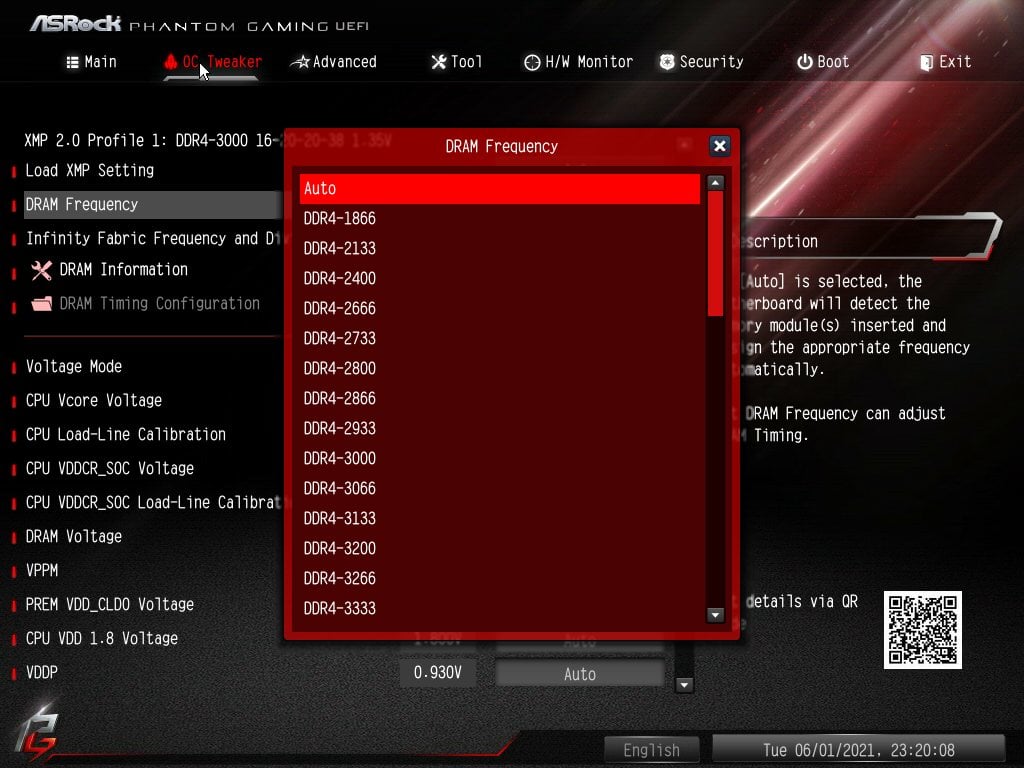
You’re looking for the options called ‘DRAM Frequency’ and ‘DRAM Timing Configuration’ to set frequency and memory timings manually. But, again, I should remind you that it’s improbable that you’ll need to tinker with timings to get your memory working at its rated speed.
XMP Not Working/PC Refuses to Boot After Setting XMP
Well, that’s rough. It’s rare, but it does happen. Some CPU, motherboard, and memory combinations will refuse to run memory at its rated speed. You have no choice but to tinker with memory timings manually and get a stable overclock on your memory in such cases.
The very worst-case scenarios I have seen only involve minor tweaks like upping the voltage or dialing back a few memory timings. If you want a better understanding of how RAM timings work and what they mean, I’d recommend checking out my Best Memory for Ryzen article, where I have covered these topics in great detail.
Frequently Asked Questions
Memory Overclocking for Workstations: Always a Bad Idea?
Anything that compromises system stability is not recommended for workstation systems, where hours of work may be lost due to a crash. However, you do have to balance it with the performance gains you can enjoy with faster memory.
As a rule, we never recommend processor overclocking because the gains are too marginal to warrant the potential drop of system stability and added power draw. It’s not worth it.
Memory is a bit more complicated to address.
If you’re using your PC primarily for rendering, I recommend running and buying lower-clocked memory that you then run only at stable JEDEC speeds. A crash can obliterate that 20-hour render that was about to complete, wasting precious time when you could have started another project to render on that machine. It’s just not worth it.
On the other hand, active workstations (machines where you work in the viewport, etc.) would benefit from faster memory and wouldn’t risk too much due to potential system instability. If you’re sure you can trust yourself to save your work constantly, there’s not much downside to running higher speed, low latency memory that makes your viewport snappier and more responsive.
XMP Profile 1 or Profile 2?
On some motherboards, you might see more than a single XMP profile that you can enable. Although the timings offered by both profiles might look the same, there’s a critical difference between the two profiles.
Profile 1 loads your memory kit’s default XMP memory timings (CL, tRCD, tRP, tRAS – the sequence of 4 numbers you see after your frequency when buying a RAM module). But it keeps the BCLK frequency and other memory settings optimized for the motherboard you’re using. This is the profile that offers better stability but might come at the cost of slightly looser timings.
On the other hand, Profile 2 loads a memory’s complete default XMP profile, including all the advanced timing parameters. Timings would be tighter in this case, but stability mileage would vary from motherboard to motherboard. I recommend Profile 1.
Here’s an excerpt from an ASUS product manual where they explain the two profiles in some detail.
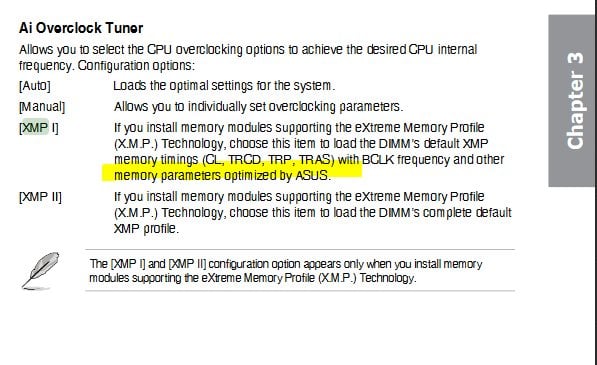
So, which one do you pick? Since we’re talking about workstation systems, stability is the most critical factor here. So, choose Profile 1 when enabling XMP on a workstation system.
Over to you
It can be complicated to wrap your head around XMP Profiles and getting them to function properly. If you still have questions after reading this guide, let us know in the comments or our forum! We are happy to help.


 in BIOS and Should You Use It?")

5 Comments
10 August, 2022
Hello. I have an Asus rog x570-i. I have docp and also realize alot of options you have that I don’t. Ethereal, it’s still safe for me to apply some of these settings for my board?
10 August, 2022
What kind of Settings would you apply?
Cheers,
Alex
21 July, 2021
Wow…just effin wow,.. I just realized that I spent money on a 3600 RAM kit and never enabled XMP…jeez! I’ve been using my workstation for almost 6 months now….Aren’t I an idiot.
Thanks for the ASUS BIOS instructions. Done!
Jake
21 July, 2021
Hahaha, hey Jake,
Happens to the best of us. I remember doing this when I upgraded my PC with ‘fast DDR3’ memory. I didn’t realize I had to change something else to get it to work at that speed for well over a year. Better late than never, eh?
Cheers,
Jerry
28 September, 2023
Same here, but I didn’t even know I was using RAM with higher clock speeds ha.