 by
by 
Ever wondered how to set up your PC’s fans for maximum cooling?
I’ll teach you all you need to know about setting up your PC’s fan curve today, that way you’ll be able to enjoy your PC at a balance of noise levels and cooling performance suited to your preference, not your manufacturer’s.
Let’s get into it!
TABLE OF CONTENTS
A Brief on PC Cooling and Fan Curves
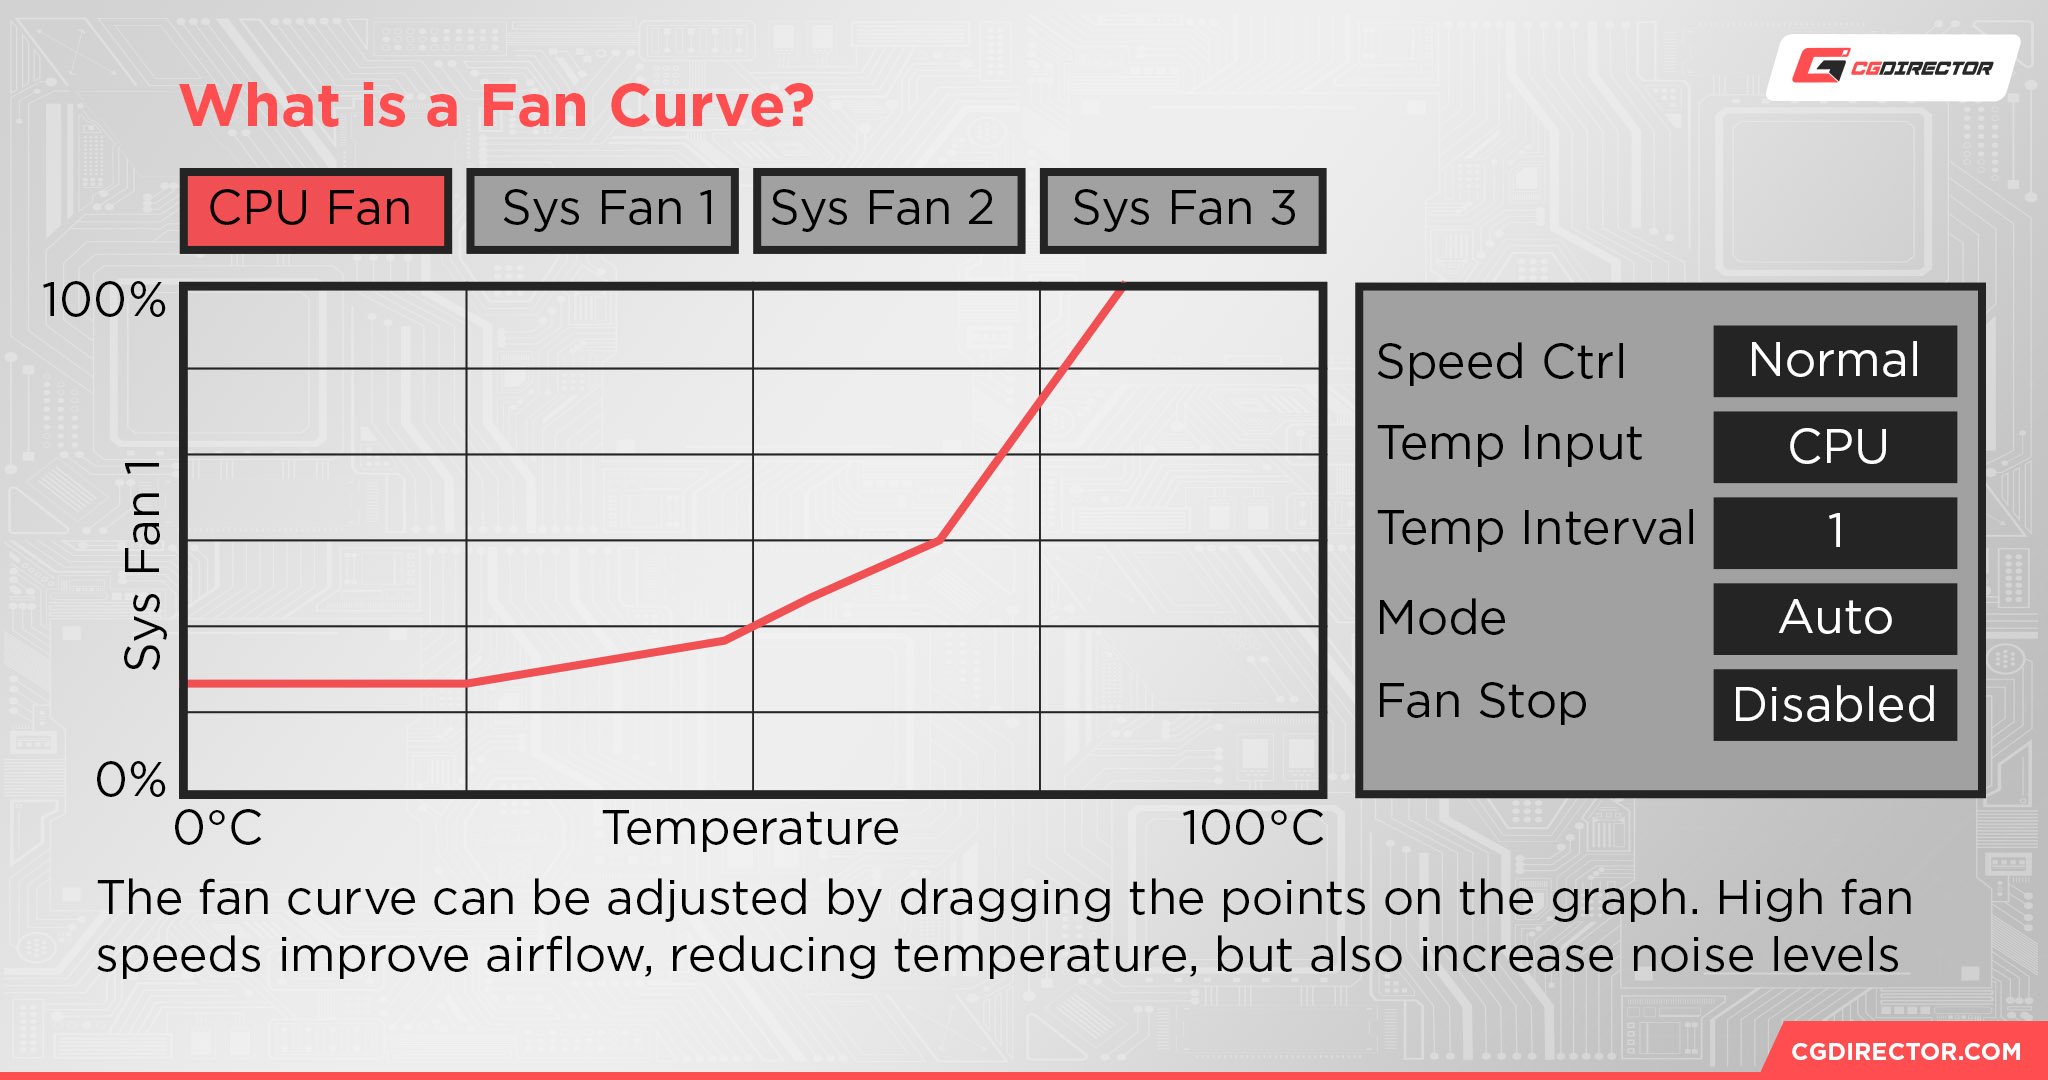
In order to properly set up your PC’s cooling, you’ll need to configure your PC’s fan curve appropriately. A Fan Curve is when you set up a cooling fan to kick in to different degrees of utilization (RPM/speed) in accordance with system temperatures.
This allows you to keep your fan inactive for longer periods of time, boost its speed quickly to maximize performance, or even make sure that even at temperature ceiling your fan curve doesn’t run at full speed, choosing some degree of thermal throttling over fan noise.
Really, however, you want to set up your fan curve is up to you and your specific setup, since fan noise-to-utilization can vary greatly depending on the fan.
But how do you even set up this fan curve to begin with, and what should you be worrying about before playing with custom fan curves? Let’s dive a little deeper.
How To Set Up Your PC’s Fans For Maximum Cooling
First: Make Sure You Have Enough Properly-Installed Fans
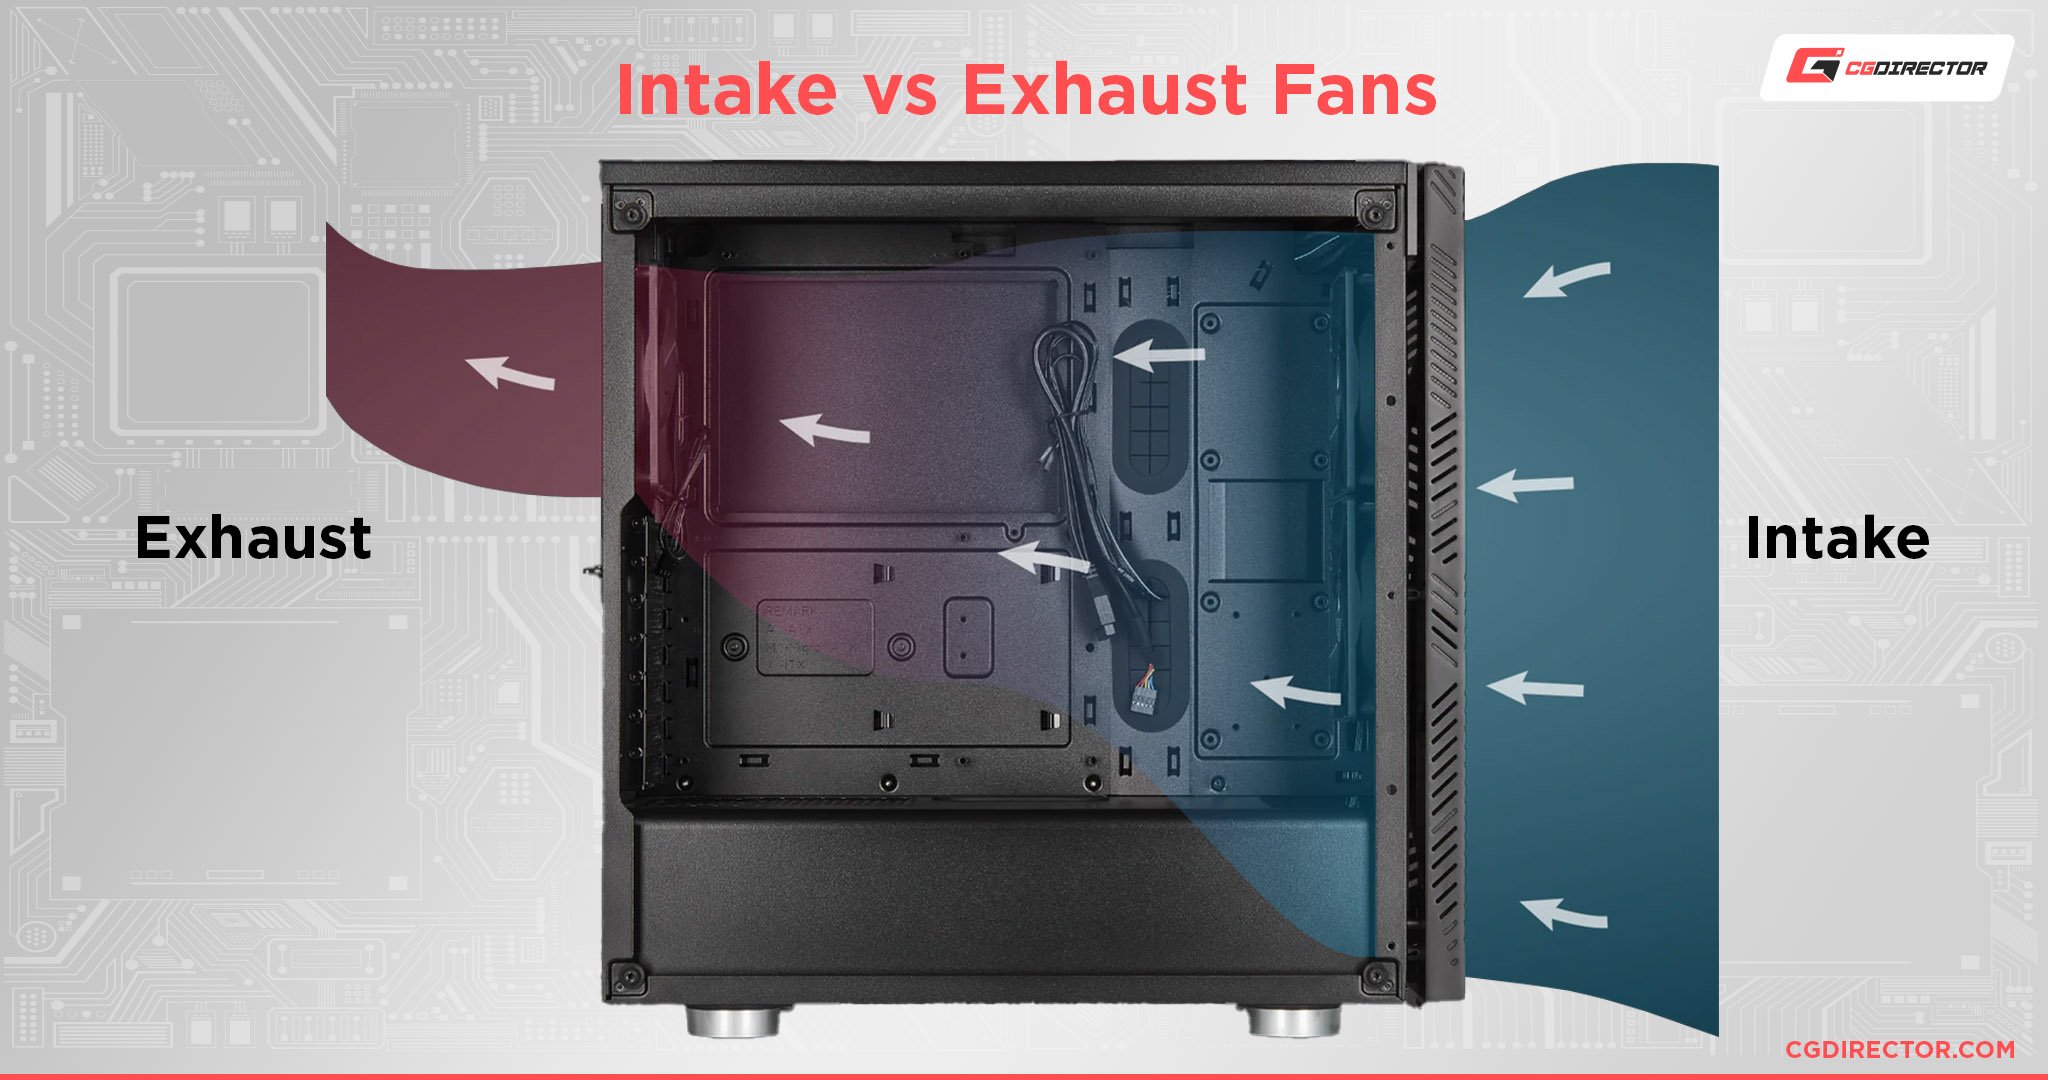
Before you do anything else, you’ll want to make sure you have enough case fans installed into the right places inside your PC.
You can still configure a fan curve with a suboptimal fan configuration, of course, but you should also know if your fan config is suboptimal to begin with.
So, what makes a PC case fan configuration good? The main thing you want to maintain is a positive pressure airflow setup. To do this, all you need to do is have more intake fans than exhaust fans.

Following this simple rule will help keep your case’s airflow healthy…as long as your intake fans have enough room to breathe, anyway. Unfortunately, some case designs are just antithetical to good airflow…hopefully yours isn’t one of them.
Set A Good Fan Curve In Your BIOS
Once you’ve confirmed your fan situation for what it is (or isn’t), let’s get to actually configuring the curve of those fans.
In order to set the curve of your cooling fans optimally, you’ll want to restart your PC and enter your BIOS, usually with the F2 or Delete Key. (It varies depending on your motherboard provider.)
Once within your BIOS, locate your Settings menu and try to find your Fan controls.
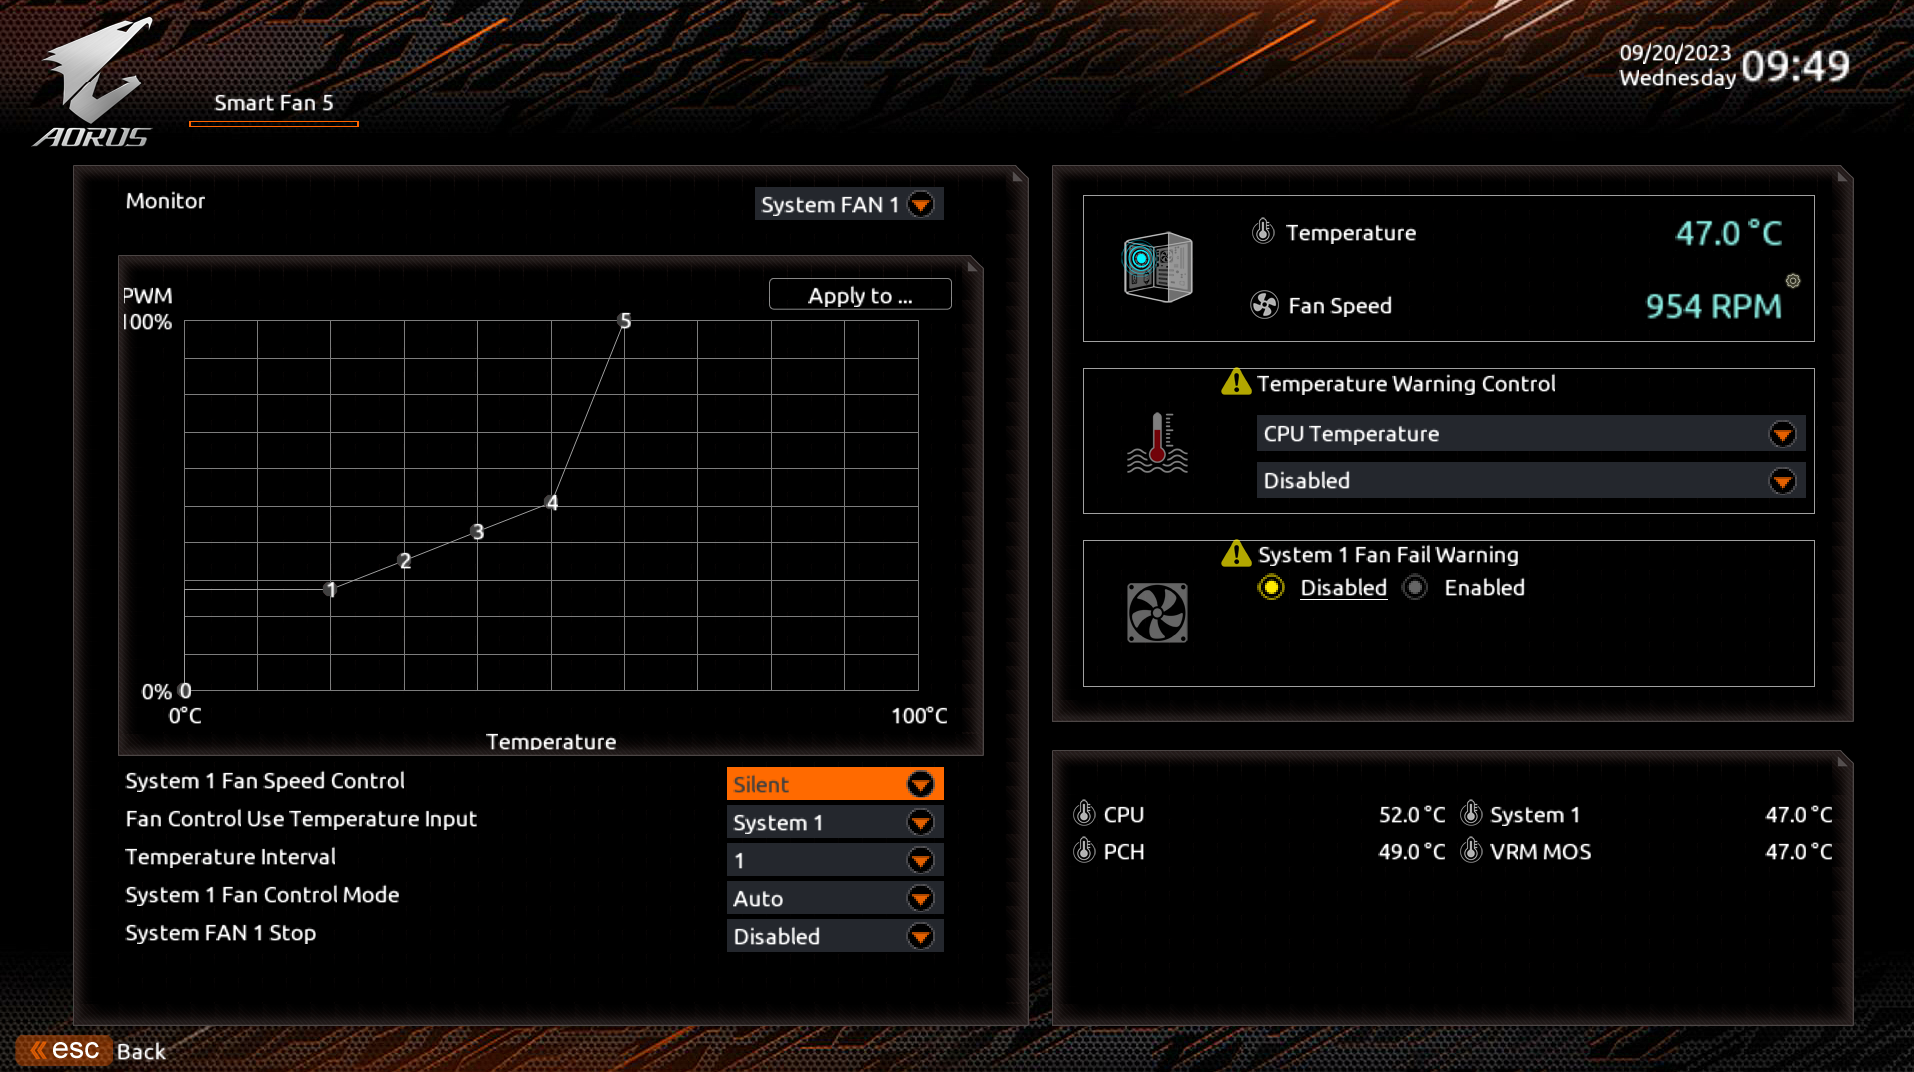
For my Gigabyte AORUS BIOS, this functionality is called “Smart Fan 5”, which I have selected in the screenshot below.
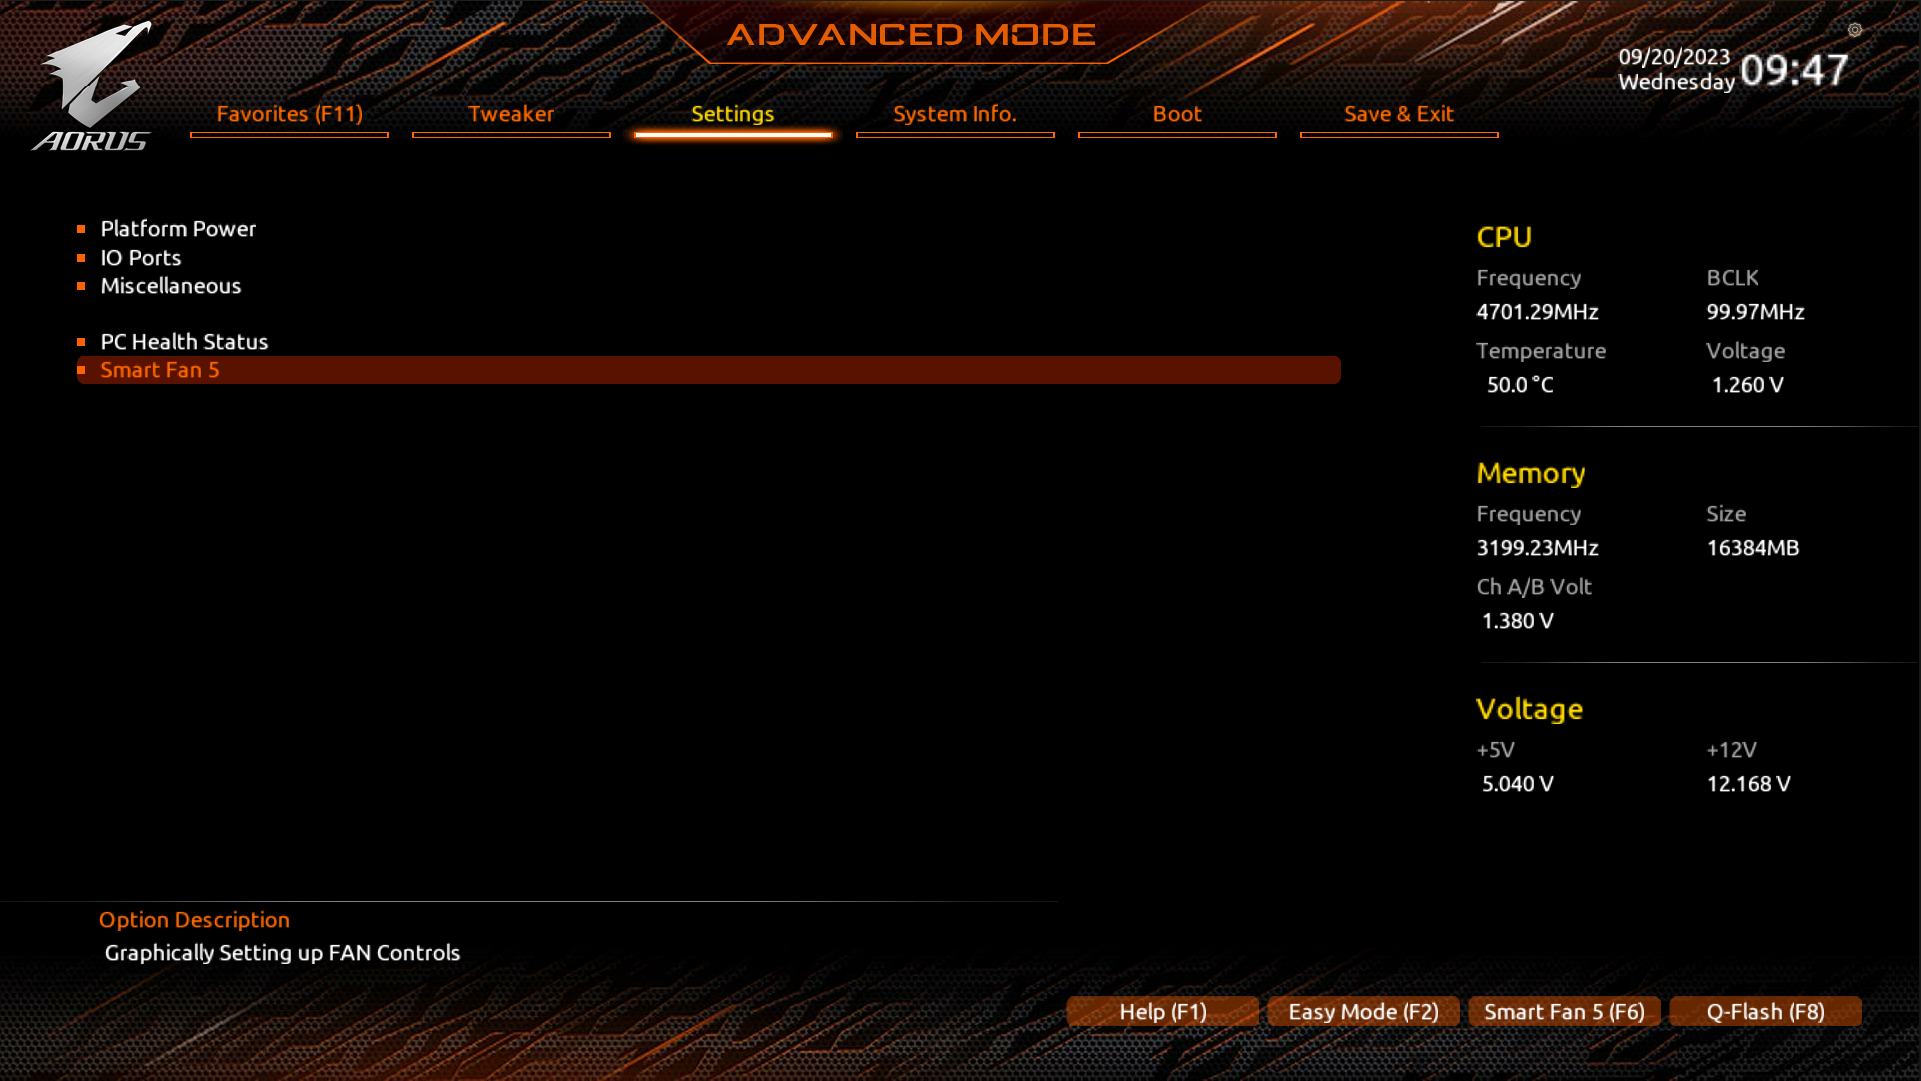
Inside Smart Fan 5, I have options to adjust the Fan Curve for all case fans hooked up to my PC, as well as my CPU cooler fan.
This (or its analog in your non-Gigabyte BIOS) is where we’ll be making our changes.
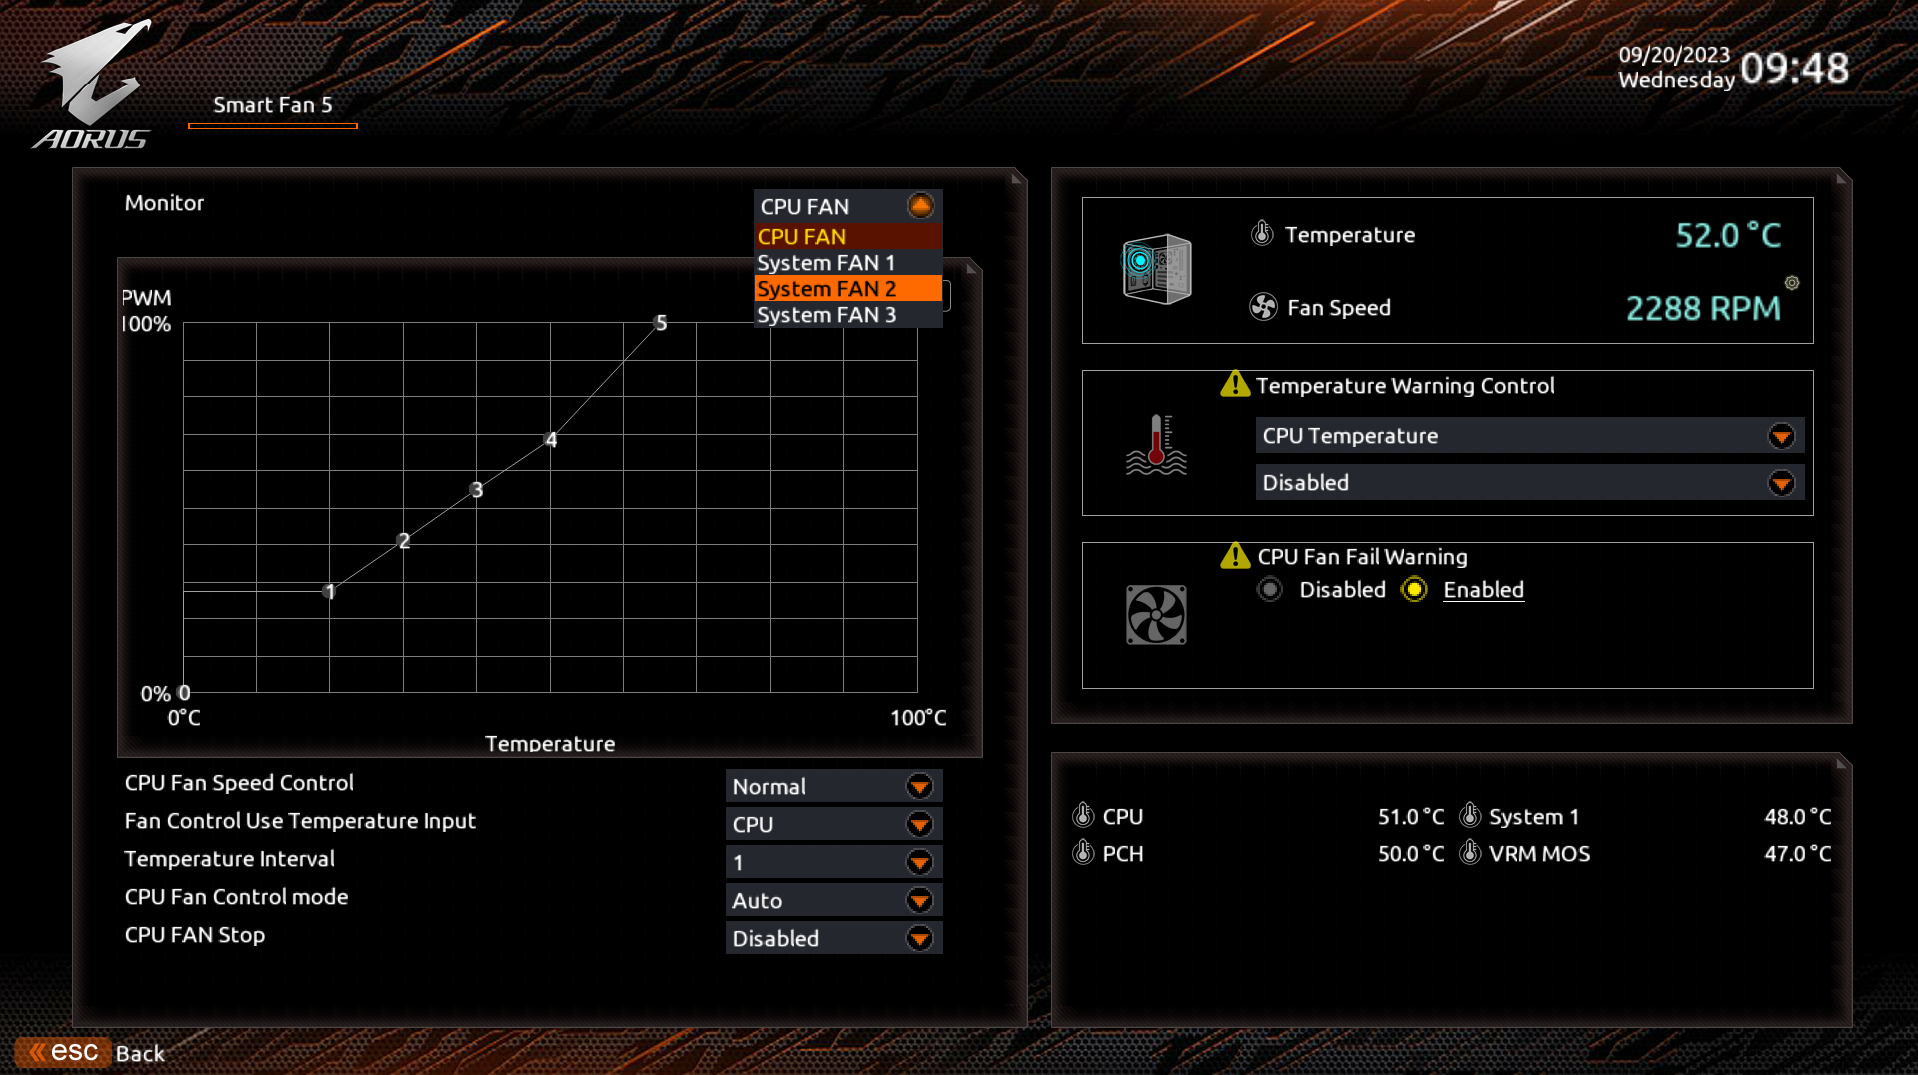
First, make note of any pre-existing Fan Curve profiles you may already be able to use.
For example, I’ve changed my System 1 Fan Curve below to a “Silent” fan curve instead of the default, which reserves the highest fan speeds for a fairly high temperature range.
Comparatively, the “Default” profile makes more reasonable steps up in fan utilization as temperatures increase, hopefully preventing a large spike in fan noise and temperature as the latter stages of the curve are reached.
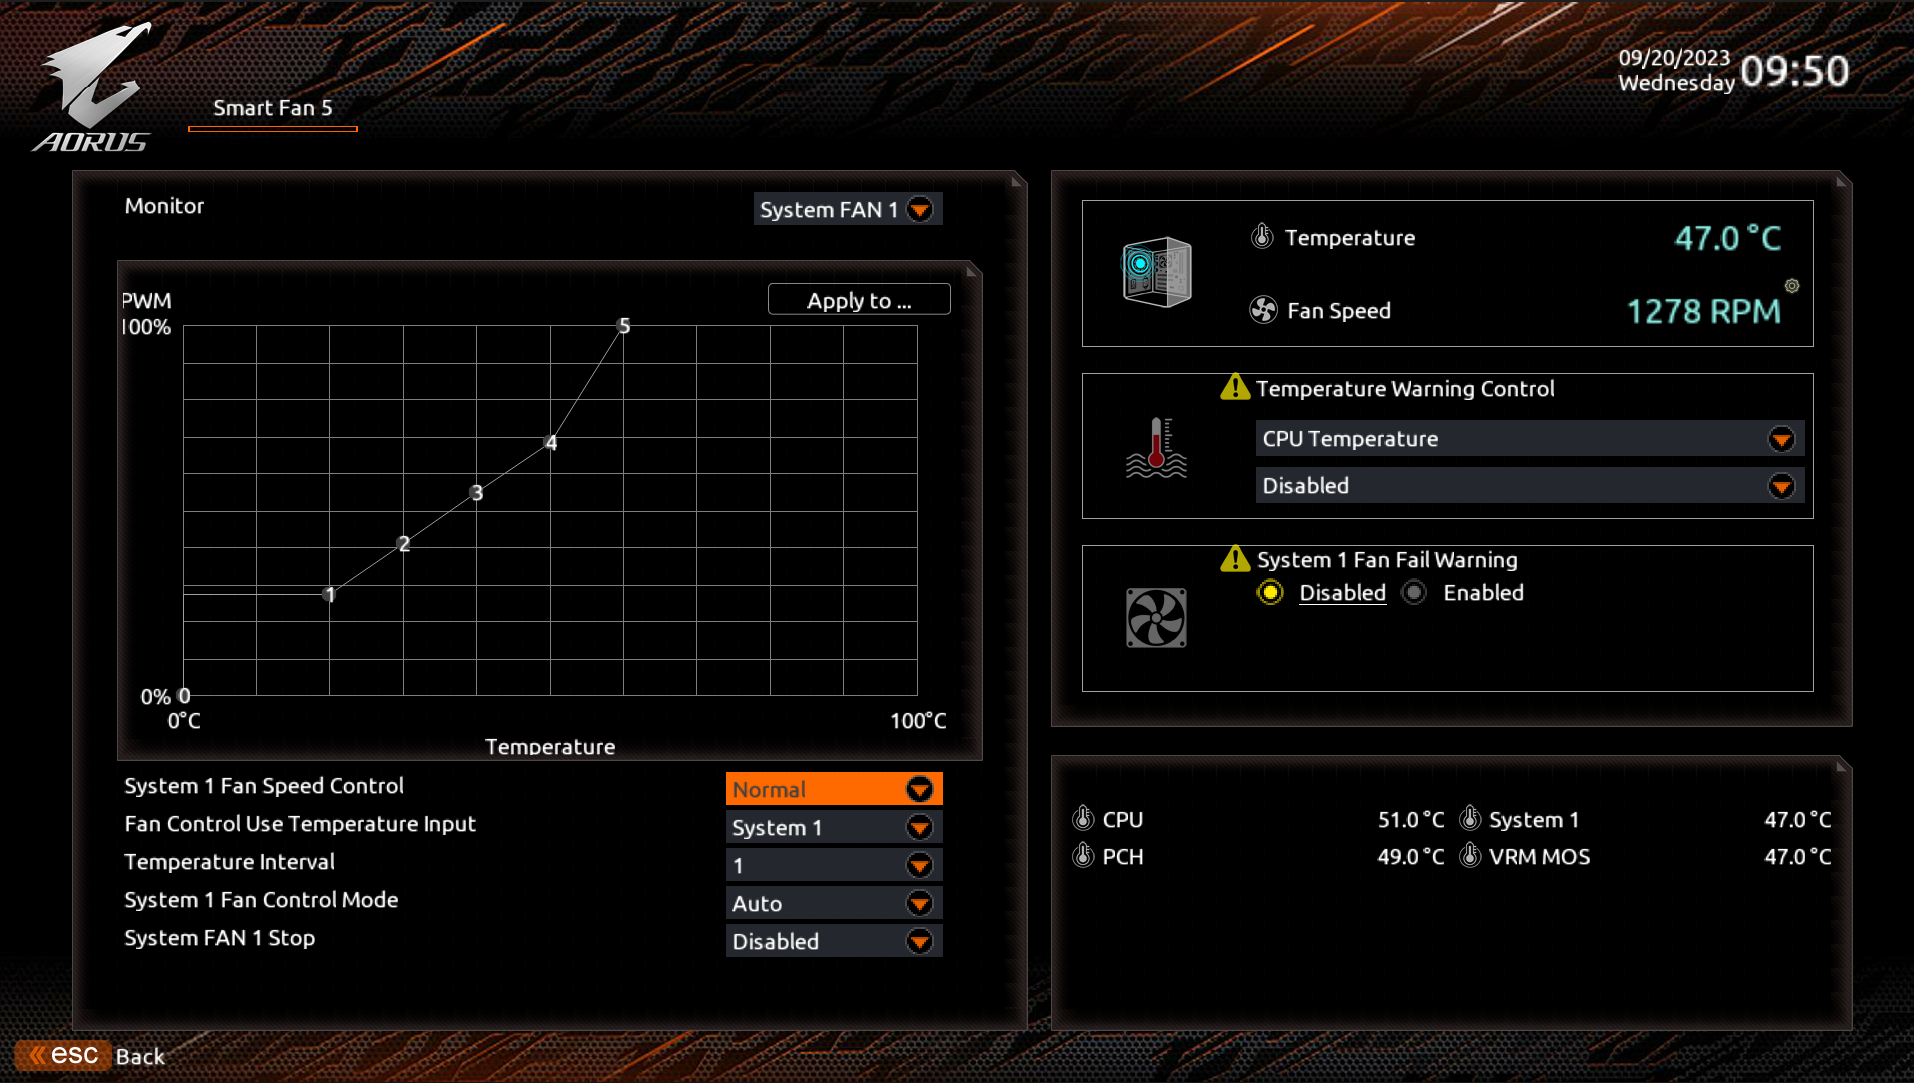
Beyond pre-set fan curves, you can also set your own fan curves by picking “Manual” and simply placing each of the numbered temperature interval points on the chart yourself.
Experimenting with custom fan curves and your own fans can help you determine when a particular fan gets too loud, or how long it can operate quietly before a particular RPM starts making it whir.
Really, you can do whatever you like at this point. Experiment! Or just use one of the preset profiles if they aren’t giving you any issues. Like with most matters on PC, the choice is yours.
Change Your GPU’s Fan Curve

In order to adjust your GPU’s fan speeds optimally, I recommend using MSI Afterburner.
Fortunately, I’ve already written a separate, step-by-step guide to adjusting GPU fan curve in MSI Afterburner, which you can refer to if you need help. Setting CPU and/or system fan curves earlier in this article through the BIOS should prepare you for doing the same thing with your GPU in Afterburner.
FAQ
What is considered high airflow in a fan?
A fan with particularly high CFM (Cubic Feet per Minute) is a fan with high airflow.
However, raw CFM by itself doesn’t guarantee good airflow, since a fan with high static pressure instead of high CFM can be better at pushing air through a surface like a heatsink.
It’s basically the difference between pushing lots of air fast (high CFM/airflow fans) and pushing less air harder (high static pressure fans).
The choice depends on where you’re using the fan. Static pressure fans are best on heatsinks and radiators, while CFM/airflow fans are best on case intake and exhaust.
Should exhaust fans be slower than intake?
Only if your number of exhaust fans matches your intake fans. If you have more intake fans than exhaust fans, you’ll brute-force a positive pressure airflow configuration either way.
But if you have a setup like one exhaust and one intake fan, it’s better to tune the exhaust fan to be slightly slower in order to preserve a high-airflow positive pressure airflow setup.
Does dusting your PC make it run better?
Absolutely! Thoroughly dusting your PC and the components within can help improve case airflow and cooling, which helps improve the operating temperatures and sustained workloads of the CPU and GPU.
If you aren’t sure how to properly dust your PC, you’re in luck! I’ve already written a full guide to dusting your PC, complete with pictures, that you can refer to.
I particularly recommend doing so if it’s been more than three months since your last PC dusting.
Over to You
And that’s it!
I hope this article helped you learn how to set up your PC’s fans for maximum cooling— or at least, how to make the most of your existing setup with a better fan curve.
Unfortunately, I can’t give any sweeping fan curve recommendations in this article, since variance among case fans is simply too high— but once you know how to use your case fan controls, you’re pretty much already halfway there!
Do you have any other questions or concerns about PC fans or cooling? Please ask them in the comments below, where myself or another CGD member can help you out.
You can also try out Forum if you want to engage in longer-form discussions with other Enthusiasts and Experts, if that’s more your speed.
Until then or until next time, though, happy computing! And remember: a loud fan is better than a slow PC. Unless you really hate fan noise, I guess….
![Where Do You Connect PC Fan PWM Cables To? [Beginner’s Guide]](https://www.cgdirector.com/wp-content/uploads/media/2023/12/Where-Do-PWM-Cables-Go-Beginners-Guide-Twitter-1-594x335.jpg "Where Do You Connect PC Fan PWM Cables To? [Beginner’s Guide]")
![What Side Should The Heatsink Fan Go On? [CPU Cooler Push or Pull]](https://www.cgdirector.com/wp-content/uploads/media/2023/08/What-Side-Should-The-Heatsink-Fan-Go-On-CPU-Cooler-Push-or-Pull-Twitter-594x335.jpg "What Side Should The Heatsink Fan Go On? [CPU Cooler Push or Pull]")
![3-Pin vs 4-Pin PC/Case Fans Compared [Differences & Which you’ll need]](https://www.cgdirector.com/wp-content/uploads/media/2023/03/3-Pin-vs-4-Pin-Fans-Twitter-594x335.jpg "3-Pin vs 4-Pin PC/Case Fans Compared [Differences & Which you’ll need]")


0 Comments