 by
by 
TABLE OF CONTENTS
If you’re building a new computer and can’t turn it on, you may need to update the BIOS.
Although your CPU is physically compatible with the motherboard, the system will not POST (Power On Self Test = all hardware is OK) until you update the BIOS.
Your system might turn on, but your screen will stay completely black because the motherboard doesn’t know how to communicate with the CPU.
This can happen when the CPU you’re trying to use with your motherboard, is newer than the motherboard. The motherboard then doesn’t support it without an update to its BIOS.
Now you may be wondering: How do I update my BIOS if I don’t already have a compatible CPU to update my BIOS with?
Luckily, you’re not alone, and most Motherboard manufacturers have come up with a solution to this problem.
Check to see if your motherboard is from one of these manufacturers:
- ASRock
- Asus
- Gigabyte
- MSI
If it is, there’s a high chance your motherboard supports a feature called “BIOS Flashback”, allowing you to update the BIOS without a CPU.
What Is BIOS Flashback?
BIOS Flashback is a feature found on certain motherboards that lets you update the BIOS without requiring a CPU, GPU, or memory installed.
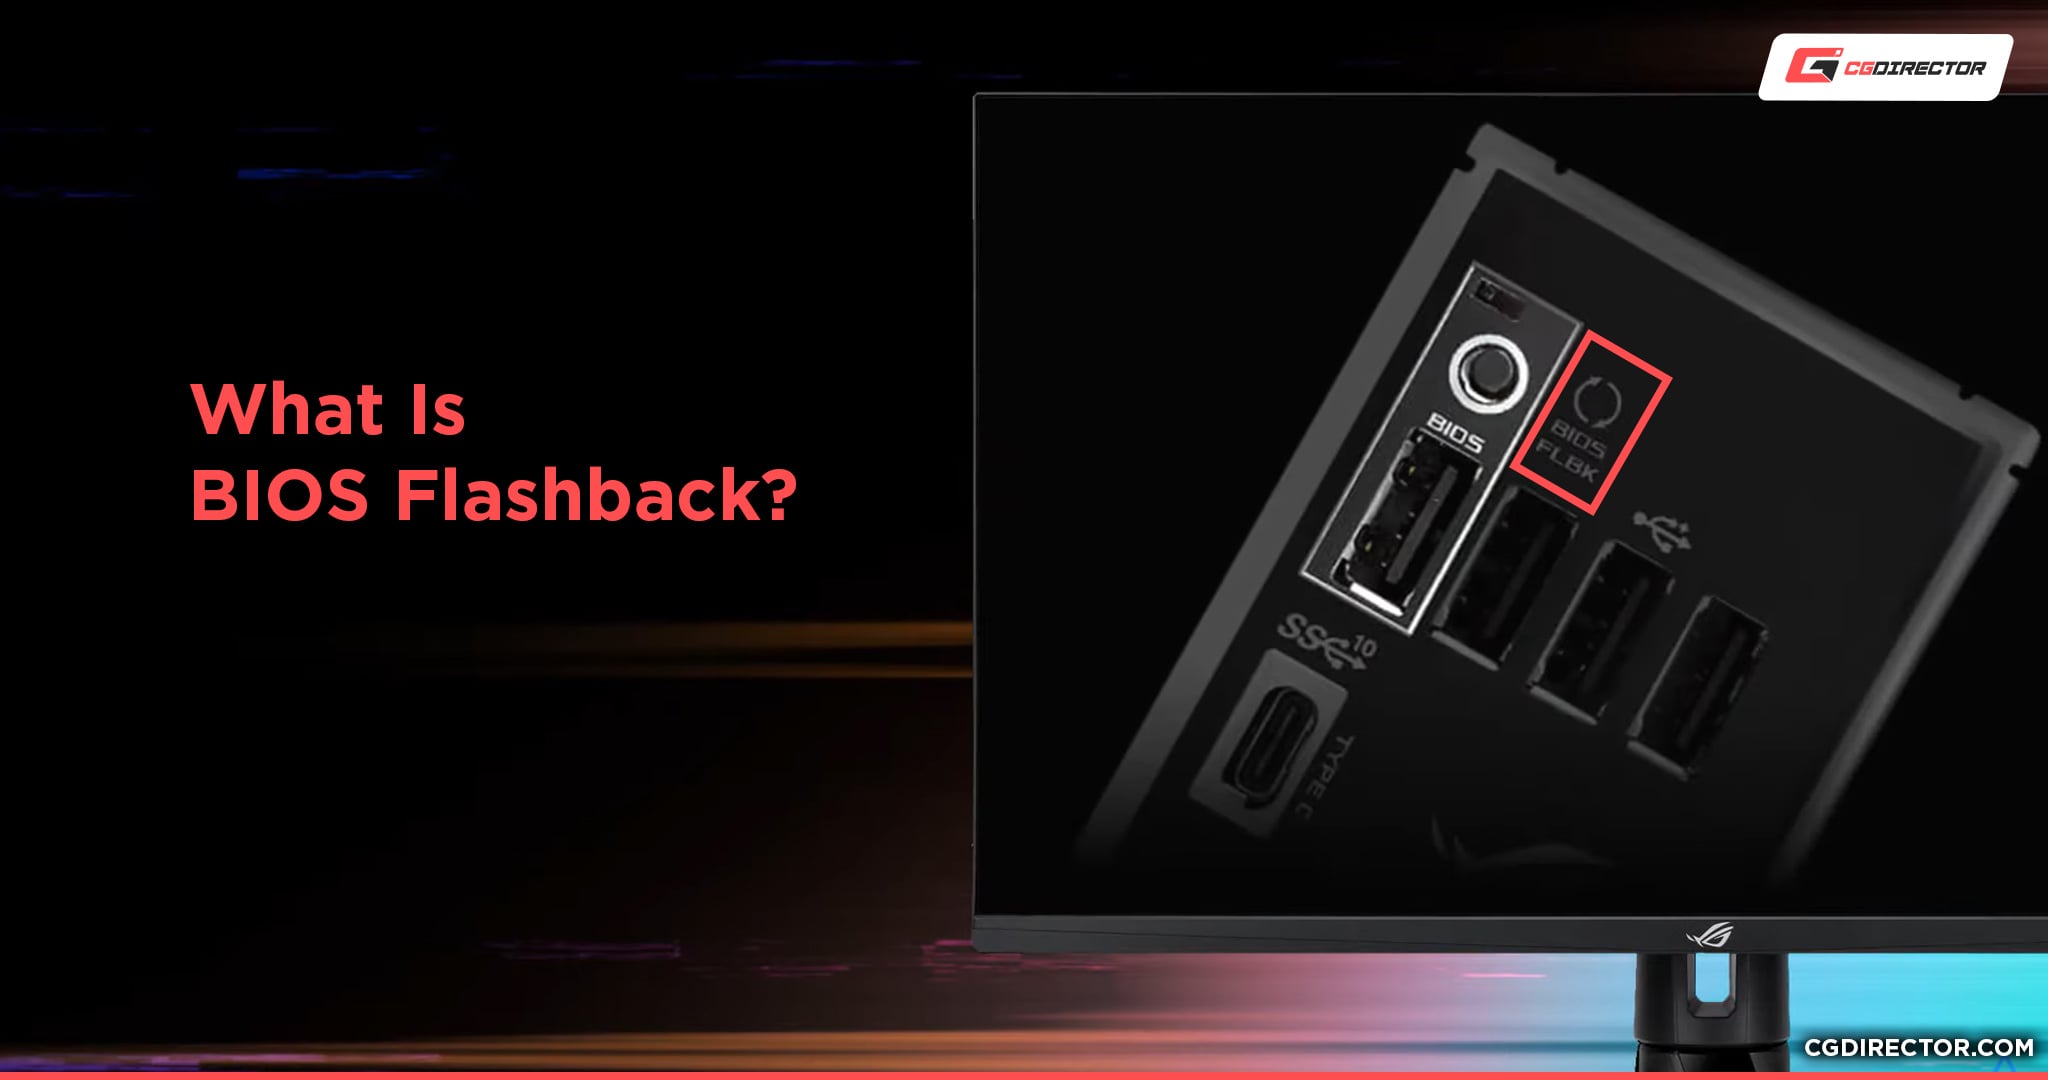
The BIOS Flashback feature might be named differently depending on the motherboard manufacturer:
- ASRock motherboards: BIOS Flashback Button
- Asus motherboards: USB BIOS Flashback
- Gigabyte motherboards: Q-Flash Plus (not to be confused with Q-Flash)
- MSI motherboards: Flash BIOS Button (not to be confused with M-Flash)
Flashing the BIOS is just another way of saying updating the BIOS.
To figure out if your motherboard supports such a feature, check the spec sheet of your motherboard on the respective manufacturer’s website.
This feature is typically found under the ‘Special Features’ section of the technical specifications sheet.
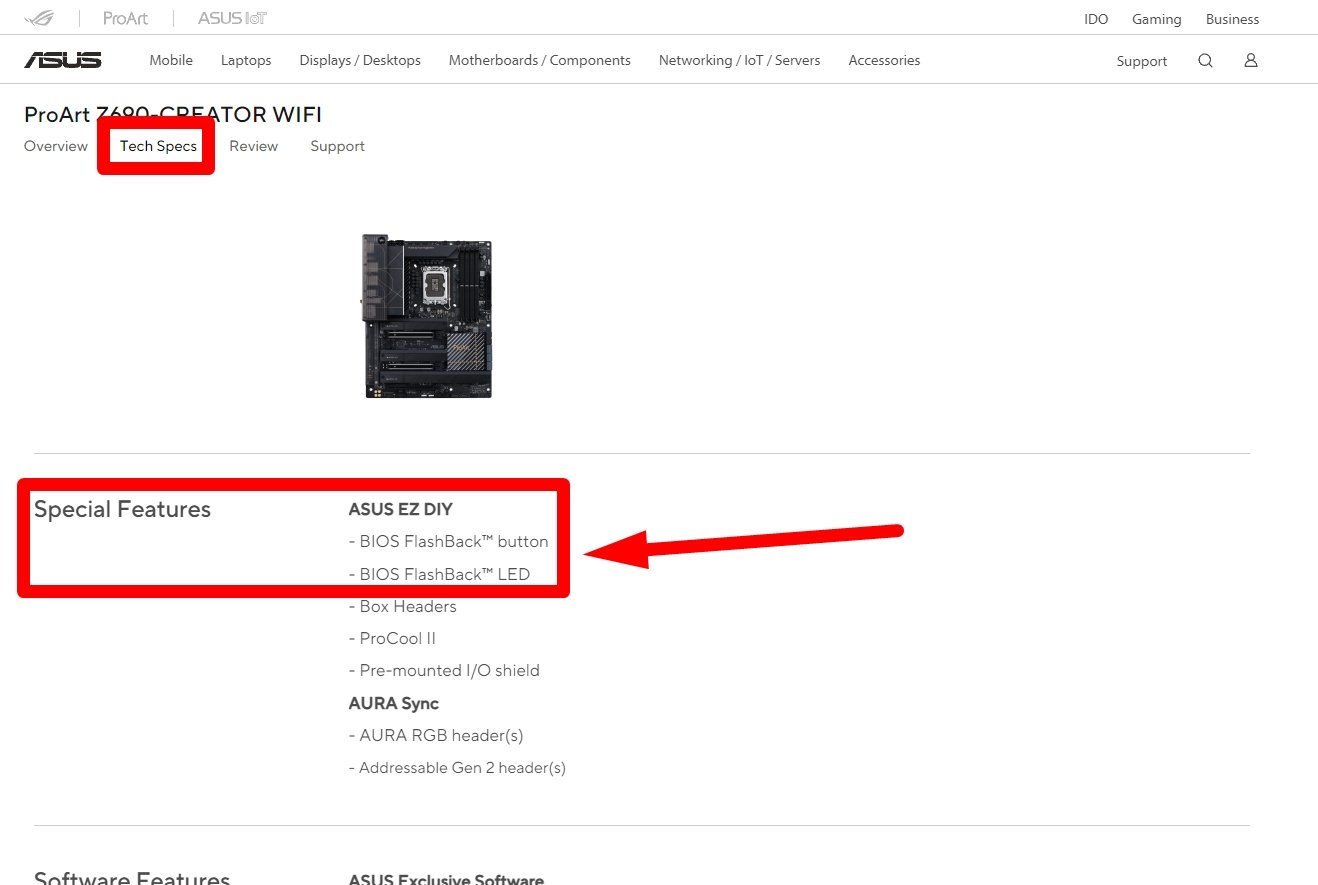
Here’s how ASUS lists BIOS Flashback support on the Motherboard Product Sheet Online
The process of a BIOS Flashback is rather straightforward: You download the BIOS Update File for your motherboard onto a USB flash drive and insert it into the correct USB Port on your motherboard.
You can then press the BIOS flash button on your motherboard to update it.
However, to ensure you don’t accidentally brick your computer, do go through all of the steps below:
What Type of USB Drive Should I Use for BIOS Flashback?
Although it’s not a guaranteed issue for everyone, there have been multiple reports of PC builders facing issues when using a USB 3.0 flash drive.
After they switched to a USB 2.0 flash drive (or inserted the USB Drive into a USB 2.0 port), the BIOS update worked.
Therefore, I recommend using a USB 2.0 flash drive to flash your BIOS, which is also recommended by most motherboard manufacturers.
There is no strict requirement regarding the size of your USB drive. Any size from ~128MB up to 32GB will be fine as the BIOS update file is typically quite small (around 10 to 25 megabytes).
If you’re having trouble determining if your flash drive is USB 2.0 or USB 3.0, checking the plastic inside the connector might help.
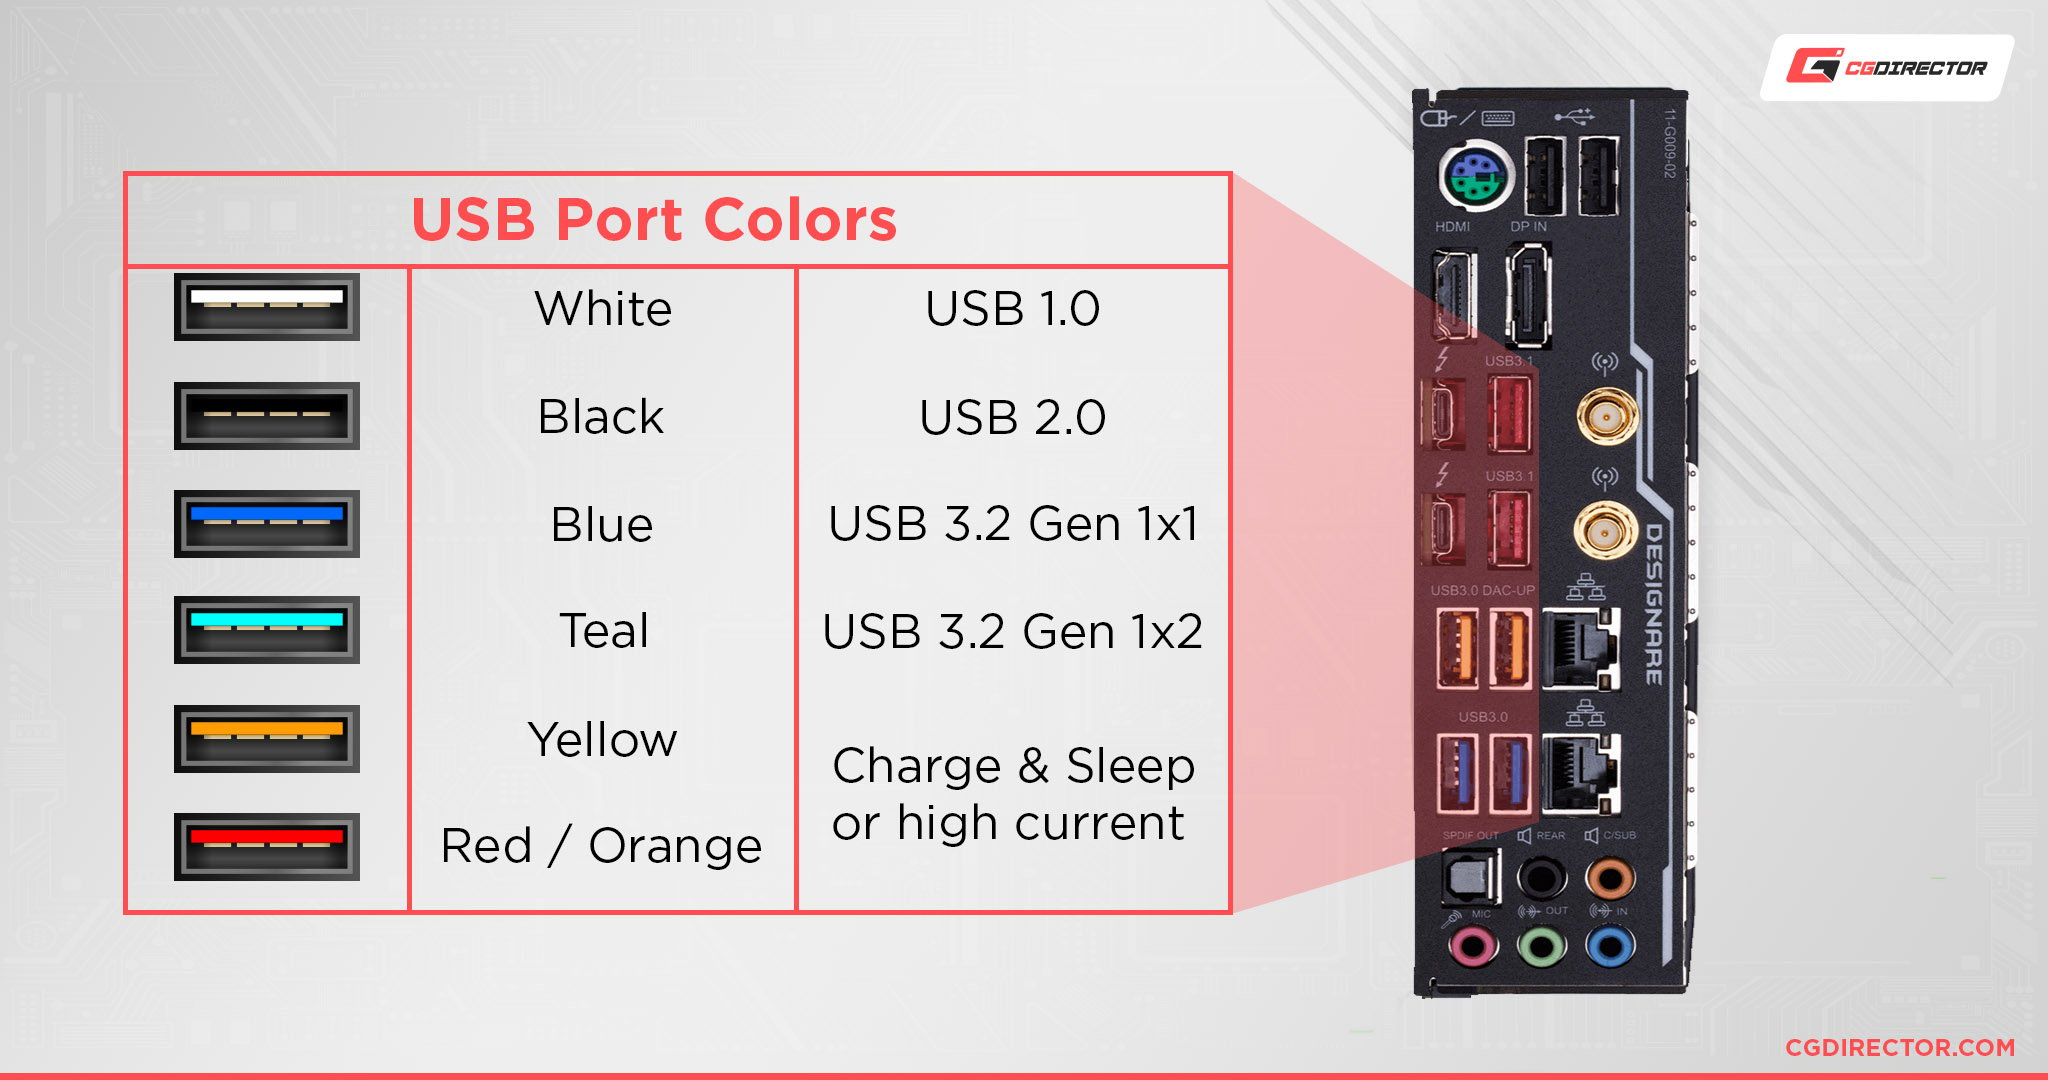
Blue end connectors indicate that the flash drive (or the interface on the motherboard’s i/o shield) supports USB 3.0, while black end connectors are USB 2.0.
Here’s our USB Guide that goes in-depth on how to identify USB connector types.
How To Update the Bios Without a CPU (Step-by-Step)
Now that we’ve prepared the USB drive, it’s time to go through flashing your BIOS step by step:
Step 1. Find Your Motherboard on the Official Manufacturer’s Website
The first step is downloading the BIOS update file from your motherboard manufacturer’s website.
Make sure you’re on the official website. Never download a BIOS file from anywhere other than the ASRock, Asus, Gigabyte, or MSI website.
The easiest way to find the correct BIOS update file is to search for your motherboard model on Google, followed by the word “BIOS”.
For example, type in “Asus ROG Maximus XIII Z590 Hero BIOS” if you own this motherboard.

Usually the first link that is listed will take you to the manufacturer’s official website. (Be sure not to click any paid ads/listings that may appear above it)
Once you’re on the page, do double-check to ensure it matches your motherboard model.
Many models can have remarkably similar albeit slightly different names.
Step 2. Download the Newest BIOS Update
On the motherboard’s product page, look for a menu / link that says something like “Support“.
Then on that “support” page, navigate to “Drivers and Utility” or “Downloads”, where you should see section called BIOS / Firmware.
There will also be a download button next to the newest version as shown in the Image below. (Asus Website as an example. Other Brands might call their Pages slightly differently)
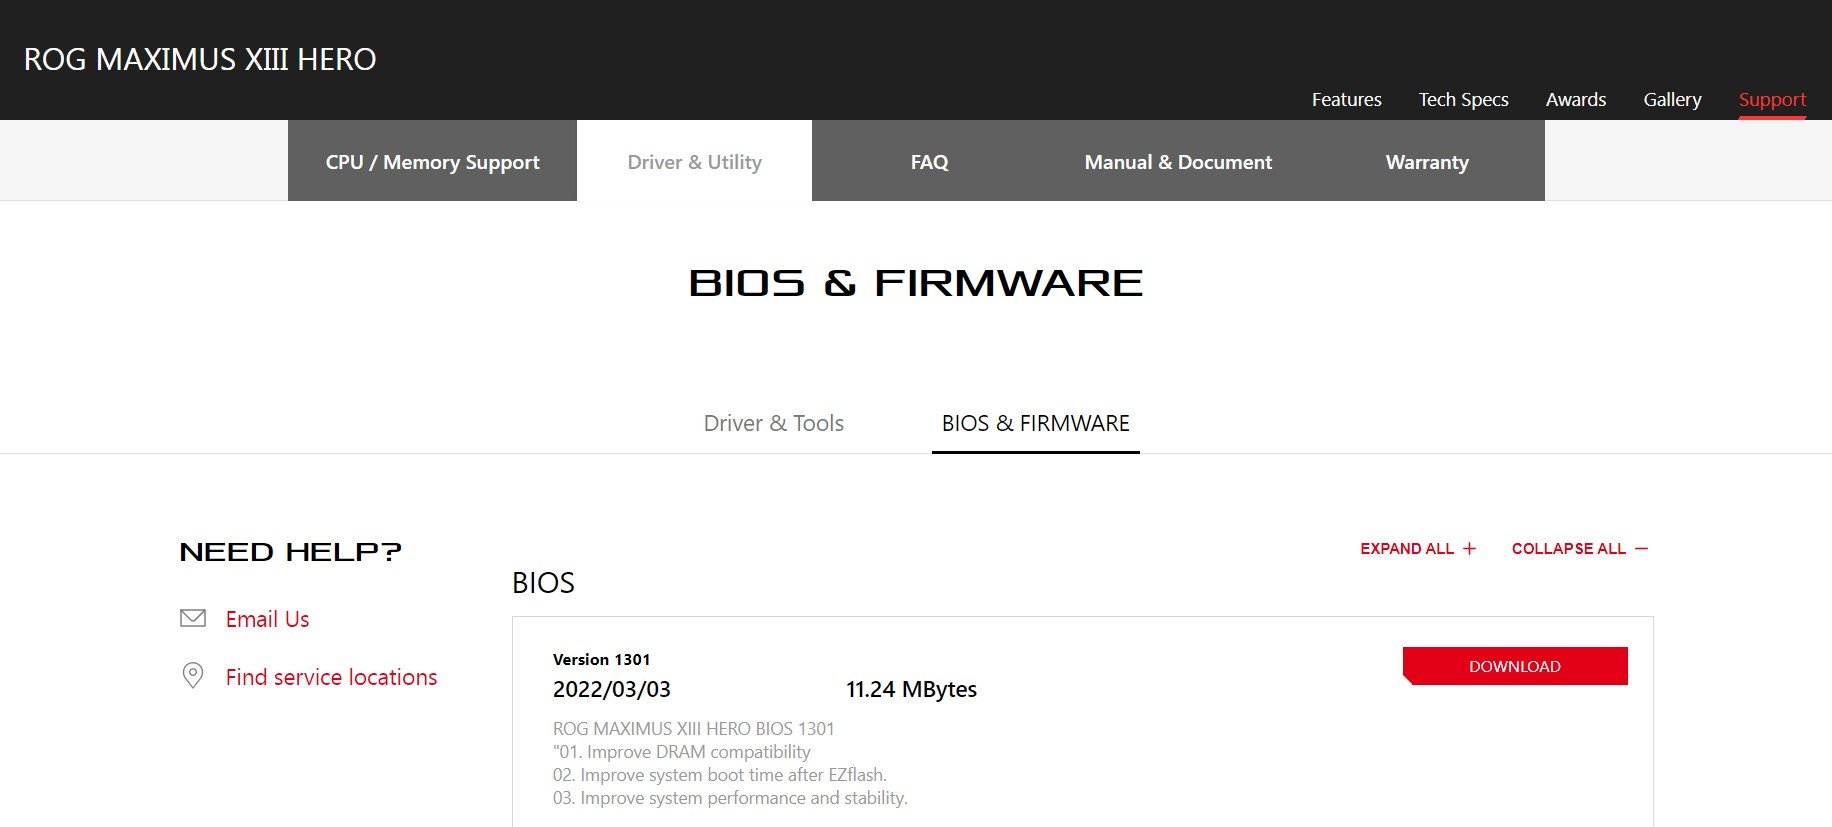
Click the download button and download the latest BIOS update for your motherboard.
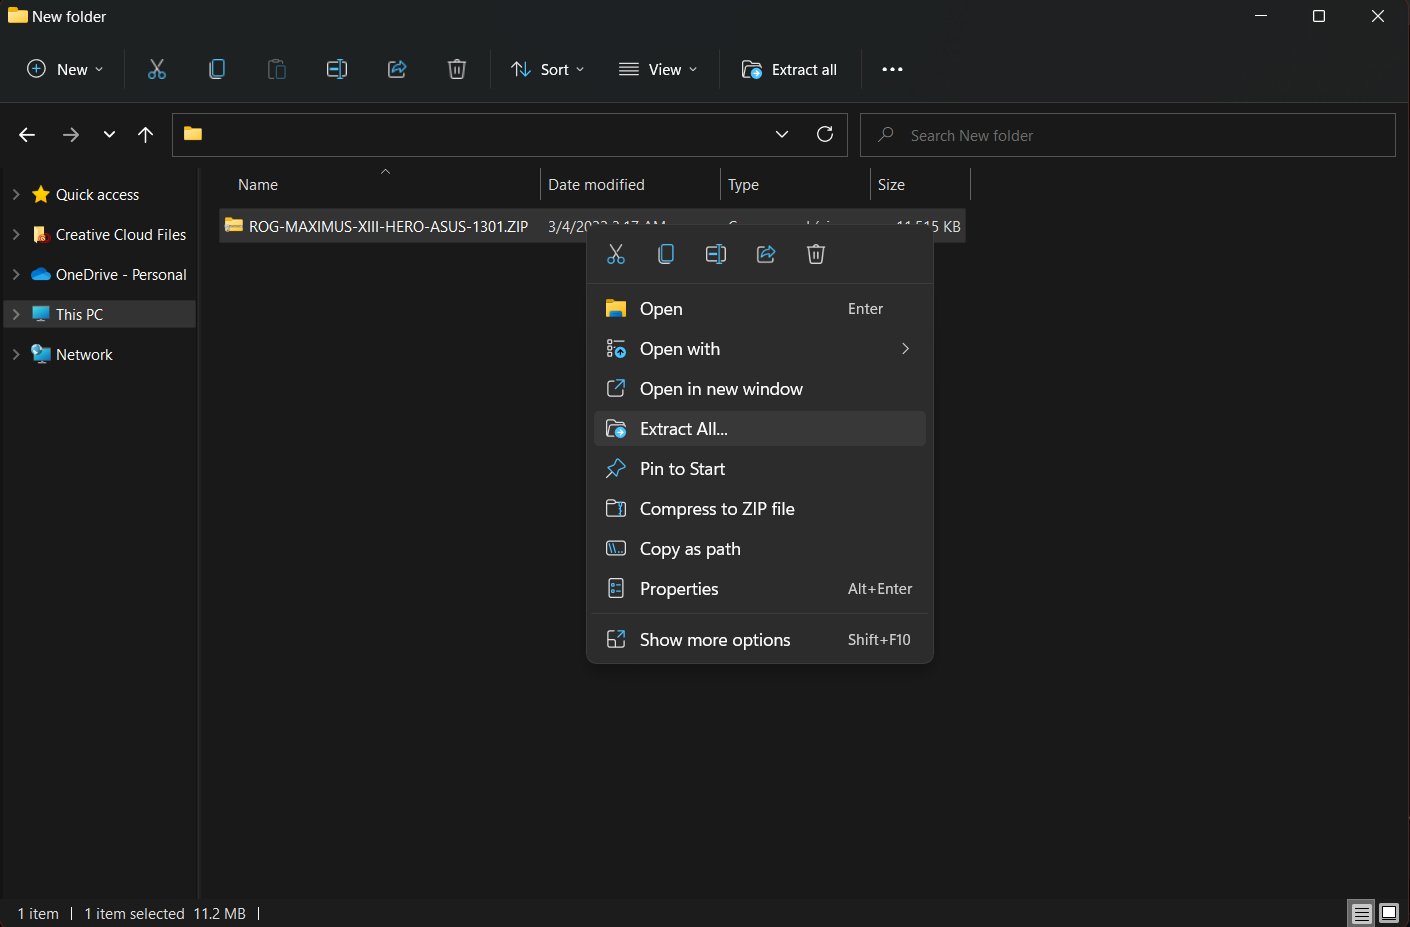
Step 3. Extract and Rename the BIOS File
Once the download is finished, it will likely be compressed into a ZIP folder.
You’ll need to right-click the file and then select ‘Extract All’ and save the extracted file (or the entire folder) to somewhere you’ll remember (e.g. temporarily to the desktop).
The next step is to rename the BIOS file.

For ASUS motherboards, the extracted folder will have a tool that’s called ‘Biosrenamer.exe’.
Simply run the tool, and your BIOS file will be automatically renamed.
You’ll need to rename the file manually if you have an ASRock, Gigabyte, or MSI motherboard.
If you want / have to rename the BIOS File manually, do so as follows:
- ASRock motherboards: rename to creative.rom
- Gigabyte motherboards: rename to gigabyte.bin
- MSI motherboards: rename to msi.rom
Although the spelling needs to be on point, the capitalization doesn’t matter.
You may also see a warning notification pop up, which states that renaming the file might make it unusable. Simply confirm that you want to continue renaming the file and disregard the warning.
Step 4. Format the USB Drive As FAT32 and Add BIOS File
The next step is to plug in your USB flash drive.
Before transferring the BIOS file, you’ll need to format the USB drive to a file system the BIOS can access.
Find your USB flash drive in ‘File Explorer’ or under ‘This PC’.
Now right-click the drive and click ‘Format’. Select ‘FAT32’ as the format type to confirm the edit and hit start. Be sure Quick Format is enabled, otherwise it might take pretty long (should be done in just a few seconds).
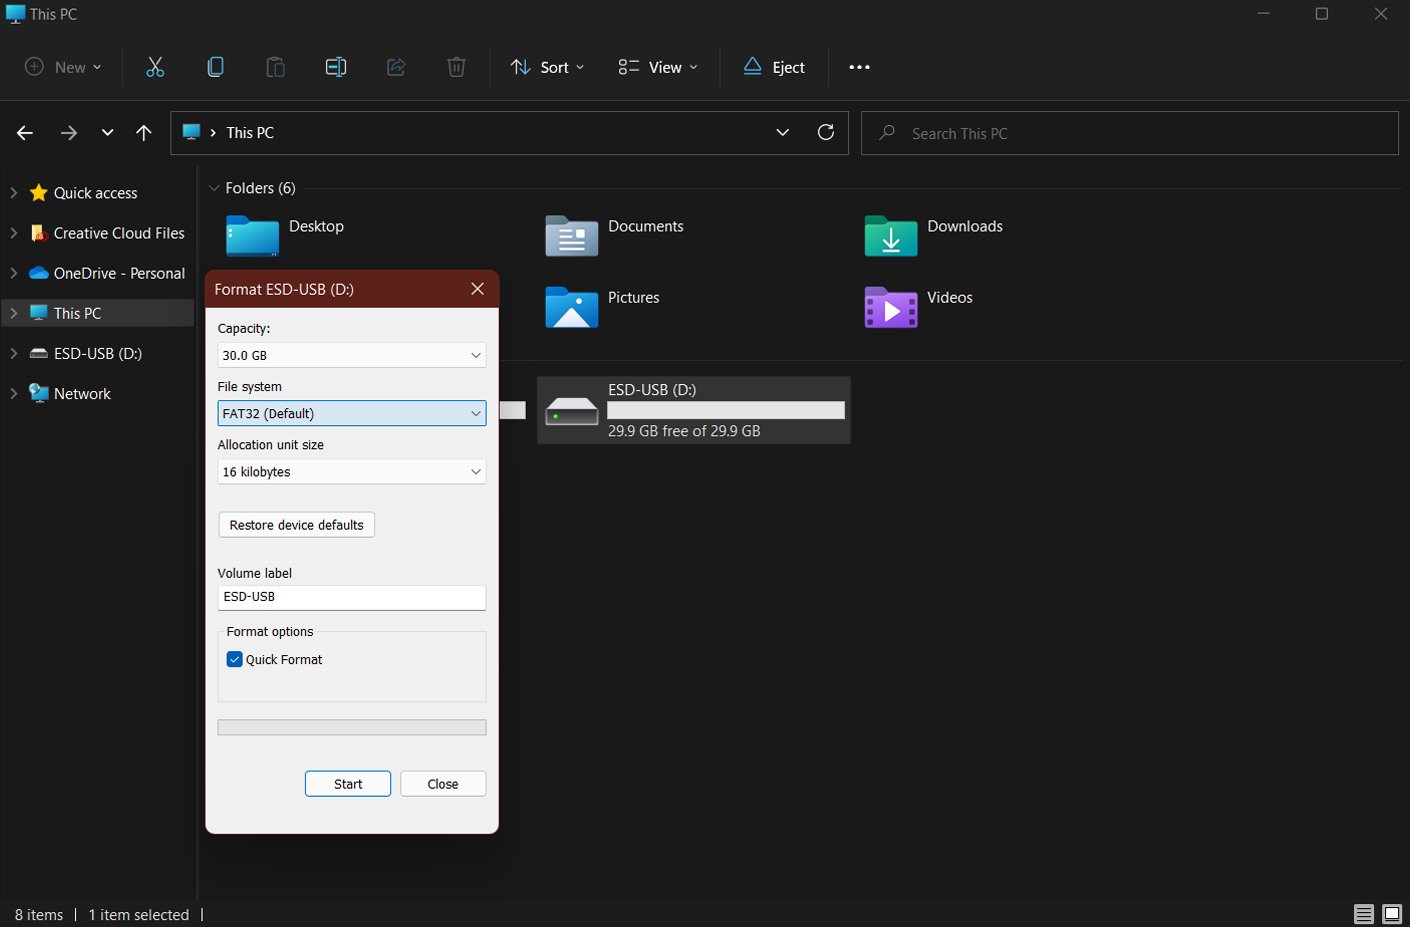
Why does your flash drive have to be formatted as FAT32 and not NTFS? Well, the BIOS has to be able to access it without the help of a CPU, and this is only possible with bare minimum file-system and drivers. In this case: FAT32.
After the formatting is completed, you can transfer the BIOS file to your flash drive from your computer. Be sure the BIOS file is stored directly at root and not inside any kind of folders on the USB Drive, otherwise it can’t be accessed.
Step 5. Safely Eject USB Drive
After transferring the BIOS File to the USB Drive, it’s time to safely eject it.
You can do this by right-clicking the drive in File Explorer and then clicking ‘Eject’.
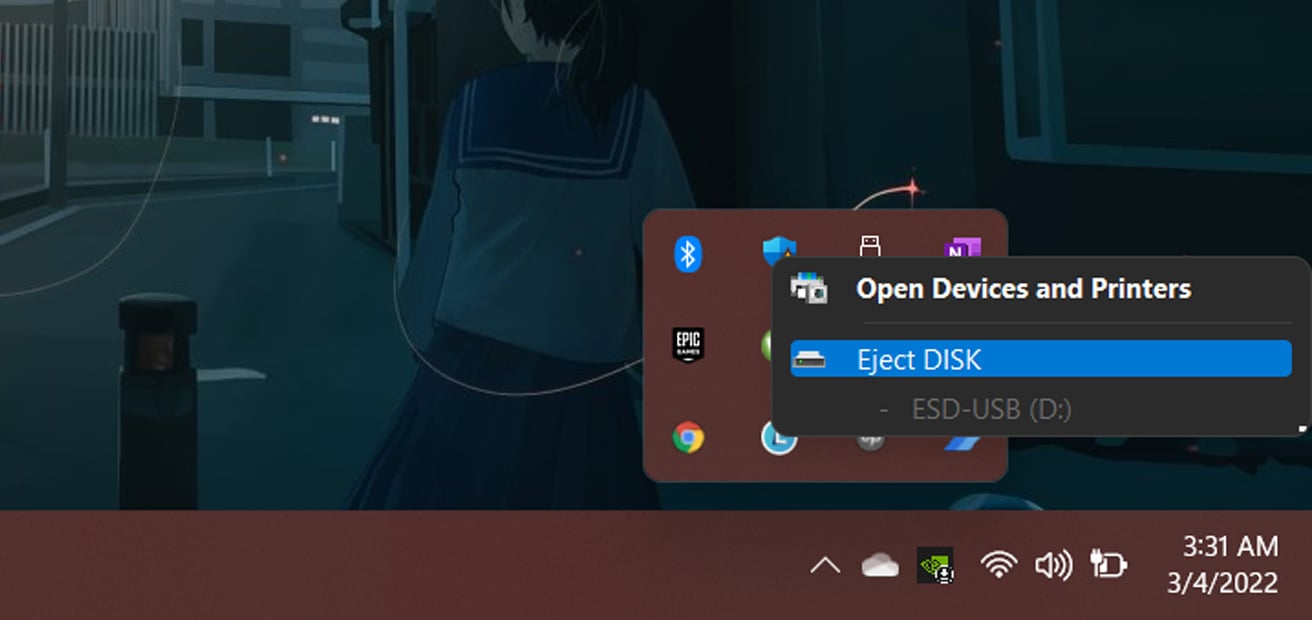
You can also find an eject button at the bottom right of your Windows screen inside the taskbar.
Now, let’s move back to the PC that needs updating:
Step 6. Connect Your Power Supply Unit (PSU)
Get your power supply and connect it to your motherboard.
Both the 24-pin main motherboard power connector and 8-pin CPU power connector(s) need to be connected for this to work.

After the cables are connected properly, connect the computer’s Power Supply (PSU) to a wall outlet and flip the PSU switch to ‘ON’.
Disclaimer: The only two parts that have to be connected / installed for BIOS Flashack to work are the Motherboard and PSU. Of course, you can still have the RAM, GPU, CPU etc. already plugged in, it won’t make a difference. Also make sure you have the PSU and Motherboard already properly mounted inside your PC’s case.
Step 7. Insert USB Drive and Press BIOS Flash Button
You don’t necessarily need any parts installed on your motherboard except the two power supply cables: 24-pin and 8-pin. If your PC is already fully assembled, though, keep your other components installed, it won’t make a difference for BIOS Flashback. (CPU, GPU, RAM, or SSD is optional to flash your BIOS.)
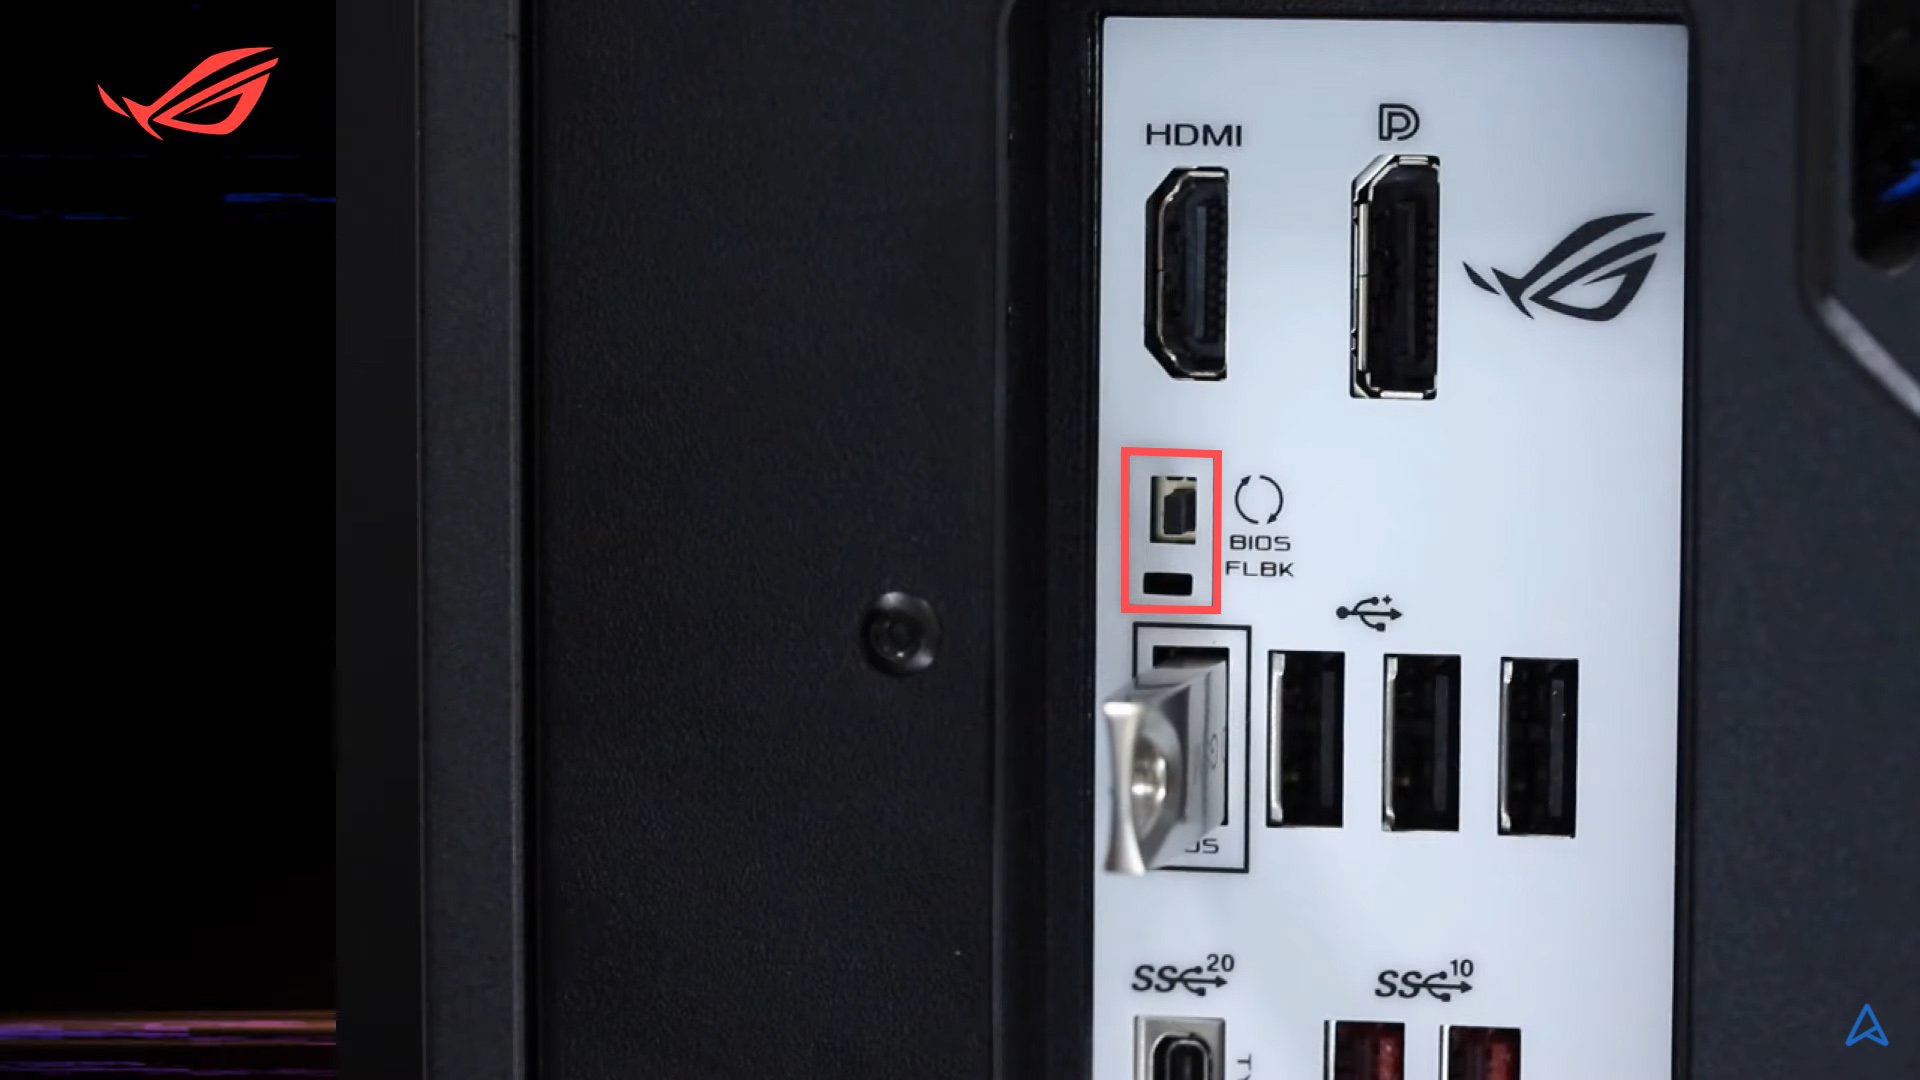
Locate the USB port on the back of your motherboard that’s labeled ‘BIOS’ or something similar and generally located right next to the BIOS Flashback button.
This port is purpose-made for updating your BIOS with a USB flash drive.
Insert the USB drive into this designated USB port.
Now press the small BIOS flash button located somewhere near the USB port. This button may be called “Q-Flash Plus” or “BIOS FLBK” on different motherboards and it may be located on the motherboard’s PCB itself and not the rear i/o shield next to the USB port.
Depending on you Motherboard you may need to hold the button for around three seconds until the LED next to the button (or the button itself) starts flashing.
Step 8. Confirm the Update Worked and Remove USB Drive
You will see an LED light flash once the BIOS update starts its work.
If you don’t see an LED light or the blinking stops after just a couple of seconds, the update likely hasn’t begun. This usually signifies that something is wrong.
In this case, check our troubleshooting steps below and go through the steps above once again, to see if you’ve missed anything
You should also try holding down the BIOS flash button for three or more seconds if an LED light doesn’t appear.
The LED light will continue flashing or be lit constantly until the update is complete, which can take around 2 – 10 minutes.
Once the update is completed, the LED will turn off, and the computer may restart or shut itself down.
Now you can remove the USB flash drive and unplug the power supply from the wall.
Then it’s time to install all your PC components to see if your computer is recognizing your new CPU.
Once all the parts are installed, you should be able to see a successful POST screen and should be able to boot or enter BIOS.
How Long Should The BIOS Update Take?
The BIOS update should take less than ten minutes to complete.
It usually takes just a few minutes to complete flashing.
However, I recommend waiting up to 30 minutes before trying to fix anything.
If it’s been updating for over 30 minutes or an hour and the LED is still blinking, you might have one the issues listed in our troubleshooting steps below.
The best plan of action is to restart the entire process with a different flash drive. Make sure to follow each step exactly as detailed.
Troubleshooting Steps
Here are tips we’ve collected over the years that you can try to resolve typical issues during BIOS Flashback:
- Be sure the USB Drive is formatted as FAT32 not NTFS
- Use Rufus to format the USB Drive as non-bootable
- Try a USB Drive with either MBR or GPT Partition Tables
- Try a USB 2.0 USB Drive
- Use a different USB Drive, and try one with < 4GB storage space
- Make sure the BIOS file is correctly named and placed in the drive’s root
- Use stable final BIOS versions, not BETA versions
- Try different / an older BIOS version (the newest one might have bugs)
- Doublecheck you’ve downloaded the correct BIOS file. Some Motherboard names sound very similar (B550 vs B550M etc)
- Be sure the USB Drive is in the designated USB port (consult the motherboard manual to see which one this is)
- Although not strictly necessary, try unplugging all components from the motherboard (CPU, GPU, RAM etc.) except the ATX 24 pin and CPU Power Cable(s)
- Clear your CMOS before doing a BIOS update / flashback
Conclusion
Although it can be annoying having to update your BIOS when upgrading your CPU, the process is relatively straightforward.
As long as your motherboard supports BIOS Flashback, following the steps outlined in this guide, your computer will be up and running in no time.
FAQ
Is the BIOS Flash Process Complete When the Flash BIOS LED Stops Blinking?
Yes, this indicates that the update is completed.
The LED should have been blinking for five to six minutes.
If the LED only blinked or displayed for a few seconds, the update did not work.
What if My Motherboard Doesn’t Offer BIOS Flashback?
If your motherboard doesn’t offer a BIOS Flashback feature, the best method is to install an older, compatible CPU in your motherboard.
You can then use a traditional method to update your BIOS.
If you don’t have another CPU you can install, ask a friend to see if you can borrow one of their old ones.
Another option is to bring your PC into a store and ask them to install a temporary CPU to update your BIOS.
Over to You
So, are the questions in your head regarding updating BIOS without a CPU answered in this article? If you have any questions, feel free to ask us in the comments or on our forum!
 in BIOS and Should You Use It?")
![How To Reset An MSI BIOS? [All Possible Ways]](https://www.cgdirector.com/wp-content/uploads/media/2022/09/How-To-Reset-MSI-BIOS-All-Possible-Ways-Twitter-594x335.jpg "How To Reset An MSI BIOS? [All Possible Ways]")
")


8 Comments
28 February, 2024
how can I update bios without a bios button?
8 March, 2024
What is your Motherboard’s name, exactly? You’ll usually be able to find instructions on its product page.
Cheers,
Alex
11 February, 2023
This helped a lot, thanks.
23 August, 2022
i have a ASRock a320m-HDV 4.02 with bios version 3.70 i had a ryzen 3 processor in it that came from skytech gaming.. i was recieving error messages such as Memory error or a Kernal error or it would just kick out to the bios settings… i removed and reinstalled the ram… and i have purchased a Ryzen 5 5000series Zen3 architecture and still nothing.. i tried purchasing and installing a Nvidia RTX 2060 card and installing it to see if i would get picture and still nothing. ihave no idea what to do from here and i am curious about the compatibility of the Processor i bought to the ASROCK A320M-HDV i have…
2 September, 2022
Hey Edward,
Did you ever do a clean OS install?
Cheers,
Alex
3 July, 2022
Hi there, I installed a new 5600 Ryzen on x570 but monitor mouse keyboard stoped working, I changed it back to same 2600 Ryzen but whole PC turns on but no display mouse or keyboard lights working
4 July, 2022
Hey Ali,
When did the monitor, mouse, keyboard stop working – When you were booted into the os already?
With the 2600, does it POST, are you getting any indicator LEDs on your motherboard?
Cheers,
Alex
28 June, 2022
Saved me, thank you!