 by
by ![How to Add More Storage to Your MacBook [4 Ways]](https://www.cgdirector.com/wp-content/uploads/media/2023/07/How-to-Add-More-Storage-to-Your-MacBook-Twitter-1200x675.jpg "How to Add More Storage to Your MacBook [4 Ways]")
TABLE OF CONTENTS
Apple’s latest and greatest MacBooks sure are a sight to behold.
They’re sleek beyond measure, efficient unlike any other option on the market, and are, perhaps most surprisingly, competitively priced.
They’re not, however, upgradeable, which means that you really need to think twice before making any kind of purchasing decision. And that, in short, is quite a problem.
Our preferences change over time and so do our needs. You might be okay with 8GB of Unified Memory right now, but what if your workload evolves further down the road? What if you realize that you need more than 256GB of storage for your projects?

Apple’s MacBooks are some of the finest laptops on the market, but this limitation of sorts is their biggest — and most prominent — flaw; their Achilles’ heel, if you will.
Fortunately, there are ways to add more storage to your MacBook.
Buying a model with a bigger SSD is obviously the best possible route, but if you don’t have the necessary funds — or just don’t want to succumb to Apple’s upselling tactics — there are still options you can harness post-purchase.
With that little introduction out of the way, let’s begin!
How to add more Storage to your MacBook
External SSD Storage
The “go-to” option for both Windows and macOS users alike. This, in short, is the simplest and most user-friendly way of adding more storage to your MacBook — or computer in general.
It’s not the cheapest option, but it sure is worth the price of admission.
As far as external SSD storage is concerned, you have two options:
- You can buy an external SSD like, say, a Samsung T7 (or an equivalent offering from a different manufacturer)
- You can “build” such a thing by buying an external enclosure (SATA SSD or NVMe) and populating it with one of your own SSDs

The latter option is obviously more effective price-wise and, needless to say, you’d be able to reach higher read/write speeds if you end up going with a Thunderbolt-certified enclosure.
Plus, if you ever end up needing even more storage, you’ll be able to simply purchase a new, higher capacity SSD and replace your existing one.
With a “pre-made” SSD — like the aforementioned Samsung T7 — you’ll always be limited by its capacity.
If the need for more storage arises, you’ll have to buy another one.
Still, either option will do just fine if you don’t have a wholly specific use-case.
External Hubs (and Docks) With Built-In Storage
Buying an external hub that has an embedded SSD deep within its enclosure is yet another stellar option.
Not only will it provide your MacBook with additional storage, but it’ll also extend your laptop’s port selection — it’s a 2-for-1 kind of deal!
It all depends on the model you end up buying, but you can expect at least a couple of USB-As, a full-size HDMI port, and perhaps even Ethernet. All in all, this one’s for those who’d like to combine both their external SSD and their hub/dongle!
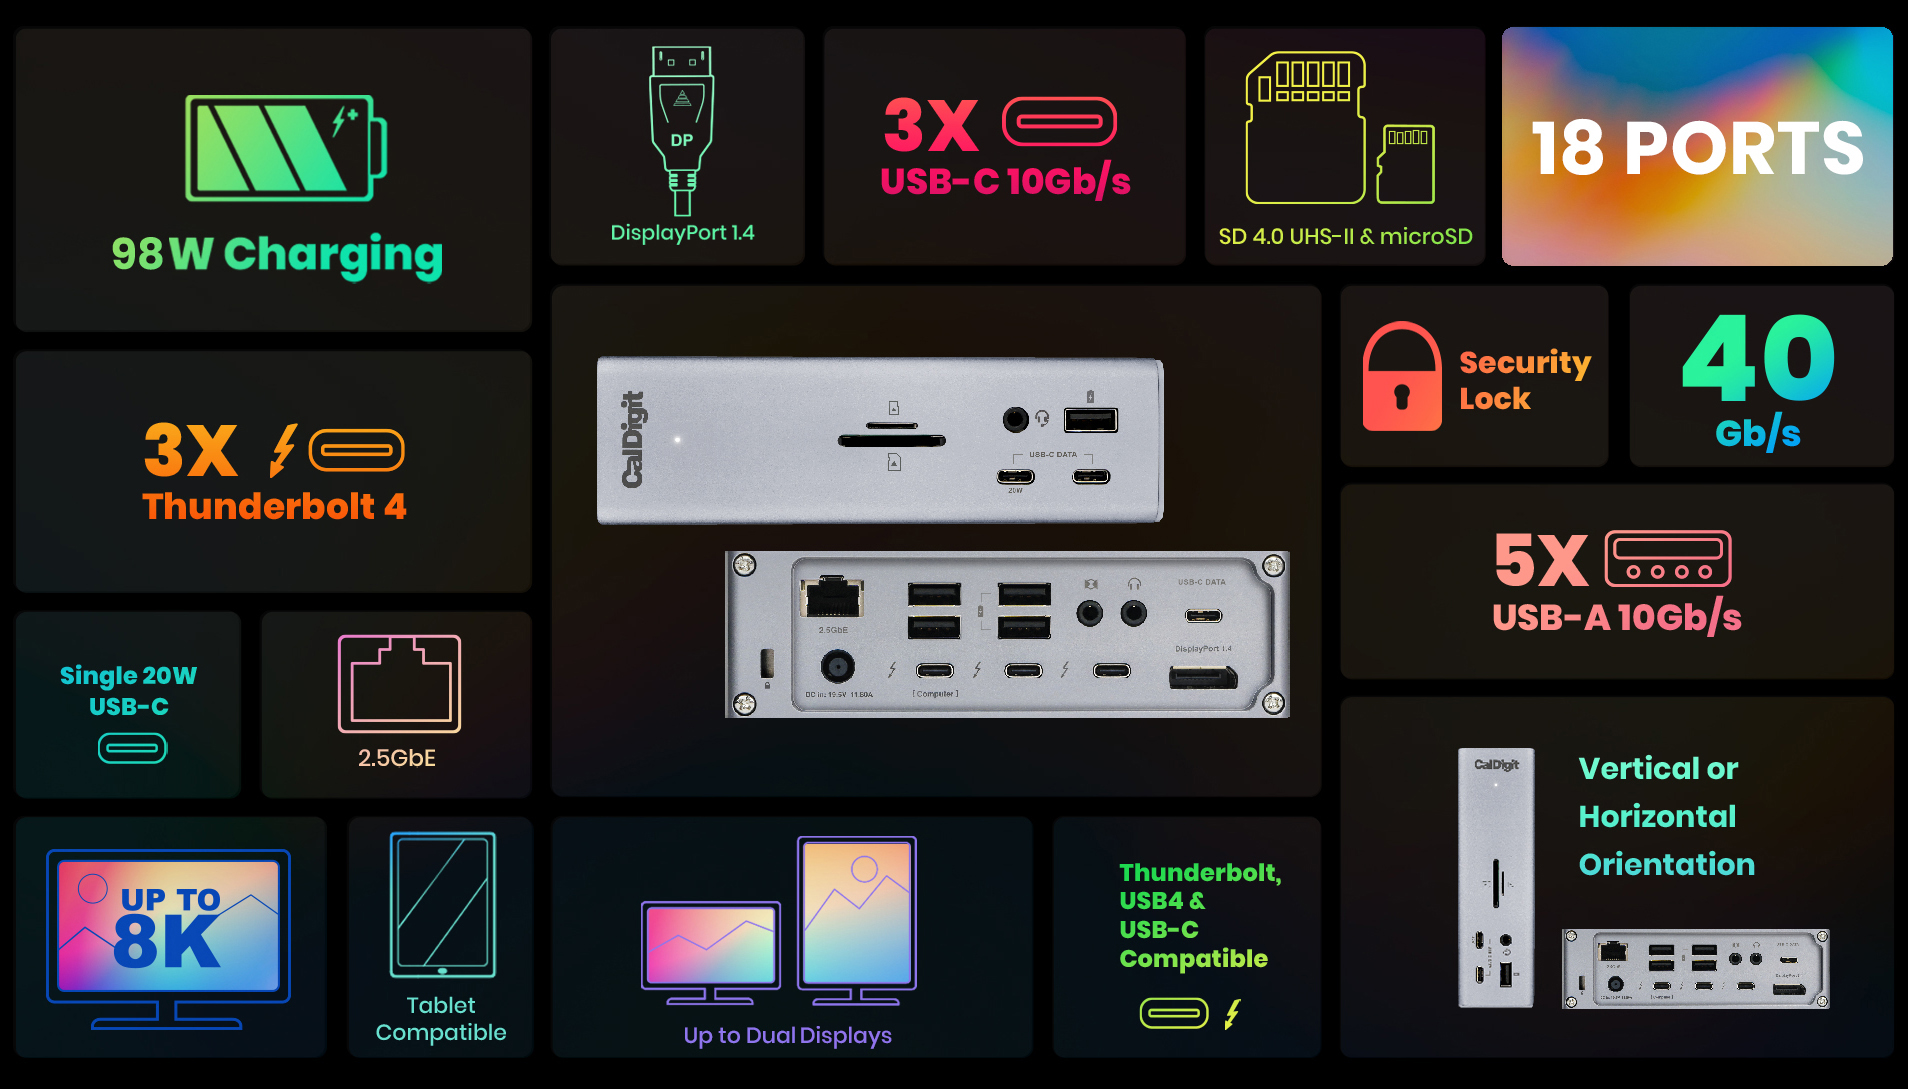
If your MacBook is often tethered to a wall outlet and is being used as a regular desktop computer — i.e. connected to a monitor with a wireless/wired keyboard and mouse — then buying a large Thunderbolt dock might make sense.
These are still fairly portable and, better yet, extend the overall functionality of your MacBook in a myriad of different ways.
To learn more about one such external hub, make sure to watch the following video from Elevated Systems:
Cloud Storage [Free/Paid] / NAS Storage
Adding more storage to your MacBook through various different cloud services — like Google Drive, Dropbox, OneDrive, and others — is a stellar (and most convenient) option, especially if you always have access to a stable internet connection.
If you want to stay within Apple’s ecosystem, then buying additional iCloud storage might be worth exploring.
The 2TB option costs $9.99, although pricing will vary depending on your region. Having such a vast amount of storage available to you at all times — for such an acceptable price — is no doubt sufficient for the vast majority of users.
Alternatively, if you’re more of a demanding user and have the need for a tremendous amount of online storage — and are willing to spend a lot more money right now so as to spend less in the long run — you should definitely explore network-attached storage (or NAS, for short).
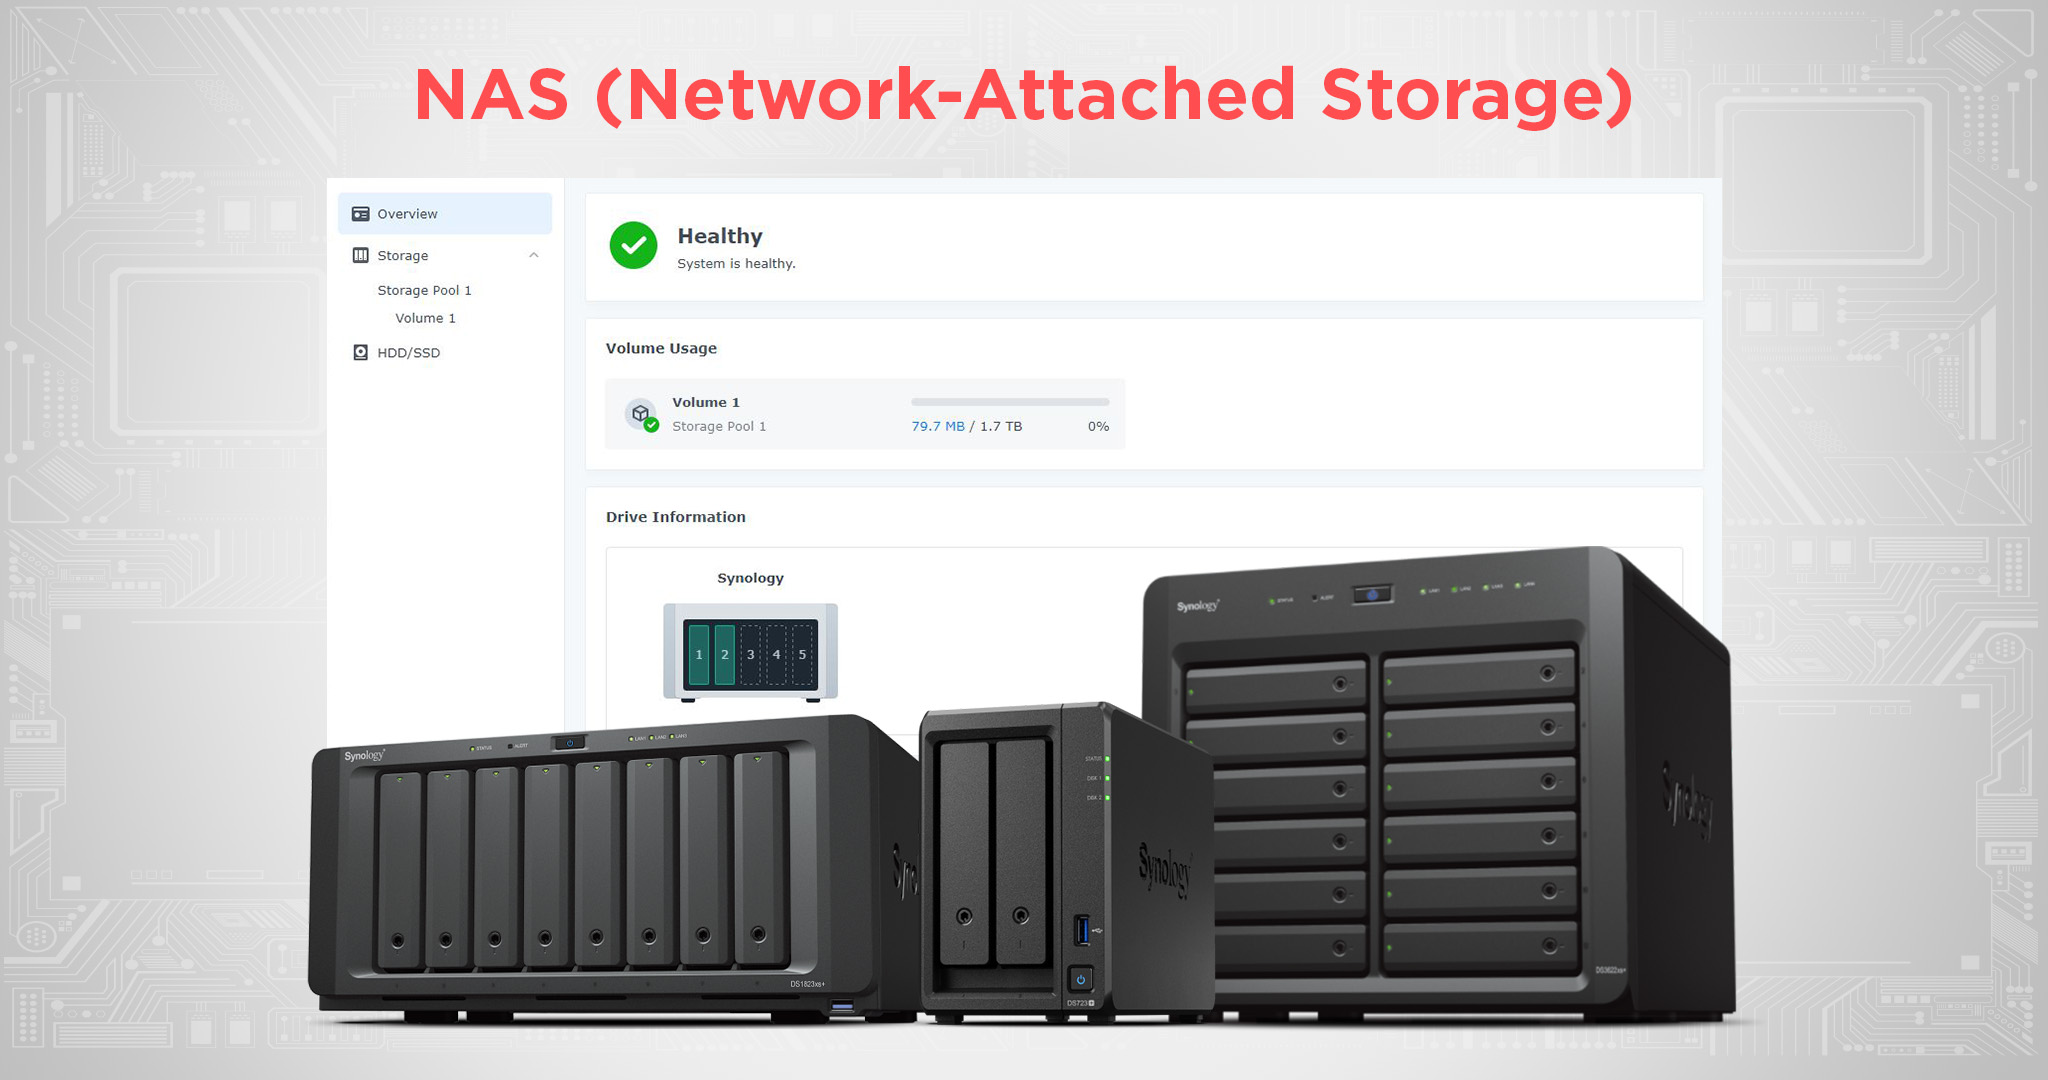
It’s not as easy to set up (an understatement), but it is a much more versatile option when compared to “traditional” cloud-based services.
That being said, for most people (and most budgets), it’s totally overkill — but it’s nonetheless important you know it exists.
USB Drives & SD Cards
If you don’t need particularly impressive transfer speeds — and are content with storing your files onto a piece of storage that isn’t quite as reliable and long-lasting — then a regular USB drive or SD card will surely do the trick.
USB drives are still a fairly cheap and convenient way of storing (non-critical) files and media. And, better yet, they’re small, easy to carry, and certain models even have “convertible” USB connectors (both type-A and type-C).
SD cards (of any kind) are a bit harder to recommend as they’re not as durable and, unless you have a 14”/16” MacBook Pro, you’ll need an additional adapter/hub to fully utilize it. Still, it is an option, and it might be worth exploring.
Conclusion
Adding more storage to your MacBook is by no means as complicated or even expensive as it might sound.
Better yet, there’s a myriad of different options available which means that you can easily find one that’ll suit your needs and preferences.
Apple’s latest ARM-based MacBooks don’t offer any kind of upgrade path which, needless to say, is less than ideal.
Fortunately, it doesn’t have to be as big of a hindrance as it might seem at first glance as it can easily be circumvented with an additional investment.
FAQ
Let’s go over a few potential questions you might have regarding this particular topic:
How Much Storage Does My MacBook Have?
If you’re on macOS Ventura, click on the Apple icon in the upper left-hand corner and then on System Settings.
Now that a new window has popped up, look at the sidebar and click on General.
Now click on Storage and you’ll be presented with a fairly comprehensive breakdown of your main storage drive.
If you’re on macOS Monterey (or a few versions prior to it), this whole process is even simpler: click on the Apple icon and then on About This Mac. A small new window will open up, and on it, you’ll see five different tabs: Overview, Displays, Storage, Support, and Service.
Simply click on the Storage tab and you’ll immediately see both how big an SSD your MacBook has and how much of it is already reserved/populated with your existing media (applications, audio files, photographs, movies, and so on).
Can I Add More Storage to My M1/M2 MacBook?
You can’t replace/upgrade its internal SSD if that’s what you’re wondering.
With Apple’s ARM-based Macs, no internal component can be swapped out or upgraded.
You can, however, purchase an external SSD or, say, buy additional cloud-based storage, but you’ll never be able to increase the capacity of your MacBook’s internal SSD (unless it’s an older Intel-based model).
How Can I Add More Storage to My MacBook?
You can purchase an external SSD, a USB stick, or, say, additional cloud storage.
Each of these options caters to a different kind of need and use-case, and they all have their own pros and cons.
An external SSD is obviously the best and most potent option, but it’s also the most expensive. A regular USB stick is much smaller in size but it’s also slower and nowhere near as reliable.
Finally, cloud storage offers a very unique mix of both versatility and convenience, but it’s obviously not for everyone.
Either way, users are spoiled for choice.
Is 256GB of Storage Enough?
It is, but only for those who don’t work with a ton of different files, projects, and media.
If all you do is browse the web, stream videos, and work in a few applications, then 256GB — while by no means ideal or expansive — will get the job done.
Do note that there will come a time when you’ll need additional space. At that point, you’ll either have to delete some of your existing files or, alternatively, invest in an external SSD or some other form of storage (be it physical or cloud-based).
Over to You
Have you expanded your MacBook’s storage and, if so, which option did you go with and why? Let us know in the comment section down below and, in case you need any help, head over to our forum and ask away!

![Which Mac Is the Right Desktop Computer for You? [Update]](https://www.cgdirector.com/wp-content/uploads/media/2023/11/Which-Mac-Is-the-Right-Desktop-Computer-for-You-Twitter-594x335.jpg "Which Mac Is the Right Desktop Computer for You? [Update]")
![Are M3 MacBooks Worth It / Worth the Wait? [2024 Update]](https://www.cgdirector.com/wp-content/uploads/media/2023/05/Should-You-Wait-for-the-M3-MacBooks-or-Buy-an-Older-Model-Twitter-594x335.jpg "Are M3 MacBooks Worth It / Worth the Wait? [2024 Update]")
![Are MacBooks Good for Video Editing? [2024 Update]](https://www.cgdirector.com/wp-content/uploads/media/2023/11/Are-M1-and-M2-MacBooks-Good-for-Video-Editing-Twitter-594x335.jpg "Are MacBooks Good for Video Editing? [2024 Update]")

0 Comments