 by
by 
TABLE OF CONTENTS
You might’ve heard the words “normal map” or “bump map” or any assortment of other weirdly named “maps” when you’ve been scouring the internet for texture maps.
These maps sometimes trip up even experienced artists. So in this article, I’m going to explain to you exactly what these maps are and how you can use them.
What Are These “Maps”?
Sadly, these aren’t maps that’ll lead you to treasure, but they can sure lead you to better renders.
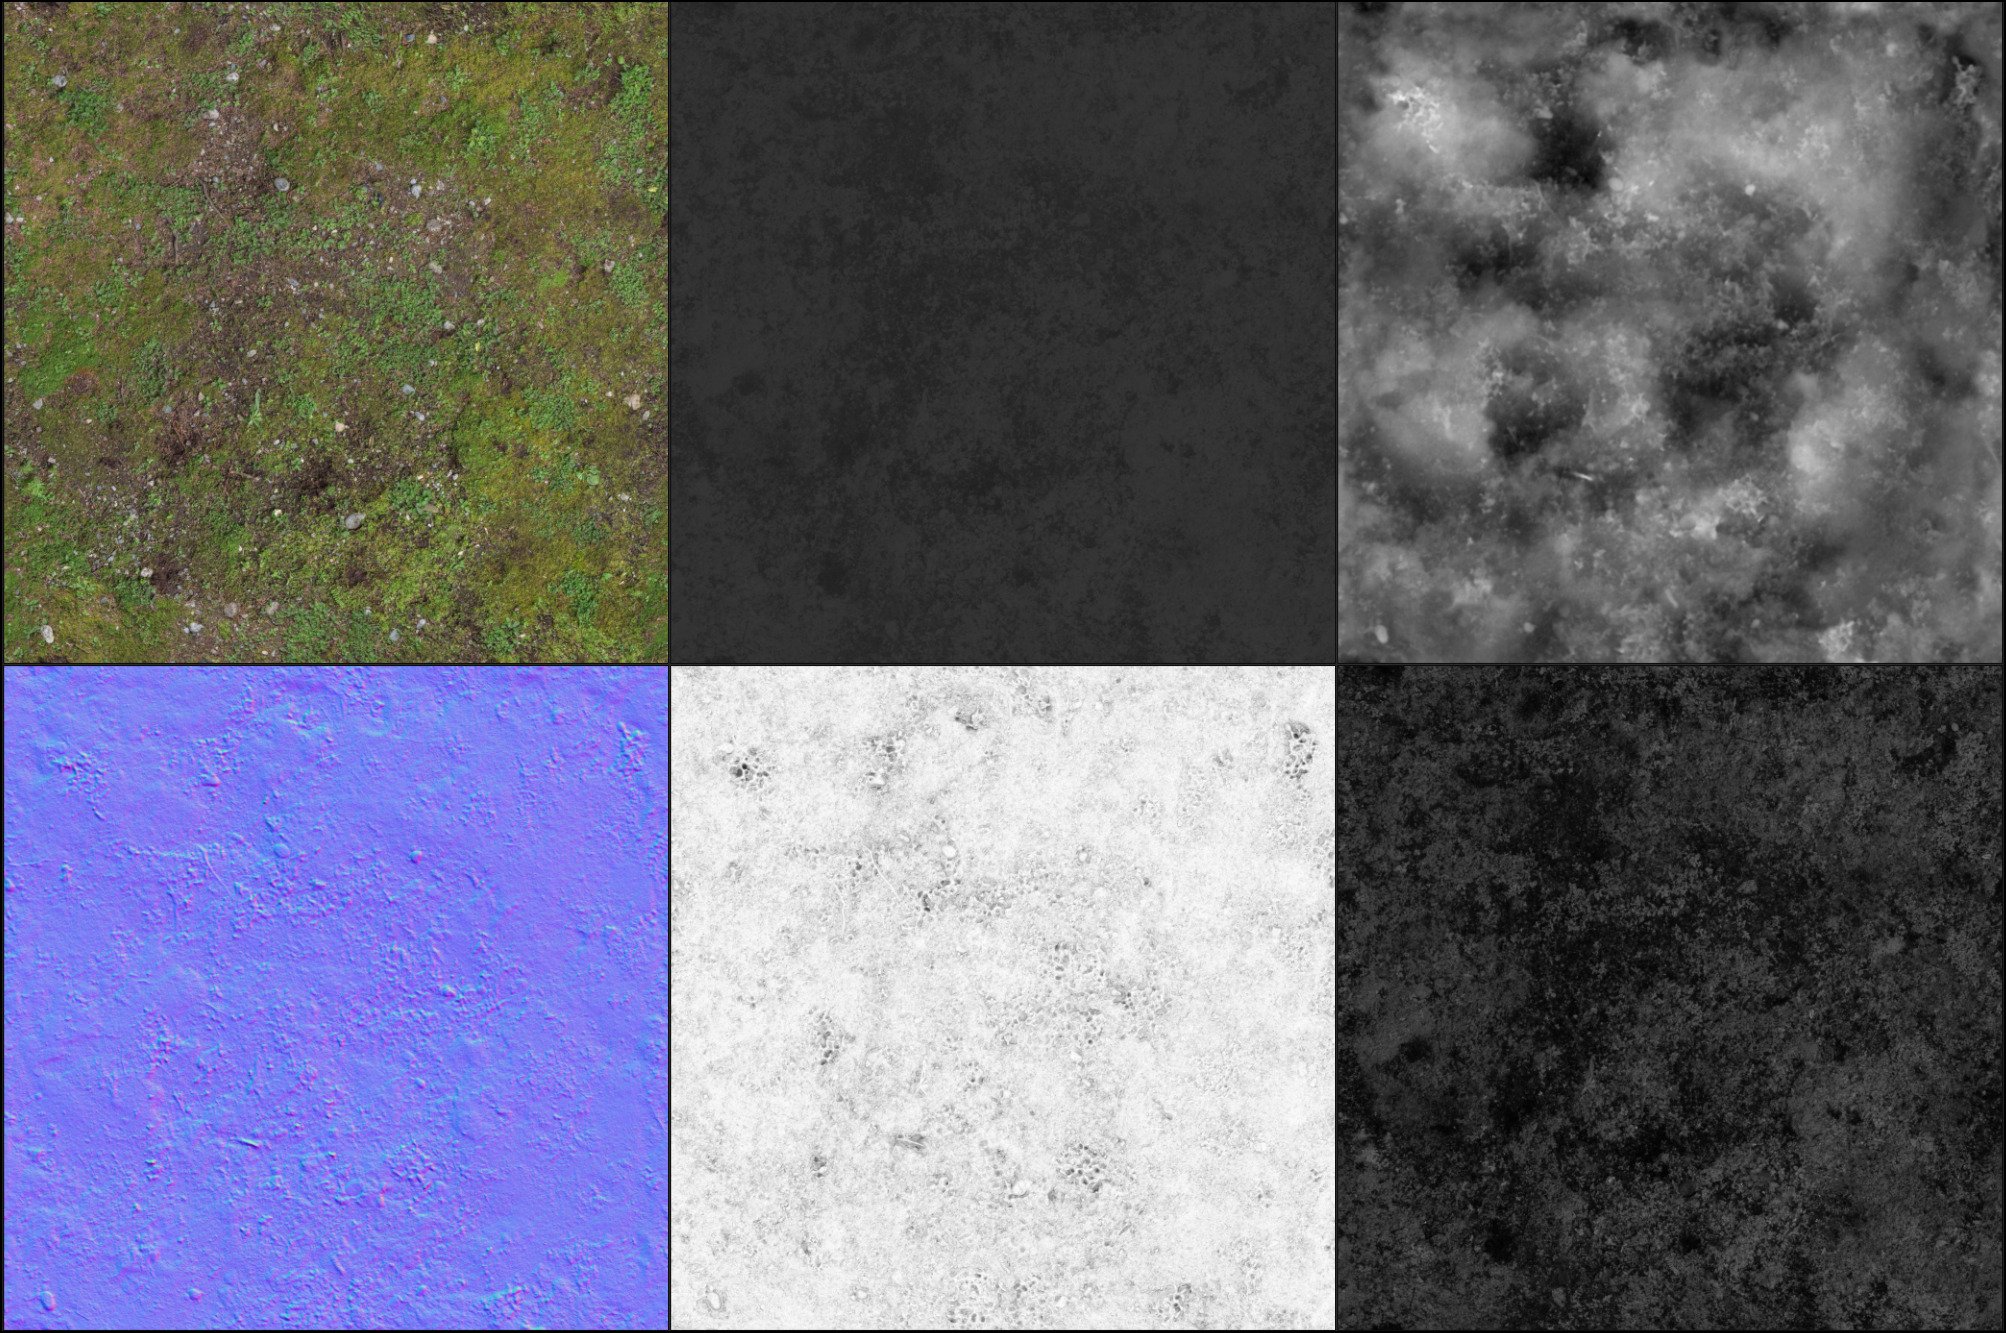
Texture maps are called “maps” because they are images that store information that can tell a computer how to change the surface of a model.
Take a diffuse/albedo map, for instance. They provide the computer with information about what color/texture to make the surface of the model.
It’s worth mentioning that diffuse maps and albedo maps are commonly used interchangeably, but are two different things. However, for our purposes, it’s a moot point.
The computer can then use that information to give your model a texture.
But what about normal maps?
Normal Maps
If diffuse and albedo maps give your models color and textures, normal maps give your models depth.
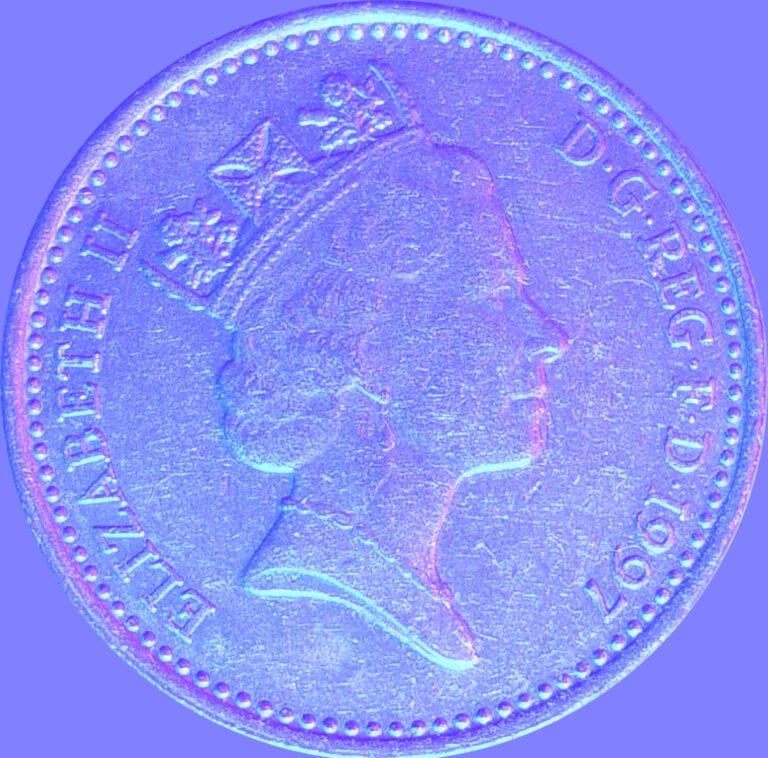
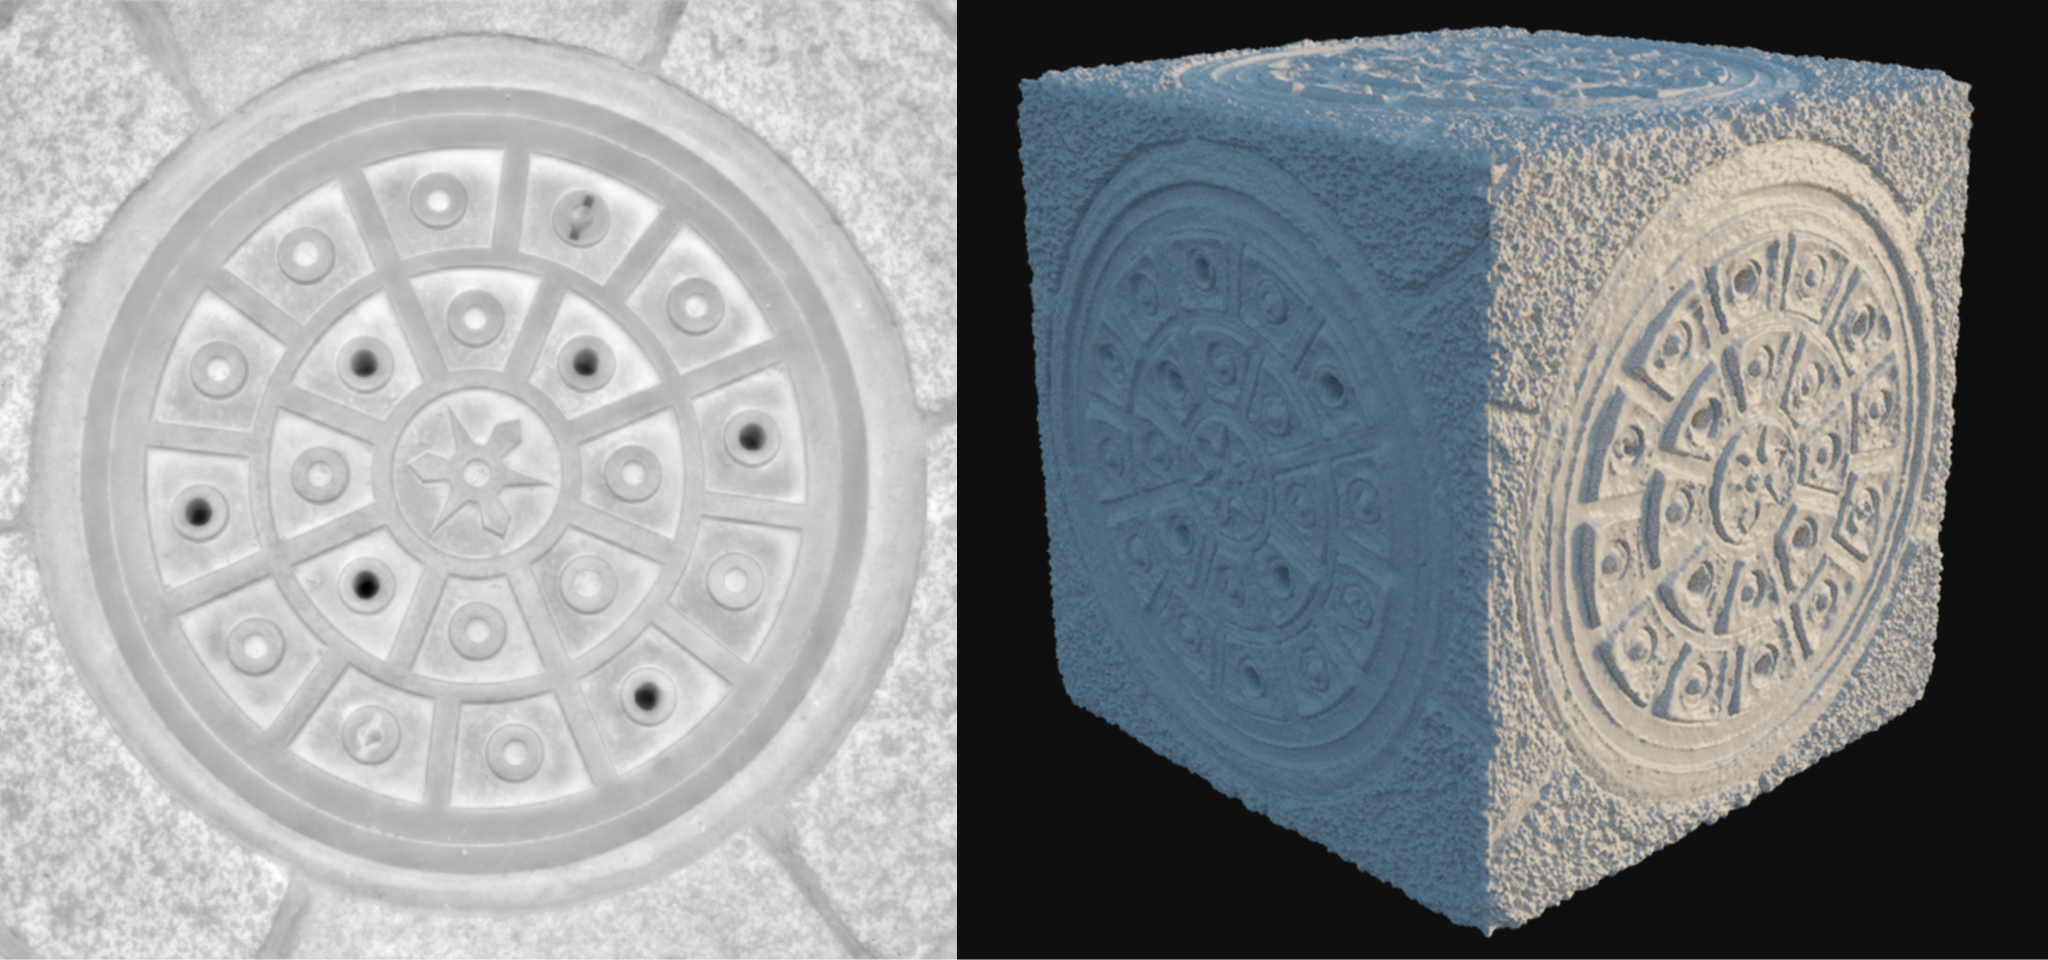
Dan’s Normal Map Coin Creation
See how you can intuitively understand the depth of that coin? How you can understand the curvature of the edges?
That’s the same thing a computer “sees.” And it uses this information to give your models fake depth.
But what do I mean by “fake depth”?
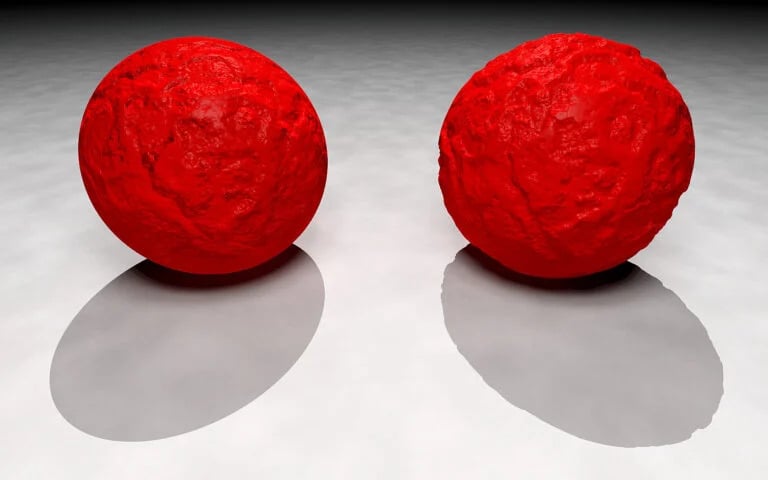
The sphere on the left has a bump map applied to it—we’ll get to it in a bit, but it is very similar to a normal map—and the sphere on the right has actual geometry.
See any differences?
Take a look at the silhouette of the sphere on the left. Take a look at the shadow as well.
See how smooth it is? The surface of the sphere looks bumpy enough, but the silhouette is just a plain ol’ sphere.
That’s what I mean by “fake depth.”
The normal map makes it seem like the surface of the model is bumpy when, in reality, it’s still a sphere.
It just makes it so that when the surface catches the light, it catches the light in a way that makes it seem bumpy. But because there’s no actual geometry there, the silhouette and the shadow look like what it truly is, a simple sphere.
Alright. If normal maps only add fake depth, why even bother using them?
When to Use Normal Maps
You use normal maps when you want to add in minute details onto your model in a way that doesn’t destroy performance.
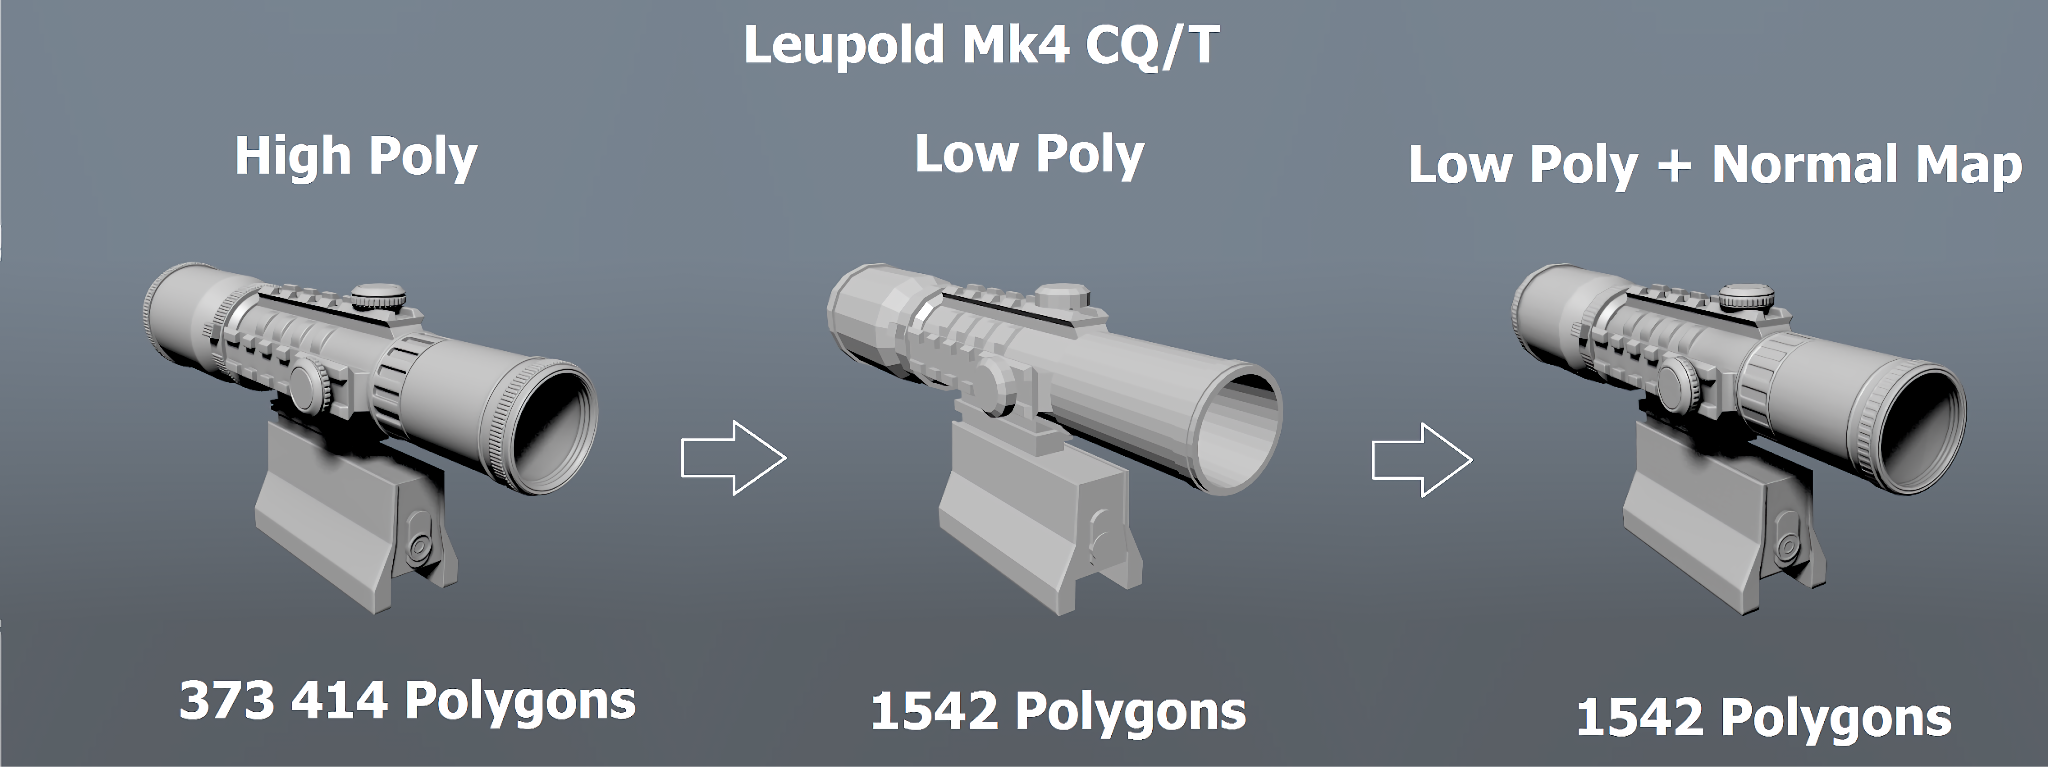
Image-Credit: Jordan Clarry BA5
See how big the poly count of the high poly model is? That’s a very high-quality model, but also pretty impractical.
Have a couple of those around your scene and it’ll slow down to a crawl.
So that’s where normal maps come to the rescue.
You can create normal maps of your own models.
In a process known as “baking” a normal map, you can take a very high poly model, create a lower poly, yet still identifiably the same model, and then “bake” the details of the high poly model down to the low poly one.
This process creates a normal map of the high poly model, preserving almost all the details within the normal map.
You can then take this normal map and apply it to your low poly model, which in turn gives your low poly model the appearance of the high poly model, but at a far, far lower performance cost.
Do you see how useful normal maps can be now?
Yes, normal maps will only ever add fake detail, but if you combine those fake details with a model that doesn’t need those fake details to function by itself, you can increase the quality of the overall model without having to model in all those minute details by hand—saving you countless hours.
Think of normal maps as the…icing on a cake. The icing doesn’t make the cake, but it sure does make it delicious.
Okay…cool. But what’s a bump map then?
Bump Maps
Bump maps are pretty much old-school normal maps that barely anyone uses anymore.
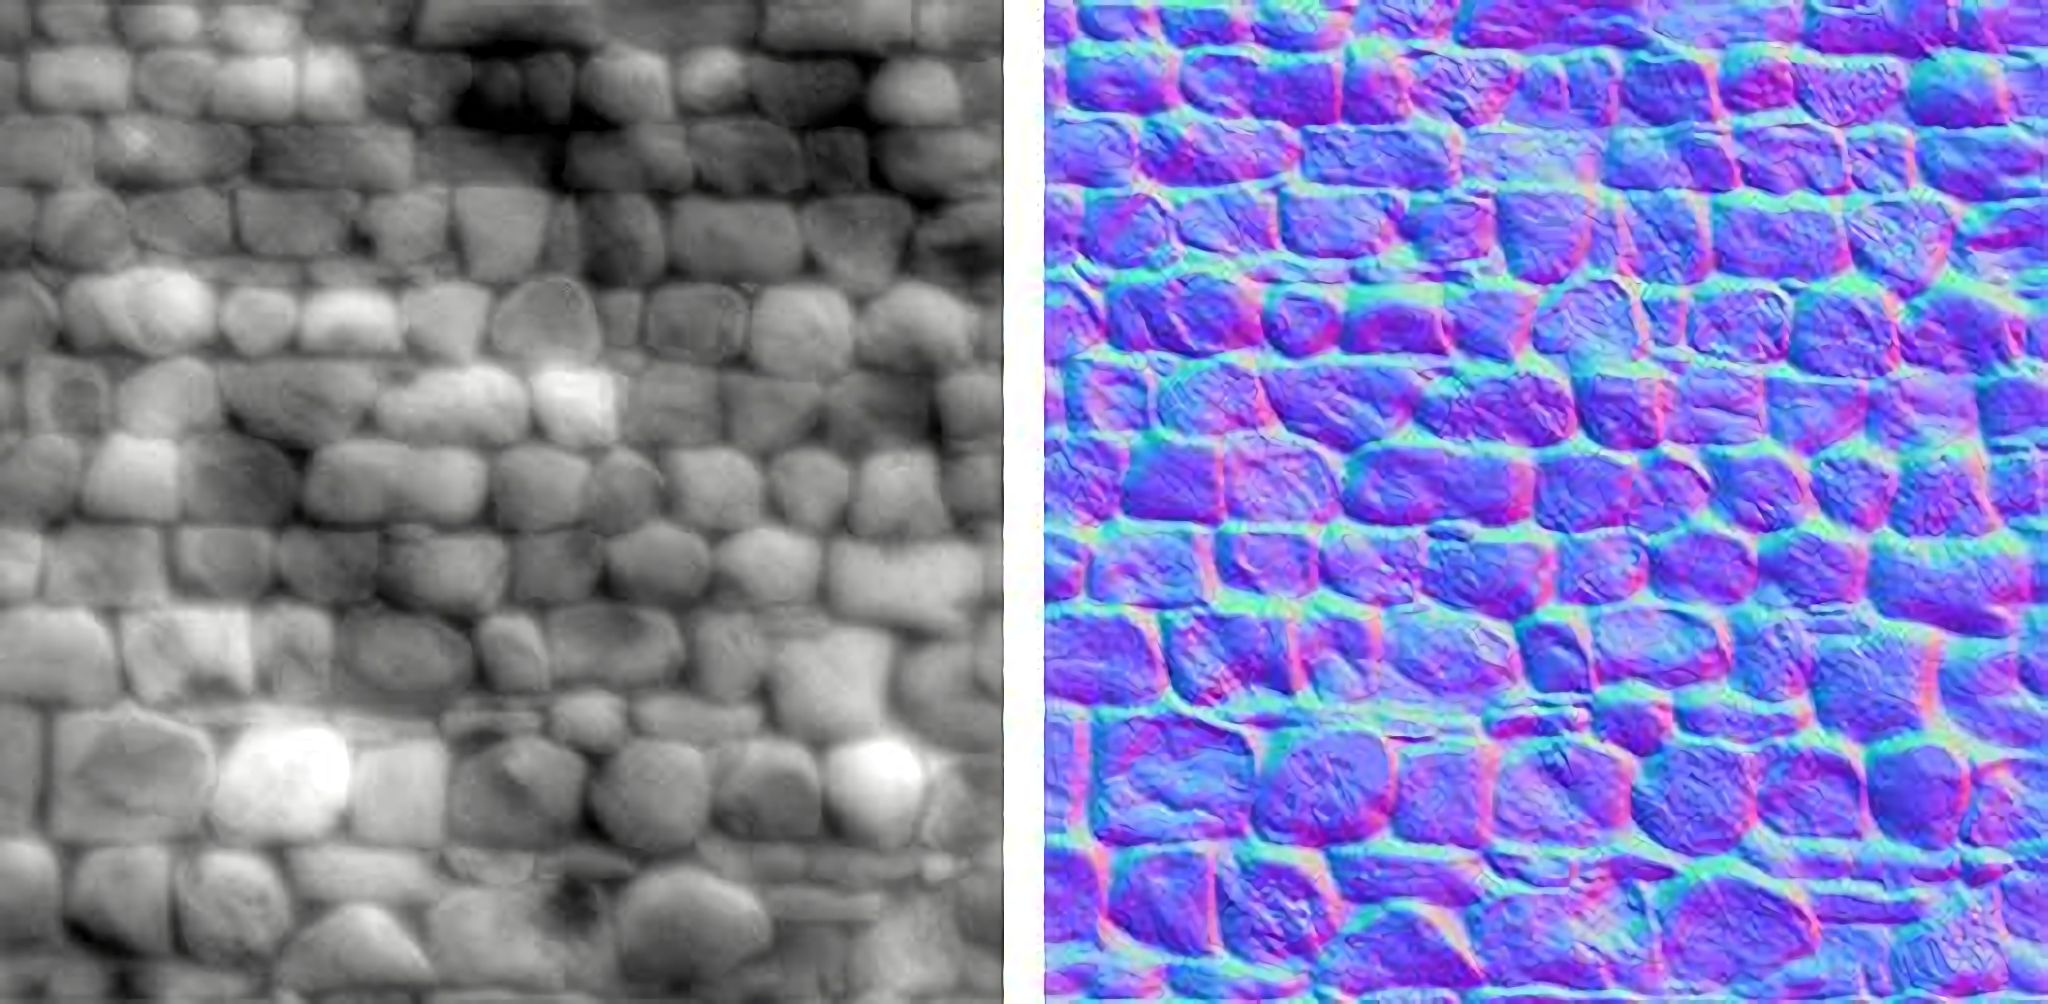
They’re images that represent height values using a 256 color gradient from black to white.
Black means that it’s indented and white means that it’s extruded. And gray means that the surface of the texture is at the same height as the model, meaning that it doesn’t change anything—gray can also be thought of as the “base purple” of a normal map.
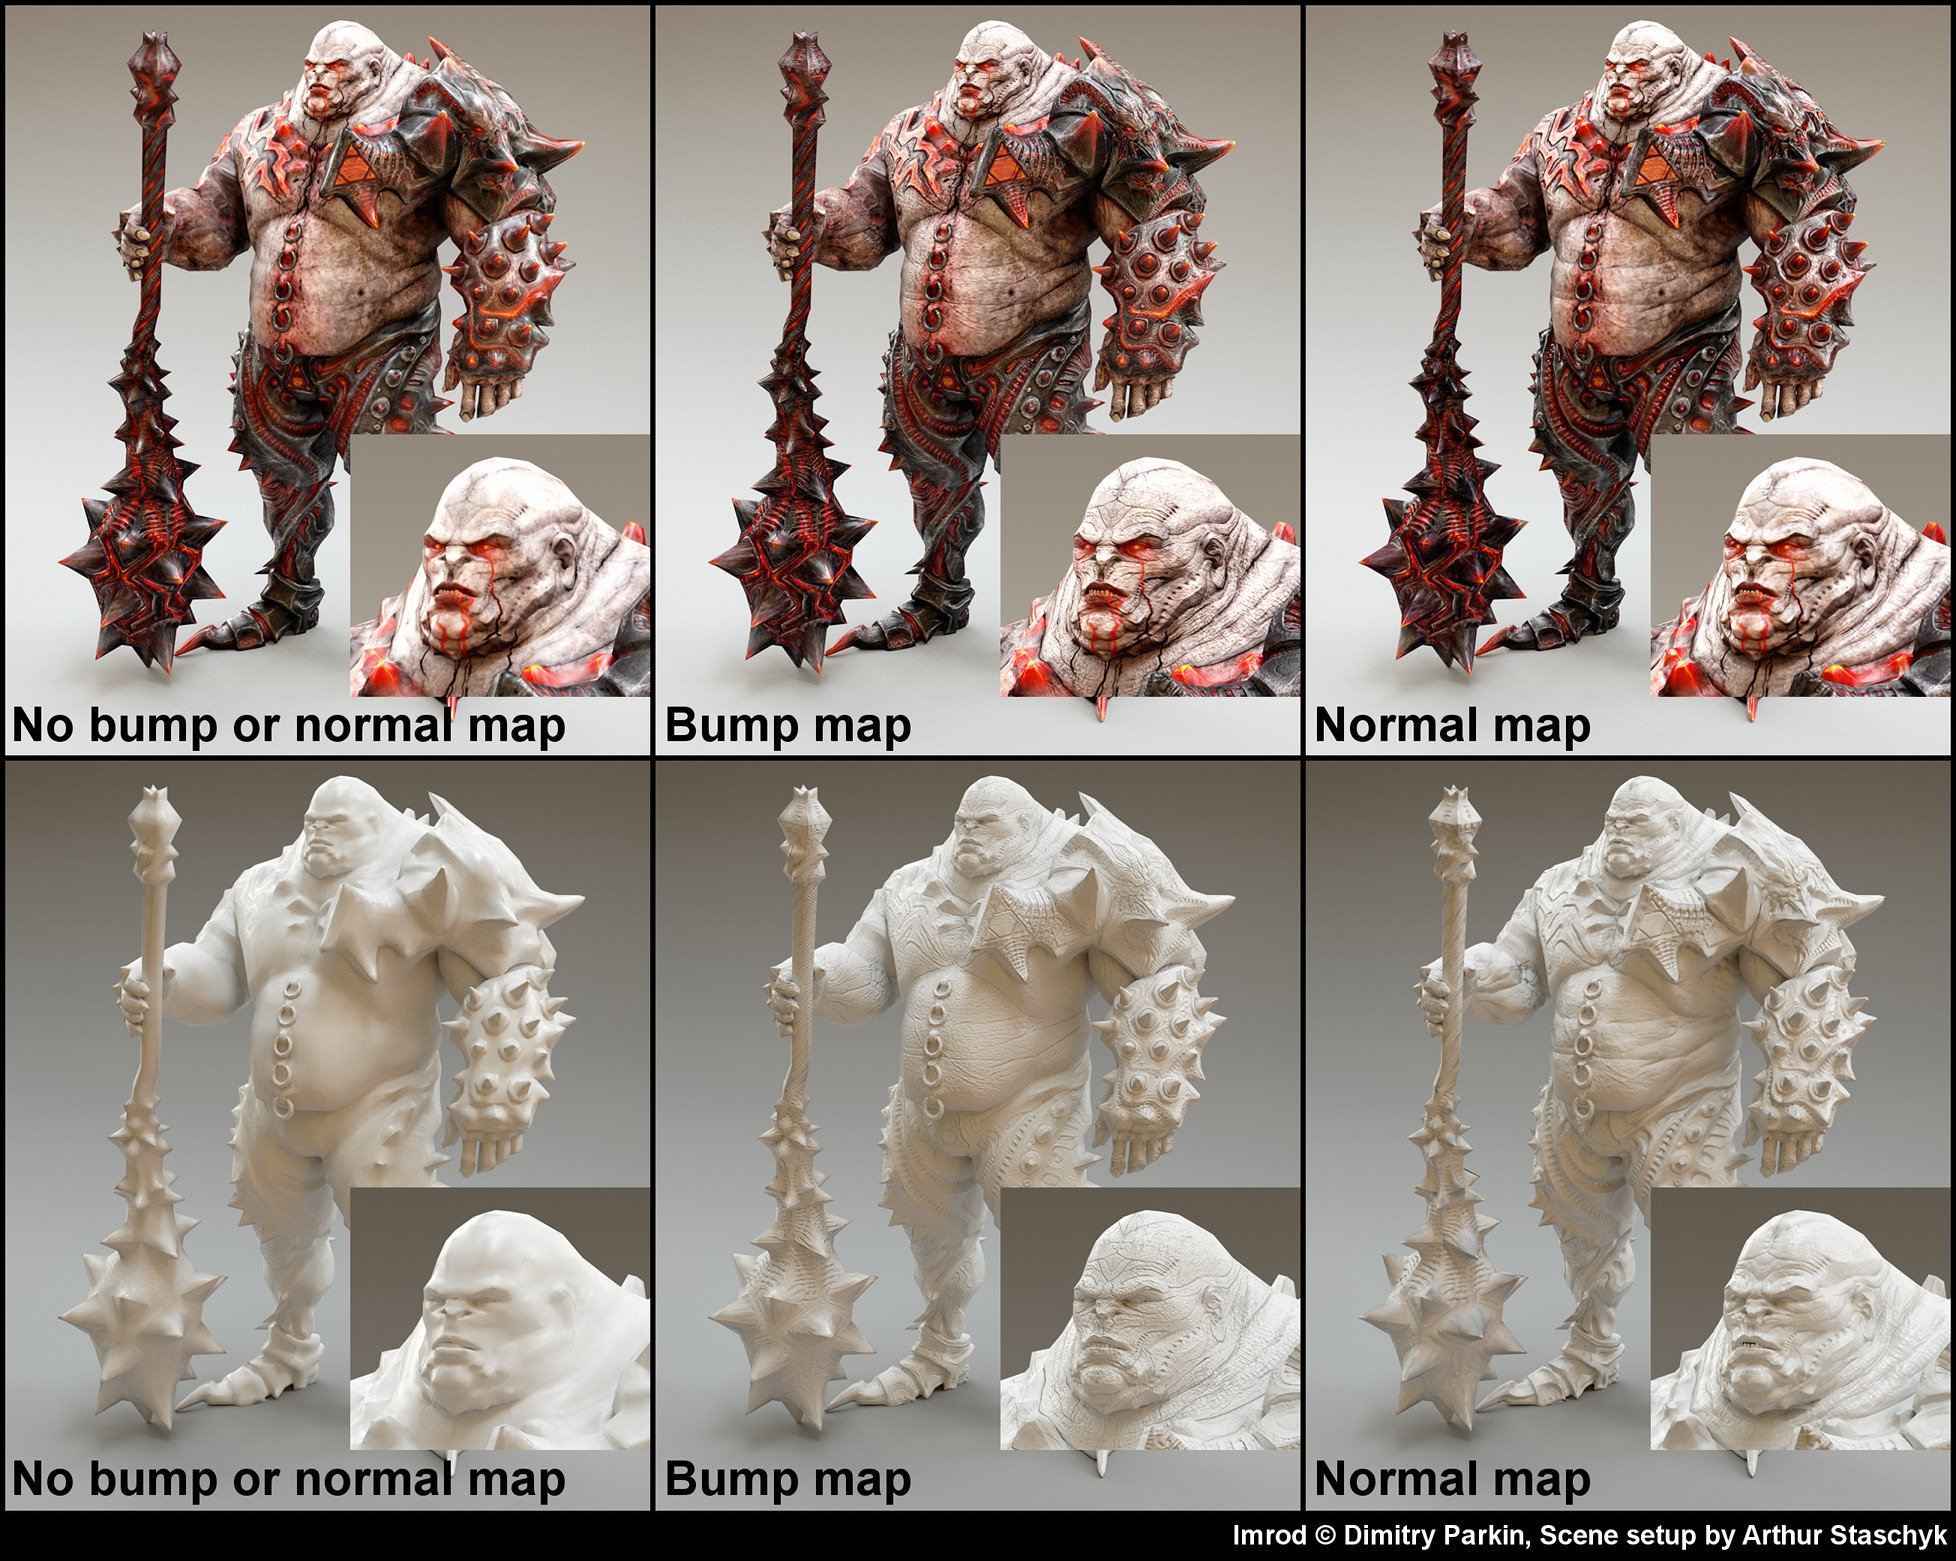
Dimitri Parkin (Link)
Bump maps have generally been phased out in favor of normal maps because they can store more information than a bump map.
A bump map can only really show height information; whereas normal maps can show angle information as well.
This means that normal maps can capture a more realistic depiction of the detail compared to a bump map.
When to Use Bump Maps
Don’t use bump maps. Just use normal maps.
From a technical point of view, bump maps aren’t as large file size-wise compared to normal maps, so if you’re really, really, really tight on the VRAM, you could potentially downgrade to bump maps to save you a couple of MBs.
But that’s a very niche reason. 99% of people don’t need to worry about that.
So yeah, just use normal maps. They’re better in pretty much every way.
Displacement Maps
Normal maps give your models fake depth, displacement maps give your models actual depth.
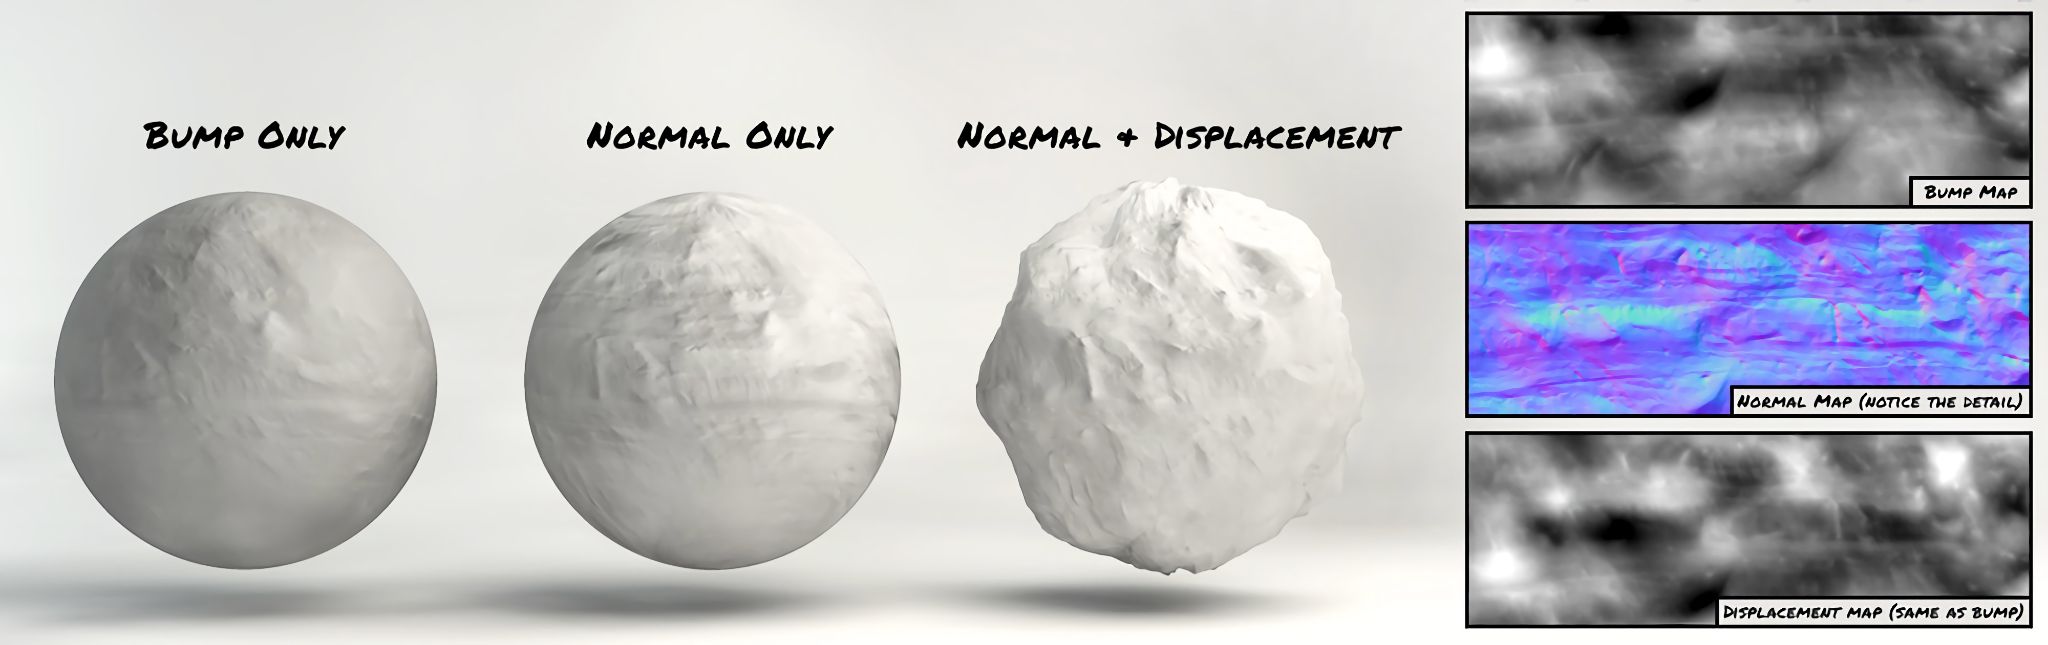
Image-Source (Texturebook)
You can think of a displacement map like a bump or normal map on steroids.
It’s basically a texture map just like a bump map but is made to displace and manipulate actual geometry, meaning that shadows and silhouettes are also affected and the lighting will also look as accurate as having handmade displacements.
But, there’s a major catch. You need geometry to actually display anything.
Put a displacement map on a plane with four vertices and you’ll get nothing.
There’s also the fact that displacement maps are pretty heavy on computers and render engines because of all the detail.
Not to mention that not all render engines support displacement maps.
So why even bother with them?
When to Use Displacement Maps
Hand modeling minute details is a pain in the a**—Ahem. It’s a very slow process, so if you want lots of actual geometric detail quickly, you use displacement maps.
It’s usually not very efficient to hand model tiny details over and over again.
It’s a ton of work. So why not speed it up with a displacement map?
Just subdivide your surface a couple of times or use micro-poly displacement features, and then slap on a displacement map and you’ve got tons of fine detail in minutes compared to the hours it would’ve taken you to hand paint/model them.
Other Maps
Height Maps
It’s a different name for a displacement map.

Yep. It’s as simple as that. If a displacement map is for minute details, you can think of a height map as a displacement map for huge details, by which I mean details like the mountains and valleys of earth.
Bump maps and displacement maps and height maps can be used interchangeably sometimes, but in general:
- Bump Map – Small fake details
- Displacement Map – Small real details
- Height Map – Large real details
When to Use Height Maps
Do you want to create a landscape really fast? Do you want the landscape to look good from a distance?
Then terrain height maps are for you. Just like any sort of texture map, they won’t give you the same quality as hand creating a landscape, but that’s a ton of work, and if you just want a pretty-looking bird’s-eye view of some landscape, there’s no point bothering with all that work.
So just slap on a terrain texture to a subdivided plane, add a height map for the displacement, and you’re off to the races.
In Summary
Hopefully, that explained these different maps well.
They can be a little confusing for the pros even sometimes, and some people using different names for the same map don’t help that.
But in general, those are the maps you need to know about when it comes to simulating geometry unevenness.
FAQ
What is a normal map used for?
Normal maps are generally used in games and other 3D environments to add small details onto 3D models.
These details can be wrinkles on skin, nuts and bolts and small indents and extrusions, and other fine detail on textures such as wood grain, porous surfaces on concrete or brick.
You can use normal maps to add these details in without having to model them by hand and incurring a performance hit because of all the geometry.
What is the difference between a normal map and a bump map?
A bump map can be thought of as an older normal map.
Bump maps were used before normal maps became a thing.
Bump maps are less advanced than normal maps because they can only show the height values of a texture, whereas normal maps can show angle as well—which allows them to show detail more realistically.
Because of this, they’ve mostly gone the way of the dinosaur now, so most people use normal maps instead.
Is a height map the same as displacement?
Yep. It’s pretty much the same thing, they’re just used in different areas.
Height maps are usually used when you have to displace large things such as terrain, whereas displacement maps are usually used for smaller-scale things.
Regardless of what they’re called, they’re both fundamentally the same thing: a black and white image that allows your computer to modify the geometry of a model.
How do I convert a texture into a normal map?
That’s pretty easy, there are tons of software that allows you to do that with just a couple of clicks.
We actually made a whole article covering how to do that.
Where can you get these texture maps?
There are a lot of free and paid sites out there that you can use to get texture maps from.
And most, if not all, of them, give you not just the texture, but a plethora of other maps such as normal, AO, roughness, metallic so that you don’t have to bother with any of that boring technical work and can just focus on the creative aspect of actually using those maps.
We have an article going over the best websites where you can get such texture maps.
Did that explain everything you need to know about these different texture maps? Got any other unanswered questions? Ask us in the comments or our forum!

")


14 Comments
27 September, 2023
This page was extremely useful. Turns out I was using a bump node to interface between a Normal Map texture and the Normal input on the Principle BSDF, which isn’t a great idea. I now understand why a normal map NODE is the preferred interface. Thank you 🙂
4 August, 2023
thanks this helped me a lot!
10 July, 2023
Does convert one bump map to normal map make it work better than original bump map?
12 February, 2023
Thanks, this article is very simple to understand!
1 August, 2022
wow this post was absolut gold for me
im a student for game design and got into Maya substance painter and 3d stuff in general about 1 year ago
My teacher never really explained in detail what each map does and we actually only used Normal, Color, Height, and Metallic maps
its good to know when to actually use what
Thanks alot to share these informations with us