 by
by ![What Does The Red Light On My Motherboard Mean? [& How to fix]](https://www.cgdirector.com/wp-content/uploads/media/2022/12/What-Does-the-Red-Light-on-My-Motherboard-Mean-Twitter-1200x675.jpg "What Does The Red Light On My Motherboard Mean? [& How to fix]")
TABLE OF CONTENTS
Some motherboards come with a dedicated set of LED diodes that indicate hardware errors — the kind that can occur when you try to boot up your system.
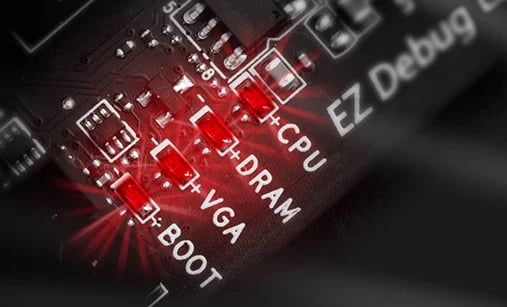
Close-up of the MSI EZ Debug LEDs on the Motherboard. Image-Credit: MSI
What Does The Red Light On My Motherboard Mean?
These red (or orange) LEDs on your Motherboard indicate that something has gone wrong in the process of initializing all of the hardware components that make up your PC. This initialization phase occurs right after you turn on your computer and is called the POST (Power-on-self-test).
These LEDs (also called Debug LEDs) can be extremely helpful in narrowing down the root cause of whatever issue you’re facing, especially because, in most cases, the Monitor will not function to display more information.
Whenever any of these LEDs stay lit, you’re being informed that something’s gone awry.
This could indicate several problems ranging from loose connections to hardware incompatibility to defective components that need to be replaced.
This article covers everything you need to know should you ever have to deal with this pesky — and most debilitating — issue.
Before You Start Troubleshooting
First things first, you should run a few preliminary tests to make the troubleshooting process a lot easier later on:
- Let the LEDs settle. Those indicator LEDs can blink frantically during every boot-up routine. Only if one of the 4 LEDs stays permanently lit for a minute or more do you truly have an issue at hand.
- Make sure that all PSU and motherboard cables are firmly in place and that there are no loose connections.
- Ensure that all your hardware is compatible. For example, if you’re sporting an AMD Ryzen 5000 series CPU, you won’t be able to use it with a B350 motherboard. You can use websites like PCPartPicker or our troubleshooting guides to double-check your entire setup.
- Remove all USB devices and peripherals that are not vital during the boot-up process.
- Reset the BIOS by clearing your CMOS, resetting the appropriate jumper, or simply loading the default values within the BIOS itself. Doing so will reset all CPU and RAM settings to their factory defaults.
- Remove all RAM modules except the one located in the second DIMM slot (assuming you have more than one stick of RAM)
LED Indicators and What They Mean
Most motherboards nowadays have four LED indicators, all of which have a singular purpose: to help narrow down issues that happen during the POST (Power-on-self-test) phase.
Often before anything can be displayed on your monitor.
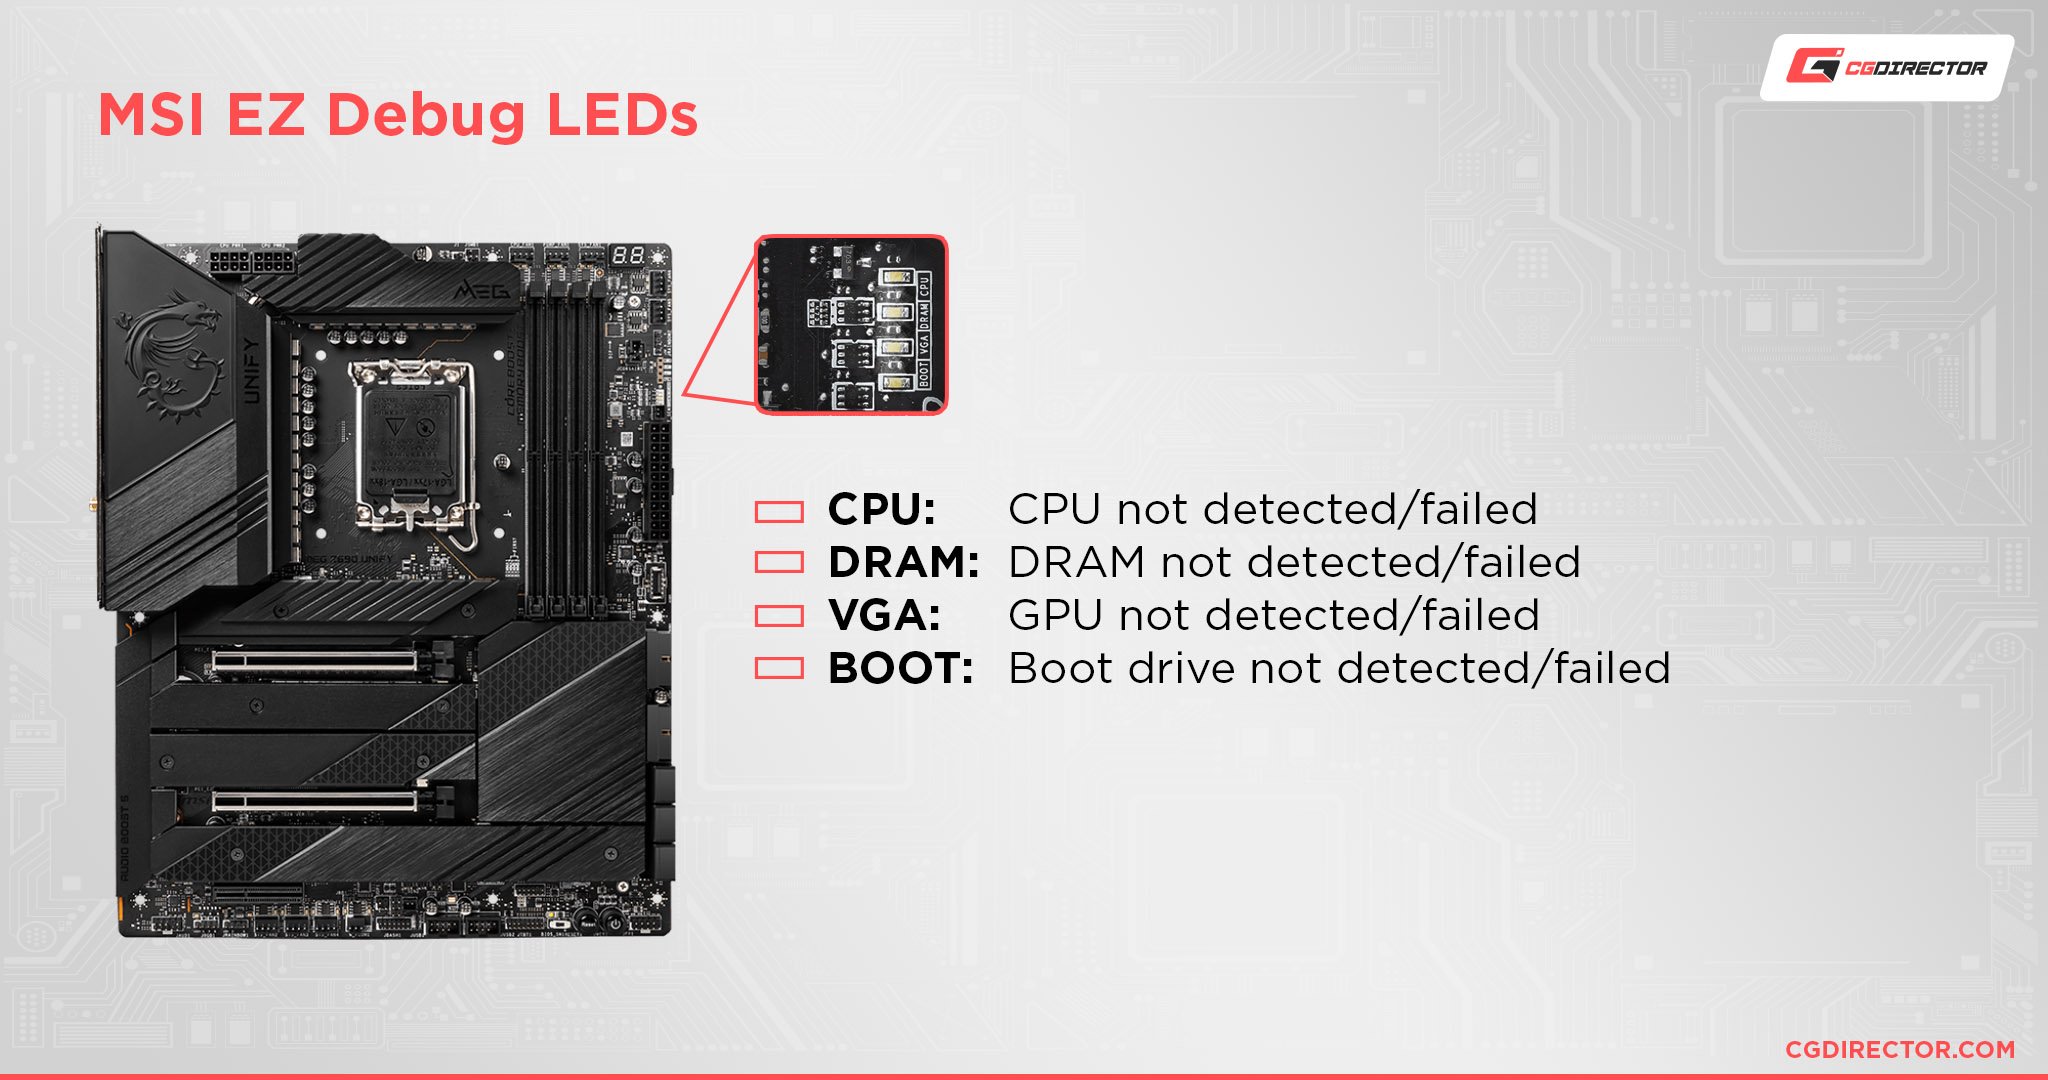
Most Motherboard Diagnostic LEDs consist of 4 individual LEDs: BOOT, CPU, VGA, and DRAM.
BOOT
The BOOT LED lights up to show the status of your main storage device — the one on which your operating system is installed. If this particular diode starts blinking, your HDD/SSD is the culprit.
- If you’ve just assembled your PC, this diode may blink because there’s still no operating system installed
- Otherwise, ensure the boot drive is properly connected and is set as the primary boot drive within your BIOS
- If your BIOS doesn’t detect your SSD, be sure to step through our guide here
- If you still can’t get the system to boot, unplug all storage drives except the boot drive and then try again
- If the issue persists, either your boot drive is corrupted or is flat-out dead. If it’s corrupted, you can try reinstalling your operating system of choice; otherwise, you’ll need to replace it altogether and embark on this process from scratch
- For SATA HDDs/SSDs: Be sure both the Data and Power Cables are plugged in and that the SATA Port you’re using isn’t disabled because of bandwidth sharing (try a different SATA port)
- For M.2 SSDs: Be sure your motherboard in fact supports the type of M.2 Drive and interface protocol (e.g. NVMe isn’t supported by all M.2 slots, chipsets and motherboards) you’re trying to use. Check your Motherboard’s spec sheet and manual
CPU
This diode will indicate any kind of issue related to your CPU, including compatibility issues, outdated BIOS firmware, and more.
- Check your motherboard’s QVL (Qualified Vendor List) to make sure the CPU you’re running is compatible
- You may need to update your BIOS if your CPU was manufactured later than your motherboard. Here’s how to update your BIOS even if your CPU is currently incompatible (without a CPU)
- An improperly installed CPU can also cause this diode to blink; ensure that your processor and all necessary power cables from the PSU(4-pin, 8-pin!) are properly connected
- Otherwise, unmount the CPU cooler, remove the CPU from the socket and check for any bent pins (assuming it has any) or thermal paste residue in places where it does not belong
- Reseat the CPU, apply an adequate amount of thermal paste and remount the heatsink
- If this doesn’t yield any change, the CPU is either defective or has run its course and, therefore, warrants a replacement
VGA
The VGA LED will start blinking whenever there’s a problem with your GPU. This can occur if your graphics card isn’t properly attached (including thee power cables from the PSU) or if the GPU itself is physically damaged.
- First, ensure that all the 6-pin and/or 8-pin PCIe power cables are securely in place on both the GPU and the PSU
- Ensure your GPU is installed in the appropriate slot (PCIe x16). Alternatively, you can try slotting your GPU in a different PCIe slot (assuming you don’t have an ITX motherboard) in case the x16 one is damaged. Check to see whether there’s any physical damage on the slot and GPU itself.
- Be sure the PCIe socket’s back latch has clicked into place when you install the GPU
- If nothing seems to work, you can use your CPU’s iGPU (if it comes with an integrated graphics chip). Otherwise, you’ll have to replace your graphics card
- If possible, try your GPU in a friend’s PC to see if it works there. Or try a different GPU in your PC to see if it fixes the issue. That way you can narrow down the culprit.
- Be sure your Monitor is plugged into the Graphics Card (if you have a discreet GPU) or into your motherboard’s display connector (if you have an iGPU)
DRAM
If the DRAM LED starts blinking during the boot-up process, there’s something wrong with your RAM modules.
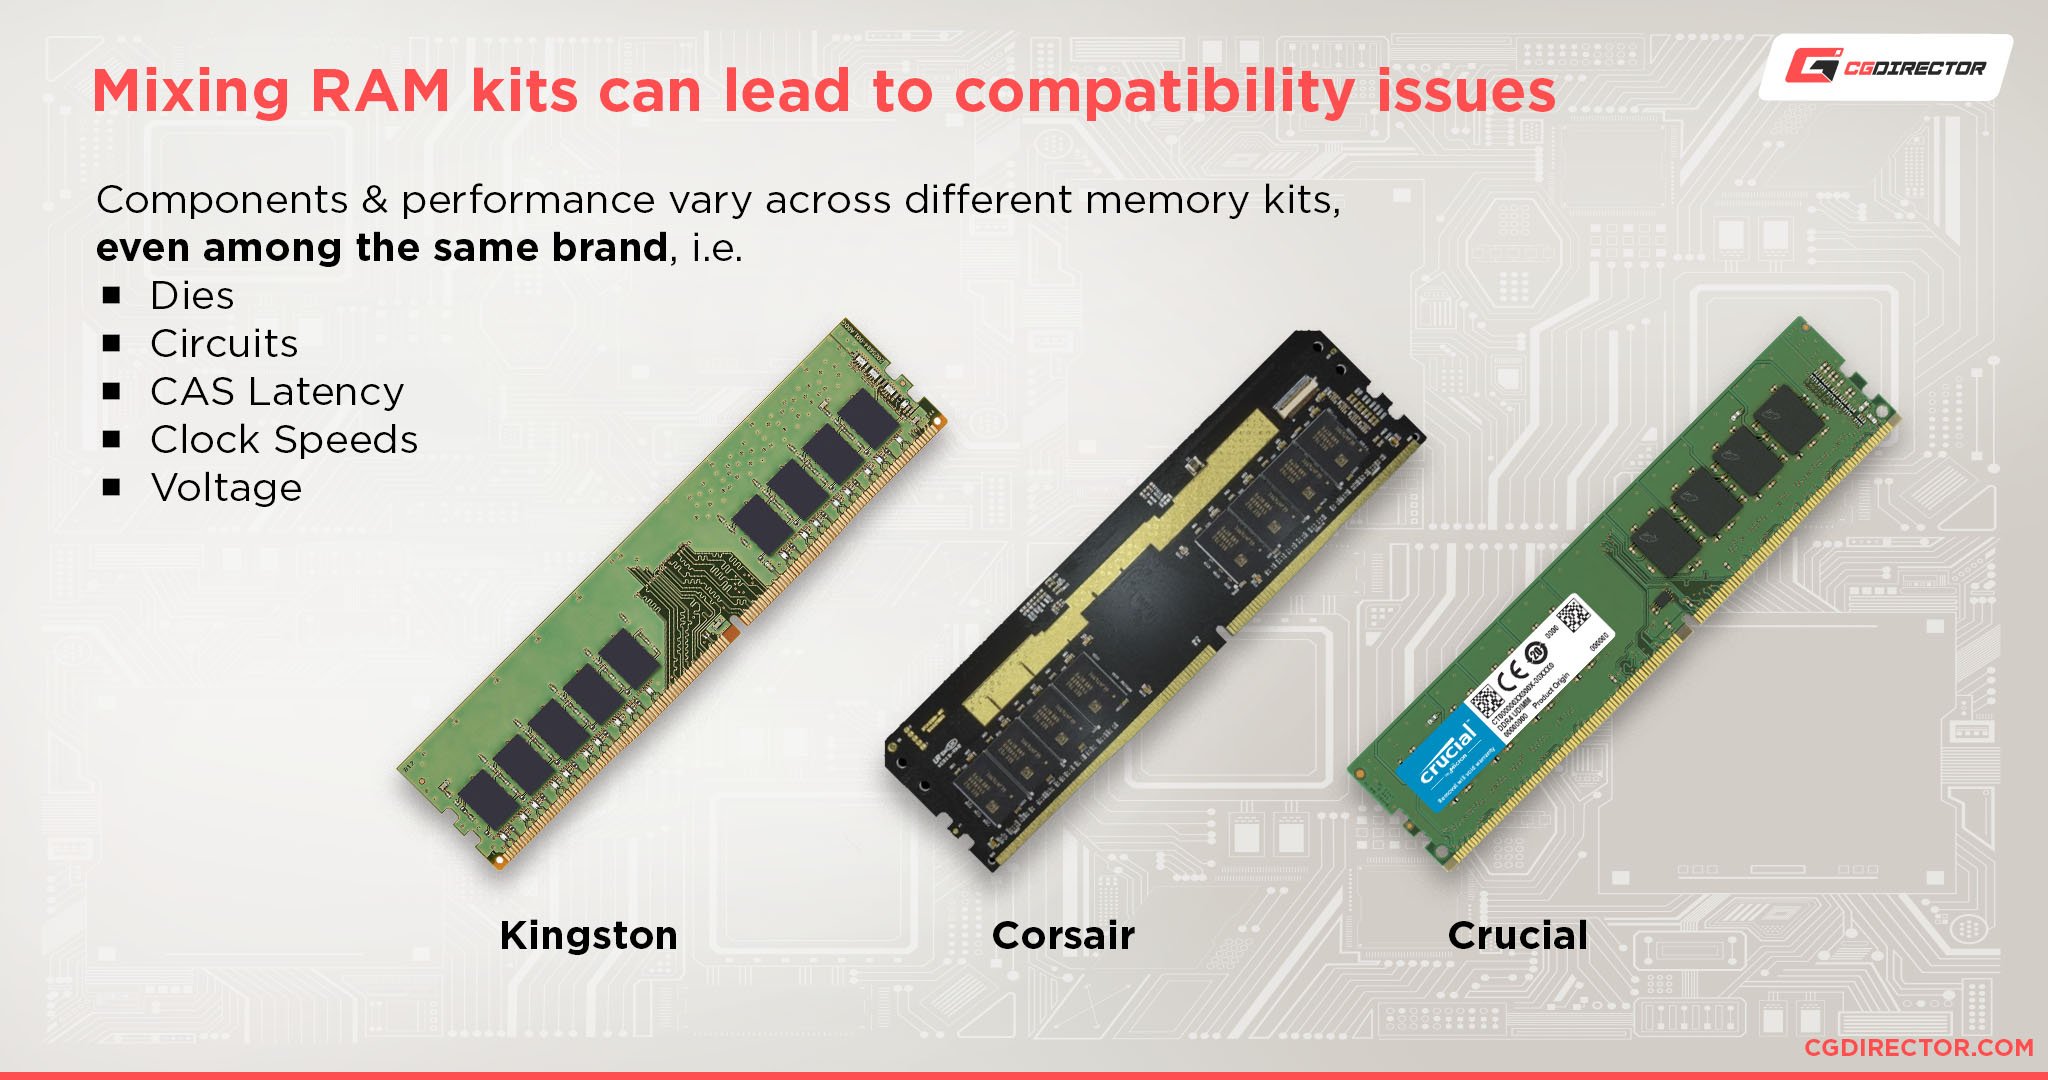
- In case your system has more than one stick, check whether they are of the same brand and frequency, mixing RAM modules can lead to a host of issues
- Next, ensure your RAM sticks are properly seated and that both clamps flanking them have snapped in place
- If the issue persists, try booting up your system with just a single RAM module. Try each of your RAM module one at a time to figure out if one of them might be damaged. Be sure it’s placed in the correct slot (usually the second one from the CPU)
- Interestingly, bent CPU pins can trigger the DRAM LED to light up as well, so double check your CPU’s and Motherboard’s pins for damage
- Lastly, make sure the RAM Modules you’re using are listed on your Motherboard’s QVL (Qualified Vendor List), if they are not, the RAM modules might be incompatible with your motherboard
Other Hardware Errors
Depleted CMOS Battery
A depleted CMOS battery, while not as frequent an occurrence as some other issues, may well be the culprit.
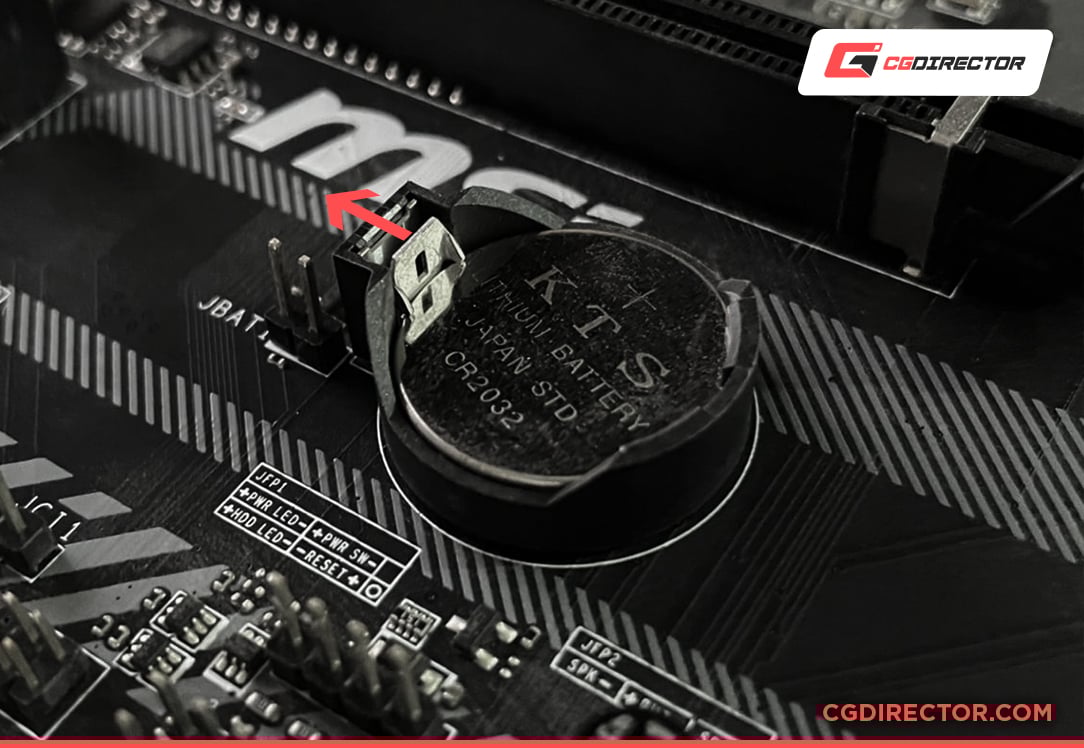
While this issue can be tackled by changing your BIOS settings every time the power is cut — or resetting them to their default values — it is nonetheless better to simply replace the battery altogether.
Most motherboards have a relatively inexpensive CMOS battery (CR2032), so replacing it won’t be much of an issue.
Note: The location of your CMOS battery varies from one motherboard form factor to another.
To deal with this issue, do the following:
- Shut down your system and unplug all power cables
- Turn off your power supply
- If you have an ATX or mATX motherboard, simply press/push the safety lock/clip and remove the CMOS battery. Slot in the new battery by pushing it into its slot until the lock clicks
- In the case of most ITX motherboards, the CMOS battery is covered in plastic/black tape and is connected to the motherboard with a plug. Detach this plug to remove the CMOS battery and repeat the aforementioned procedure
Faulty PSU
A faulty PSU may well be the issue’s origin.
You can test your power supply by connecting it to another system and, in doing so, checking it for any signs of life. Swapping out any cables (if you have extra in the box it came in) if it is a modular PSU might also do the trick.
Unstable Overclock
An unstable overclock can also cause your LEDs and especially the CPU LED to blink & stay lit. In this case, resetting the BIOS should remove all overclock settings, and the PC should boot without any issues.
Once your PC boots up, lower the overclock values and run some stress tests to ensure the stability of the overclock if you want it back in place.
Further reading
Our MSI EZ Debug LED Troubleshooting Guide has some additional things you can try to troubleshoot any PC related POSt / Boot issue.
Also, go through our troubleshooting articles and do reach out to us in the comments or our forum full of PC building veterans. We’re happy to help to get your PC up and running in no time!
FAQ
Let’s go over a few potential questions you might have regarding this topic:
My motherboard only has a single LED. How should I start troubleshooting?
Older motherboards may only possess a single debug LED. You’ll need to find the faulty component by trial and error.
Start by checking if all connections are secure, and then go through each step mentioned above.
Double-check if your motherboard comes with error code LEDs that can help narrow down the issue.
Why is my DRAM LED blinking after adding another RAM stick?
Make sure to insert your second RAM module into the fourth DIMM slot.
To have your memory run in dual channel mode, both the old stick and the new one need to be compatible.
If they are compatible, but the LED diode keeps blinking, reset the DRAM voltage and frequency and turn off the XMP profile in the BIOS.
Over to you
We hope that this guide has helped you in dealing with this frustrating issue. Feel free to post any questions in the comment section down below or, alternatively, on our forum!

![What Does The White Light (LED) on My Motherboard Mean? [Updated]](https://www.cgdirector.com/wp-content/uploads/media/2023/12/What-Does-The-White-Light-on-My-Motherboard-Mean-Twitter-copy-594x335.jpg "What Does The White Light (LED) on My Motherboard Mean? [Updated]")
![How To Fix The Red DRAM Light On Your Motherboard [2024 Update]](https://www.cgdirector.com/wp-content/uploads/media/2023/11/How-To-Fix-Red-DRAM-Light-on-Motherboard-Twitter-594x335.jpg "How To Fix The Red DRAM Light On Your Motherboard [2024 Update]")
![Why Does My Computer Beep and What Does It Mean? [Beep Code Guide]](https://www.cgdirector.com/wp-content/uploads/media/2023/08/Why-Does-My-Computer-Beep-and-What-Does-It-Mean-Twitter-594x335.jpg "Why Does My Computer Beep and What Does It Mean? [Beep Code Guide]")

2 Comments
18 October, 2023
My CPU LED Light lights up permanently when i render in 3dsmax with vray. What should i do?
7 November, 2023
Check your CPU’s temps and make sure you’re not overclocking your CPU. Try resetting your BIOS settings to factory defaults if nothing helps.